TP Link TL-WR1502X Handleiding
Bekijk gratis de handleiding van TP Link TL-WR1502X (4 pagina’s), behorend tot de categorie Router. Deze gids werd als nuttig beoordeeld door 88 mensen en kreeg gemiddeld 4.3 sterren uit 44.5 reviews. Heb je een vraag over TP Link TL-WR1502X of wil je andere gebruikers van dit product iets vragen? Stel een vraag
Pagina 1/4

Refer to the following scenarios to determine an appropriate network mode.
Determine Network Mode
*Images may dier from your actual products.
©2023 TP-Link 7106510694 REV1.0.0
Wi-Fi 6 Portable Router
Quick Installation Guide
Recommended
Scenarios
Mode
Switch I Want to...
Network
Mode
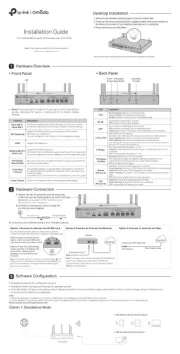
Hardware Information
Button Description
DescriptionButton
This switch is used to change the
operation mode of the router.
Note: If you toggle this switch
accidentally, set it back to the original
mode within 3 seconds. The mode of
the router won’t change.
Press the button for 1 second and
immediately press the WPS button on
your client to start the WPS process.
Press and hold the button for about 6
seconds until the LED blinks red to
reset the router to its factory default
settings.
WPS/Reset Button
Mode Switch
Interface Description
DescriptionInterface
In / Router 3G/4G USB Modem USB Tethering / mode, it
functions as a WAN port.
In Hotspot / Access Point / Range Extender / Client mode, it
functions as a LAN port.
For connecting your PC or other wired devices to the
router.
Use this USB 2.0 port to connect your 3G/4G USB modem,
mobile device, or USB storage device to the router.
Your mobile device can be charged when it is connected to
the powered-on router via the USB port (5 V/0.5 A).
This port is used to connect the USB-C charger
provided in the package.
1 Gbps
WAN Port
1 Gbps
LAN Port
3G/4G USB Port
Power Port
Mode Switch
IndicationStatus
The router has started up but is
disconnected from the internet.
Solid Red
Blinking Red The router is being reset. Do not power
o your router.
LED Indication
Blinking Blue
The router is starting up / being upgraded /
establishing the WPS connection.
The router is switching modes and will reboot.
The router is connected to the internet or
the main network, or the WPS connection is
successfully established.
Solid Blue
During Travel
LED
Router Mode
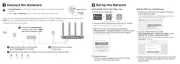
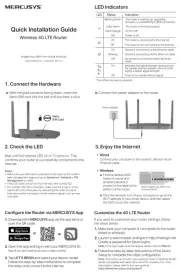
5. Connect your device to the router (wireless or wired).
4. Wait until the router’s LED turns solid (blue or red) before moving on.
2
Internet
Wired Network
3
Notes:
1. On the Select Connection Type page, if you are not sure, click AUTO DETECT.
2. You can customize your
Network Name
and (SSID)
Password
for the 2.4GHz/5GHz wireless
network during the Quick Setup, but you need to reconnect your wireless devices to the new
Wi-Fi network(s).
1. Set the Mode Switch to . Router
2. Connect the router’s WAN port to the existing wired network with an Ethernet
cable.
3. Power on the router.
7. Start the Quick Setup, make sure the operation mode is Router/USB Internet,
and click .NEXT
6. Launch a web browser and enter http://tplinkwifi.net http://192.168.0.1 or in
the address bar. Create a password to log in.
8. Router Select as your network mode, and click NEXT.
9. Follow the step-by-step instructions to set up the internet connection, and
enjoy the internet.
http://tplinkwi.net
Let’s Get Started
WAN
1
Requirements
A USB cable.
At Home
(e.g., home, oce, etc.)
Hotspot Hotspot Turn an existing public Wi-Fi into a private network (wired and
wireless).
Access Point
Range Extender
Client
Expand an existing Wi-Fi network for better Wi-Fi coverage.
Connect a wired-only device, such as a smart TV, media player,
or game console, to a Wi-Fi network.
Turn an existing wired-only network into a wireless network.
AP/RE
During Travel
(e.g., hotel, airport, cafe,
cruise ship, RV, camp, etc.)
Router 3G/4G USB Modem
Share the internet with more wireless devices when the wired
network is limited to one device at a time.
Share a 3G/4G USB modem’s data with other devices.
USB Tethering Share a mobile device’s cellular data with other devices.
Router
(Default Mode)
An existing wired network provided by a
modem or other network device.
A 3G/4G USB modem (with a SIM card
inserted).
A mobile device (with a SIM card inserted).
A public Wi-Fi.
An existing wired network provided by a
router, switch, etc.
An existing Wi-Fi network.
An existing Wi-Fi network.
5. Launch a web browser and enter http://tplinkwifi.net http://192.168.0.1 or in
the address bar. Create a password to log in.
4. Connect your device to the router (wireless or wired).
http://tplinkwi.net
Let’s Get Started
6. Start the Quick Setup, make sure the operation mode is Router/USB Internet,
and click .NEXT
7. Select your network mode, and click NEXT.
8. Follow the step-by-step instructions to set up the internet connection, and
enjoy the internet.
Note: You can customize your Network Name (SSID) Password and for the 2.4GHz/5GHz
wireless network during the Quick Setup, but you need to reconnect your wireless devices to
the new Wi-Fi network(s).
1. Set the Mode Switch to . Router
2. Power on the router.
3. Wait until the router’s LED turns solid (blue or red), which indicates that the
router has started up, and then connect the router’s port to your 3G/4G USB
USB modem or mobile device.
USB Tethering Mode
3G/4G USB Modem Mode
3G/4G USB Modem Mode / USB Tethering Mode
1
2
3
• If you are sharing a 3G/4G USB modem's data, select 3G/4G USB Modem.
• If you are sharing a mobile device’s data, select USB Tethering.
Note: When USB tethering, avoid connecting the tethered mobile device to the router's Wi-Fi.
Hotspot Mode
Public Hotspot
2
1
2. Power on the router.
3. Wait until the router’s LED turns into solid red before moving on.
5. Launch a web browser and enter http://tplinkwifi.net http://192.168.0.1 or in
the address bar. Create a password to log in.
4. Connect your device to the router (wireless or wired).
http://tplinkwi.net
Let’s Get Started
6. Start the Quick Setup, make sure the operation mode is Hotspot NEXT, and click .
7. Follow the step-by-step instructions to set up the internet connection, and
enjoy the internet.
Notes:
1. On the Select Connection Type page, if you are not sure, use Dynamic IP in most cases or
consult the ISP.
2. If the public hotspot requires a Captive Portal Authentication, complete the authentication
during the Quick Setup before you can access the network. Refer to FAQ-Q6 for more details.
3. You can customize your
Network Name
and (SSID)
Password
for the 2.4GHz/5GHz wireless
network during the Quick Setup, but you need to reconnect your wireless devices to the new
Wi-Fi network(s).
1. Set the Mode Switch to .Hotspot
• Wireless: Connect your device to the router’s Wi-Fi. The default wireless network
names (SSIDs) and wireless password are printed on both the Wi-Fi info card and
the label at the bottom of the router.
• Wired: Turn o the Wi-Fi on your device and connect to the WAN LAN or port of the
router with an Ethernet cable.


5. Launch a web browser and enter http://tplinkwifi.net in the address bar. Create
a password to log in.
http://tplinkwi.net
Let’s Get Started
At Home
Range Extender Mode
Internet
4. Connect a computer to the WAN LAN or port of the router with an Ethernet cable.
Client Mode
Frequently Asked Questions (FAQ)
Q1. What should I do if there is no internet access?
• Check if the internet is working normally by connecting a
computer/phone directly to the current network. If it is not, contact
your internet service provider. If you’re in a hotel room or on a trade
show, the internet may be limited and requires that you authenticate
for the service or purchase the internet access.
• If you are using a cable modem, power o your modem for about 5
minutes, then power it on and check the internet. If your modem has
more than one Ethernet port, keep other ports unconnected.
• Log in to the web management page, and go to the Network Map
page to check whether the internet IP address is valid or not. If it’s
valid, go to Advanced > Network > Internet Advanced , click
Settings Use the Following DNS Addresses, select , set the primary
DNS to 8.8.8.8, and set the secondary DNS to 8.8.4.4. If it is not,
check the hardware connection or contact your internet service
provider.
Access Point Mode
Existing Router
Internet
LAN
WAN or LAN
1.
Set
the Mode Switch to AP/RE.
4. Wait until the router’s LED turns solid (blue or red) before moving on.
2. Connect the router’s port to the existing router with an Ethernet WAN or LAN
cable.
3. Power on the router.
2
5. Connect your device to the router (wireless or wired).
• Wireless: Connect your device to the router’s Wi-Fi. The default wireless network
names (SSIDs) and wireless password are printed on both the Wi-Fi info card and
the label at the bottom of the router.
• Wired: Turn o the Wi-Fi on your device and connect to the WAN LAN or port of the
router with an Ethernet cable.
Note: You can customize your
Network Name
and (SSID)
Password
for the 2.4GHz/5GHz
wireless network during the Quick Setup, but you need to reconnect your wireless devices to
the new Wi-Fi network(s).
7. Start the Quick Setup, make sure the operation mode is AP/RE/Client, and
click .NEXT
6. Launch a web browser and enter http://tplinkwifi.net in the address bar. Create
a password to log in.
8. Access Point NEXTSelect as your network mode, and click .
9. Follow the step-by-step instructions to set up the internet connection, and
enjoy the internet.
http://tplinkwi.net
Let’s Get Started
4. Connect your device to the router (wireless or wired).
9. Relocate the router about halfway between your main AP and the Wi-Fi dead
zone, and enjoy the internet.
• Wireless: Connect your device to the router’s Wi-Fi. The default wireless network
names (SSIDs) and wireless password are printed on both the Wi-Fi info card and
the label at the bottom of the router.
• Wired: Turn o the Wi-Fi on your device and connect to the WAN LAN or port of the
router with an Ethernet cable.
Note: You can either copy or customize your extended network names during the Quick Setup.
The extended networks share the same Wi-Fi password as that of your main network.
7. Range Extender Select as your network mode, and click NEXT.
8. Follow the step-by-step instructions to set up the internet connection.
2
5. Launch a web browser and enter http://tplinkwifi.net in the address bar. Create
a password to log in.
http://tplinkwi.net
Let’s Get Started
7. Client Select as your network mode, and click NEXT.
6. Start the Quick Setup, make sure the operation mode is AP/RE/Client, and click
NEXT.
8. Follow the step-by-step instructions to set up the internet connection.
Note: In Client mode, you can only connect your devices to the router through a wired
connection.
Congure via Tether
The TP-Link Tether app provides a simple, intuitive
way to access and manage your router.*
How to begin
1. Refer to the Connect the Hardware section of your
desired network mode to connect your router properly.
2. Download the Tether app via Apple Store or Google
Play, or simply scan the QR code.
Scan for Tether Tether
or
4. Tap the button in the Tether app and select Portable
Router. Follow the steps to complete the setup and
connect to the internet.
3. Open the Tether app and log in with your TP-Link ID.
Note: If you don’t have an account, create one first.
Choose Your Device Type
Gaming Router
Range Extender
Portable Router
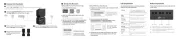
Wi-Fi Information
A Wi-Fi info card is included in the package.
When you set new SSIDs, Wi-Fi passwords, login
account info, and more, please write them down on the
card for convenient management.
Model: Archer AX3000
Wireless Password/PIN:XXXXXXXX
SSID:TP-Link_XXX X
SSID:TP-Link_XXX X_5G
The default wireless network names (SSIDs) and
wireless password are printed on the label at the
bottom of the router.
Q2. How do I restore the router to its factory default settings?
• With the router powered on, press and hold the button for 6 Reset
seconds until the LED blinks red to restore the factory default settings.
Q3. What should I do if I forget the router’s web management password?
• If you are using a TP-Link ID to log in, click Forgot Password? on the
login page and then follow the instructions to reset it.
• Alternatively, refer to FAQ > Q2 to reset the router. Then visit
http://tplinkwi.net to create a new login password.
Q4. What should I do if I forget my Wi-Fi password?
• If you have not changed the default wireless password, it can be found on
the label of the router.
• Connect a computer directly to the LAN port of the router using an Ethernet
cable. Log in to the router’s web management page at http://tplinkwi.net,
and go to the Wireless page to retrieve or reset your wireless password.
Q5. What should I do if my wireless signal is unstable or too weak?
It may be caused by too much interference.
• Set your wireless channel to a dierent one.
• Choose a location with fewer obstacles that may block the signal between
the portable router and the main AP. An open corridor or a spacious location
is ideal.
• Move the router to a new location away from Bluetooth devices and other
household electronics, such as cordless phones, microwaves, and baby
monitors, to minimize signal interference.
• In Range Extender mode, the ideal location to place the router is halfway
between your main AP and the Wi-Fi dead zone. If that is not possible, place
the router closer to your main AP to ensure stable performance.
• If the portal login page didn't open during the Quick Setup process,
connect your smartphone or computer to the router, then open any
website, and you will be redirected to the portal login page.
• If some public hotspots limit the number of devices each customer can
access by MAC address, do the following:
1. Connect a smartphone to the public hotspot’s Wi-Fi. Find the
smartphone’s MAC address on its Wi-Fi list, and write the MAC address
down.
2. Log in to the web management page of the router and go to Advanced
> > >Network Internet Router MAC Address Use Custom MAC . Select
Address, enter the MAC address that your smartphone uses to connect to
the public hotspot’s Wi-Fi, and click SAVE.
For technical support, replacement services, user
guides, and other information, please visit
https://www.tp-link.com/support, or simply scan
the QR code.
Safety Information
• Keep the device away from water, re, humidity or hot environments.
• Do not attempt to disassemble, repair, or modify the device. If you need service,
please contact us.
• Do not use damaged charger or USB cable to charge the device.
• Do not use any other chargers than those recommended.
• Do not use the device where wireless devices are not allowed.
• Adapter shall be installed near the equipment and shall be easily accessible.
Please read and follow the above safety information when operating the device. We
cannot guarantee that no accidents or damage will occur due to improper use of the
device. Please use this product with care and operate at your own risk.
TP-Link hereby declares that the device is in compliance with the essential
requirements and other relevant provisions of directives 2014/53/EU, 2009/125/EC,
2011 /65/EU and (EU) 2015/863.
The original EU Declaration of Conformity may be found at
https://www.tp-link.com/en/support/ce
TP-Link hereby declares that the device is in compliance with the essential
requirements and other relevant provisions of the Radio Equipment Regulations 2017.
The original UK Declaration of Conformity may be found at
https://www.tp-link.com/support/ukca
Q7. What should I do if I want to change the router’s network mode?
Refer to the Determine Network Mode section and gure out whether the
Mode Switch needs to be set in order to change the router’s network mode.
• If yes, follow these steps:
1. Set the Mode Switch to your desired mode and wait 2 minutes for the
router to reboot automatically.
2. Follow the QIG instructions of your desired mode to set the router up.
• If no, follow these steps:
1. Refer to the Connect the Hardware section of your desired mode to
connect your router properly.
2. Log in to the web management page of the router and go to Internet >
Connection Settings. Select your desired network mode, congure the
parameters, and click .SAVE
*Router network mode compatibility in
the Tether app may vary between app
versions.
Images may differ from your actual
interface.
Q6. What should I do if I cannot enter the captive portal when the router is set
to Hotspot mode?
Main AP
1.
Set
the Mode Switch to AP/RE.
2. Power on the router near your main AP.
3. Wait until the router’s LED turns into solid red before moving on.
6. Start the Quick Setup, make sure the operation mode is AP/RE/Client, and
click .NEXT
1.
Set
the Mode Switch to AP/RE.
2. Power on the router near your main AP.
3. Wait until the router’s LED turns into solid red before moving on.
9. After the setup, connect your wired-only device like smart TV, game console or
media player to the WAN LANor port via an Ethernet cable to enjoy the internet.
Internet
Main AP
2
WAN or LAN
1
1 1
OR OR
Other DeviceSmart TV Desktop
3
Product specificaties
| Merk: | TP Link |
| Categorie: | Router |
| Model: | TL-WR1502X |
Heb je hulp nodig?
Als je hulp nodig hebt met TP Link TL-WR1502X stel dan hieronder een vraag en andere gebruikers zullen je antwoorden
Handleiding Router TP Link
4 Juli 2025
4 Juli 2025
2 Juli 2025
13 Mei 2025
13 Mei 2025
2 Mei 2025
26 Maart 2025
20 Februari 2025

13 November 2024

26 September 2024
Handleiding Router
- Bosch
- Grandstream
- Foscam
- VTech
- Planet
- ATen
- Allied Telesis
- Barco
- Cambium Networks
- WyreStorm
- D-Link
- Ezviz
- Ubiquiti Networks
- Powerplus
- Belkin
Nieuwste handleidingen voor Router
30 Juli 2025

29 Juli 2025
29 Juli 2025

29 Juli 2025
29 Juli 2025
28 Juli 2025
15 Juli 2025
14 Juli 2025
7 Juli 2025
7 Juli 2025