TP Link Archer AX72 Handleiding
Bekijk gratis de handleiding van TP Link Archer AX72 (68 pagina’s), behorend tot de categorie Router. Deze gids werd als nuttig beoordeeld door 71 mensen en kreeg gemiddeld 5.0 sterren uit 36 reviews. Heb je een vraag over TP Link Archer AX72 of wil je andere gebruikers van dit product iets vragen? Stel een vraag
Pagina 1/68

© 2020 TP-Link 1910012856 REV1.0.0
User Guide
AX5400 Wi-Fi 6 Router
Archer AX72

Contents
About This Guide . . . . . . . . . . . . . . . . . . . . . . . . . . . . . . . . . . . . . . . . . . . . . . . . . . . . .1
Chapter 1. Get to Know About Your Router . . . . . . . . . . . . . . . . . . . . . . . . . . .3
1. 1. Product Overview. . . . . . . . . . . . . . . . . . . . . . . . . . . . . . . . . . . . . . . . . . . . . . . . . . . . . . . . . . . . 4
1. 2. Appearance . . . . . . . . . . . . . . . . . . . . . . . . . . . . . . . . . . . . . . . . . . . . . . . . . . . . . . . . . . . . . . . . . 4
1. 2. 1. Top Panel . . . . . . . . . . . . . . . . . . . . . . . . . . . . . . . . . . . . . . . . . . . . . . . . . . . . . . . . . . . . . 4
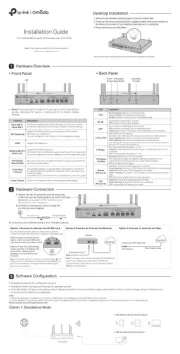
1. 2. 2. Back Panel . . . . . . . . . . . . . . . . . . . . . . . . . . . . . . . . . . . . . . . . . . . . . . . . . . . . . . . . . . . . 5
1. 2. 3. Side Panel. . . . . . . . . . . . . . . . . . . . . . . . . . . . . . . . . . . . . . . . . . . . . . . . . . . . . . . . . . . . . 6
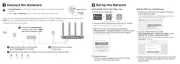
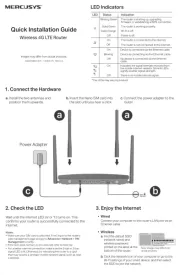
Chapter 2. Connect the Hardware . . . . . . . . . . . . . . . . . . . . . . . . . . . . . . . . . . . .7
2. 1. Position Your Router . . . . . . . . . . . . . . . . . . . . . . . . . . . . . . . . . . . . . . . . . . . . . . . . . . . . . . . . . 8
2. 2. Connect Your Router. . . . . . . . . . . . . . . . . . . . . . . . . . . . . . . . . . . . . . . . . . . . . . . . . . . . . . . . . 8
Chapter 3. Log In to Your Router. . . . . . . . . . . . . . . . . . . . . . . . . . . . . . . . . . . . 11
Chapter 4. Set Up Internet Connection . . . . . . . . . . . . . . . . . . . . . . . . . . . . . 13
4. 1. Use Quick Setup Wizard . . . . . . . . . . . . . . . . . . . . . . . . . . . . . . . . . . . . . . . . . . . . . . . . . . . . 14
4. 2. Quick Setup Via TP-Link Tether App. . . . . . . . . . . . . . . . . . . . . . . . . . . . . . . . . . . . . . . . . 14
4. 3. Manually Set Up Your Internet Connection . . . . . . . . . . . . . . . . . . . . . . . . . . . . . . . . . . 15
4. 4. Set Up the Router as an Access Point . . . . . . . . . . . . . . . . . . . . . . . . . . . . . . . . . . . . . . . 18
4. 5. Set Up an IPv6 Internet Connection . . . . . . . . . . . . . . . . . . . . . . . . . . . . . . . . . . . . . . . . . 18
Chapter 5. TP-Link Cloud Service . . . . . . . . . . . . . . . . . . . . . . . . . . . . . . . . . . 22
5. 1. Register a TP-Link ID. . . . . . . . . . . . . . . . . . . . . . . . . . . . . . . . . . . . . . . . . . . . . . . . . . . . . . . . 23
5. 2. Change Your TP-Link ID Information. . . . . . . . . . . . . . . . . . . . . . . . . . . . . . . . . . . . . . . . . 23
5. 3. Manage the User TP-Link IDs . . . . . . . . . . . . . . . . . . . . . . . . . . . . . . . . . . . . . . . . . . . . . . . 24
5. 3. 1. Add TP-Link ID to Manage the Router. . . . . . . . . . . . . . . . . . . . . . . . . . . . . . . . . 25
5. 3. 2. Remove TP-Link ID(s) from Managing the Router. . . . . . . . . . . . . . . . . . . . . . 25
5. 4. Manage the Router via the TP-Link Tether App . . . . . . . . . . . . . . . . . . . . . . . . . . . . . . 26
Chapter 6. Wireless Settings . . . . . . . . . . . . . . . . . . . . . . . . . . . . . . . . . . . . . . . 27
6. 1. Specify Wireless Settings . . . . . . . . . . . . . . . . . . . . . . . . . . . . . . . . . . . . . . . . . . . . . . . . . . 28
6. 2. Schedule Your Wireless Function . . . . . . . . . . . . . . . . . . . . . . . . . . . . . . . . . . . . . . . . . . . 30
6. 3. Use WPS for Wireless Connection . . . . . . . . . . . . . . . . . . . . . . . . . . . . . . . . . . . . . . . . . . 30
6. 3. 1. Connect via the Client’s PIN . . . . . . . . . . . . . . . . . . . . . . . . . . . . . . . . . . . . . . . . . . 31

6. 3. 2. Connect via the Router’s PIN . . . . . . . . . . . . . . . . . . . . . . . . . . . . . . . . . . . . . . . . . 31
6. 3. 3. Push the WPS Button. . . . . . . . . . . . . . . . . . . . . . . . . . . . . . . . . . . . . . . . . . . . . . . . . 31
6. 4. Advanced Wireless Settings . . . . . . . . . . . . . . . . . . . . . . . . . . . . . . . . . . . . . . . . . . . . . . . . 32
Chapter 7. Guest Network. . . . . . . . . . . . . . . . . . . . . . . . . . . . . . . . . . . . . . . . . . 34
7. 1. Create a Network for Guests . . . . . . . . . . . . . . . . . . . . . . . . . . . . . . . . . . . . . . . . . . . . . . . 35
7. 2. Customize Guest Network Options. . . . . . . . . . . . . . . . . . . . . . . . . . . . . . . . . . . . . . . . . . 36
Chapter 8. USB Settings. . . . . . . . . . . . . . . . . . . . . . . . . . . . . . . . . . . . . . . . . . . . 37
8. 1. Access the USB Storage Device . . . . . . . . . . . . . . . . . . . . . . . . . . . . . . . . . . . . . . . . . . . . 38
8. 1. 1. Access the USB Device Locally . . . . . . . . . . . . . . . . . . . . . . . . . . . . . . . . . . . . . . . 38
8. 1. 2. Access the USB Device Remotely . . . . . . . . . . . . . . . . . . . . . . . . . . . . . . . . . . . . 39
8. 1. 3. Customize the Access Settings. . . . . . . . . . . . . . . . . . . . . . . . . . . . . . . . . . . . . . . 41
8. 2. Media Sharing . . . . . . . . . . . . . . . . . . . . . . . . . . . . . . . . . . . . . . . . . . . . . . . . . . . . . . . . . . . . . . 43
8. 3. Time Machine . . . . . . . . . . . . . . . . . . . . . . . . . . . . . . . . . . . . . . . . . . . . . . . . . . . . . . . . . . . . . . 44
Chapter 9. HomeShield . . . . . . . . . . . . . . . . . . . . . . . . . . . . . . . . . . . . . . . . . . . . 46
9. 1. Network Security . . . . . . . . . . . . . . . . . . . . . . . . . . . . . . . . . . . . . . . . . . . . . . . . . . . . . . . . . . . 47
9. 2. Parental Controls . . . . . . . . . . . . . . . . . . . . . . . . . . . . . . . . . . . . . . . . . . . . . . . . . . . . . . . . . . . 47
9. 3. Network Analysis & Optimization. . . . . . . . . . . . . . . . . . . . . . . . . . . . . . . . . . . . . . . . . . . . 48
Chapter 10. OneMesh with Seamless Roaming . . . . . . . . . . . . . . . . . . . . . . 50
10. 1. Set Up a OneMesh Network. . . . . . . . . . . . . . . . . . . . . . . . . . . . . . . . . . . . . . . . . . . . . . . . . 51
10. 2. Manage Devices in the OneMesh Network . . . . . . . . . . . . . . . . . . . . . . . . . . . . . . . . . . 53
Chapter 11. Network Security . . . . . . . . . . . . . . . . . . . . . . . . . . . . . . . . . . . . . . . 55
11. 1. Protect the Network from Cyber Attacks . . . . . . . . . . . . . . . . . . . . . . . . . . . . . . . . . . . . 56
11. 2. Access Control . . . . . . . . . . . . . . . . . . . . . . . . . . . . . . . . . . . . . . . . . . . . . . . . . . . . . . . . . . . . . 56
11. 3. IP & MAC Binding . . . . . . . . . . . . . . . . . . . . . . . . . . . . . . . . . . . . . . . . . . . . . . . . . . . . . . . . . . . 58
Chapter 12. NAT Forwarding. . . . . . . . . . . . . . . . . . . . . . . . . . . . . . . . . . . . . . . . . 61
12. 1. Share Local Resources on the Internet by Port Forwarding . . . . . . . . . . . . . . . . . . 62
12. 2. Open Ports Dynamically by Port Triggering. . . . . . . . . . . . . . . . . . . . . . . . . . . . . . . . . . 64
12. 3. Make Applications Free from Port Restriction by DMZ . . . . . . . . . . . . . . . . . . . . . . . 65
12. 4. Make Xbox Online Games Run Smoothly by UPnP . . . . . . . . . . . . . . . . . . . . . . . . . . . 66
Chapter 13. VPN Server . . . . . . . . . . . . . . . . . . . . . . . . . . . . . . . . . . . . . . . . . . . . . 68
13. 1. Use OpenVPN to Access Your Home Network . . . . . . . . . . . . . . . . . . . . . . . . . . . . . . . 69
13. 2. Use PPTP VPN to Access Your Home Network . . . . . . . . . . . . . . . . . . . . . . . . . . . . . . 70
Product specificaties
| Merk: | TP Link |
| Categorie: | Router |
| Model: | Archer AX72 |
| Kleur van het product: | Zwart |
| Breedte: | 272.5 mm |
| Diepte: | 147.2 mm |
| Hoogte: | 49.2 mm |
| Aan/uitschakelaar: | Ja |
| Frequentie van processor: | 1000 MHz |
| Aantal processorkernen: | 2 |
| Wi-Fi-standaarden: | 802.11a, 802.11b, 802.11g, Wi-Fi 4 (802.11n), Wi-Fi 5 (802.11ac), Wi-Fi 6 (802.11ax) |
| USB-poort: | Ja |
| Ethernet LAN: | Ja |
| Type stroombron: | DC |
| Aantal Ethernet LAN (RJ-45)-poorten: | 4 |
| MIMO: | Ja |
| Type processor: | Ja |
| Modulatie: | OFDM, 1024-QAM |
| Wifi-band: | Dual-band (2.4 GHz / 5 GHz) |
| Wifi-standaard: | Wi-Fi 6 (802.11ax) |
| WLAN gegevensoverdrachtsnelheid (max): | 5400 Mbit/s |
| WLAN gegevensoverdrachtsnelheid (eerste band): | 4804 Mbit/s |
| WLAN gegevensoverdrachtsnelheid (tweede band): | 574 Mbit/s |
| Interfacetype Ethernet LAN: | Gigabit Ethernet |
| Ethernet LAN, data-overdrachtsnelheden: | 10,100,1000 Mbit/s |
| Bekabelingstechnologie: | 10/100/1000Base-T(X) |
| Netwerkstandaard: | IEEE 802.11a, IEEE 802.11ac, IEEE 802.11ax, IEEE 802.11b, IEEE 802.11g |
| Ondersteunde beveiligingsalgoritmen: | WPA, WPA-Enterprise, WPA2, WPA2-Enterprise, WPA3 |
| Antennas quantity: | 6 |
| Temperatuur bij opslag: | -40 - 70 °C |
| Aantal poorten USB 3.2 Gen 1 (3.1 Gen 1) Type A: | 1 |
| Web-gebaseerd management: | Ja |
| Luchtvochtigheid bij opslag: | 5 - 90 procent |
| Reset button: | Ja |
| MAC adres filtering: | Ja |
| Filtratie: | Ja |
| Ethernet WAN: | Ja |
| Firewall: | Ja |
| IP-adresfilter: | Ja |
| DoS aanval preventie: | Ja |
| Universal Plug and Play ( UPnP ): | Ja |
| Ouderlijk toezicht: | Ja |
| Quality of Service (QoS): | Ja |
| Access Control List (ACL): | Ja |
| DHCP client: | Ja |
| Network address translation (NAT): | Ja |
| DMZ support: | Ja |
| DSL WAN: | Ja |
| WPS Push Button Security: | Ja |
| Type WAN-aansluiting: | RJ-45 |
| Bedrijfstemperatuur (T-T): | 0 - 40 °C |
| Relatieve vochtigheid in bedrijf (V-V): | 10 - 90 procent |
| Type product: | Draagbare router |
| MU-MIMO-technologie: | Ja |
| Antenne-ontwerp: | Extern |
| Dynamic DNS (DDNS): | Ja |
| Port forwarding: | Ja |
| Poortactivering: | Ja |
| Ondersteuning voor Samba (opslag): | Ja |
| Draadloos distributiesysteem (WDS) brug: | Ja |
Heb je hulp nodig?
Als je hulp nodig hebt met TP Link Archer AX72 stel dan hieronder een vraag en andere gebruikers zullen je antwoorden
Handleiding Router TP Link
4 Juli 2025
4 Juli 2025
2 Juli 2025
13 Mei 2025
13 Mei 2025

2 Mei 2025

26 Maart 2025
20 Februari 2025

13 November 2024

26 September 2024
Handleiding Router
- Verizon
- StarTech.com
- Longshine
- NetComm
- Phicomm
- Silverline
- D-Link
- Technicolor
- Keenetic
- Nec
- Netgear
- Beafon
- Readynet
- Airlive
- Gefen
Nieuwste handleidingen voor Router
30 Juli 2025

29 Juli 2025
29 Juli 2025

29 Juli 2025
29 Juli 2025
28 Juli 2025
15 Juli 2025
14 Juli 2025
7 Juli 2025
7 Juli 2025