Technaxx TX-125 Handleiding
Technaxx
Fotocamera
TX-125
Bekijk gratis de handleiding van Technaxx TX-125 (11 pagina’s), behorend tot de categorie Fotocamera. Deze gids werd als nuttig beoordeeld door 77 mensen en kreeg gemiddeld 4.5 sterren uit 39 reviews. Heb je een vraag over Technaxx TX-125 of wil je andere gebruikers van dit product iets vragen? Stel een vraag
Pagina 1/11

1
Technaxx® * User Manual
Nature Wild Cam 8MP TX- 125
The Declaration of Conformity for this device is under the Internet link:
www.technaxx.de/ (in bottom bar “Konformitätserklärung”). Before using the device
the first time, read the user manual carefully.
Service phone No. for technical support: 01805 012643 (14 cent/minute from
German xed-line and 42 cent/minute from mobile networks).
Free Email: support@technaxx.de
Keep this user manual for future reference or product sharing carefully. Do the same
with the original accessories for this product. In case of warranty, please contact the
dealer or the store where you bought this product. Warranty 2 years
Enjoy your product * Share your experien and opinion on one ce
of the well-known internet portals
Contents
Features ........................................................................................................ 1
Camera overview ........................................................................................... 2
Power supply ................................................................................................. 2
Inserting the memory card ............................................................................. 3
Basic Operations ........................................................................................... 3
Download Files to a computer (2 ways) ......................................................... 9
Technical specications ................................................................................. 9
Features
Security camera battery operated for indoor and outdoor use
Ideal for recording and observing the wildlife and for monitoring houses
FullHD video resolution 1080p
2.4” TFT LCD display (720x320)
1/3.2" CMOS sensor with 8MP
Select functions: video, photo, video & photo
PIR sensor (~18m) & IR range (~ m) for night recordings 18
iggering time 0.5 seconds Tr
t- micophone & speaker Buil in
MicroSD card** up to 32GB (**not included in delivery)
Camera protection class IP56 (dust proof & heavy splash water proof)

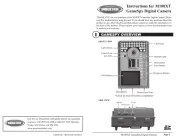
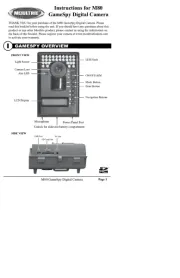
2
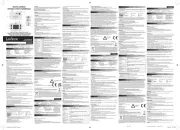
Camera overview
Inside view
Front view
1
Display screen
10
Down Button
2
Up button / Video button
11
MicroSD card s lot
3
Shot Button
12
AV Jack
4
Right Button
13
Mini USB connector
5
OK Button
14
OFF-TEST-ON Mode
6
Speaker
15
Infrared LEDs
7
Menu Button
16
Lens
8
Left Button
17
Front PIR sensor (motion sensor)
9
Playback Button
18
Side PIR sensor (motion sensor
Power supply
Before use, install pieces of AA batteries* 1.5V (*included) in the correct 8x
polarity. Open the camera case and remove the battery cover.
Extended Information for Power supply
The device does not work with a battery voltage lower than 4V.
The battery life with default video length of 15 seconds will be: 8 hours in
day mode or 1.5 hours in night mode & 2000 videos in day mode or 400
videos in night mode (8xAA batteries installed).

3
Inserting the memory card
The camera has no built- memory, therefore insert a formated (with FAT32) in
MicroSD card** up to 32GB (**not included) for saving les. We suggest to use
class 6 or above high speed card.
Attention: Do not insert the MicroSD card forcibly refer to the marking on the ;
camera. T MicroSD card should have same temperature like the ambient he
temperature. The camera will be short-circuiting inuenced by environment
temperature and humidity. Notice protection for the camera when using it
outdoor.
If the capacity of MicroSD card is full, the camera will stop recording
automatically. The LEDs will go out (when Endless Capture is OFF) .
Press the edge of the card gently to pop- the MicroSD card. out
Basic Operations
Turn On and O the camera
First time start in Test mode select the device language. Not possible in ON
mode!
Switch the MODE button to “Test” to turn on the camera for settings.
Switch the MODE button to “ON” to turn the camera in recording mode.
Switch the MODE button to “Off” to turn off the camera.
System Setup
Switch MODE button to “Test”, then you can set the system parameters.
Press Up/Down button to switch between Video and Photo mode for
manual use in Test mode.
Press Menu button to open the setup menu.
Press Up/Down button to scroll through all menus. Then press OK
button to enter the options interface.
Press Up/Down button to scan all options. And press OK button to
conrm options.
Press MENU button again to turn back to last menu or exit the
setup menu.
Setup menu and function as below:
Mode: [Photo] / [Video] / [Photo & Video] (default). Select and press OK
button to conrm.
Set the
working mode
Photo mode
Camera only takes pictures.
Video mode
Camera only records vid eo.
Photo & Video mode
(default)
Camera will take a photo rst,
and then start to record video.
Product specificaties
| Merk: | Technaxx |
| Categorie: | Fotocamera |
| Model: | TX-125 |
Heb je hulp nodig?
Als je hulp nodig hebt met Technaxx TX-125 stel dan hieronder een vraag en andere gebruikers zullen je antwoorden
Handleiding Fotocamera Technaxx

12 Maart 2024

13 Maart 2023
Handleiding Fotocamera
- Gembird
- Lumens
- Olympus
- Burris
- Denver
- Lenovo
- Berger & Schröter
- Dahua Technology
- Casio
- EVOLVEO
- Camouflage
- Minox
- Akaso
- Brinno
- Arlo
Nieuwste handleidingen voor Fotocamera

29 Juli 2025

29 Juli 2025
29 Juli 2025

28 Juli 2025

28 Juli 2025
15 Juli 2025
15 Juli 2025
15 Juli 2025
14 Juli 2025
14 Juli 2025