Steren BIKE-030 Handleiding
Steren
Fietscomputer
BIKE-030
Bekijk gratis de handleiding van Steren BIKE-030 (2 pagina’s), behorend tot de categorie Fietscomputer. Deze gids werd als nuttig beoordeeld door 47 mensen en kreeg gemiddeld 3.7 sterren uit 24 reviews. Heb je een vraag over Steren BIKE-030 of wil je andere gebruikers van dit product iets vragen? Stel een vraag
Pagina 1/2

Indicadores de velocidad
Los símbolos indican que la velocidad actual (SDP)
es mayor o menor que la velocidad promedio (AVS).
Cronómetro
Para utilizar el cronómetro, con el monitor en modo
Odómetro, presione el botón hasta que aparezca el SET
símbolo Sw en pantalla; presione para activarlo o
para detenerlo. Oprima el botón SET para reiniciar el
cronómetro . Oprima el botón MODE para salir.
Recordatorio de mantenimiento
Cuando el contador supere los 500 Km, aparecerá el
símbolo Presione simultáneamente los botones y
MODE para borrarlo.
Recordatorio para engrasar la
bicicleta
Cuando el odómetro supere los 300 Km, aparecerá el
símbolo Presione simultáneamente los botones y
MODE para borrarlo.
Borrar datos
Presione durante 3 segundos para borrar todos los
datos en la pantalla (excepto la hora).
Modo de reposo
Si el monitor no recibe ninguna señal después de 5
minutos, aproximadamente, entrará en ahorro de
energía y sólo se mostrará la hora.
1. Mantenga presionado el botón hasta que el SET
símbolo de grados comience a destellar (Esto indica que
el dispositivo está en modo de edición).
2. Presione para seleccionar la unidad de medición
en grados: (centígrados) o (Fahrenheit); presione °C °F
SET para confirmar.
3. Presione para elegir el formato de hora o 12 24
h; presione para confirmar.SET
4. Presione para editar la hora; presione . Edite SET
los minutos con y presione . Edite los segundos; SET
presione . SET
5. A continuación, presione para seleccionar la
circunferencia de la llanta, presione SET para confirmar
cada dígito.
6. Presione si desea cambiar la unidad de medición de
distancia: Km (kilómetros) o Mile (millas); presione SET
para confirmar. Después de realizar este ajuste, la
configuración de inicio estará completa.
7. Espere aproximadamente 10 segundos sin presionar
ningún botón para salir del modo de edición.
MODE
MAX
AVS
SPD
KM / H
Sw
AM
Th
PM
RAT
TM
TM UP
TTM DN
DST
TRIP UP
ODO DN
Km Mile
CIR / CM
Manual de instrucciones
Velocímetro y medidor de
distancia para bicicleta
V0.0BIKE-030
1017A
• Por seguridad, debe conducir con precaución y prestar
total atención al entorno durante el trayecto en bicicleta.
Evite distraerse con el medidor.
• Asegúrese de adherir correctamente las piezas en la
bicicleta. La empresa no se hace responsable por mal
uso o mala instalación del producto.
• Este aparato no se destina para utilizarse por
personas (incluyendo niños), cuyas capacidades
físicas, sensoriales o mentales sean diferentes o estén
reducidas, o carezcan de experiencia o conocimiento.
• Los niños deben supervisarse para asegurar que no
empleen el aparato como juguete.
• No exponga el equipo a temperaturas extremas.
• Evite utilizarlo en condiciones de lluvia o humedad.
Alerta de
mantenimiento
Engrasar la
bicicleta
Desplazamiento
Cambio de
modo
Selector (SET)
Comparador
Monitor
Pieza magnética
para rayo
Batería de botón
CR2032 (x2)
Sensor
Cinchos (x6)
Tornillos (x4)
Base para manubrio
Ajuste de hora
Circunferencia de
la llanta
Unidad de distancia
Comparador
Sensor
Monitor
Pieza
magnética
60 cm
Indicador de
batería baja
PRECAUCIONES
Precauciones Descripción generalContenido Colocación o reemplazo de
baterías Instalación Instalación en la bicicleta Instalación en la bicicleta
Modo de uso Configuración de inicio
Pantalla
principal
Pantalla del
modo TM/TRIP
Pantalla del modo
odómetro (ODO)
Datos generales
Datos de tiempo y distancia
recorridos pedaleando (UP)
y sin pedalear (DN)
Datos de medición de
distancia
Secuencia de configuración Funciones adicionales Funciones adicionales Apéndice Apéndice Especificaciones
Esquema de instalación
Monitor
Sensor
La información que se muestra en este manual sirve
únicamente como referencia sobre el producto. Debido
a actualizaciones pueden existir diferencias. Por favor,
consulte nuestra página web www.steren.com para
obtener la versión más reciente del manual.
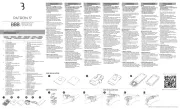
Utilice una moneda o un objeto plano para abrir el
compartimento para batería, tanto en el monitor como
en el sensor.
Inserte las baterías como se muestra en la imagen.
Asegúrese de colocarlas con la polaridad correcta.
Coloque los tornillos en la base, e introduzca un
par de cinchos, como se muestra en la imagen.
Deslice el monitor sobre la base hasta escuchar
un clic. Si desea retirarlo, presione el seguro
inferior (de la base) y deslice el monitor hacia
arriba.
Utilice un par de cinchos para fijar el sensor en
la tijera de la bicicleta, como se muestra en la
imágen.
Retire el tornillo de la pieza magnética, y
colóquela en un rayo de la llanta, como se
muestra en la imagen. Vuelva a colocar el tornillo
firmemente.
La distancia entre el sensor y el
monitor no debe superar los 60 cm
No debe haber más de 10
mm de distancia entre el
sensor y la pieza mágnetica
Adhiera la base y el botón en el manubrio.
Asegúrelos con los cinchos.
Lea este instructivo para saber cómo utilizar
adecuadamente el producto. Por favor, consulte la
versión más reciente en nuestra página www.steren.-
com
MODE
MAX
AVS
SPD
KM / H
Sw
AM
Th
PM
RAT
TM
TM UP
TTM DN
DST
TRIP UP
ODO DN
Km Mile
CIR / CM
MODE
MAX
AVS
SPD
KM / H
Sw
AM
Th
PM
RAT
TM
TM UP
TTM DN
DST
TRIP UP
ODO DN
Km Mile
CIR / CM
MODE
MAX
AVS
SPD
KM / H
Sw
AM
Th
PM
RAT
TM
TM UP
TTM DN
DST
TRIP UP
ODO DN
Km Mile
CIR / CM
1
2
3
1
2
SEN S OR
60 cm
10 mm
+
Una vez insertada la batería, el monitor encenderá
automáticamente y se mostrará la pantalla principal.
El dispositivo tiene tres modos de visualización en los que
se muestran los datos del recorrido.
Presione el botón en el monitor o el botón del MODE
manubrio para cambiar el modo de visualización.
Después de unos segundos volverá a la pantalla
principal.
Reinicio
Para reiniciar el equipo, retire la batería del monitor y
vuelva a colocarla después de 10 s aproximadamente.
Iluminación
Mantenga presionado el botón hasta que MODE
encienda la luz de la pantalla.
Circunferencia de las llantas
De acuerdo con el tamaño de las llantas de la bicicleta
consulte las siguientes tablas para conocer la circunferen-
cia. Estos datos deben ser introducidos en la configura-
ción inicio del equipo.
El tamaño, generalmente, se muestra en la parte lateral
de las cubiertas de las llantas.
Tamaño
27” x 1 – 1/4”
27” x 1 – 1/8”
26” x 2.3”
26” x 2.25”
26” x 2.1”
26” x 2.0”
26” x 1.9”
26” x 1.75”
26” x 1.5”
26” x 1.25”
26” x 1.0”
24” x 1.9”
20” x 1 – 1/4”
1.6” x 2.0”
1.6” x 1.95”
1.6” x 1.5”
Circunferencia
216.1
215.5
213.5
211.5
209.5
207.4
205.5
203.5
198.5
195.3
191.3
191.6
161.8
125.3
125.7
120.6
Alimentación monitor: 3 V - - - (1 x CR2032)
Alimentación sensor: 3 V - - - (1 x CR2032)
Antes de comenzar la configuración, es importante que
conozca cuál es la circunferencia de las llantas de la
bicicleta. Consulte el “Apéndice” al final de este manual
para obtener referencias acerca de las medidas
estándar.
SPD
ODO
DST
MXS
AVS
TTM
TM
RAT
Th
Sw
TM UP
TM DN
TRIP UP
TRIP DN
Velocidad actual
Odómetro (distancia acumulada)
Distancia recorrida
Velocidad máxima
Velocidad promedio
Tiempo total de recorrido
Tiempo de recorrido
Tiempo acumulado de recorrido
Temperatura actual
Cronómetro
Tiempo de trabajo
Tiempo de reposo
Distancia recorrida en trabajo
Distancia recorrida en reposo
+
+
Unidad de
temperatura
Formato de hora
Tamaño
700 C x 38 mm
700 C x 38 mm
700 C x 35 mm
700 C x 32 mm
700 C x 30 mm
700 C x 28 mm
700 C x 25 mm
700 C x 23 mm
700 C x 20 mm
700 C x tubular
650 C x 23 mm
650 C x 20 mm
Circunferencia
218.0
216.8
215.5
211.5
214.5
213.6
212.4
210.5
207.4
213.0
199.0
194.5

Reminder to grease the bike
When the odometer exceeds 300 km, the symbol
Simultaneously press the buttons and MODE to delete
Reminder of maintenance
When the counter exceeds 500 km, the symbol
Simultaneously press the buttons and MODE to delete
it.
Chronometer
To use the stopwatch, with the monitor in Odometer
mode, press the button until the symbol appears SET Sw
on the display; press to activate or to stop it. Press
the SET button to reset the stopwatch. Press the MODE
button to exit.
Speed Indicators
The symbols indicate that the current speed is (SDP)
higher or lower than the average speed (AVS).
1. Press and hold the button until the degree symbol SET
starts flashing (This indicates that the device is in edit
mode).
2. Press to select the measuring unit in degrees: ° C
(centigrade) or ° F (Fahrenheit); press to confirm.SET
3. Press to choose the 12 or 24 hour time format;
press to confirm.SET
4. Press to edit the time; press SET. Edit the minutes
with and press . Edit the seconds; press .SET SET
5. Then press to select the circumference of the rim,
press to confirm each digit.SET
6. Press if you want to change the distance measuring
unit: Km (kilometers) or Mile (miles); press to SET
confirm. After this setting is made, the startup configura-
tion is complete.
7. Wait approximately 10 seconds without pressing any
button to exit the edit mode.
Delete data
Press for 3 seconds to erase all data on the screen
(except time).
Sleep Mode
If the monitor does not receive any signal after about 5
minutes, it will enter energy saving and only the time will
be displayed.
MODE
MAX
AVS
SPD
KM / H
Sw
AM
Th
PM
RAT
TM
TM UP
TTM DN
DST
TRIP UP
ODO DN
Km Mile
CIR / CM
Instruction manual
Bicycle Speedometer
and odometer
V0.0BIKE-030
1017A
• For safety, you must drive with caution and pay close
attention to the environment during the bike ride. Avoid
distraction with the meter.
• Be sure to properly attach the parts to the bicycle. The
company is not responsible for misuse or poor
installation of the product.
• This appliance is not intended for use by persons
(including children) whose physical, sensory or mental
capabilities are different or reduced, or lack experience
or knowledge.
• Children should be supervised to ensure that they do
not use the appliance as a toy.
• Do not expose the equipment to extreme temperatu-
res.
• Avoid using in rain or wet conditions.
Alert from
maintenance
Grease the
bicycle
Displacement
Change mode
Selector (SET)
Comparator
Display
Magnet to spokes
Button battery
CR2032 (x2)
Sensor
Cinchos (x6)
Screws (x4)
Handlebar base
Time setting
Circumference of
tire
Distance unit
Comparator
Sensor
Display
Magnet
60 cm
Battery low
indicator
CAUTIONS
Cautions General descriptionContent Placing or Replacing batteries Installation Bicycle installation Bicycle installation
How to use Start settings
Principal
screen
Screen mode
TM/TRIP
Odometer mode
display (ODO)
General data Data of time and distance
traveled by pedaling (UP)
and without pedaling (DN)
Measurement data from
distance
Configuration Sequence Additional Functions Additional Functions Appendix Appendix Specifications
Installation Diagram
Display
Sensor
The information shown in this manual is for reference
only on the product. Due to updates there may be
differences. Please refer to our website
www.steren.com for the latest version of the manual.
Use a coin or flat object to open the battery compartment
on both the monitor and the sensor.
Insert the batteries as shown in the picture. Be sure to
place them with the correct polarity. Place the screws in the base, and insert a pair of
straps, as shown in the picture.
Slide the monitor onto the base until you hear a
click. If you want to remove it, press down on the
lower latch (from the base) and slide the monitor
up.
Use a pair of straps to attach the sensor to the
bicycle scissor, as shown in image.
Remove the screw from the magnetic part, and
place it on a spokes of the tire, as shown in the
image. Replace the screw firmly.
The distance between the sensor
and the monitor should not exceed
60 cm
There must be no more than
10 mm of distance between
the sensor and the magnetic
part
Attach base and button to handle. Secure the
base with the straps.
Read this instruction manual to learn how to use the
product properly. Please check the latest version on
our website www.steren.com
MODE
MAX
AVS
SPD
KM / H
Sw
AM
Th
PM
RAT
TM
TM UP
TTM DN
DST
TRIP UP
ODO DN
Km Mile
CIR / CM
MODE
MAX
AVS
SPD
KM / H
Sw
AM
Th
PM
RAT
TM
TM UP
TTM DN
DST
TRIP UP
ODO DN
Km Mile
CIR / CM
MODE
MAX
AVS
SPD
KM / H
Sw
AM
Th
PM
RAT
TM
TM UP
TTM DN
DST
TRIP UP
ODO DN
Km Mile
CIR / CM
1
2
3
1
2
SENSOR
60 cm
10 mm
+
Once the battery is inserted, the monitor will automatically
turn on and the main screen will be displayed.
The device has three display modes in which the route
data is displayed.
Press the MODE button on the monitor or the handle
button to change the display mode. After a few seconds
you will return to the main screen.
Reset
To restart the computer, remove the battery from the
monitor and replace it after approximately 10 s.
Illumination
Press and hold the button until the display lights MODE
up.
Tire circumference
According to the size of the bicycle tires, refer to the
following tables for the circumference. This data must be
entered in the computer's startup configuration.
The size is usually shown on the side of the tire covers.
Size
27” x 1 – 1/4”
27” x 1 – 1/8”
26” x 2.3”
26” x 2.25”
26” x 2.1”
26” x 2.0”
26” x 1.9”
26” x 1.75”
26” x 1.5”
26” x 1.25”
26” x 1.0”
24” x 1.9”
20” x 1 – 1/4”
1.6” x 2.0”
1.6” x 1.95”
1.6” x 1.5”
Circumference
216.1
215.5
213.5
211.5
209.5
207.4
205.5
203.5
198.5
195.3
191.3
191.6
161.8
125.3
125.7
120.6
Monitor input: 3 V - - - (1 x CR2032)
Sensor input: 3 V - - - (1 x CR2032)
Before starting the configuration, it is important that you
know the circumference of the bicycle tires. Refer to the
"Appendix" at the end of this manual for references about
standard measurements.
SPD
ODO
DST
MXS
AVS
TTM
TM
RAT
Th
Sw
TM UP
TM DN
TRIP UP
TRIP DN
Current speed
Odometer (accumulated distance)
Distance traveled
Maximum speed
Average speed
Total travel time
Travel time
Cumulative travel time
Actual temperature
Chronometer
Working time
Rest time
Distance covered in work
Distance walked at rest
+
+
Unit of
temperature
Time format
Size
700 C x 38 mm
700 C x 38 mm
700 C x 35 mm
700 C x 32 mm
700 C x 30 mm
700 C x 28 mm
700 C x 25 mm
700 C x 23 mm
700 C x 20 mm
700 C x tubular
650 C x 23 mm
650 C x 20 mm
Circumference
218.0
216.8
215.5
211.5
214.5
213.6
212.4
210.5
207.4
213.0
199.0
194.5
Product specificaties
| Merk: | Steren |
| Categorie: | Fietscomputer |
| Model: | BIKE-030 |
| Kleur van het product: | Zwart |
| Soort: | Afstandsmeter op wiel |
| Touchscreen: | Nee |
| Electronisch kompas: | Nee |
| Ondersteund aantal accu's/batterijen: | 2 |
| Display technologie: | LCD |
| Tekstregels: | 4 regels |
| Memory-functie: | Ja |
| Maximale meetafstand: | - m |
| Batterijtechnologie: | Alkaline |
| Type beeldscherm: | Digitaal |
| Display met achtergrondverlichting: | Ja |
Heb je hulp nodig?
Als je hulp nodig hebt met Steren BIKE-030 stel dan hieronder een vraag en andere gebruikers zullen je antwoorden
Handleiding Fietscomputer Steren

27 Juni 2023
Handleiding Fietscomputer
- Halfords
- Walfort
- SmartHalo
- Cateye
- Union
- VDO
- Prophete
- Shimano
- Maxxus
- Pro
- Xplova
- Bontrager
- Mavic
- Polar
- Asaklitt
Nieuwste handleidingen voor Fietscomputer
25 Augustus 2025
29 Juli 2025
28 Juli 2025
6 Juli 2025
5 Juli 2025
5 Juli 2025
5 Juli 2025
2 Juli 2025
1 Juli 2025
1 Juli 2025