Speco Technologies IMP100DLWH Handleiding
Speco Technologies
Niet gecategoriseerd
IMP100DLWH
Bekijk gratis de handleiding van Speco Technologies IMP100DLWH (2 pagina’s), behorend tot de categorie Niet gecategoriseerd. Deze gids werd als nuttig beoordeeld door 36 mensen en kreeg gemiddeld 3.6 sterren uit 18.5 reviews. Heb je een vraag over Speco Technologies IMP100DLWH of wil je andere gebruikers van dit product iets vragen? Stel een vraag
Pagina 1/2

Thank you for choosing the slide style impedance matching volume control.Speco IMP100DL
The has a unique adjustable design which allows it to be used as an impedance matching stereo volume control when 2x, 4x, or IMP100DL
8x switch positions are selected, as a standard stereo non-impedance matching volume control when 1x switch positions are selected or
(Note: 1x positions are for use with impedance matching speaker selector or other impedance matching device). When the impedance
matching switch positions are selected, this design enables you to connect up to 8 pairs of 8-ohm speakers or 4 pairs of 4-ohm speakers to
an 8-ohm stable amplifier and operate them simultaneously without the fear of amplifier overload, eliminating the need for a speaker selec-
tor or other impedance matching device.
(Note that when using a 4-ohm stable amplifier, you can c ponnect u
to 16 pairs of 8-ohm speakers or up to 8 pairs of 4-ohm speakers.)
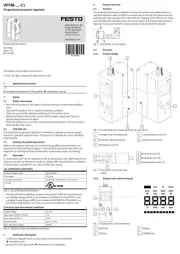
Wiring and Installation
First determine the minimum operating impedance of the amplifier
to be used in your installation. This information should be in your
amplifier owner’s manual. Using the speaker chart at left choose
the proper position for the impedance atching slide switch (seem
Fig. 1) and put it in the correct position.
Recommended Switch Position 8 ohm Stable Amplifier.
Connecting 1 Pair of 8 ohm Speakers
Connecting 2 Pairs of 8 ohm Speakers
Connecting 3-4 Pairs of 8 ohm Speakers
Connecting 5-8 Pairs of 8 ohm Speakers
1X Position
2X Position
4X Position
8X Position
Recommended Switch Position 4 ohm Stable Amplifier.
Connecting 2 Pairs of 8 ohm Speakers
Connecting 3-4 Pairs of 8 ohm Speakers
Connecting 5-8 Pairs of 8 ohm Speakers
Connecting 9-16 Pairs of 8 ohm Speakers
1X Position
2X Position
4X Position
8X Position
8 ohm Speaker Chart
Recommended Switch Position 8 ohm Stable Amplifier.
Connecting 1 Pair of 4 ohm Speakers
Connecting 2 Pairs of 4 ohm Speakers
Connecting 3-4 Pairs of 4 ohm Speakers
2X Position
4X Position
8X Position
4 ohm Speaker Chart
Recommended Switch Position 4 ohm Stable Amplifier.
Connecting 1 Pair of 4 ohm Speakers
Connecting 2 Pairs of 4 ohm Speakers
Connecting 3-4 Pairs of 4 ohm Speakers
Connecting 5-8 Pairs of 4 ohm Speakers
1X Position
2X Position
4X Position
8X Position BACK VIEW
Fig. 1
8X 4X 2X 1X
Model IM 100DL P
100 Watt Slide Style Impedance Matching ume ControVol l

Fig. 3
Operational Check
After making all connections, check for proper
operation. Switch the system to the ON position.
Using either the television or music, slowly increase
the volume on the amplifier/receiver to mid position. Now, slowly raise the
volume control slider knob on the IMP100DL, from its minimum position up
towards its maximum position. ou should hear sound emanating from theY
speakers, increasing in volume as you raise the volume control slider knob
through its twelve steps. Select the level of sound that is most pleasing to
you. If no sound is heard from any or all speakers, switch the system FFO
immediately and check for open or loose connections, wrong polarity or
shorts in the wires.
Wiring Instructions (Fig. 2)
The has detachable connector blocks to which the amplifier andIMP100DL
speaker wires should be connected. When connecting the speaker leads from
the amplifier outputs to the volume controls red input connector block, strip
about an 1/8 inch of insulation from the wire and twist or solder it so that there
are no loose strands. Insert the wires from the amplifiers outputs into the vol-
ume control connector block inputs.
Note: Wires should stay consistant right + from the amplifier to right + on
the input side of the connecting block. Most speaker wire has some form of
iden-tification such as raised ribs or color coding to help determine
positive and negative connections. Connect the speakers to the black
output connector block following the same format as above. When the wires
are connected to blocks, plug them back into the volume ontrol input and c
o nutputs. Do ot apply undue pressure while plugging it into the socket.
Make sure the plug is engaged in the socket properly and is not loose.
Caution: Do not reverse the input and output
connections or serious damage may
occur to your amplifier.
200 New Highway, Amityville, NY 11701
For information regarding service or return,
Call us TOLL FREE: 1-800-645-5516
In Metro New York 631-957-8700
http://www.specotech.com
Date of urchase:P _____________________
Where urchased:P ____________________
P Purchase rice: ______________________
Speco 2-Year Limited Warranty
This warranty is valid only on products purchased in the United States of America. This warranty applies
only to the original user/purchaser.
Subject to conditions and exclusions found below, this indoor volume control is warranted against manufac-
turing defects in material and workmanship for two (2) years including parts and labor.
Speco Technologies will repair or replace (at our discretion) any parts found to be defective for the warranty
period specified. will provide a replacement for any defective part.We
Conditions
1. ou must obtain a eturn Authorization (RA) number for any merchandise being returnedY R
to Speco Technologies, whether for return/e change or repair, whether in or out of warrantyx .
2. This warranty will be honored only upon the presentation of the original dated bill of sale or sales slip.
3. Transportation of the product to Speco Technologies for service is the responsibility of the user. Repaired
or replaced product will be returned prepaid during warranty period.
Exclusions
1. This warranty shall not cover improper adjustment of customer operated controls or products which
have been altered or abused.
2. This warranty shall not apply to the appearance of the product or accessory items including, but
not limited to cabinets, cabinet parts, knobs, etc.
3. This warranty does not apply to uncrating, setup, installation, or removal and/or reinstallation of
products prior to or after repair.
4. This warranty shall not apply to repairs or replacements necessitated by any cause beyond the result of
manufacture including, but not limited to, any malfunction, defects or failure caused by or resulting from un-
authorized service or inferior parts, neglect, accident, fire, flood, other acts of nature or incorrect line voltage.
The foregoing is in lieu of all other expressed warranties and we do not authorize any party to assume
for us any obligation or liability. In no event shall we be liable for incidental or consequential damage aris-
ing from the use of this product, or for any delay in the use of this product due to causes beyond our control.
Some states do not allow limitations of how long an implied warranty lasts and/or do not allow the exclusion
or limitation of consequential damages. The above limitations on implied warranty and consequential
damages may not apply to you.
This warranty gives you specific legal rights. You may have other rights which vary from state to state.
NO For warranty purposes and your protection in the TE:
event of theft or loss of this product, please fill in the
information below and keep with your sales receipt.
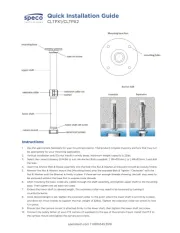
Mounting (Fig. 3)
Using the screws provided, install the completed assembly
into a single gang electrical work box, approximately 18
cubic inches or greater. An open back electrical box or
plaster ring may be more convenient to work with.
Note: void mounting the next to lines A IMP100DL AC
or dimmers.
Specifications
• Switchable impedance atching 1x, 2x, 4x, or 8x positionsm
• Soft touch 12-step slide attenuation
• equency esponse: 20Hz to 20kHzFr R
• Power Handling: 100 ttsWa
• Removable terminal blocks accept up to 4-gauge wire 1
• Mounting Dimensions (W D): 1.63˝ x 2.74˝x H x x 2.66˝
(42mm x 70mm x 68mm)
Fig. 2
Speco Technologies is constantly developing and improving products. Rev. 4/ /202021
Product specificaties
| Merk: | Speco Technologies |
| Categorie: | Niet gecategoriseerd |
| Model: | IMP100DLWH |
Heb je hulp nodig?
Als je hulp nodig hebt met Speco Technologies IMP100DLWH stel dan hieronder een vraag en andere gebruikers zullen je antwoorden
Handleiding Niet gecategoriseerd Speco Technologies

18 Maart 2025

18 Maart 2025

11 Maart 2025
28 Januari 2025

27 December 2024

27 December 2024

26 November 2024

26 November 2024

26 November 2024

18 September 2024
Handleiding Niet gecategoriseerd
- ESE
- UPG
- Cylinda
- Twinkly
- Bogen
- Virax
- Tivoli Audio
- Mach Power
- Hario
- Monogram
- Waltec
- Emmaljunga
- Taylor
- Spring
- Bright Starts
Nieuwste handleidingen voor Niet gecategoriseerd
2 Augustus 2025
2 Augustus 2025

1 Augustus 2025

1 Augustus 2025

1 Augustus 2025
1 Augustus 2025

1 Augustus 2025
1 Augustus 2025

1 Augustus 2025
1 Augustus 2025