Soundsphere SS-MBL Handleiding
Soundsphere Niet gecategoriseerd SS-MBL
Bekijk gratis de handleiding van Soundsphere SS-MBL (100 pagina’s), behorend tot de categorie Niet gecategoriseerd. Deze gids werd als nuttig beoordeeld door 17 mensen en kreeg gemiddeld 4.3 sterren uit 7 reviews. Heb je een vraag over Soundsphere SS-MBL of wil je andere gebruikers van dit product iets vragen? Stel een vraag
Pagina 1/100
SS-MBL & SS-MBM
Mounting Brackets
OWNER’S MANUAL
© 2021 MSE Audio. Rev. 02.25.2021
360º of the Best Sound Around™
Contact: MSE Audio, 855.663.5600 / 913.663.5600 / [email protected]
MBL & MBM Installation & Safety Procdures
WARNING
Be sure to securely tighten all hardware before hanging the loudspeaker. Wire rope (steel cable), cable clamps with
saddles and thimbles of suitable size and strength are the recommended materials for overhead suspensions. All
loudspeakers should be redudantly safety wired to structural members of the building with an approved safety wire
system or other agency certied materials.
IMPORTANT: Always check local safety codes before installing any overhead loudspeaker system and for periodic
inspection and maintenance of the installation.
nstall Instructions
Flush mount brackets (models MBM and MBL) are normally installed at the factory. If they are ordered separately, it will
be necessary to drill three holes in the loudspeaker’s reector to mount the bracket. Recommended hole size for the three
mounting holes is:
1/2” diameter for model (or any model loudspeaker with a 26” reector that requires the MBL mounting bracket)Q-12A
3/8” diameter for model (or any model loudspeaker with a 20” reector that requires the MBM mounting bracket)Q-8
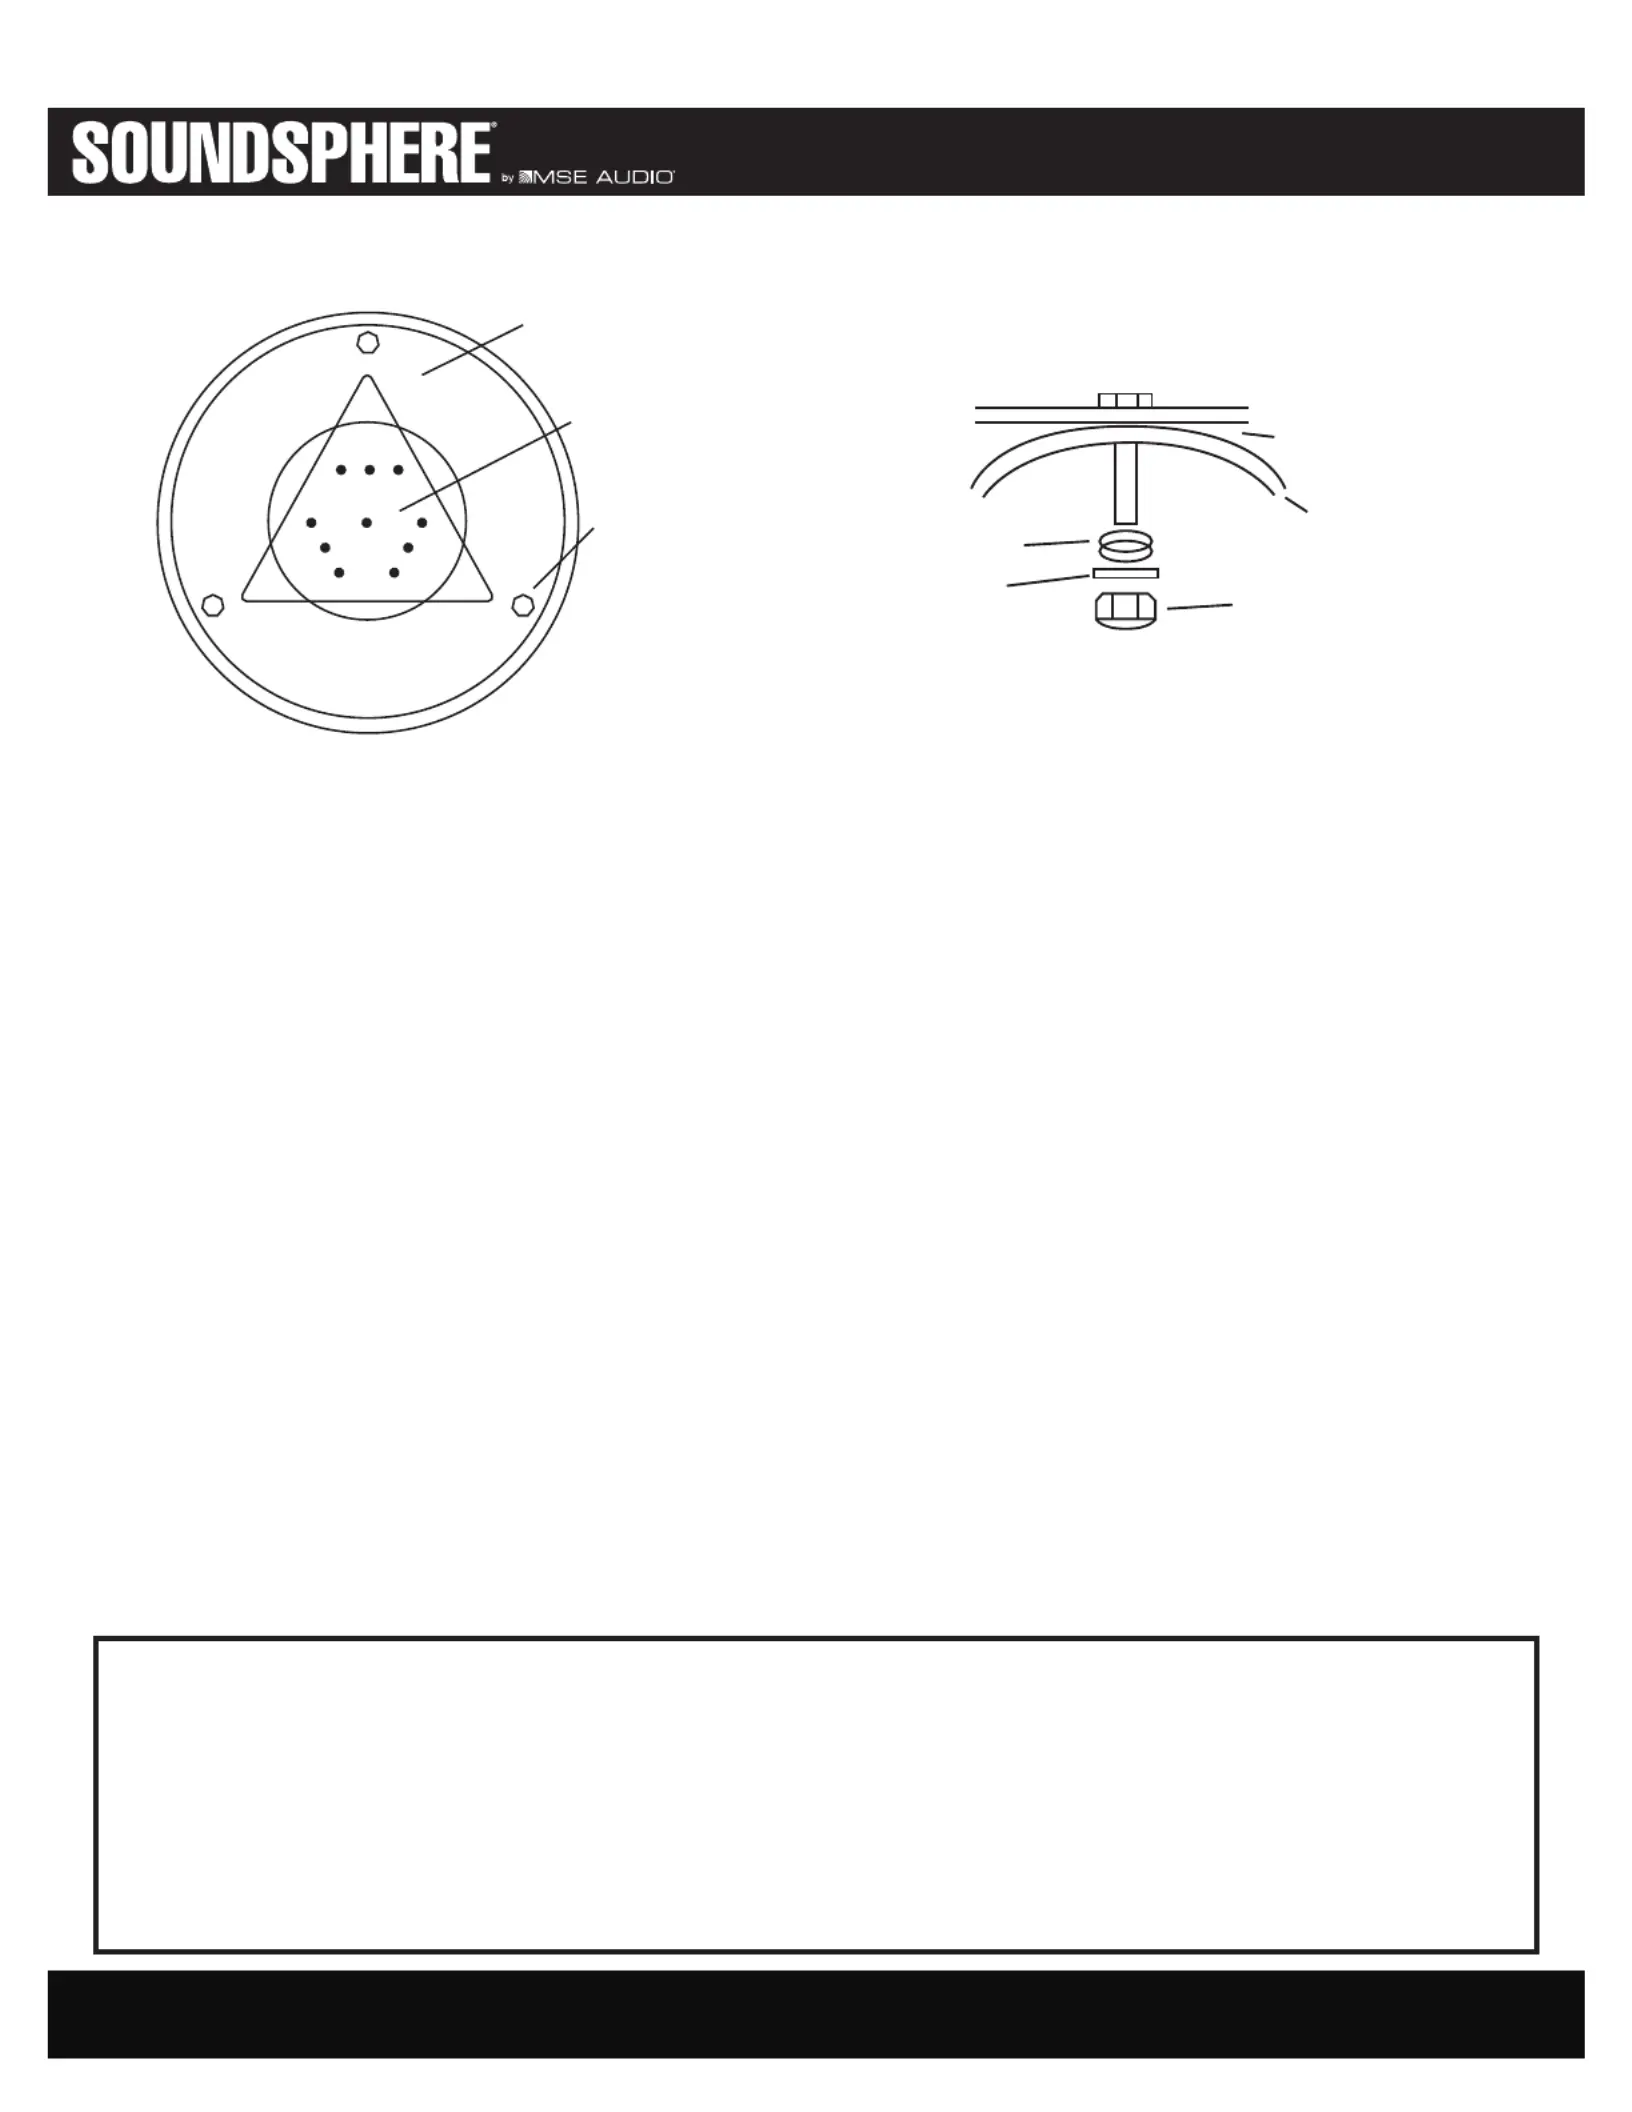
Diagram 1
1. With the back of the reector facing up, place the studs of the mounting bracket against the reector. Center the
mounting bracket on the reector by lining up the three corners of the bracket with the leg bolts and equalize the
distance between the studs and the bolt heads.
2. Mark the reector where the bracket studs contact it.
3. Drill a small hole at each of the three marks (approx 3/16” or less).
4. Check the hole alignment with the bracket studs. If the studs are centered on the holes, drill out the holes with a drill
of the appropriate diameter, as indicated above. If not, properly locate the small hole(s).
CAUTION: To avoid splintering the berglass or chipping the gelcoat, run the drill at a slow speed and feed the bit with a
very light pressure. Be very careful not to hit the speaker cone with the drill.
Diagram 2
5. After the bracket has been mounted on a surface, place the reector on the studs and attach the grommet, at
washer, and nylon lock nut. Tighten the nut only enough to “snug up” the unit and provide a vibration free assembly.
NOTE:If you are installing a Q-12A or Q-MB with a TX-250 transformer mounted on the reector, use the 9 1/4” thick rubber
spacer washers, three on each stud, to provide adequate clearance between the mounting bracket and the transformer.
MOUNTING
BRACKET
REFLECTOR
GROMMET
FLAT WASHER
NYLON LOCK NUT
Diagram 2
REFLECTOR
MOUNTING
BRACKET
LEG BOLT
Diagram 1
Product specificaties
| Merk: | Soundsphere |
| Categorie: | Niet gecategoriseerd |
| Model: | SS-MBL |
Heb je hulp nodig?
Als je hulp nodig hebt met Soundsphere SS-MBL stel dan hieronder een vraag en andere gebruikers zullen je antwoorden
Handleiding Niet gecategoriseerd Soundsphere

10 November 2025
3 Februari 2025
3 Februari 2025
3 Februari 2025
3 Februari 2025
3 Februari 2025
19 Juni 2024
Handleiding Niet gecategoriseerd
Nieuwste handleidingen voor Niet gecategoriseerd
7 Juni 2026
7 Juni 2026
7 Juni 2026
6 Juni 2026
6 Juni 2026
6 Juni 2026
6 Juni 2026
6 Juni 2026
6 Juni 2026
6 Juni 2026