Sony NTM-DA1 Handleiding
Sony
Niet gecategoriseerd
NTM-DA1
Bekijk gratis de handleiding van Sony NTM-DA1 (4 pagina’s), behorend tot de categorie Niet gecategoriseerd. Deze gids werd als nuttig beoordeeld door 262 mensen en kreeg gemiddeld 4.7 sterren uit 131.5 reviews. Heb je een vraag over Sony NTM-DA1 of wil je andere gebruikers van dit product iets vragen? Stel een vraag
Pagina 1/4

4-460-179- (1)11
Digital Audio
Nursery Monitor
Operating Instructions
©2013 Sony Corporation Printed in China
NTM-DA1
Owner’s Record
The model and serial numbers are located on the rear of the receiver (under the belt clip).
Record the serial number in the space provided below. Refer to these numbers whenever you
call upon your Sony dealer regarding this product.
Model No. NTM-DA1
Serial No.
Model No. AC-P5004
Serial No.
For customers who purchased this product in the USA
Please register this product on line at
http://www.sony.com/productregistration.
Proper registration will enable us to send you periodic mailings about new products,
services, and other important announcements. Registering your product will also allow us
to contact you in the unlikely event that the product needs adjustment or modification.
Thank you.
WARNING
To reduce fire or shock hazard, do not expose the unit to rain or moisture.
IMPORTANT SAFETY INSTRUCTIONS
-SAVE THESE INSTRUCTIONS
DANGER
TO REDUCE THE RISK OF FIRE OR ELECTRIC SHOCK, CAREFULLY
FOLLOW THESE INSTRUCTIONS
If the shape of the plug does not fit the power outlet, use an attachment plug adaptor of the
proper configuration for the power outlet.
STRANGULATION HAZARD
Children have STRANGLED in cords.
Keep the cord out of the reach of
children (more than 0.9m (3ft)
away). Do not remove the tag on
the cord.
To prevent cord entanglement and
strangulation:
Do not place the transmitter or AC adaptor cord
within reach of children.
Do not place the transmitter or AC adaptor cord
in, or attach it to, a crib or playpen.
Fasten the AC adaptor cord of the transmitter on
the wall with cord clips (not supplied).
Never use extension cords with AC adaptors. Use
only AC adaptors provided.
This device complies with Part 15 of the FCC Rules.
Operation is subject to the following two conditions:
(1) this device may not cause harmful interference, and
(2) this device must accept any interference received, including interference that may cause
undesired operation.
CAUTION
Observe the following cautions, as there may be a risk of heat generation, fire or explosion.
* Nickel Metal Hydride battery is built into the product.
Charge the product by the designated charging method.
Do not place the product in or near fire, or put the product in a microwave.
Do not leave the product in a car in hot weather.
Do not store or use the product in a hot and humid place such as in a sauna bath.
Do not disassemble, crush or pierce the product.
Do not expose the product to excessive shock such as dropping from a high place.
Do not expose the product to high temperatures above 60°C (140°F).
Keep the product dry.
Dispose of the product appropriately.
Charge the product by the designated charging method in the instruction manual.
CAUTION
You are cautioned that any changes or modifications not expressly approved in this manual
could void your authority to operate this equipment.
For the customers in the U.S.A.
Note:
This equipment has been tested and found to comply with the limits for a Class B digital
device, pursuant to Part 15 of the FCC Rules.
These limits are designed to provide reasonable protection against harmful interference in a
residential installation. This equipment generates, uses, and can radiate radio frequency
energy and, if not installed and used in accordance with the instructions, may cause harmful
interference to radio communications.
However, there is no guarantee that interference will not occur in a particular installation. If this
equipment does cause harmful interference to radio or television reception, which can be
determined by turning the equipment off and on, the user is encouraged to try to correct the
interference by one or more of the following measures:
– Reorient or relocate the receiving antenna.
– Increase the separation between the equipment and receiver.
– Connect the equipment into an outlet on a circuit different from that to which the receiver is
connected.
– Consult the dealer or an experienced radio/TV technician for help.
This Transmitter must not be co-located or operated in conjunction with any other antenna or
transmitter.
The following FCC statement applies only to the version of this model manufactured for sale in
the USA. Other versions may not comply with FCC technical regulations.
The available scientific evidence does not show that any health problems are associated with
using low power wireless devices. There is no proof, however, that these low power wireless
devices are absolutely safe. Low power Wireless devices emit low levels of radio frequency
energy (RF) in the microwave range while being used. Whereas high levels of RF can produce
health effects (by heating tissue), exposure of low-level RF that does not produce heating
effects causes no known adverse health effects. Many studies of low-level RF exposures have
not found any biological effects. Some studies have suggested that some biological effects
might occur, but such findings have not been confirmed by additional research. NTM-DA1 has
been tested and found to comply with FCC radiation exposure limits set forth for an
uncontrolled environment and meets the FCC radio frequency (RF) Exposure Guidelines in
Supplement C to OET65.
Precautions
Safety Precautions
Operate the transmitter and receiver on 5V DC. To operate them from house current, use
only the supplied AC adaptors; do not use any other type.
Place the transmitter more than 0.9m (3ft) away from your child.
Should any solid object or liquid fall into the unit, disconnect the AC adaptor after turning the
unit is power off and have the unit checked by qualified personnel before operating it any
further.
Notes on the AC adaptor
Connect the AC adaptor to a nearby easily accessible wall outlet. If trouble occurs while the
adaptor is in use, immediately set the Power/VOICE ACT switch of the receiver to OFF and
disconnect the AC adaptor from the wall outlet. And also set the Power switch of the
transmitter to OFF and disconnect the AC adaptor from the wall outlet.
The unit is not disconnected from the AC power source (mains) as long as it is connected to
the wall outlet, even if the unit itself has been turned off.
If you are not going to use the Digital Audio Nursery Monitor for a long time, disconnect both
the transmitter and receiver from the wall outlet by pulling out the AC adaptors.
If you have any questions or problems concerning your Digital Audio Nursery Monitor, please
consult your nearest Sony dealer.
http://www.sony.net/
Precautions on Usage
This product cannot replace responsible adult supervision of a child. It is designed to
assist adults in child supervision. Do not use it for medical monitoring of a sick baby or
child.
The transmitter detects normal sound levels within a range of 2 to 3m (6 to 10feet) from
your child. If the child moves outside of this range, it may not be able to detect sounds from
him or her.
The transmission range between the transmitter and receiver is up to 270m (900feet) (Line
of Sight). It is essential that you check the transmission range and condition of the Digital
Audio Nursery Monitor on initial installation, and on a regular basis after that.
Stay close to the receiver in order to hear normal sounds from it. Check the volume regularly
to ensure that it is set high enough.
The sensitivity of the Digital Audio Nursery Monitor can be affected by other devices using
2.4GHz frequency, such as a wireless LAN device, a cordless telephone, or a microwave oven,
that may be used near the transmitter and receiver. Using such devices may shorten the
transmission range and cause sounds to be distorted.
Avoid placing the transmitter and receiver near heat sources or where they are subject to
direct sunlight, excessive dust, moisture, or mechanical shock.
Cautions on Water-resistance (for the receiver only)
The receiver is designed so that it can be used with slight exposure to water, rain, snow and
other forms of moisture, but there are several points on which caution should be observed.
Do not allow the receiver to come into contact with large amounts of water.
Do not immerse the receiver in water. If the receiver is dropped into water, set the Power/
VOICE ACT switch to OFF immediately and disconnect the power cord. Do not use it any more
and consult your nearest Sony dealer.
If the receiver get wet, wipe it off with a dry cloth.
Do not pour cold or hot water directly from a faucet or hose onto the product, as it is not of
waterproof.
If you use the product near water, close the jack cover of the DC IN 5V jack firmly. If it is left
open, moisture may get inside the product and may cause a malfunction.
If moisture has getten inside the product, some may remain in its openings. Shake the
product lightly to shed water then wipe the surface. If not, the remaining water will spill out
when you move the product.
Specifications
Frequency: Digital 2.4 GHz
Transmitting Distance: Approx. 270 m (900 feet) (Line of Sight)
Transmitter
Power requirement: AC adaptor (DC IN 5 V jack): 100 V-240 V AC, 50 Hz/60 Hz
Dimensions:
Normal position
Approx. 53 mm × 62.3 mm × 56.1 mm (w/h/d)
(2 1/8 in × 2 1/2 in × 2 1/4 in) incl. projecting parts
When mounting on the wall
Approx. 53 mm × 45.1 mm × 70.3 mm (w/h/d)
(2 1/8 in × 1 13/16 in × 2 7/8 in) incl. projecting parts
Mass: Approx. 41 g (1.45 oz)
Operating temperature: 0 °C - 40 °C (32 °F - 104 °F)
Power consumption:
0.85 W
Receiver
Power requirement: AC adaptor (DC IN 5 V jack): 100 V-240 V AC, 50 Hz/60 Hz
Audio power output:
0.65 W
Speaker: 28 mm dia., 8 Ω
Dimensions:
When the stand is closed
Approx. 51.1 mm × 99.1 mm × 36.1 mm (w/h/d)
(2 1/8 in × 4 in × 1 7/16 in) incl. projecting parts
When the stand is open
Approx. 51.1 mm × 97.7 mm × 69.5 mm (w/h/d)
(2 1/8 in × 3 7/8 in × 2 3/4 in) incl. projecting parts
Mass: Approx. 100 g (3.53 oz)
Operating temperature: 0 °C - 40 °C (32 °F - 104 °F)
Power consumption:
At the maximum load: 2.5 W
Normal mode *: 0.85 W
* When operated with the medium volume level, and Voice Activation off
AC adaptor:
Input: 100 V - 240 V AC, 50 Hz/60 Hz, 0.3 A
Output: DC 5 V/0.4 A
Dimensions:
Approx. 63mm × 26.8mm × 44mm (w/h/d)
(2 1/2 in × 1 1/16 in × 1 3/4 in) excl. projecting parts
Mass: Approx. 64 g (2.3 oz)
Design and specifications are subject to change without notice.


Installation
Transmitter
DC IN 5 V jack
Microphone
Power switch
Base
Power indicator
light
Receiver
RANGE ALM
(Range alarm)
indicator light
BATT/CHG
(Battery/Charge)
indicator light
Power/VOICE ACT
switch
Jack cover*/
DC IN 5 V jack
Built-in Stand/
Belt clip
VOLUME indicator
VOLUME control
SOUND LEVEL
indicator lights
Speaker
Strap hole
* If you use the product near water, close the jack cover of the DC IN 5V jack firmly. If it is left open, moisture may get
inside the product and may cause a malfunction.
Indicator information (Receiver only)
BATT/CHG indicator light
Off: power off
Green: power on
Orange: charging
Flashing in red: low battery
RANGE ALM indicator light Red: indicates the receiver has been moved out of the reception range.
SOUND LEVEL indicator lights Red: indicates the input sound volume level from the transmitter (off [low] to 3
[high]).
In the box
Transmitter (1)
Receiver (1)
AC adaptors (2)
Operating Instructions (this sheet)
Tip
The same AC adaptor is supplied for the transmitter and the receiver.
Transmitter
More than 0.9 m (3 ft)
Place the transmitter more than 0.9m (3feet) away from your child.
1 Connect the supplied AC adaptor to the DC IN 5V jack and plug it into a wall outlet.
Notes
The transmitter clicks when it is turned to the maximum angle. Do not try to turn it any further.
Do not place the transmitter or the AC adaptor cord within reach of children.
Do not place the transmitter or the AC adaptor cord in, or attach it to, a crib or playpen.
Never use extension cords with the AC adaptor. Use only the AC adaptor provided.
Make sure that the transmitter is not covered or obstructed in picking up sounds.
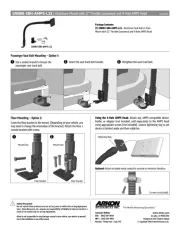
Mounting the transmitter on a wall
A screw is not supplied. Prepare commercially available screw (diameter: 3.1 mm to 3.5 mm
(1/8 in to 9/64 in), length: more than 20 mm (25/32 in)) suitable for the mounting hole at the
bottom of the transmitter.
3.1 mm – 3.5 mm
(1/8 in – 9/64 in)
More than 20 mm
(More than 25/32 in)
5.7 mm – 6.5 mm
(7/32 in – 17/64 in)
2.3 mm – 2.5 mm
(3/32 in – 7/64 in)
1 Screw the screw into the wall.
Be sure the screw head protrudes between 2.5mm and 3mm (1/8in) from the surface of
the wall.
2 Hold the transmitter and turn it until it clicks.
3 Mount the transmitter on the screw.
Between 2.5 mm
and 3 mm (1/8 in)
CAUTION
The transmitter clicks when it is turned to the maximum angle. Do not try to turn it any further.
When mounting the transmitter on a wall, use the screw suitable to the wall material or strength. Attaching screw
may damage the wall. Attach the screw firmly to a pillar or a stud in a wall, if possible.
Connect the AC adaptor cord to the transmitter, mount the transmitter on the wall, then connect the AC adaptor to
a wall outlet.
Sony is not responsible for accidents or damage caused by improper installation, insufficient wall strength or
improper screw installation, natural calamity, etc.
Fasten the screw securely so that the transmitter does not fall off the wall.
Receiver (when using it with the AC adaptor)
1, 2 2
3
1 Open the jack cover of the DC IN 5V jack.
2 Connect the supplied AC adaptor to the DC IN 5V jack and plug it into a wall outlet.
3 Open the stand, and adjust the receiver angle.
Notes
Place the receiver on a stable surface. If the receiver is placed on an unstable surface or in an inclined position, it
may fall or topple over, and may cause injury.
Adjust the receiver angle until it is stable. If you incline the receiver too much, the it may topple over.
Carrying the receiver
When you carry the receiver by hanging it on your neck or attaching it to your belt, the receiver
operates on the built-in battery. The BATT/CHG indicator light will show the remaining battery
power.
Attaching a strap to the receiver
Note
No strap is supplied. Use a strap of sufficient strength.
Attaching the receiver to your belt
Belt
Note
If you attach the receiver to your belt using the belt clip, handle it carefully to avoid dropping it.
Built-in battery (Receiver only)
When the receiver is connected to the AC adaptor and the built-in battery has discharged to a
certain level, the built-in battery starts charging automatically and is charged up to full charge.
Battery life
It will last about 16hours after it has been fully charged (when operated with the medium
volume level, and Voice Activation off).
Charging duration
About 7 hours are required to charge the empty battery to its full capacity, in an ambient
temperature of 25 °C (77 °F). Charging may take longer, depending on whether or not the
receiver is turned on and other ambient conditions.
Checking the remaining battery power
When the battery power is getting low, a beep sounds and the BATT/CHG indicator light of the
receiver flashes in red.
Notes
If you consume the battery power completely and leave it like that, the battery life may be affected. Charge the
battery by connecting it to the AC adaptor as soon as it has been used up.
Even if you do not intend to use the receiver for a long period, charge the battery to its full capacity once every
6months to maintain its performance.
Setting up
Turning on the power
Power/VOICE ACT
switch
Power switch
Transmitter Receiver
1 Set the power switch of the transmitter to ON.
2 Set the Power/VOICE ACT switch of the receiver to ON or VOICE ACT.
You will hear sound from the speaker.
Notes
When the receiver is turned on while the transmitter is not on, an alarm sounds in the receiver as no signal can be
transmitted. We recommend turning the transmitter on first.
Do not turn the power on when the receiver is close to the transmitter. Feedback noise will be generated.
Tips
According to the level of sound detected by the microphone of the transmitter, more SOUND LEVEL indicator lights
(up to 3 lights) turn on in red.
The receiver sounds an alarm when it is moved out of the transmission range.
Turning off the power
1 Set the Power/VOICE ACT switch of the receiver to OFF.
2 Set the power switch of the transmitter to OFF.
Customizing the Digital Audio Nursery Monitor
Adjusting the volume
The volume of the sounds you receive varies depending on the loudness of the baby’s voice,
distance between the transmitter and the baby, direction of the built-in microphone of the
transmitter, obstructions, etc.
Set the volume as required using the VOLUME control. If the volume level is set too high and is
accompanied by a shrill noise, reduce the volume.
To increase sound volume, turn the VOLUME control downward. The green area of the
VOLUME indicator is extended.
To decrease sound volume, turn the VOLUME control upward. The green area of the VOLUME
indicator is reduced.
VOLUME indicator
(Green)
VOLUME control
The sound volumes decreased.
The sound volumes increased.
Note
The SOUND LEVEL indicator lights turn on according to the input sound level received from the transmitter. The
level setting of the VOLUME control does not affect it.
Using the Voice Activation function
The Voice Activation function ensures that when the transmitter has detected sound of more
than a certain volume, monitor sound is automatically output from the speaker of the receiver.
This function is usable when it is not required for the receiver to constantly check for sounds
from the nursery, such as when the baby is sleeping quietly or the parents are sleeping.
1 Set the Power/VOICE ACT switch to VOICE ACT to turn the function on.
Troubleshooting
Should any problem persist after you have made the following checks, consult your nearest
Sony dealer. For checking or repairing the Digital Audio Nursery Monitor, the Sony dealer must
have your transmitter and receiver together, even if only one of them seems to have a
problem.
No sound
The AC adaptor is disconnected from the wall outlet.
The battery of the receiver is used up.
The receiver is too far from the transmitter.
Volume is low. (The volume is turned down.)
In quiet surroundings, the Power/VOICE ACT switch of the receiver is set to the VOICE ACT
position.
Too much noise
The receiver is too far from the transmitter.
Interference from another device (microwave oven, Wi-Fi device, BLUETOOTH device, etc.)
using 2.4GHz frequency.
Turn off the device, or move it further from the transmitter and receiver.
Weak reception
The transmitting distance of the radio is 270m (900ft) in the line of sight, however, it may be
shortened by obstructions between the transmitter and the receiver, such as walls or
furniture.
Change the location of the transmitter and receiver so that they are close to each other.
Feedback noise
The receiver is too close to the transmitter.
Volume is too high.
The alarm sounds
The transmitter is not turned on.
The receiver is too far from the transmitter.
There is an obstruction between the transmitter and the receiver.
The battery charge is getting low.
Warning alarm
The receiver sounds the warning alarm in the following cases.
Take appropriate action, according to the alarm.
When the receiver is moved out of the reception range:
The receiver sounds 4 beeps per second consecutively.
The RANGE ALM indicator light turns in red.
Move the receiver closer to the transmitter.
When the power of the built-in battery of the receiver is running out:
If the battery power is getting low, the receiver sounds 3 beeps per second 3times. If you
continue using the receiver, the receiver sounds a beep for several seconds then turns off
automatically.
The BATT/CHG indicator light flashes in red.
Connect the receiver to the AC adaptor.
When the problem indicated by the alarm is corrected, the alarm stops automatically.
If you want to turn off the alarm, set the Power/VOICE ACT switch to OFF to turn off the
receiver.
Notes
You cannot adjust the alarm volume.
There is no setting allowing you to disable the alarm function.
Product specificaties
| Merk: | Sony |
| Categorie: | Niet gecategoriseerd |
| Model: | NTM-DA1 |
Heb je hulp nodig?
Als je hulp nodig hebt met Sony NTM-DA1 stel dan hieronder een vraag en andere gebruikers zullen je antwoorden
Handleiding Niet gecategoriseerd Sony
28 Juli 2025
8 Juli 2025
7 Juli 2025
7 Juli 2025
7 Juli 2025
7 Juli 2025
7 Juli 2025
7 Juli 2025
7 Juli 2025
7 Juli 2025
Handleiding Niet gecategoriseerd
- MacAllister
- Chuango
- BendixKing
- Spedal
- Lupine
- CDVI
- LaCie
- Infiniton
- Yeaz
- Balay
- OP/TECH
- Prenatal
- Millecroquettes
- Ventus
- Rusta
Nieuwste handleidingen voor Niet gecategoriseerd

31 Juli 2025

31 Juli 2025
31 Juli 2025
31 Juli 2025

31 Juli 2025
31 Juli 2025

30 Juli 2025
30 Juli 2025
30 Juli 2025
30 Juli 2025