Sony ECM-66B Handleiding
Bekijk gratis de handleiding van Sony ECM-66B (2 pagina’s), behorend tot de categorie Microfoon. Deze gids werd als nuttig beoordeeld door 77 mensen en kreeg gemiddeld 4.0 sterren uit 39 reviews. Heb je een vraag over Sony ECM-66B of wil je andere gebruikers van dit product iets vragen? Stel een vraag
Pagina 1/2

Electret Condenser
Microphone
Operating Instructions
Before operating the unit, please read this manual
thoroughly. This manual should be retained for future
reference.
Mode d’emploi
Avant la mise en service de l’appareil, lire attentivement
ce mode d’emploi et le conserver pour toute référence
ulterieure.
Bedienungsanleitung
Bitte lesen Side diese Bedienungsanleitung vor
Inbetriebnahme des Gerates sorgfaltig durch, und
bewahren Sie fur spatere Bezugnahme auf.
3-776-705- (1)11
English
For the cutomers in Europe
This product with the CE marking complies with the EMC
Directive (89/336/EEC) issued by the Commission of the
European Community.
Compliance with this directive implies conformity to the
following European standards:
• EN55103-1: Electromagnetic Interference (Emission)
• EN55103-2: Electromagnetic Susceptibility (Immunity)
This product is intended for use in the following
Electromagnetic Environment(s): E1 (residential), E2
(commercial and light industrial), E3 (urban outdoors),
and E4 (controlled EMC environment, ex. TV studio).
Attention:
The electromagnetic fields at the specific frequencies
may degrade the intended performance level of analog
audio signals.
FEATURES
•Wide unidirectional characteristics with wide frequency
range (70–14,000 Hz)
•Two-way powering system using an internal battery or
external power supply.
•Ideal design for professional application in radio and TV
studios or other audio fields because of its high quality
performance and its extremely compact size.
•Easy handling carrying case.
PRECAUTIONS
•The microphone should never be dropped or subjected
to any excessive shock.
•Keep the microphone away from extremely high
temperatures (above 60°C or 140°F)
•If the microphone is placed too near the speakers, a
howling effect (acoustic feedback) may occur. In this
case, decrease the speaker volume until the howling
stops.
•Microphone an recording instruments should be turned
on 10 minutes before they are actually used. This
assures stable performance of the microphones and
instruments.
ECM-66B
Sony Corporation 2003 Printed in Japan
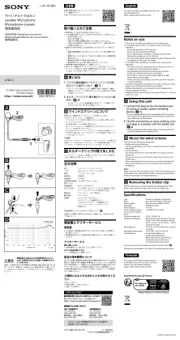
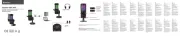
+20
0
+10
–10
–20
20 50 100 200 500 1k 2k 5k 10k 20k
Frequency response
Réponse en fréquence
Frequenzgang
Response in dB
Réponse en dB
Wiedergabe in dB
Frequency in Hz
Fréquence en Hz
Frequenz in Hz
Directivity
Directivité
Richtwirkung
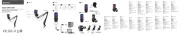
•The supplied microphone holders are convenient for
attaching the microphone to clothing. Be careful not to
cover the microphone head.
•Attach the microphone with cellophane or vinyltape to
the inside of an instrument such as a guitar, bass, etc.,
to obtain a high quality sound. Be sure to place a rubber
or felt cushion between the microphone and instrument.
SPECIFICATIONS
General
Type Electret condenser microphone
Power supply Battery: IEC designation R6 or LR6 (size
AA)
External power: 24 to 48 V DC
Microphone output terminal
Cannon XLR-3-12C type
Microphone cable
Approx. 2.3 mm dia., 3 m long (3/32 inch
dia., 10 feet long)
Dimensions Microphone: Approx. 10.6 mm dia. × 24.2
mm (7/ 16 dia. ×31/32 inches)
Power supply section: Approx. 20 mm
dia. ×163 mm (13/16 dia. × 6 1/2 inches)
Mass Microphone: Approx. 7 g (0.247 oz)
Power supply section: Approx. 160 g (5.6
oz) (including cable, not including battery)
Finish Black chromium finish (microphone
capsule section)
Satin-nickel finish (power supply section)
Supplied accessories
Carrying case (1)
Microphone holder (2)
Wind screen (1)
Operating Instructions (1)
Warranty booklet (1)
Performance
Frequency range
70–14,000 Hz
Directivity Wide unidirectional
Output impedance
100 ohms ±20% (1 kHz), balanced
Sensitivity (deviation ±2 dB)
Open circuit voltage:
–50 dB (3.16 mV, 0 dB = 1 V/1 Pa, 1 kHz)
Effective output level:
–55.1 dBm (0 dBm = 1 mW/1 Pa, 1kHz)
Recommended load impedance is more
than 3 kohms.
Signal-to-noise ratio
More than 65 dB (1 kHz, 1 Pa)
Inherent noise Less than 29 dB SPL (0 dB = 20µPa)
Wind noise*1Less than 50 dB SPL (with wind screen)
Induction noise from external magnetic field*2
Less than 5 dB SPL/1 10 ×-7T
Maximum input sound pressure level (1 kHz, 1%)*3
130 dB SPL (63.1 Pa)
Dynamic range
More than 101 dB
Environmental temperatures
– ° ° – ° °20 C to +60 C ( 4 F to 140 F) for
storage
0°C to 60°C (+32°F to 140°F) for
operation
*1 Wind noise is the value measured by applying a wind
velocity of 2 m/sec. (6.6 ft./sec.) from all directions to
the microphone. The mean value is taken and
converted to the equivalent input sound level.
0 dB SPL = 20µPa
*2 The external magnetic field induction noise is
measured with the microphone placed in an alternating
magnetic field of 50 Hz, 1 milligauss.
0 dB SPL = 20µPa
*3 The maximum noise value is taken and then converted
to the equivalent input sound level.
0 dB SPL = 20µPa
Power requirements
Normal operating voltage
1.5 V DC at battery operation
Minimum operating voltage
1.1 V DC at battery operation
External power supply
24 to 48 V DC
Current drain Less than 3.0 mA (1.5 V DC) (with
battery)
Less than 2.0 mA (with external power
supply)
Battery life R6 manganese battery: Approx. 300
hours
LR6 alkaline battery: Approx. 400 hours
Design and specifications subject to change without
notice.
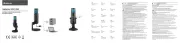
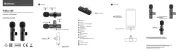
Microphone capsule
Power supply section Output
connector
PARTS IDENTIFICATION
Supplied accessories
Wind screen
Microphone holders
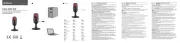
BATTERY OPERATION
1Open the battery compartment by turning the sleeve
counterclockwise.
2Insert an IEC designation R6 or LR6 (size AA) battery
into the battery compartment.
3Close the compartment by turning the sleeve clockwise.
Be sure to close the sleeve firmly, otherwise
malfunction or noise may occur due to the loose fit.
4Set the BATTERY switch to ON.
The BATTERY indicator momentarily lights up and then
turns off. This indicates that the battery voltage is within
the operable range.
To check the battery condition
Set the BATTERY switch to OFF, then wait for more than
5 seconds, and then set the switch to ON and see if the
BATTERY indicator lights up or not. If the indicator does
not light up, the battery has exhausted.
Notes
•If the microphone is not to be used for a long time,
remove the battery to avoid any possibility of corrosion.
•In case of battery leakage, wipe off any deposit in the
battery compartment.
•Battery life depends on the battery type being used.
Refer to the Battery life“ ” in “ ”Specifications below.
When the battery is exhausted, sensitivity will be
decreased and distortion will be heard. When this
occurs, replace with a new battery.
CONNECTIONS
The output connector of the microphone is the Cannon
XLR-3-12C type. Connect the microphone plug to the
microphone input of a mixer or a tape recorder. The
microphone cable is 3m (10 feet) long.
If a longer cable is necessary, an extention cable up to
200 m (660 feet) may be used without affecting sound
quality or performance. Use a cable with a Cannon XLR-
3-11C connector at one end and an appropriate plug at
the other end which matches the input equipment.
Note
If cable connector connection is necessary, note that
there are two basic types connections, balanced to
ground and unbalanced to ground, and solder
connections carefully. Poor soldering may cause hum pick
up.
EXTERNAL POWER SUPPLY
The ECM-66B is designed for external powering (12 to 48
V DC) as well as internal battery power. The external
power supply system consists of a DC power source,
standard two conductor shielded microphone cable, and
center-tapped transformer of the microphone. Use an
external power supply unit available in marketplace.
Notes
•When the output connector is connected to the external
power supply unit, the power is automatically supplied
from the unit even if the battery is inserted and the
BATTERY switch is set to ON.
The internal battery can serve as a backup power
source in case of a power failure. If the backup power
source is unnecessary, set the BATTERY switch to OFF
or remove the battery from the battery compartment.
•For extending the cable between the power supply and
the microphone, use a balanced-type cable.
MORE ABOUT MICROPHONE USE
•To eliminate the effect of wind or breath noise, cover
the microphone with the supplied wind screen. This will
attenuate wind or breath noise by 20 dB.
Check for correct polarity.
Français
Pour les clients en Europe
Ce produit portant la marque CE est conforme à la
Directive sur la compatibilité é é lectromagn tique (EMC)
(89/336/CEE) émise par la Commission de la
Communaut enne.é europé
La conformit cette directive implique la conformité à é aux
normes europ ennes suivantes:é
• é é éEN55103-1: Interf rences lectromagn tiques
(émission)
• é é é éEN55103-2: Sensibilit lectromagn tique (immunit )
Ce produit est pr vu pour tre utilis dans lesé ê é
environnements lectromagné étiques suivants:
E1 (r sidentiel), E2 (commercial et industrie l re), E3é é èg
(urbain ext rieur) et E4 (environnement EMC contr , ex.é ô él
studio de té él vision).
Attention:
Les champs é é àlectromagn tiques fréquences
spécifiques peuvent dégrader le niveau de performance
prévu des signaux audio analogiques.
CARACTERISTIQUES
• éCaract ristiques unidirectionnelles larges avec large
gamme de fr quences (70 14.000 Hz).é –
• é ’Deux possibilit s d alimentation: soit par batterie
interne, soit par alimentation extérieure.
• éConception id ale pour les travaux professionnels en
studio de radio ou de t l vision et autres applicationsé é
audio en raison de ses performances de haute qualité
et de sa remarquable compacité.
• èEtui de transport tr s pratique.
PRECAUTIONS
•Ne jamais laisser tomber le microphone ni le soumettre
à des chocs.
• à ‘éTenir le microphone l cart de toute source de
temp rature lev F).é é ée (au-dessus de 60°C ou de 140°
• é èSi le microphone est plac trop pr s des enceintes, une
réaction acoustique (hurlement) se produira. Dans ce
cas, r duire le volume des enceintes de manié è àre
supprimer ce ph nom ne.é è
• ’Le microphone et les appareils d enregistrement doivent
être mis sous tension 10 minutes avant leur utilisation
proprement dite afin d assurer la stabilit’ é de leur
fonctionnement.
IDENTIFICATION DES ELEMENTS
Accessoires fournis
Paravent
Pinces de microphone
FONCTIONNEMENT SUR PILE
1Ouvrir le logement pile en tournant la douille dans le
sens inverse des aiguilles d une montre.’
2Installer une pile R6 ou LR6 selon la désignation IEC
(format AA) dans le logement.
3Refermer le logement en tournant la douille dans le
sens des aiguilles d une montre. Refermer’
convenablement la douille; faute de quoi, une
défaillance ou des parasites se produiraient.
4Régler le commutateur BATTERY sur ON.
Le t moin BATTERY s allumera momentan ment, puisé ’ é
s’éteindra. Cela indique que la tension de la pile est
dans la plage de fonctionnement.
Pour contrôler l’état de la pile
Régler le commutateur BATTERY OFF, attendre auà
moins 5 secondes, puis le remettre sur ON et regarder si
le témoin BATTERY s allume ou non. S il reste teint, la’ ’ é
pile est é épuis e.
Remarques
• ’ éSi l on pr voit de ne pas utiliser le microphone pendant
longtemps, en retirer la pile pour viter toute possibilité é
de corrosion.
• ’éEn cas de fuite d lectrolyte, essuyer convenablement
tout d t dans le logement.é ôp
• é éLa dur e de vie de la pile d pend de son type. Voir
“ ” “ é ” èAutonomie de la pile sous Sp cifications ci-apr s.
Lorsque la pile est d e, sa sensibilit diminue eté écharg é
le son est dé éform . Dans ce cas, remplacer la pile par
une neuve.
Capsule de microphone
Section d’alimentation Connecteur
de sortie
Respecter les polarités.
(à suivre)
Horizontal
microphone
holder
Vertical
microphone
holder
Support de microphone
horizontal
Support de microphone
vertical
BATTERY indicator
BATTERY switch
Témoin BATTERY
Commutateur
BATTERY

CONNEXIONS
Le connecteur de sortie du microphone est du type
Cannon XLR-3-12C. Raccorder la fiche du microphone
sur l entr e de microphone d un mixeur ou d un’ é ’ ’
magnétophone. La longueur du c ble du microphopne estâ
de 3 m (10 pieds).
On pourra utiliser un c ble rallonge allant jusqu 200 mâ ’à
(660 pieds) sans affecter la qualit et les performancesé
du son. Se servir d un c ble dot un connecteur’ â é ’ d
Cannon XLR-3-11C d un c une fiche qui’ ô ét et d’
convienne entr autre.à l’équipement d’ ée de l’
Remarque
Si le branchement d un connecteur de c ble est’ â
n cessaire, tenir compte du fait qu il en existe de deuxé ’
sortes, trique trique à savoir symé à la terre et asymé à la
terre. Effectuer soigneusement la soudure car des
ronflement pourra se produire si elle est défectueuse.
ALIMENTATION EXTERIEURE
Le microphone ECM-66B est con u pour s alimenter surç ’
une source ext rieure (courant continu de 12 48 V) oué à
sur une pile interne. Le circuit d alimentation ext rieure se’ é
compose d une source de courant continu, d un c ble de’ ’ â
microphone blind deux conducteurs standard et dé à ’un
transformateur à prise médiane pour microphone. Utiliser
une alimentation ext rieure disponible sur le march .é é
Remarques
•Quand le connecteur de sortie est raccordé à une
alimentation ext rieure, celle-ci assureé
automatiquement l alimentation m me si une pile est’ ê
ins r gl é ée et que le commutateur BATTERY est ré é à
ON.
La batterie interne peut servir d alimentation de secours’
en cas de panne de courant. Si l alimentation de’
secours est inutile, r gler le commutateur BATTERY é à
OFF ou retirer la pile du logement pile.
• ’ â ’En cas d allonge du c ble entre la source d alimentation
et le microphone, se servir d un c ble de type’ â
sym trique.é
REMARQUES SUR L’UTILISATION
DU MICROPHONE
•Pour supprimer les effets du vent ou de la respiration,
protéger le microphone à l’aide du paravent fourni. Le
souffle sera ainsi r duit d environ 20 dB.é ’
•Les pinces de microphone, fournies, sont pratiques
pour fixer l appareil sur un v tement. Veiller ’ ê à ne pas
couvrir la tête du microphone.
• à ’ é àFixer le microphone l aide de ruban adh sif
l int’ érieur d’un instrument comme une guitare ou une
contrebasse pour obtenir un son de haute qualité.
Veiller à placer un coussinet de caoutchouc ou de
feutre entre le microphone et l’instrument.
SPECIFICATIONS
Données générales
Type Microphone condensateur à é lectret
Alimentation Pile: 1 de format AA (R6 ou LR6 selon la
désignation IEC)
Source ext rieure: 24 48 V CCé à
Borne de sortie de microphone
De type Cannon XLR-3-12C
Câble de microphone
Env. 2,3 mm diam., 3 m long
(3/32 pouce diam., 10 pieds long)
Dimensions Microphone:
Env. 10,6 mm diam. × 24,2 mm
(7/ 16 diam. ×31/32 pouce)
Section alimentation:
Env.20 mm diam. 163 mm×
(13/16 diam. × 6 1/2 pouces)
Poids Microphone:
Env. 7 g (0,247 once)
Section alimentation:
Env. 160 g (5,6 onces)
(le câble compris, sans la pile)
Finition En chrome noir (section de capsule)
En nickel satiné (section alimentation)
Accessoires fournis
Etui de transport (1)
Pince de microphone (2)
Paravent (1)
Mode d emploi (1)’
Brochure de garantie (1)
Performances
Gamme de fréquences
70–14.000 Hz
DirectivitéUnidirectionnelle large
Impédance de sortie
100 ohms ±20% (1 kHz), symétrique
Sensibilité (déviation ±2 dB)
Tension en circuit ouvert:
–50 dB (3,16 mV, 0 dB = 1 V/1 Pa, 1 kHz)
Niveau de sortie efficace:
–55,1 dBm (0 dBm = 1 mW/1 Pa, 1 kHz)
L imp’ édance de charge recommandée est
de plus de 3 kohms.
Rapport signal/bruit
Plus de 65 dB (1 kHz, 1 Pa)
Bruit inhérent Moins de 29 dB SPL (0 dB = 20µ Pa)
Bruit de vent*1Moins de 50 dB SPL (avec paravent)
Bruit d induction du champ magn tique externe*’ é 2
Moins de 5 dB SPL/1 10 ×-7T
Niveau d e de pression sonore maximum ( 1 kHz,’ éentr à
1%)*3130 dB SPL (63,1 Pa)
Plage dynamique
Plus de 101 dB
Temp environnementérature d’
De 20 C 4 F F)– ° à +60°C (de – ° à +140°
pour l entreposage’
De 0 C (de +32° àC +60° ° àF +140°F)
pour le fonctionnement
*1 Le bruit du vent est la valeur mesurée avec application
d locit’un vent d’une vé é de 2 m/sec (6,6 pieds/sec)
dans le tous les sens. La valeur moyenne est prise et
convertie au niveau sonore d’ é éentr e quivalent.
0 dB SPL = 20µ Pa
*2 Le bruit d’ é éinduction du champ magn tique ext rieur est
mesur dans un champé avec le microphone placé
magnétique alternant de 50 Hz, 1 milligauss.
0 dB SPL = 20µ Pa
*3 La valeur de bruit maximum est prise, puis convertie
au niveau sonore d’ é éentr e quivalent.
0 dB SPL = 20µ Pa
Alimentation
Tension de fonctionnement normale
1,5 V CC en fonctionnement sur pile
Tension de fonctionnement minimale
1,1 V CC en fonctionnement sur pile
Alimentation extérieure
24 à 48 V CC
ConsommationMoins de 3,0 mA (1,5 V CC) (avec pile)
Moins de 2,0 mA (avec alimentation
ext rieure)é
Autonomie de la pile
Pile au mangan se R6: Env. 300 heuresè
Pile alcaline LR6: Env. 400 heures
Conception et sp cifications sont sujettes modificationé à
sans préavis.
Deutsch
Für Kunden in Europa
Dieses Produkt besitzt die CE-Kennzeichnung und erfüllt
die EMV-Direktive (89/336/EEC) der EG-Kommission.
Die Erf llung dieser Direktiven bedeutet Konformit t fü ä ür
die folgenden Europ ischen Normen:ä
•EN55103-1: Elektromagnetische Interferenz (Emission)
•EN55103-2: Elektromagnetische Empfindlichkeit
(Immunit t)ä
Dieses Produkt ist f r den Einsatz unter folgendenü
elektromagnetischen Bedingungen ausgelegt: E1
(Wohnbereich), E2 (kommerzieller und in beschr nktemä
Maße industrieller Bereich), E3 (Stadtbereich im Freien)
und E4 (kontrollierter EMV-Bereich, z.B. Fernsehstudio)
Achtung:
Elektromagnetische Felder an bestimmten Frequenzen
können die spezifischen Leistungspegel der analogen
Audiosignale beeinträchtigen.
MERKMALE
•Mikrofon mit breiter Keulencharakteristik und breitem
Ü –bertragungsbereich (70 14.000 Hz).
•Zwei Möglichkeiten der Stromversorgung: durch
eingelegte Batterie oder Versorgung von au en.ß
•Ideal für professionelle Anwendungen in Radio-,
Fernsehstudios usw., da es sich durch h chste Leistungö
und au erordentliche Kompaktheit auszeichnet.ß
•Praktischer Tragekasten.
ZUR BESONDEREN BEACHTUNG
•Lassen Sie das Mikrofon nie fallen und setzen Sie es
auch keinen Ersch tterungen aus.ü
•Schützen Sie das Mikrofon vor extrem hohen
Temperaturen ( ber 60ü °C).
•Wenn das Mikrofon zu nahe an Lautsprecher gebracht
wird, kann ein Heulton (akustische Rückkopplung)
auftreten. In diesem Fall vermindern Sie die
Lautsprecher-Lautst rt.ärke, bis das Heulen aufhö
•Mikrofone und Aufnahmegeräte sollten etwa 10 Minuten
vor tats chlichem Gebrauch eingeschaltet werden.ä
Dadurch wird stabile Leistung von Mikrofonen und
Ger hrleistet.äten gewä
BEZEICHNUNG DER TEILE
Mitgeliefertes Zubehör
Windschutz
Mikrofonhalter
BATTERIEBETRIEB
1Ö üffnen Sie das Batteriefach durch Drehen der H lse im
Gegenuhrzeigersinn.
2Setzen Sie eine Mignonzelle (IEC-Bezeichnung R6 oder
LR6) in das Batteriefach ein.
3Schlie lseßen Sie das Batteriefach durch Drehen der Hü
im Uhrzeigersinn. Achten Sie darauf, dass das
Gehäuse einwandfrei geschlossen ist, da anderenfalls
Betriebsstörungen oder Geräusche verursacht werden
können.
4Stellen Sie den Batterieschalter (BATTERY) auf ON.
Die Batterieanzeige leuchtet kurz auf und erlischt dann.
Dies zeigt an, dass die Batteriespannung innerhalb des
Betriebsbereichs ist.
Zum Prüfen des Batteriezustands
Stellen Sie den Batterieschalter (BATTERY) auf OFF,
warten mindestens 5 Sekunden lang, und stellen Sie den
Schalter dann auf OFF und pr fen, ob dieü
Batterieanzeige aufleuchtet oder nicht. Wenn die Anzeige
nicht aufleuchtet, ist die Batterie verbraucht.
Hinweise
•Wenn das Mikrofon längere Zeit nicht benutzt wird,
entnehmen Sie die Batterie, um die M glichkeit einerö
Korrosion auszuschließen.
•Falls die Batterie ausgelaufen ist, beseitigen Sie die
R ckst ndig.ü ände im Batteriefach vollstä
•Die Lebensdauer der Batterie h ngt vom verwendetenä
Batterietyp ab. Siehe hierzu Lebensdauer der Batterie„ “
unter „Technische Daten“ unten. Wenn die
Batteriespannung nachl sst, nimmt die Empfindlichkeitä
des Mikrofons ab, und Klangverzerrungen treten auf. In
diesem Fall wechseln Sie die Batterie aus.
ANSCHLÜSSE
Das Mikrofon ist mit einem Cannon XLR-3-12C-
Ausgangsanschluss ausgestattet. Schlie en Sie denß
Mikrofonstecker an den Mikrofoneingang eines
Mischpults oder eines Cassettenrecorders an. Das
Mikrofonkabel ist 3 m lang.
Sie k nnen auch ein Verl ngerungskabel von bis zu 200ö ä
m verwenden, ohne dass dadurch die Klangqualit t oderä
Leistung des Mikrofons in irgendeiner Weise
beeinträchtigt wird. Verwenden Sie ein Kabel mit einem
Cannon XLR-3-11C-Anschluss an einem Ende und
einem entsprechenden Stecker am anderen Ende, der in
die Mikrofoneingangsbuchse des verwendeten Ger tesä
passt.
Hinweis
Bei Anschluss eines Kabelsteckers ist darauf zu achten,
dass es zwei grunds tzlich verschiedene Typen gibtä
(erdsymmetrisch und erdunsymmetrisch). Löten Sie die
Anschl ltig fest. Schlechte L nnenüsse sorgfä ötstellen kö
Brummen verursachen.
EXTERNE STROMVERSORGUNG
Das Mikrofon ECM-66B kann auch extern (12 bis 48 V
Gleichspannung) gespeist werden. Das externe
Speisungssystem besteht aus einer
Gleichspannungsquelle, einem abgeschirmten Standard-
Zweileiter-Mikrofonkabel und dem Mittelanzapfungs-
Transformator des Mikrofons. Verwenden Sie eine im
Fachhandel erh ltliche Fremdstromversorgung.ä
Hinweise
•When the output connector is connected to the external
power supply unit, the power is automatically supplied
from the unit even if the battery is inserted and the
BATTERY switch is set to ON.
The internal battery can serve as a backup power
source in case of a power failure. If the backup power
source is unnecessary, set the BATTERY switch to OFF
or remove the battery from the battery compartment.
•Zur Verlängerung des Kabels zwischen
Stromversorgungssystem und Mikrofon verwenden Sie
ein symmetrisches Kabel.
TIPPS ZUM GEBRAUCH DES
MIKROFONS
•Um Wind- und Atemgeräusche zu vermeiden, decken
Sie das Mikrofon mit dem mitgelieferten Windschutz ab.
Hierdurch werden Wind- und Atemger usche um 20 dBä
abgeschw cht.ä
•Mit den mitgelieferten Mikrofonhaltern kann das
Mikrofon praktisch an der Kleidung befestigt werden.
Achten Sie darauf, den Mikrofonkopf nicht abzudecken.
•Das Mikrofon kann auch mit Klebeband an der
Innenseite eines Instruments wie z.B. einer Gitarre usw.
befestigt werden, um qualitativ hochwertige Aufnahmen
zu erzielen. In diesem Fall bringen Sie ein Gummi- oder
Filzstück zwischen Mikrofon und Instrument an.
TECHNISCHE DATEN
Allgemeines
Typ Elektret-Kondensatormikrofon
Stromversorgung
Batterie: Mignonzelle (IEC-Bezeichnung
R6 oder LR6)
Externe Stromversorgung: 24 bis 48 V
Gleichspannung
Mikrofonausgangsanschluss
Cannon XLR-3-12C
Mikrofonkabel
ca. 2,3 mm , 3 m Lφänge
Abmessungen Mikrofon: ca. 10,6 mm φ × 24,2 mm
Spannungsversorgungsteil: ca. 20 mm φ
× 163 mm
Masse Mikrofon: ca. 7 g
Spannungsversorgungsteil:
ca. 160 g (einschlie lich Kabel, ohneß
Batterie)
Oberfläche Schwarzes Chrom-Finish
(Mikrofonkapselteil)
Samt-Nickel-Finish
(Spannungsversorgungsteil)
Mitgeliefertes Zubehör
Tragekasten (1)
Mikrofonhalter (2)
Windschutz (1)
Bedienungsanleitung (1)
Garantiekarte (1)
Kenndaten
Übertragungsbereich
70–14.000 Hz
Richtwirkung Breite Keulencharakteristik
Ausgangsimpedanz
100 Ohm ±20% (1 kHz), symmetrisch
Ausgangspegel (Abweichung ±2 dB)
Leerlaufspannung:
–50 dB (3,16 mV, 0 dB = 1 V/1 Pa, 1 kHz)
Effektiver Ausgangspegel:
–55,1 dBm (0 dBm = 1 mW/1 Pa, 1kHz)
Empfohlene Lastimpedanz: ber 3 kOhmÜ
Signal-Rauschabstand
Über 65 dB (1 kHz, 1 Pa)
Eigenrauschen
Weniger als 29 dB SPL (0 dB = 20µPa)
Windger usche*ä1
Weniger als 50 dB SPL (mit Windschutz)
Induktionsgeräusche von externem Magnetfeld* 2
Weniger als 5 dB SPL/1 × 10 -7T
Maximaler Eingangsschallpegel (bei 1 kHz, 1%)* 3
130 dB SPL (63,1 Pa)
Dynamik Über 101 dB
Umgebungstemperaturen
– ° ° ü20 C bis +60 C f r Aufbewahrung
0°C bis 60°C für Betrieb
*1 Dieser Wert wurde bei einer Windgeschwindigkeit von
2 m/s von allen Richtungen auf das Mikrofon
gemessen. Der Durchschnittswert ist dann auf den
äquivalenten Eingangsschallpegel umgerechnet
worden.
0 dB SPL = 20µPa
*2 Das durch ein externes Magnetfeld induzierte
Rauschen wurde bei Aufstellung des Mikrofons in
einem magnetischen Wechselfeld von 50 Hz. 1
Milligauß gemessen.
0 dB SPL = 20µPa
*3 Der maximale Rauschpegel ist dann auf den
äquivalenten Eingangsschallpegel umgerechnet
worden.
0 dB SPL = 20µPa
Spannungsversorgung
Normale Betriebsspannung
1,5 V Gleichspannung bei Batteriebetrieb
Minimale Betriebsspannung
1,1 V Gleichspannung bei Batteriebetrieb
Externe Speisung
24 bis 48 V Gleichspannung
Stromaufnahme
Weniger als 3,0 mA (1,5 V
Gleichspannung) (mit Batterie)
Weniger als 2,0 mA (mit externer
Speisung)
Lebensdauer der Batterie
R6-Manganbatterie: ca. 300 Stunden
LR6-Alkalibatterie: ca. 400 Stunden
Änderungen, die dem technischen Fortschritt dienen,
bleiben vorbehalten.
Mikrofonkapsel
Stromversorgungsteil Ausgangsanschluß
Die Batterie
polaritätsrichtig
einsetzen.
Horizontaler
Mikrofonhalter Vertikaler
Mikrofonhalter
Batterieanzeige
Batterie-
schalter
(BATTERY)
Product specificaties
| Merk: | Sony |
| Categorie: | Microfoon |
| Model: | ECM-66B |
Heb je hulp nodig?
Als je hulp nodig hebt met Sony ECM-66B stel dan hieronder een vraag en andere gebruikers zullen je antwoorden
Handleiding Microfoon Sony
6 Augustus 2025
7 Juli 2025

6 Juli 2025
5 Juli 2025
6 Juni 2025

18 December 2024

22 November 2024

22 November 2024

22 November 2024

22 November 2024
Handleiding Microfoon
- Maono
- Samson
- Soundsation
- KeepOut
- Saramonic
- CKMOVA
- President
- Max
- Celly
- Srhythm
- GVM
- CAD Audio
- RCF
- Thomson
- MRSDY
Nieuwste handleidingen voor Microfoon
15 September 2025
15 September 2025
15 September 2025
15 September 2025
15 September 2025
15 September 2025

15 September 2025
15 September 2025
15 September 2025
15 September 2025