Silverline 594260 Handleiding
Silverline
Niet gecategoriseerd
594260
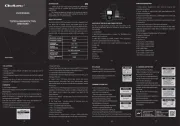
Bekijk gratis de handleiding van Silverline 594260 (3 pagina’s), behorend tot de categorie Niet gecategoriseerd. Deze gids werd als nuttig beoordeeld door 270 mensen en kreeg gemiddeld 4.8 sterren uit 135.5 reviews. Heb je een vraag over Silverline 594260 of wil je andere gebruikers van dit product iets vragen? Stel een vraag
Pagina 1/3

General Safety
IMPORTANT: Read these instructions in combination with the owner’s manuals of both vehicles for jump
starting information. Especially if the vehicle is fitted with start/stop engine technology.
IMPORTANT: Both vehicles must have the same voltage electrical system (typically 12V) and have a
negative earth.
• Always wear protective gloves and goggles when handling lead acid batteries
• Be aware that lead-acid batteries emit flammable gases. Ensure there are no heat sources,
open flames or electrical sparks near to the battery. Do not smoke. Ensure that batteries are well
ventilated
• Do not attempt to jump start a vehicle with a battery that is leaking, cracked,
or otherwise damaged
• If battery acid contacts skin or clothing, wash thoroughly with soap and water.
If battery acid contacts eyes, wash thoroughly with clean water and seek medical help
• Do not allow positive and negative lead clamps to touch.
Short circuits can create heat and fire
• Do not allow the 2 vehicles to make contact
• Do not allow any metal items to come into contact with the battery terminals. Short circuits can
start fires and cause explosions
• Always remove all metal jewellery before handling lead acid batteries
• Be aware that loose clothing / long hair etc could get caught in moving engine parts.
When using this product, tie up hair and secure loose clothing
594260
3.6m
Jump Leads 600A max
Jump Leads 600A max
Câbles de démarrage 600 A max
Starthilfekabel, max. 600 A
Cables de arranque para batería 600 A
Cavi di avviamento 600 A max
Startkabels, max. 600 A
• Only use these jump leads in dry conditions
• Do not attempt to jump start a vehicle with a frozen battery
• Unless the battery is of the ‘maintenance free’ type, always check that the electrolyte level is correct before attempting
to jump start
Jump Starting Instructions;
1. Ensure all vehicle accessory systems (headlights, radio etc) are switched off.
2. Ensure the vehicle is in neutral and the parking brake is applied, or for automatic cars ‘park’ mode is selected.
3. Connect a red cable clamp to the positive terminal of the booster battery (1). If the positive battery terminal connector in
the vehicle is corroded or dirty, clean it with a suitable wire brush to ensure good contact with the jump lead clamp.
4. Connect the other red clamp of the same cable to the positive terminal of the flat battery (2). Check the cable is secure
and cannot short against any earthing point in the vehicle.
5. Attach a negative clamp to the booster battery negative terminal (3).
6. Connect the other end of the same cable to an unpainted and unmoving part of the chassis or engine block on the
vehicle with the flat battery (4) (not the negative terminal of the battery). Ensure the earthing point is away from the battery
and the fuel system.
7. Check the clamps are securely attached and that they will not come loose when the vehicle is started.
8. Allow at least 3 minutes for the battery charge to stabilise between the batteries of the 2 vehicles.
9. Start the engine of the vehicle with a good battery and let the engine run for at least 1 minute.
10. Start the vehicle with the flat battery .
11. Stop the engine of the booster vehicle and detach the cables in reverse order of fitting. Starting with the negative clamp
connected to an earthing point of the car with a flat battery.
www.silverlinetools.com
-
-
1
2
3
4
!
!
Sécurité Générale
IMPORTANT : Lisez ces consignes ainsi que celles relatives aux deux véhicules pour lesquels ce câble
de démarrage doit être utilisé. Cela est d’autant plus important s’il s’agit d’un véhicule équipé d’un moteur
doté du système
IMPORTANT : Les deux véhicules doivent disposer d’un système électrique de même tension (généralement 12 V)
et avec pôle négatif à la masse.
• Toujours porter des gants et des lunettes de protection lors de la manipulation de batteries au plomb-acide.
• Gardez à l’esprit que des batteries au plomb-acide libèrent des gaz inflammables et explosifs. Veillez à ce
qu’aucune source de chaleur, flamme nue ou étincelles électriques ne se trouvent à proximité de la batterie. Ne pas
fumer. Veillez à ce que les batteries soient bien ventilées en permanence.
• N’entreprenez jamais de faire démarrer un véhicule dont la batterie présente fuites, fissures, ou tout autre
signe de dommage.
• Si de l’acide de batterie entrait en contact avec la peau ou les vêtements, rincez abondamment à l’eau et
au savon. En cas de contact avec les yeux, rincez abondamment à l’eau claire et consultez l’avis d’un médecin.
• Ne mettez jamais en contact les pinces crocodiles des câbles positif et négatif.
Tout court-circuit peut être à l’origine de la création de chaleur et donc d’incendie.
• Ne laissez pas les 2 véhicules entrer en contact.
• Aucune pièce en métal ne doit être en contact avec les bornes de la batterie. Les court-circuits peuvent
provoquer des incendies ou des explosions.
• Pensez toujours à retirer vos bijoux en métal avant de manipuler des batteries au plomb.
• Notez que des vêtements amples, des cheveux longs etc., peuvent être pris dans les pièces du moteur lors
de l’utilisation de ce produit. Attachez vos cheveux et ne laissez aucun vêtement lâche.
• Ce câble de démarrage ne doit être utilisé que dans un environnement complètement sec.
• N’entreprenez jamais de démarrer un véhicule dont la batterie est gelée.
• À moins que la batterie ne n’appartienne à un modèle ne nécessitant aucun entretien, vérifiez toujours que le niveau
d’électrolyte soit correct avant d’essayer de démarrer un véhicule.
Instructions d’utilisation ;
1. Assurez-vous que tous les accessoires (phares, radio, etc.) soient éteints.
2. Veillez à ce que le véhicule soit au point mort et que le frein de stationnement soit actionné, ou bien, pour les véhicules
automatiques, que le mode « parking » soit sélectionné.
3. Branchez la pince crocodile rouge à la borne positive de la batterie de secours (1). Si la borne positive de la batterie est
sale ou corrodée, nettoyez-la au-préalable à l’aide d’une brosse métallique appropriée afin de vous assurer que le contact avec la
pince crocodile soit effectif.
4. Branchez l’autre pince crocodile du même câble rouge à la borne positive de la batterie déchargée (2). Vérifiez que le
câble soit bien en place et qu’il soit positionné de sorte à éviter d’occasionner tout court-circuit au niveau d’un des points de mise à
la terre du véhicule.
5. Raccordez l’une des pinces du câble de couleur noire à la borne négative de la batterie de secours(3).
6. Raccordez l’autre pince crocodile du même câble à n’importe quelle partie du châssis ou du bloc moteur du véhicule
dont la batterie est déchargée (4) (choisissez une partie métallique dépourvue de peinture et fixe : en aucun cas le câble
doit être connecté à la borne négative de la batterie déchargée). Assurez-vous que le point de mise à la terre soit tenu à
distance de la batterie et du système de carburant.
7. Assurez-vous que toutes les pinces crocodiles soient bien fixées et qu’elles ne risquent pas de se débrancher une fois
que le véhicule sera démarré.
8. Attendez au moins 3 minutes pour que la charge des batteries des deux véhicules se stabilise.
9. Démarrez le moteur du véhicule ayant une batterie en bon état et laissez le moteur tourner pendant au moins
une minute.
10. Démarrez à présent le moteur de la voiture avec la batterie à plat.
11. Vous pouvez alors arrêter le moteur du véhicule de secours et débrancher les câbles dans l’ordre chronologique
inverse par rapport à leur pose. Par conséquent, commencez par la pince crocodile noire connectée à un point de mise à la terre
du véhicule dont la batterie est déchargée.
!
5 July 2016 3:46 PM

Generelle Sicherheit
ACHTUNG! Lesen Sie diese Anweisung zusammen mit den Abschnitten zur Starthilfe in beiden
Fahrzeughandbüchern. Dies gilt insbesondere bei mit Stopp-Start-Technologie ausgerüsteten Fahrzeugen.
ACHTUNG! Beide Fahrzeuge müssen über das gleiche Bordnetz (i.d.R. 12 V) verfügen und negative
Masse haben.
• Tragen Sie beim Umgang mit Blei-Säure-Batterien stets Schutzhandschuhe und eine Schutzbrille.
• Beachten Sie, dass Blei-Säure-Batterien entzündbare Gase abgeben. Stellen Sie sicher, dass sich
keine Wärmequellen, offene Flammen oder elektrische Funken in der Nähe der Batterie befinden. Nicht
rauchen. Sorgen Sie für ausreichende Belüftung der Batterie.
• Geben Sie Fahrzeugen, deren Batterie ausläuft oder zerbrochen bzw. anderweitig beschädigt ist,
keine Starthilfe.
• Falls Haut oder Kleidung mit Batteriesäure in Berührung kommen, reinigen Sie sie gründlich mit
Wasser und Seife. Falls Batteriesäure in die Augen gelangt, waschen Sie sie gründlich mit sauberem Wasser
aus und suchen Sie ärztliche Hilfe auf.
• Achten Sie darauf, dass sich Plus- und Minusklemme nicht berühren. Durch Kurzschlüsse können
Hitze entstehen und Brände verursacht werden.
• Achten Sie darauf, dass sich die beiden Fahrzeuge nicht berühren.
• Achten Sie darauf, dass die Batterieklemmen nicht mit Metallgegenständen in Berührung kommen.
Kurzschlüsse können Brände und Explosionen auslösen.
• Legen Sie vor dem Umgang mit Blei-Säure-Batterien stets sämtlichen Metallschmuck ab.
!
Seguridad general
IMPORTANTE: Consulte siempre el manual de instrucciones de ambos vehículos antes de usar este
producto. Si el fabricante especifica una secuencia determinada para el arranque de emergencia, siga
siempre el consejo del fabricante.
IMPORTANTE: Ambos vehículos deben tener la misma tensión (12 V) y cable negativo con toma de tierra.
• Lleve siempre gafas y guantes protectores al manejar baterías de plomo-ácido.
• Tenga en cuenta que las baterías de plomo- ácido emiten gases inflamables. No efectúe la carga
de baterías cerca de cualquier tipo de fuente de ignición o calor. No fume. Asegure que las baterías estén
bien ventiladas.
• No intente nunca arrancar una batería que muestre fugas, grietas u otros desperfectos.
• Si el ácido de la batería entra en contacto con la piel o la vestimenta, proceda a lavarlos
minuciosamente con agua y jabón. Si el ácido de la batería entra en contacto con los ojos, proceda a
lavarlos minuciosamente con agua limpia y solicite ayuda médica.
• No permita que entren en contacto las abrazaderas de los conductores positivo y negativo.
Los cortocircuitos pueden causar incendios y explosiones.
• Los 2 vehículos nunca deben estar en contacto.
• No permita que elementos de metal entren en contacto con los bornes de la batería.
Los cortocircuitos pueden causar incendios y explosiones.
• Retire siempre todas las joyas de metal antes de manejar baterías de plomo-ácido.
!
Sicurezza Generale
IMPORTANTE: Leggere queste istruzioni assieme alle istruzioni sull’avviamento tramite cavi contenute
nei manuali di entrambi i veicoli, soprattutto se uno o entrambi i veicoli in questioni fossero dotati di
sistema start e stop.
IMPORTANTE: Entrambi I veicoli devono possedere un sistema elettrico con il medesimo voltaggio (12 V)
e devono avere una messa a terra negativa.
• Indossare sempre guanti protettivi e occhiali a maschera quando si maneggiano batterie al
piombo acido
• Le batterie a piombo acido emettono gas infiammabili. Assicurarsi che non ci siano fonti di calore,
fiamme o scintilla elettriche nelle vicinanze della batteria. Non fumare. Assicurarsi che le batterie siano
ben ventilate.
• Non utilizzare I cavi di avviamento se la batteria perde, è crepata o danneggiata in qualsiasi
maniera.
• Se la batteria acida entra in contatto con la pelle o I vestiti, lavare in profondità con acqua e
sapone. la batteria acida entra in contatto con gli occhi, lavare in profondità e consultare il medico.
• Non lasciare che I morsetti di polo positive e negative si tocchino. Ciò potrebbe causare un
cortocircuito che potrebbe creare calore e dare inizio a un incendio.
• Non permettere che I due veicoli entrino in contatto.
• Non permettere che nessun oggetto metallico entri in contatto con I terminali della batteria. Ciò
potrebbe causare un cortocircuito che potrebbe portare a una esplosione o dare inizio a un incendio.
• Togliersi sempre gioielli o accessori in metallo prima di toccare le batterie al piombo acido.
!
• Beachten Sie, dass sich weite Kleidung, offene Haare usw. in sich bewegenden Motorteilen verfangen können. Binden Sie vor
Gebrauch dieser Starthilfekabel lange Haare zusammen und ziehen Sie ausreichend eng anliegende Kleidung an.
• Diese Starthilfekabel dürfen nur bei trockenen Bedingungen verwendet werden.
• Diese Starthilfekabel dürfen nicht für gefrorene Batterien verwendet werden.
• Prüfen Sie vor dem Überbrücken stets den Elektrolytstand, sofern es sich nicht um eine wartungsfreie Batterie handelt.
Starthilfe-Anleitung;
1. Vergewissern Sie sich, dass alle Zubehöranlagen des Fahrzeugs (d.h. Scheinwerfer, Radio usw.) abgeschaltet sind.
2. Stellen Sie die Schaltung auf Leerlauf und ziehen Sie die Handbremse an. Bringen Sie Automatikgetriebe in Parkstellung.
3. Schließen Sie eines der roten Kabel mit der Klemme an den Pluspol der Starthilfebatterie an (1). Falls die positive Anschlussklemme
im Fahrzeug verschmutzt oder korrodiert ist, säubern Sie sie mit einer entsprechend geeigneten Drahtbürste, damit guter Kontakt zum
Überbrückungskabel gewährleistet ist.
4. Schließen Sie das andere Ende dieses roten Kabels über die Klemme an den Pluspol der entladenen Batterie an (2). Vergewissern
Sie sich, dass das Kabel fest sitzt und nicht mit einem Erdungspunkt im Fahrzeug einen Kurzschluss verursachen kann.
5. Schließen Sie eines der Minuskabel an den Minuspol der Starthilfebatterie an (3).
6. Schließen Sie das andere Ende dieses Minuskabels an eine unlackierte und bewegungslose Stelle am Fahrwerk oder Motorblock
des Fahrzeugs mit der entladenen Batterie (4) (nicht an den Minuspol der Batterie) an. Achten Sie darauf, dass der Erdungspunkt von
der Batterie und dem Kraftstoffsystem entfernt ist.
7. Vergewissern Sie sich, dass die Klemmen fest sitzen und sich beim Anlassen des Fahrzeugs nicht lösen können.
8. Warten Sie mindestens drei Minuten, damit sich der Batteriezustand zwischen den beiden Fahrzeugbatterien stabilisieren kann.
9. Lassen Sie den Motor des Fahrzeugs mit der aufgeladenen Batterie an und lassen Sie den Motor mindestens eine Minute laufen.
10. Lassen Sie dann den Motor des Fahrzeugs mit der entladenen Batterie an.
11. Schalten Sie den Motor des starthilfegebenden Fahrzeugs aus und nehmen Sie die Kabel in umgekehrter Reihenfolge wieder ab.
Beginnen Sie also mit dem Minuskabel am Erdungspunkt des Fahrzeugs mit der entladenen Batterie.
• Tenga en cuenta que la ropa suelta / pelo largo, etc. pueden engancharse en las piezas móviles del motor; antes de utilizar
esta herramienta, recójase el pelo y sujétese la ropa suelta.
• Utilice este producto solamente en condiciones completamente secas.
• No intente nunca cargar una batería congelada.
• En las baterías que requieran mantenimiento, asegúrese siempre que el nivel del electrólito sea correcto antes de arrancar
el vehículo.
Instrucciones de funcionamiento para cables de arranque;
1. Asegure que estén desconectados todos los sistemas auxiliares del vehículo (faros, radio, etc.).
2. Asegúrese de que colocar el freno de mano en el vehículo o modo de “Parking” para vehículos con cambio de
marchas automático.
3. Conecte la pinza con el cable de color rojo en el borne positivo de la batería del vehículo principal (1). Si los bornes de la batería
muestran corrosión o suciedad, proceda a limpiarlos con un cepillo de alambre adecuado.
4. Conecte la pinza con el cable de color rojo en el borne positivo de la batería del vehículo que desee arrancar (2). Asegúrese de
que el cable esté lo suficientemente alejado de cualquier parte metálica del vehículo.
5. Conecte la pinza con el cable de color negro en el borne negativo de la batería del vehículo principal (3).
6. Sujete el otro extremo del cable negativo en una parte limpia del chasis del vehículo o en cualquier otra pieza metálica sólida
(4) (nunca en el borne negativo de la batería). No sujete la pinza en ninguna parte del sistema de combustible del vehículo, podría
ocurrir chispas y provocar un incendio.
7. Asegúrese de que las pinzas estén firmemente sujetas para que no se aflojen cuando arranque el vehículo.
8. Espere 3 minutos para que se estabilice la carga de la batería de ambos vehículos.
9. Encienda el motor del vehículo principal (batería cargada) y deje el motor encendido durante 1 minuto.
10. Ahora arranque el vehículo con la batería descargada.
11. A continuación, detenga el motor del vehículo principal y desconecte los cables en el orden opuesto. Primero el cable negativo
y después el positivo.
• Abiti larghi / capelli lunghi, ecc. Potrebbero incastrarsi nelle parti mobile del motore. Quando si utilizza questo prodotto è consigliabile
legarsi I capelli e assicurare o cambiare I vestiti.
• Utilizzare questi cavi di avviamento solo in ambienti asciutti
• Non cercare di riavviare il veicolo se la batteria è gelata
• A meno che le batterie non siano del tipo che non richiede manutenzione, verificare sempre che il livello di elettroliti sia corretto
prima di cercare di riavviare.
Istruzioni cavi di avviamento;
1. Assicurarsi che tutti gli accessori del veicolo (i fari, la radio, ecc.) siano spenti.
2. Assicurarsi che il veicolo sia in folle e che il freno a mano sia inserito o, per le automatiche, che la modalità “parcheggio”
sia attivata.
3. Connettere un morsetto rosso al terminale positive dell’accumulatore di avviamento (1). Se il terminale positive nel veicolo è
corroso o sporco, pulirlo con una spazzola metallica per assicurare un buon contatto con il morsetto del cavo.
4. Connettere l’altro morsetto del cavo al terminale positive della batteria scarica (2). Controllare che il cavo sia assicurato e che non
venga a contatto con nessun punto di messa a terra.
5. Collegare un morsetto negative al terminale negativo dell’accumulatore di avviamento (3).
6. Connettere l’altro estremo dello stesso cavo ad una parte fissa e non verniciata del telaio o del blocco motore sul veicolo con
una batteria scarica (4) (non il terminale negativo della batteria). Assicurarsi che il punto di messa a terra sia lontano dalla batteria e
dal sistema di alimentazione a combustibile.
7. Controllare che I morsetti siano ben collegati e che non possano staccarsi quando viene avviato il motore.
8. Dare tempo 3 minuti alla carica della batteria di stabilizzarsi tra le batterie dei 2 veicoli.
9. Avviare il veicolo con una buona batteria e lasciare funzionare il motore per almeno 1 minuto.
10. Avviare il veicolo con la batteria scarica.
11. Fermare il motore del veicolo che trasmette e sganciare I cavi In ordine inverso. Cominciare dal morsetto negativo connesso a
un punto di messa a terra del veicolo con una batteria scarica .
Algemene veiligheid
BELANGRIJK: Lees deze instructies samen met de instructies van beide voertuigen die gebruikt worden
bij het jumpstarten, vooral wanneer het voertuig voorzien is van een stop/start system
BELANGRIJK: Lees deze instructies samen met de instructies van beide voertuigen die gebruikt worden
bij het jumpstarten, vooral wanneer het voertuig voorzien is van een stop/start system
• Draag te allen tijde beschermende handschoenen bij het hanteren van loodzuuraccu’s
• Loodzuuraccu’s stoten ontvlambare gassen uit. Houdt loodzuuraccu’s uit de buurt van
warmtebronnen, open vlammen en elektrische vonken. Rook niet in de buurt van accu’s. Zorg voor
voldoende ventilatie
• Jumpstart geen voertuig voorzien van een lekkende, gescheurde of anders beschadigde accu
• Wanneer accuzuur in contact komt met uw huid/kleren, wast u dit grondig met water en zeep.
Als accuzuur in uw ogen terecht komt, spoelt u uw ogen met schoon water en zoekt u onmiddellijk
medische hulp
• De positieve en negatieve accuklemmen mogen elkaar niet raken. Kortsluiting kan brand en
explosies veroorzaken
• Voorkom contact tussen de twee voertuigen
• De accuklemmen mogen niet in contact komen met metalen voorwerpen. Kortsluiting kan brand
en explosies veroorzaken
• Voordat u loodzuuraccu’s hanteert dient u al uw sieraden af te doen
!
• Loszittende kleding en losse haren kunnen door bewegende onderdelen gegrepen worden. Doe uw haar in een staart en draag
geen loszittende kleding
• Gebruik de startkabels enkel in droge omstandigheden
• Probeer voertuigen met bevroren accu’s niet te jumpstarten
• Tenzij u bezit over een onderhoudsvrije accu, controleert u of het elektrolytniveau juist is voordat u het voertuig probeert te starten
Jumstart instructies;
1. Zorg ervoor dat alle elektrische accessoire systemen (lichten, radio, etc.) uitgeschakeld zijn.
2. Het voertuig dient in zijn vrij te staan met de handrem omhoog. Automaten dienen in de parkeer stand te staan.
3. Sluit de rode klem op de positieve pool van de boostaccu aan (1). Als de accupool vuil of verroest is, maakt u deze met een
geschikte staalborstel schoon voor het verzekeren van een juiste aansluiting.
4. Sluit de andere rode klem van dezelfde kabel op de positieve pool van de lege accu aan (2). Zorg voor een goede aansluiting en
voorkom mogelijke kortsluiting.
5. Sluit de zwarte klem op de negatieve pool van de boostaccu aan (3).
6. Sluit de andere klem van dezelfde kabel op een niet-geverfd en niet-bewegend deel van het chassis of motorblok van het
voertuig met de lege accu aan (niet de negatieve pool van de accu) (4). Zorg ervoor dat het aardepunt uit de buurt van de accu en
brandstofsysteem ligt.
7. Controleer of de klemmen juist bevestigd zijn en niet los kunnen schieten tijdens het starten van het voertuig
8. Geef de accu’s 3 minuten de tijd zodat het laadniveau tussen de accu’s van de twee voertuigen kan stabiliseren
9. Start de motor van het voertuig met volle accu en laat de motor minimaal 1 minuut lopen
10. Start het voertuig met de lege accu
11. Schakel de motor van het voertuig met de volle accu uit en ontkoppel de klemmen in tegenovergestelde volgorde. Start met
het ontkoppelen van de negatieve klem, aangesloten op een aardepunt van het voertuig met de lege accu.
Product specificaties
| Merk: | Silverline |
| Categorie: | Niet gecategoriseerd |
| Model: | 594260 |
Heb je hulp nodig?
Als je hulp nodig hebt met Silverline 594260 stel dan hieronder een vraag en andere gebruikers zullen je antwoorden
Handleiding Niet gecategoriseerd Silverline

5 Februari 2025

5 Februari 2025

7 December 2024

7 December 2024

7 December 2024

5 December 2024

15 November 2024

2 November 2024

2 November 2024

2 November 2024
Handleiding Niet gecategoriseerd
- TOTO
- A-Designs
- Minox
- Columbus
- FASTCABLiNG
- GC Audio
- Fusion
- POWRUI
- MAK
- Mellerware
- James
- EXSYS
- Nevadent
- Ergodyne
- Lamptron
Nieuwste handleidingen voor Niet gecategoriseerd
13 September 2025

13 September 2025

13 September 2025
13 September 2025
13 September 2025
13 September 2025
13 September 2025
13 September 2025

13 September 2025
13 September 2025