Sanus WSEDM1 Handleiding
Sanus Flat panel steun WSEDM1
Bekijk gratis de handleiding van Sanus WSEDM1 (2 pagina’s), behorend tot de categorie Flat panel steun. Deze gids werd als nuttig beoordeeld door 53 mensen en kreeg gemiddeld 4.8 sterren uit 2 reviews. Heb je een vraag over Sanus WSEDM1 of wil je andere gebruikers van dit product iets vragen? Stel een vraag
Pagina 1/2
WALL side
WALL side
WALL side
WALL side
WALL side
WALL side
WALL side
WALL side
WALL side
WALL side
WALL side
WALL side
WALL side
WALL side
qty. 2
qty. 1
qty. 1
Anchor
Base
Cover
4
2
1
qty. 2
qty. 2
Wall Plate Screw
3M Command
™
Strip
3
5
#10 x 1-¾ in.
WSEDM1-B2
WSEDM1-W2
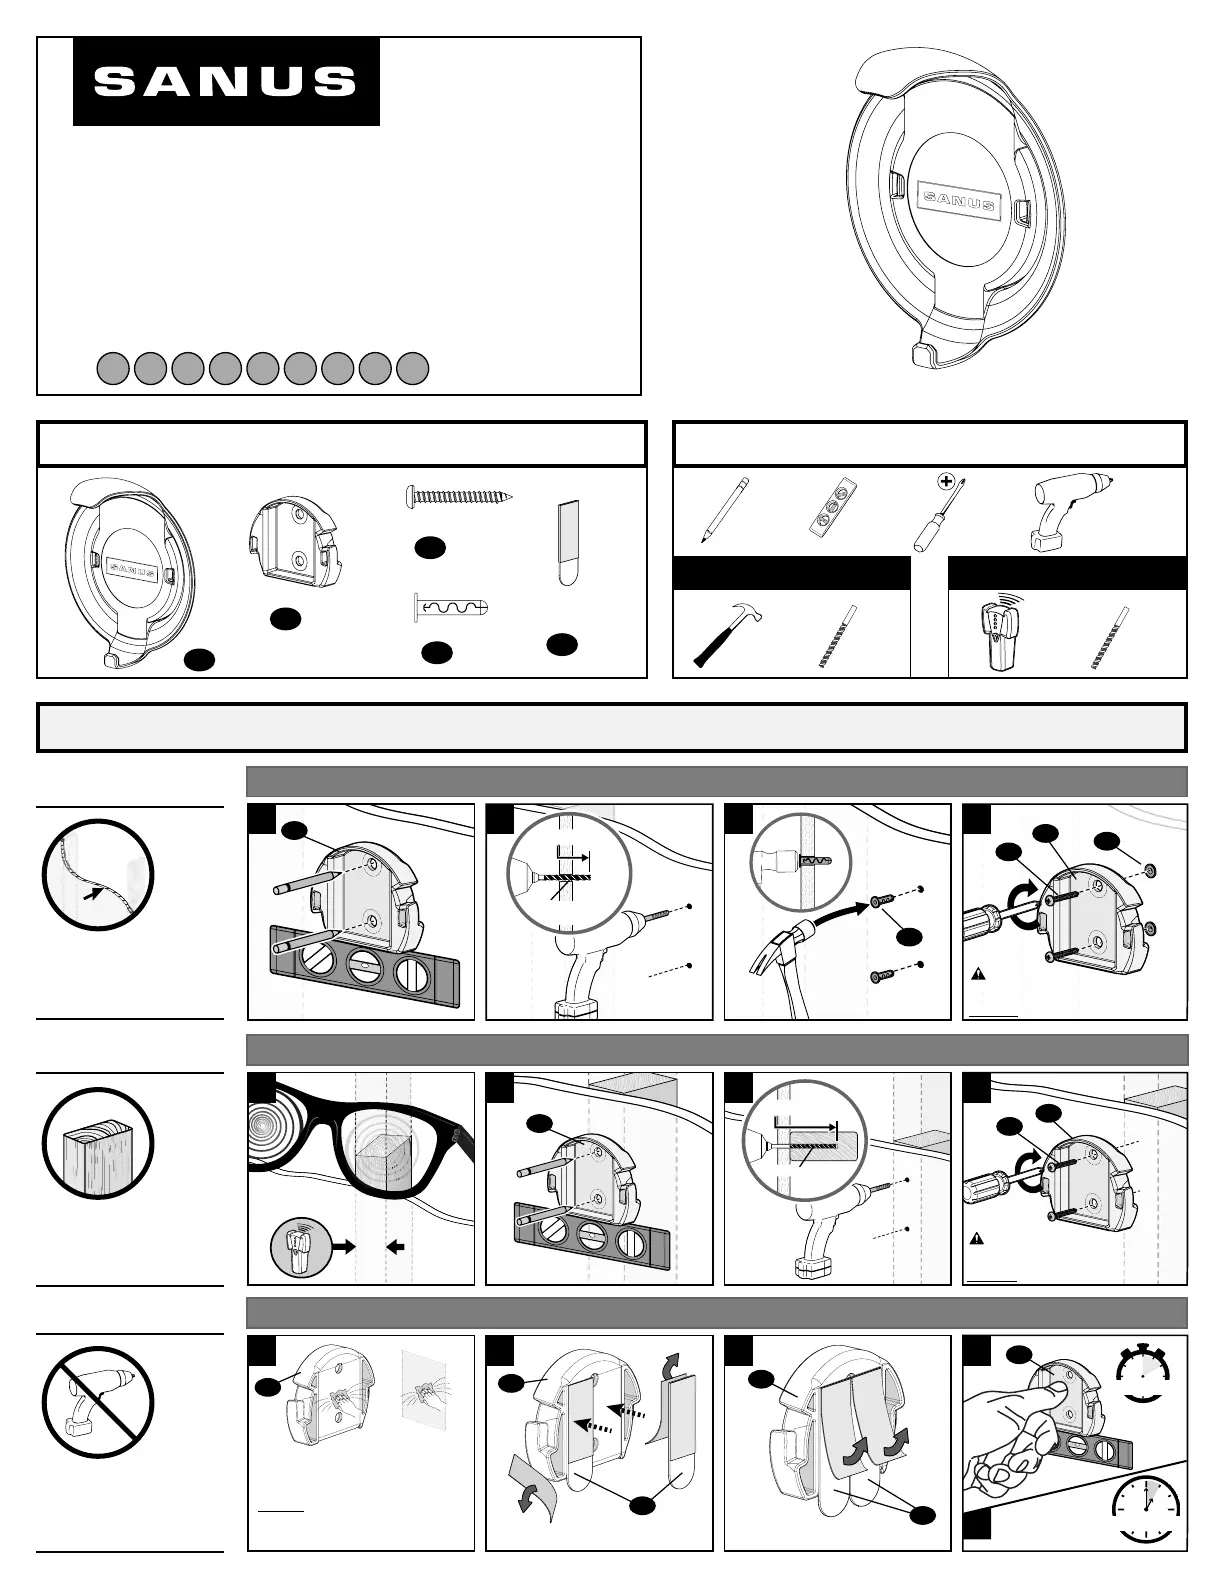
INSTRUCTION MANUAL
Wood Stud InstallDrywall Install
PencilLevel
Stud Finder
Phillips
Screwdriver
Drill Bit
Drill Bit
Electric
Drill
1/8 in.
(3 mm)
Wood
1/4 in.
(6 mm)
Hammer
6901-602581 00
Parts Included Tools Required
Wood Stud Installation
Drywall Only Installation
Command
™
Strip Installation
1 Secure The Base
WALL side
WALL side
WALL side
WALL side
WALL side
WALL side
WALL side
WALL side
WALL side
WALL side
WALL side
WALL side
WALL side
WALL side
WALL side
WALL side
WALL side
WALL side
WALL side
WALL side
WALL side
WALL side
WALL side
WALLside
WALL side
WALL side
WALL side
WALL side
WALL side
WALL side
WALL side
WALL side
WALL side
WALL side
WALL side
WALL side
WALL side
WALL side
WALL side
WALL side
WALL side
WALL side
WALL side
WALL side
WALL side
WALL side
WALL side
WALL side
WALL side
WALL side
WALL side
WALL side
WALL side
WALL side
WALL side
WALL side
1/8 in. (3 mm)
1 ¾
in. (4.5 cm)
Bit
1
in. (2.5 cm)
Bit
1/4 in. (6.5 mm)
02
02
2
2
2
30 seconds
5
5
2
4
Lightly clean both wall and base
surfaces with isopropyl alcohol.
DO NOT use household cleaners as
they may leave behind residues which
can affect adhesion.
Drywall
Option
Wood Stud
Option
No Drill
Option
02
3
2
3
4
(not needed for 3M Command
™
Strip install)
Wait one hour
before continuing
a
a
a
b
b
b
c
c
c
d
d
d
e
Remove the red linerRemove the black liner
ES
FR
DE
IT
NL
SV
RU
ZH
JA
1 hour
Wall Mount
for Amazon Echo Dot
CAUTION:
Avoid damage to the base.
DO NOTovertighten the screws.
CAUTION:
Avoid damage to the base.
DO NOTovertighten the screws.
Product specificaties
| Merk: | Sanus |
| Categorie: | Flat panel steun |
| Model: | WSEDM1 |
Heb je hulp nodig?
Als je hulp nodig hebt met Sanus WSEDM1 stel dan hieronder een vraag en andere gebruikers zullen je antwoorden
Handleiding Flat panel steun Sanus

19 November 2025
18 November 2025
7 Oktober 2025
27 Maart 2025
17 November 2024
17 November 2024
5 September 2024
5 April 2024
5 April 2024
5 April 2024
Handleiding Flat panel steun
Nieuwste handleidingen voor Flat panel steun
20 Januari 2026
10 Januari 2026
7 Januari 2026
7 Januari 2026
6 Januari 2026
6 Januari 2026
6 Januari 2026
5 Januari 2026
5 Januari 2026
31 December 2026