Samsung CS21B850F6 Handleiding

Samsung Televisies CS21B850F6

Lees hieronder de 📖 handleiding in het Nederlandse voor Samsung CS21B850F6 (8 pagina's) in de categorie Televisies. Deze handleiding was nuttig voor 22 personen en werd door 2 gebruikers gemiddeld met 4.5 sterren beoordeeld

Pagina 1/8
English - 1
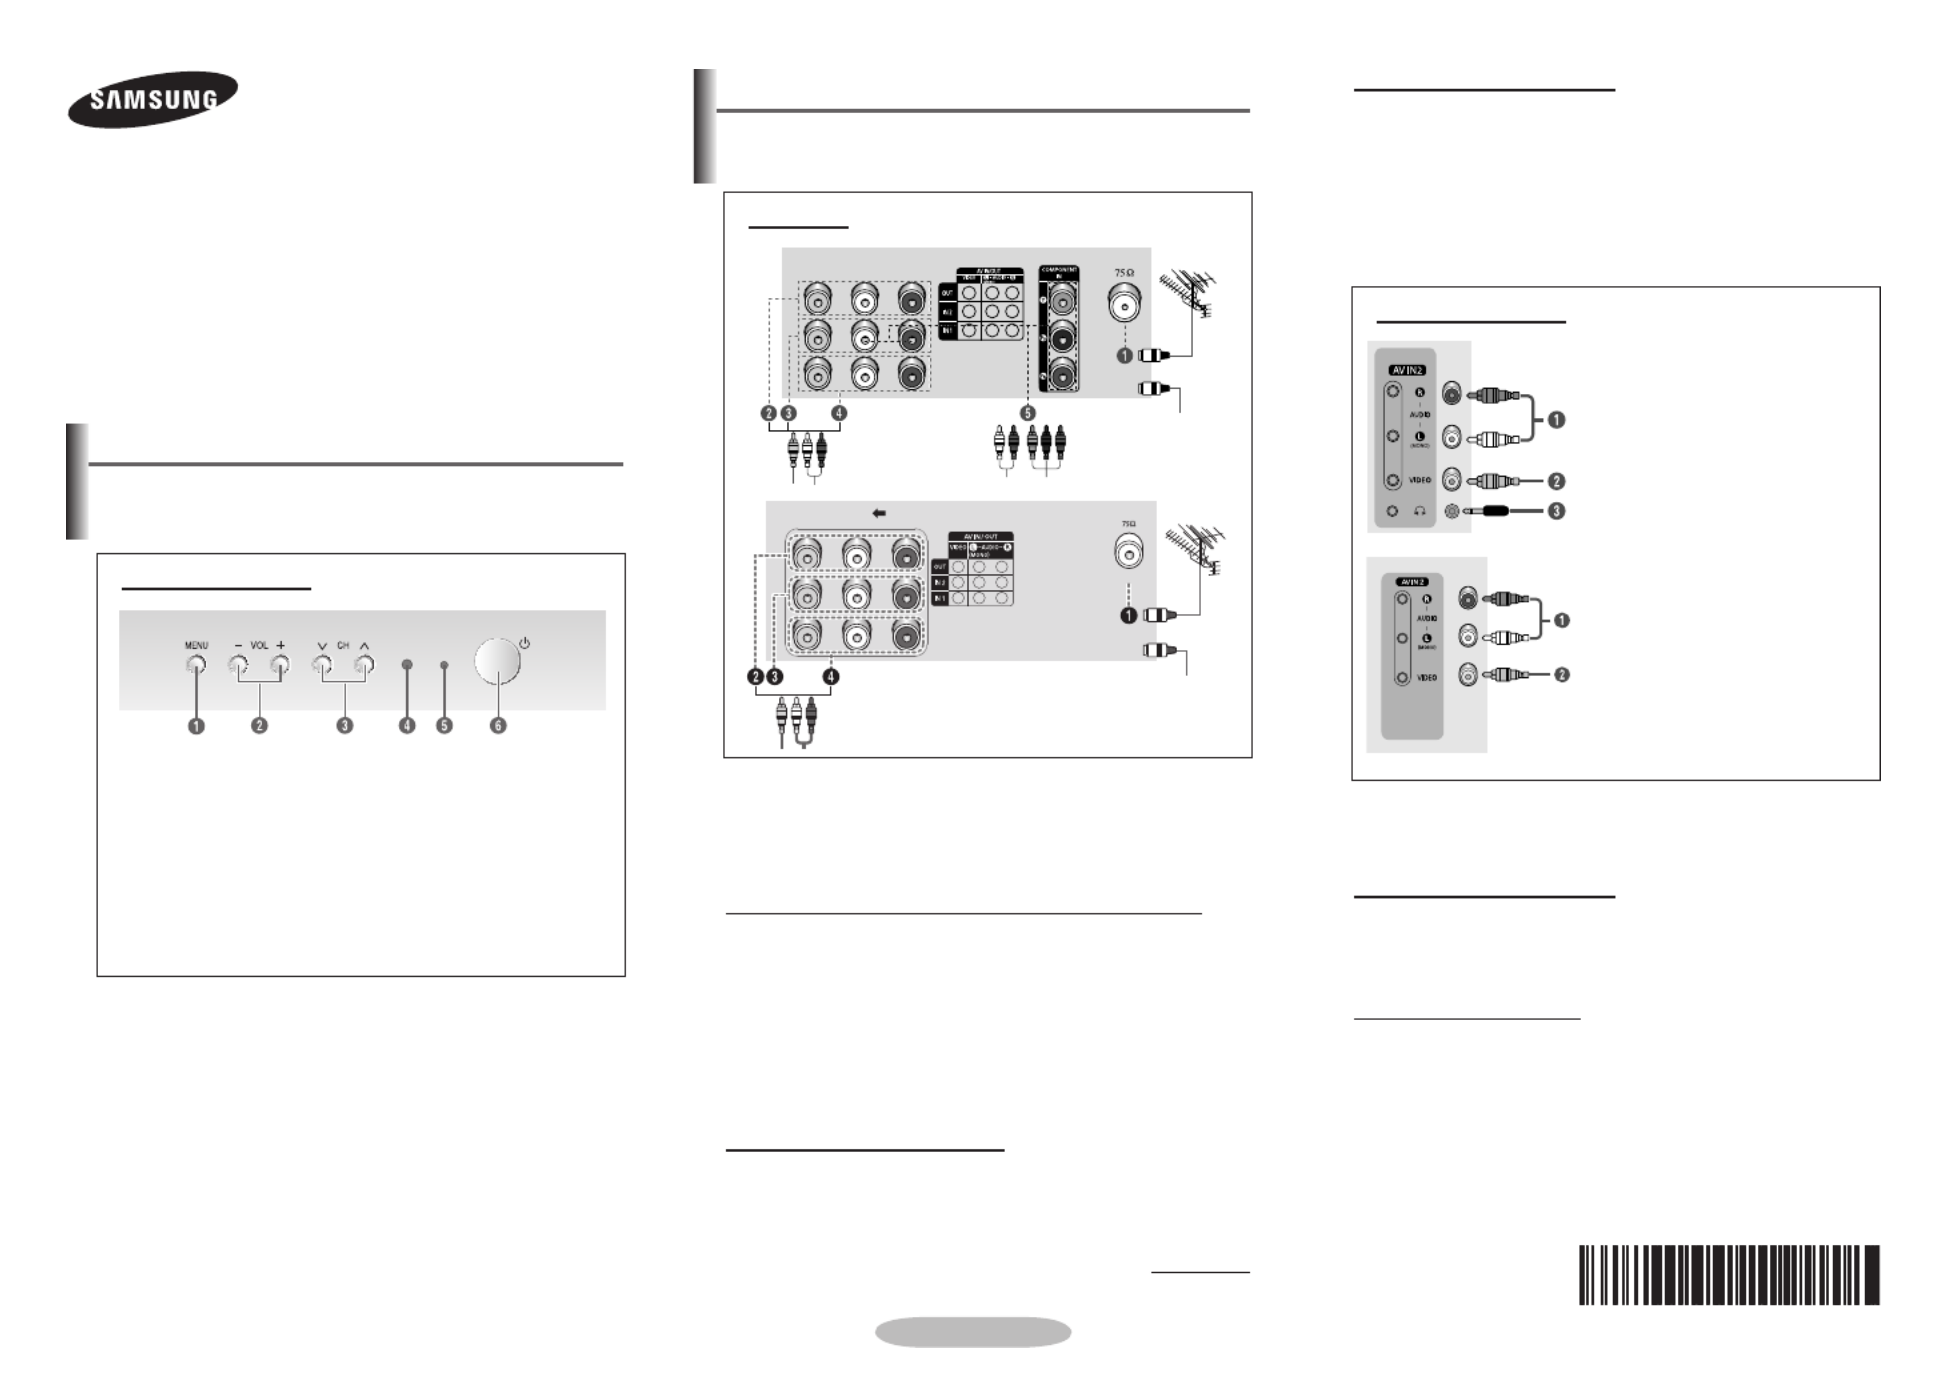
Connection Panel (depending on the model)
Whenever you connect an audio or video system to your
television, ensure that all elements are switched off.
Please be sure to match the color coded input terminals
and cable jacks.
Connecting to an Aerial or Cable Television Network
Connect the aerial or network input cable to the
1 (75 Ω
coaxial socket).
To view television channels correctly, a signal must be
received by the set from one of the sources: an outdoor
aerial, cable television network, or satellite network.
If you are using an indoor aerial, you may need to adjust it
when tuning your television until you obtain a picture that is
both sharp and clear.
Connecting to the RCA Output
The RCA2 connectors are used for equipment, such as a
recording VCR or audio system.
continued...
cable television
network
Rear Panel
or
Please be sure to match the colour coded input terminals
and cable jacks.
Connecting to the RCA Input
The ( - / ) and ( ) connectors are used 1AUDIO L R 2VIDEO
for equipment, such as a camcorder, video disc player, or
video game device.
Connecting Headphones
The (headphone) jack is used for watching a television 3
programme without disturbing the other people in the room.
Prolonged use of headphones at a high volume may damage
your hearing.
When both the front (or side) AV and rear connectors are
connected to external equipment, the front (or side) AV
receives priority.
COLOUR TELEVISION
CS21Z43/21Z45/21Z47/21Z50/21Z57
/21Z58/21AE0/21AF0/21AJ0/21AD0/
21BA0/21AS0/21BF0
Owner’s Instructions
Before operating, please read this manual thoroughly,
and retain it for future reference.
Register your product at
www.samsung.com/global/register
The actual configuration of your TV may be different,
depending on your model.
Control Panel (depending on the model)
You can use the buttons to switch the TV on when it is 3
in standby mode depending on the model.
The and buttons also have the same function as 2 3
the ◄/►/▲/▼ buttons on the remote control.
If the remote control no longer works or you have
misplaced it, you can use the controls on the panel of the
television.
Front (or Side) Panel
1 On-screen menu display
2 Volume adjustment
3 Channel selection
4 Remote control sensor
5 Standby indicator
6 Power on/off
AA68-03974E-01
Audio input
Video input
Headphone jack
Audio input
Video input
Front (or Side) Panel
The actual configuration of your TV may be different,
depending on your model.
cable television
network
or
Connecting to the RCA Input
The RCA3 and RCA4 connectors are used for equipment,
such as a VCR, DVD, decoder, satellite receiver, video
game device, or video disc player. (When using the mono
equipment, connect to the input connector.)AUDIO-L
The RCA5 connectors are used for equipment such as a
DVD with component output.
English - 2
Remote Control
(depending on the model)
Operation of remote control may be affected by bright
artificial light near to the TV.
Installing Batteries
Remove the cover. Install two AAA size
batteries, then replace the cover.
When the remote control does not
operate normally, check that the “+” and
“-” ends of the batteries are inserted correctly or the batteries
are drained.
Do not mix battery types, i.e. alkaline and manganese.
1 POWER
Used to switch the TV
on and off.
2 �ENU�ENU
Used to display the
on-screen menu or
return to the previous
menu.
3 ▲/▼/◄/►
Used to control the
cursor in the menu.
P < / >
Used to display the
next or previous stored
channel
= + / -
Used to increase or
decrease the volume.
4 �UTE�UTE
Used to switch the
sound off temporarily.
To turn the sound back
on, press the , �UTE
= + or = - button.
5 Numeric buttons
Used to select channels
directly.
6 INFOINFO
Used to view the
channel information
and setting status you
selected.
7
SOURCE
Used to display all of
the available video
sources.
8
TOOLS (depending on
the model)
You can check the
following selection by
pressing Tools button.
1. Sleep Timer(Used to
select a preset time
interval for automatic
turn off.)
2. Picture �ode(Used
to select the picture
effect.)
3. Sound �ode(Used
to select sound
effect.)
4. Dual I-II(Used to
select sound mode.)
5. Turbo Plus (Used to
select the Turbo Plus
option.)
6. Equalizer (Used to
display the Equalizer
menu)
7. Easy View
Used to display
Channel Grouping,
Channel Minimizer,
Channel Scheduler,
Music Mode, Half
Mute menu.
9 ENTERENTER
While using the
on-screen menus,
press the ENTER
button to activate (or
change) a particular
item.
0EXIT
Used to exit from any
display or return to
normal viewing.
!
PRE-CH
Used to switch
repeatedly between
the last two channels
displayed.
Turning the TV On and Off
Press the POWER ” button,or button, or P / < > Numeric
button on the remote control. You can also use the “ P
button on the TV.
Caution: One pole switch is totally not off (one line still
live) if power cord is not unplugged.
English - 3
◆ Source List
You can switch between
viewing signal from
connected equipment,
such as a VCR, DVD, set-
top box, and the TV source
(broadcast or cable).
You can change the required source simply by
pressing the button on the remote control. SOURCE
It might take a short period of time for pictures to be
switched.
Input
Source List
Viewing the �enus
1 �ENUPress the button.
The main menu is displayed on the screen. Its left side
has five icons: , , , , and Input Picture Sound Channel
Setup.
2 Press the or ▼ button to select one of the icons.
Press the button to access the icon’s sub-menu.ENTER
3 Press the or ▼ button to move to items in the menu.
Press the button to enter items in the menu.ENTER
4 Press the button to change the selected ▲/▼/◄/►
items. Press the button to return to the previous �ENU
menu.
5 EXITPress the button to exit from the menu.
Setup - Plug & Play
When the television is initially powered on, several basic
customer settings proceed automatically and subsequently.
The following settings are available.
1 If the television is in standby
mode, press the POWER
button on the remote control.
The is Start Plug & Play
displayed. To start Plug
& Play, press the ENTER
button. The menu Language
is displayed.
The menu will automatically appear after Language
several seconds, even if the
ENTER button is not pressed.
2 Select the appropriated
language by pressing the
▲ or button. Press the
ENTER Check button. The
antenna input. is displayed.
If any language is not
selected, the language
menu will disappear about
30 seconds later.
continued...
You can scan for the frequency ranges available to you (and
availability depends on your country). Automatically allocated
programme numbers may not correspond to actual or desired
programme numbers. However you can sort numbers
manually and clear any channels you do not wish to watch.
Channels are sorted and stored
in the order which reflects their
position in the frequency range
(with lowest first and highest
last). The programme originally
selected is then displayed.
To stop the search before
it has finished, press the
ENTER button.
When finished, the menu Sort
is displayed. To sort the stored
channels into the desired
numerical order, refer to
”. To exit without Channel - Sort
sorting, press the button.EXIT
Channel - Auto Store
3 Make sure that the antenna
is connected to the
television (refer to page 1).
Press the button. ENTER
The Area menu is displayed.
4 Press the or ▼ button to
select your area. Press the
ENTER button.
5 To search the channels,
press the button. To ENTER
stop the search, press the
ENTER button.
When the channel searching
has finished, the Clock Set
menu is displayed.
6 Press the button to or ►
move to the hour or minute.
Set the hour or minute by
pressing the or ▼ button.
7 When you have finished,
press the button.�ENU
The Enjoy your watching.
is displayed, and then the
channel which has been
stored will be activated.
Re-setting the Plug & Play
�ethod:
�ENU (Setup) ▲/▼
ENTER (Plug & Play) ▲/▼
ENTER
Plug & Play
Enter Skip
OK
Check antenna input.
Area
Asia/W.Europe
CIS/E.Europe
China
Hong Kong/UK
Australia
NZL/Indonesia
South Africa
America
�ove Enter
Skip
Plug & Play
OK
Enjoy your watching.
�ove Enter
Adjust
Skip
Plug & Play
Clock Set 1 2 : 0 0 am
�ove Enter Return
TV
Plug & Play
Language : English
Time
Child Lock
Blue Screen : On
�elody : On
�usic �ode : Off
Setup
Auto Store
P 1 C-- 102�Hz
7 %
Enter Skip
Plug & Play
Stop
Plug & Play
Enter Skip
Auto Store
Start
Plug & Play
Enter Exit
OK
Start Plug & Play.
Plug & Play
�ove Enter Skip
Language
English
Indonesia
�elayu
TV
AV1
AV2
Component
�ove Enter Return
TV Source List
Search
Enter
Return
Stop
P 1 C-- 102�Hz
7 %
Area : Belgie
Search Asia/W.Europe
CIS/E.Europe
China
Hong Kong/UK
Australia
NZL/Indonesia
South Africa
America
�ove Enter Return
TV Auto Store


Product specificaties

Merk: Samsung
Categorie: Televisies
Model: CS21B850F6

Heb je hulp nodig?

Als je hulp nodig hebt met Samsung CS21B850F6 stel dan hieronder een vraag en andere gebruikers zullen je antwoorden