Quoizel MHE1910CU Handleiding
Bekijk gratis de handleiding van Quoizel MHE1910CU (2 pagina’s), behorend tot de categorie Lamp. Deze gids werd als nuttig beoordeeld door 4 mensen en kreeg gemiddeld 4.2 sterren uit 7 reviews. Heb je een vraag over Quoizel MHE1910CU of wil je andere gebruikers van dit product iets vragen? Stel een vraag
Pagina 1/2
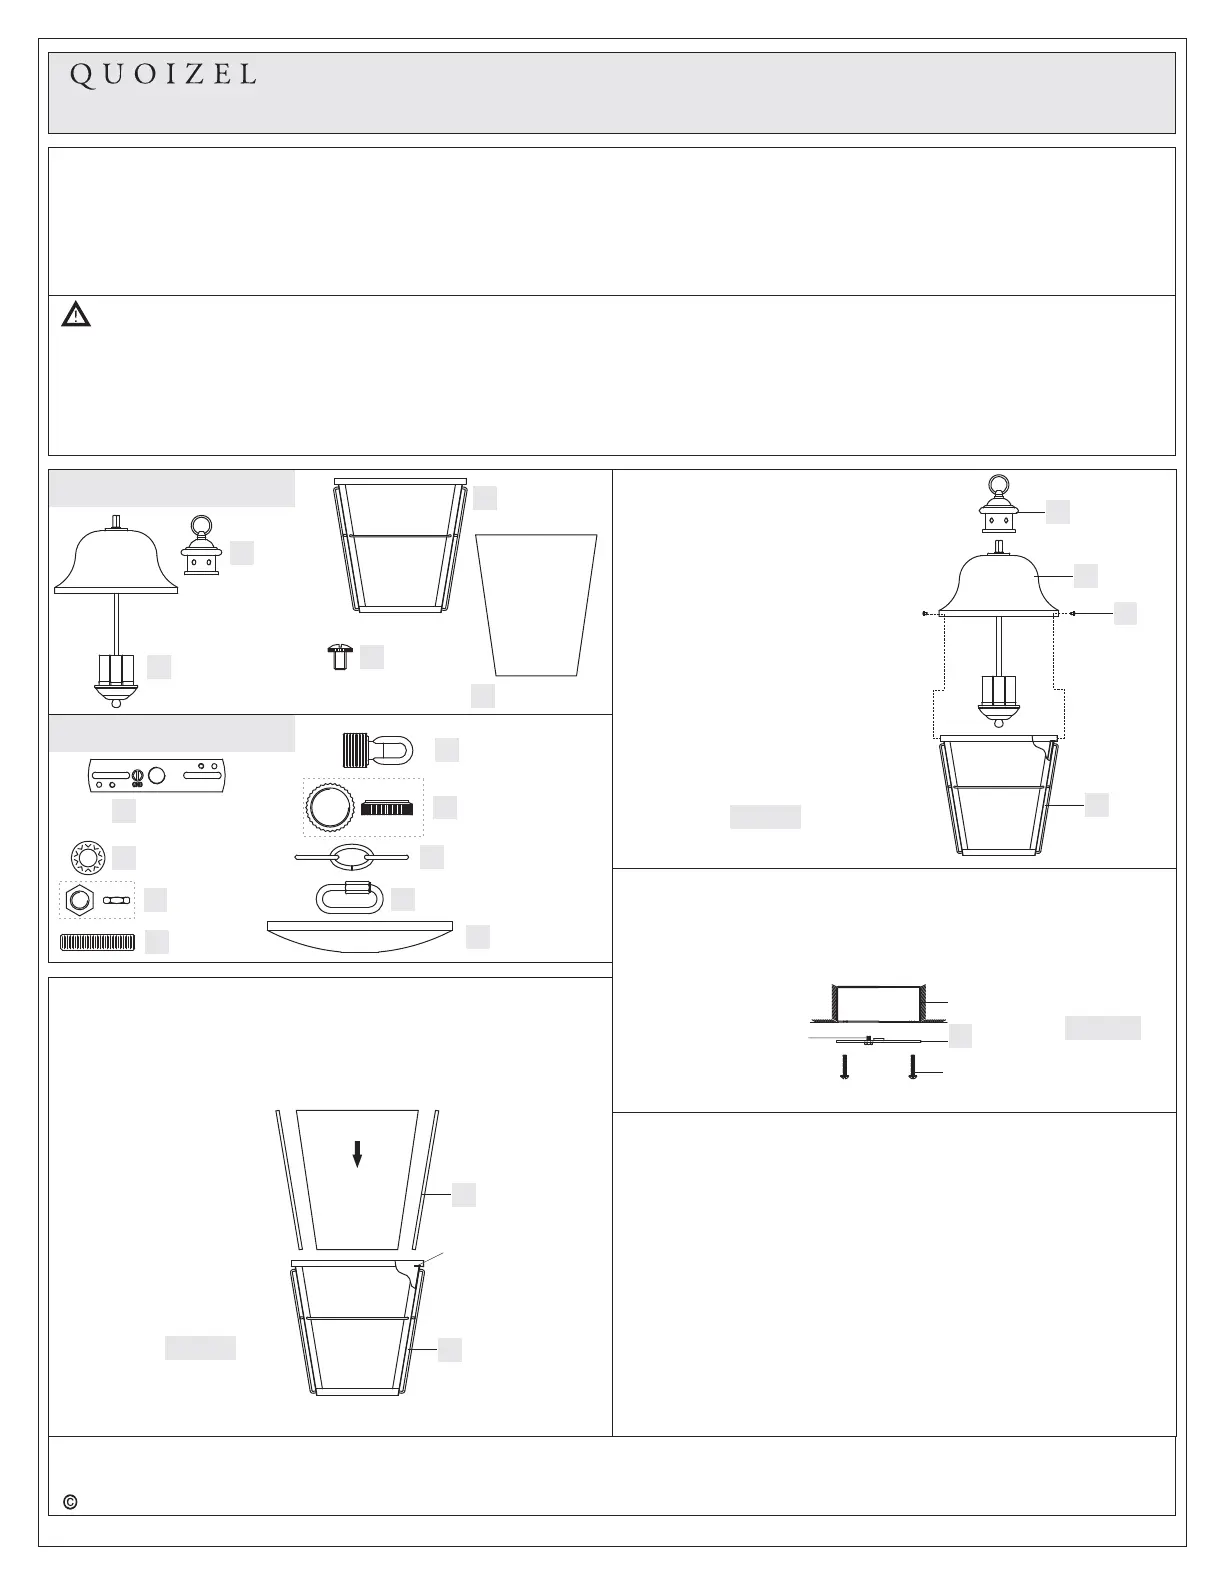
Pleasegotoforproductcleaningtips.Gototheselection.
(3)CandelabraBaseBulbs60WMaximum
30-45minutes
Identifyandinspectallpartsbeforebeginninginstallation.Checkpackagecontentlistanddiagramsbelowtobesureallpartsare
present.Ifanypartsaremissingordamaged,donotattempttoassemble,install,oroperatethefixture.Contactcustomerserviceforreplacement
parts.
www.quoizel.comCare+Maintenance
LightSource:
EstimatedAssemblyTime:
Preparation:
ToolsRequired:Flatheadscrewdriver,Phillipsscrewdriver,pliers,wirecutters,wirestrippers,electricaltape,safetyglasses.
WarningsandCautions
1of2
AssemblyInstructionSheet#IS-MHE1910CU
ForStyleMHE1910CU
6CORPORATEPARKWAY
GOOSECREEKSC29445
wwwquoizelcom
,.
..
Turnoffelectricityatcircuitbreakerormainfuseboxbeforeinstallation.Consultalicensedelectricianifindoubt.
Theseinstructionsareprovidedforyoursafety.Itisveryimportantyoureadthemcompletelybeforeinstallingthefixture.Westrongly
recommendthatalicensed,professionalelectricianperformtheinstallation.
Disconnectfixturefrompowersourcebeforereplacingbulbs.Makesurebulbsaregivensufficienttimetocoolbeforeremoval.
PackageContents
B
HardwareContents
FixtureBody
x1
AA
BB
CC
DD
EE
FF
II
Crossbar
x1
LockWasher
x2
HexNut
x2
Nipple
x1
Canopy
ChainLoop
x1
CanopyLock
Ring
x1
Ceiling
Canopy
x1
GG
FixtureChain
x1
HH
QuickLink
x2
C
Cage
x1
E
Figure2
STEP2AttachFixtureLoopand
CagetoFixtureBody
-
A.ThreadtheFixtureLoop(A)onto
thehexcouplingonthetopcenter
oftheFixtureBody(B)andhand
tightenuntilsnug.
B.PlacetheFixtureBody(B)onto
theCageandaligntheholeson
thesideofthefixturehoodtothe
mountingholesonthetopedgeof
theCage(C).Securebythreading
Screws(D)ontotheCage(C).
Handtightenuntilsnug.
STEP1AssembleGlassPanels-
A.InstallGlassPanels(E)intotheslotonthebottomedgeoftheCage
(C)andthenfoldtheTabsonthetopedgeoftheCage(C)tosecure
GlassPanels(E).
Figure1
STEP3-InstalltheCrossbartothejunctionbox
A.AttachtheCrossbar(AA)totheOutletBoxwiththeheadofthe
GreenGroundScrewfacingyou.SecureitwithOutletBoxScrews
(notincluded),tightenuntilsnug.
Figure3
OutletBox
OutletBoxScrew
(notincluded)
GreenGround
Screw
AA
A
Fixture
Loop
x1
GlassPanel
x4
D
Screw
x2
Tab
C
E
A
B
D
C
STEP4-InstalltheCanopyChainLoopandNipple
A.ThreadoneHexNut(CC)tooneendoftheNipple(DD)untilitisat
least0.25”fromtheend.PassoneLockWasher(BB)overtheendof
theNipple(DD)andthreadtheCanopyChainLoop(EE)ontothe
Nipple(DD).Byusingpliers,threadtheHexNut(CC)againstthe
CanopyChainLoop(EE)andhandtightenuntilsnug.
B.ThreadanotherHexNut(CC)tothemiddleoftheNipple(DD).Place
anotherLockWasher(BB)overtheNipple(DD)andthenthreadthe
Nipple(DD)intotheCrossbar(AA)untiltheNipple(DD)isabout
0.375”abovetheCrossbar(AA).
C.RemovetheCanopyLockRing(FF)fromtheCanopyChainLoop
(EE).PlacetheCeilingCanopy(II)overtheCanopyChainLoop(EE)
againsttheceilingtodeterminethecorrectpositionoftheNipple
(DD).ThreadtheCanopyLockRingontotheCanopyChainLoop
(EE).AdjusttheNipple(DD)toallowtheCeilingCanopy(II)torest
againsttheceilingwhenheldinplacebytheCanopyLockRing(FF).
2018QuoizelInc.
ThankyouforpurchasingaQuoizelproduct.
Needassistancewithpartsorassembly?CallQuoizelcustomerserviceat1-800-645-3184
orvisituson-lineatwww.quoizel.com
ReleasedDate:2018-01-24
Product specificaties
| Merk: | Quoizel |
| Categorie: | Lamp |
| Model: | MHE1910CU |
Heb je hulp nodig?
Als je hulp nodig hebt met Quoizel MHE1910CU stel dan hieronder een vraag en andere gebruikers zullen je antwoorden
Handleiding Lamp Quoizel

15 Maart 2026
15 Maart 2026
14 Maart 2026
14 Maart 2026
14 Maart 2026
14 Maart 2026
14 Maart 2026
14 Maart 2026
14 Maart 2026
14 Maart 2026
Handleiding Lamp
Nieuwste handleidingen voor Lamp
12 Maart 2026
12 Maart 2026
10 Maart 2026
10 Maart 2026
10 Maart 2026
8 Maart 2026
8 Maart 2026
7 Maart 2026
7 Maart 2026
7 Maart 2026