Quoizel BRT5204GK Handleiding
Bekijk gratis de handleiding van Quoizel BRT5204GK (2 pagina’s), behorend tot de categorie Lamp. Deze gids werd als nuttig beoordeeld door 4 mensen en kreeg gemiddeld 4.6 sterren uit 6 reviews. Heb je een vraag over Quoizel BRT5204GK of wil je andere gebruikers van dit product iets vragen? Stel een vraag
Pagina 1/2
1of2
ForStyleBRT5204GK
WarningsandCautions
Turnoffelectricityatcircuitbreakerormainfuseboxbeforeinstallation.Consultalicensedelectricianifindoubt.
Theseinstructionsareprovidedforyoursafety.Itisveryimportantyoureadthemcompletelybeforeinstallingthefixture.Westrongly
recommendthatalicensed,professionalelectricianperformtheinstallation.
Disconnectfixturefrompowersourcebeforereplacingbulbs.Makesurebulbsaregivensufficienttimetocoolbeforeremoval.
Pleasegotoforproductcleaningtips.Gototheselection.
(4)A19MediumBaseBulb100WMaximum,bulbnotincluded.
MinimumHangingHeightis27.5”,MaximumHangingHeightis63.5”.
30-45minutes
Identifyandinspectallpartsbeforebeginninginstallation.Checkpackagecontentlistanddiagramsbelowtoensureallpartsare
present.Ifanypartsaremissingordamaged,donotattempttoassemble,install,oroperatethefixture.MissingParts?Contactyouroriginalplaceof
purchase.
www.quoizel.comCare+Maintenance
LightSource:
FixtureHangingHeight:
EstimatedAssemblyTime:
Preparation:
ToolsRequired:Flatheadscrewdriver,Phillipsscrewdriver,pliers,wirecutters,wirestrippers,electricaltape,safetyglasses.
InstallationGuide#IS-BRT5204GK
2018QuoizelInc.
visituson-lineatwww.quoizel.com
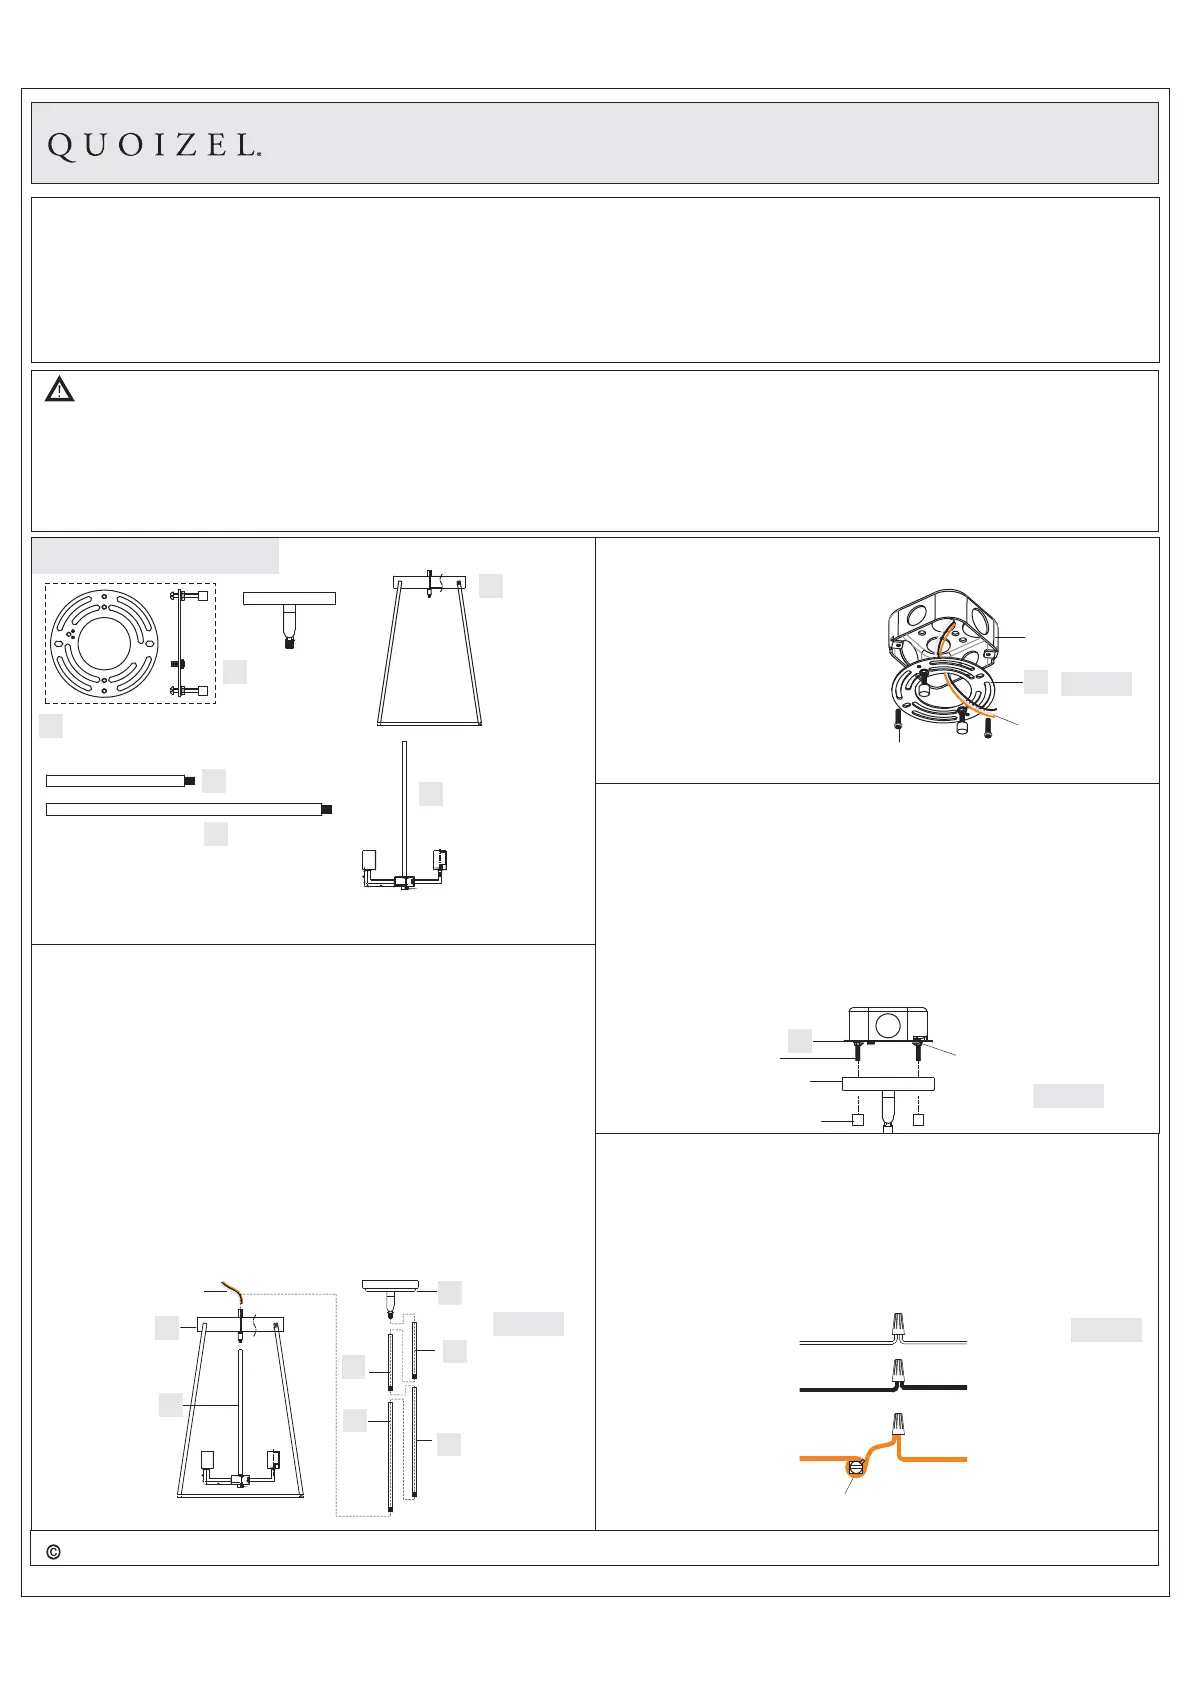
Cage
x1
E
E
Socketassembly
x1
F
F
PackageContents
A
CrossbarAssembly
x1
D
CeilingCanopy
x1
B
6”Rod
x2
C
12”Rod
x2
STEP1-InstallCeilingCanopy,RodsandFixtureBodytogether
a.Threadthecage(E)andthesocketassembly(F)togetherasshown,
Handtightenuntilsnug.
b.DeterminetheRods(B/C)tobeassembledtotheFixtureBody
accordingtoyourhangingheight.
c.Passthesupplywiresandgroundwirethroughthechosenrods
(B/C)andtheCeilingCanopy(D).ThreadtheFixtureBody,the
chosenRods(B/C)andtheCeilingCanopy(D)together.Hand
tightenuntilsnug.
SuggestedrodsforCeilingheight:
8’ceiling:use(1)6”rods
9’ceiling:use(1)6”rodsand(1)12”rods
10’ceiling:use(1)6”rodsand(2)12”rods
B
B
D
SupplyWires
andGroundWire
C
C
Figure1
STEP2-Installingthe
CrossbarAssembly
A.Passthesupplywiresfrom
outletboxthroughthe
CrossbarAssembly(A).
AttachtheCrossbarAssembly
(A)totheOutletBoxwiththe
headoftheGreenGround
Screwfacingyou.Securethe
CrossbarAssembly(A)with
OutletBoxScrews(not
included).Tightenuntilsnug.
SupplyWireswith
GroundWire
OutletBoxScrews
(notincluded)
OutletBox
A
Figure2
STEP3TestFittingCeilingCanopytoCrossbarAssembly-
A.
tothe
ceiling
RemovemountingballsfromtheCrossbarAssembly(A).Fitthe
CrossbarAssembly(A)andsecurewith
mountingballs.Note:Theshouldbesnugagainst
theandthemountingballs.If
FixtureCanopy
FixtureCanopy
not,adjustthelengthofthe
nippleontheCrossbarAssembly(A)byunscrewingthe
preassembledhexnutandlockwasherandthenscrewingthe
mountingscrewsinoroutofthecrossbaruntilthecorrectlengthis
achieved.OncetheFixtureCanopyissecure,removethemounting
ballandFixtureCanopyandproceedtoStep4.
MountingScrew
HexNutand
LockWasher
MountingBall
A
Figure3
FixtureCanopy
STEP4-WireConnections
A.
B.Usestandardwireconnectors(notincluded)tomakeallwire
connections.Twistconnectorsuntilwiresaretightlyjoinedtogether.
Wrapeachconnectionwithapprovedelectricaltapeandcarefully
stuffalltheconnectedwiresintotheOutletBox.
Wrapbareorgreengroundwirearoundgreengroundscrewonthe
crossbar,nolessthan2inchesfromtheendofthewire.Tightenthe
greengroundscrew.
GreenGroundScrew
ontheCrossbar
Whitewire
fromoutletbox
Whitewire
fromfixture
Blackwirefrom
outletbox(orRed)
Blackwire
fromfixture
Bare,orGreen
Groundwire
fromoutletbox
Groundwire
fromFixture
Figure4
ReleasedDate:2019-01-15
Product specificaties
| Merk: | Quoizel |
| Categorie: | Lamp |
| Model: | BRT5204GK |
Heb je hulp nodig?
Als je hulp nodig hebt met Quoizel BRT5204GK stel dan hieronder een vraag en andere gebruikers zullen je antwoorden
Handleiding Lamp Quoizel

15 Maart 2026
15 Maart 2026
14 Maart 2026
14 Maart 2026
14 Maart 2026
14 Maart 2026
14 Maart 2026
14 Maart 2026
14 Maart 2026
14 Maart 2026
Handleiding Lamp
Nieuwste handleidingen voor Lamp
12 Maart 2026
12 Maart 2026
10 Maart 2026
10 Maart 2026
10 Maart 2026
8 Maart 2026
8 Maart 2026
7 Maart 2026
7 Maart 2026
7 Maart 2026