Quoizel GLY648CS Handleiding
Bekijk gratis de handleiding van Quoizel GLY648CS (3 pagina’s), behorend tot de categorie Lamp. Deze gids werd als nuttig beoordeeld door 5 mensen en kreeg gemiddeld 4.0 sterren uit 3 reviews. Heb je een vraag over Quoizel GLY648CS of wil je andere gebruikers van dit product iets vragen? Stel een vraag
Pagina 1/3
Pleasegotoforproductcleaningtips.Gototheselection.
(6)B10CandelabraBaseBulbs60WMaximum.
30-45minutes
Identifyandinspectallpartsbeforebeginninginstallation.Checkpackagecontentlistanddiagramsbelowtobesureallpartsare
present.Ifanypartsaremissingordamaged,donotattempttoassemble,install,oroperatethefixture.Contactcustomerserviceforreplacement
parts.
www.quoizel.comCare+Maintenance
LightSource:
EstimatedAssemblyTime:
Preparation:
ToolsRequired:Flatheadscrewdriver,Phillipsscrewdriver,pliers,wirecutters,wirestrippers,electricaltape,safetyglasses.
WarningsandCautions
1of3
AssemblyInstructionSheet#IS-GLY648CS
ForStyleGLY648CS
6CORPORATEPARKWAY
GOOSECREEKSC29445
wwwquoizelcom
,.
..
2016QuoizelInc.
Turnoffelectricityatcircuitbreakerormainfuseboxbeforeinstallation.Consultalicensedelectricianifindoubt.
Theseinstructionsareprovidedforyoursafety.Itisveryimportantyoureadthemcompletelybeforeinstallingthefixture.Westrongly
recommendthatalicensed,professionalelectricianperformtheinstallation.
Disconnectfixturefrompowersourcebeforereplacingbulbs.Makesurebulbsaregivensufficienttimetocoolbeforeremoval.
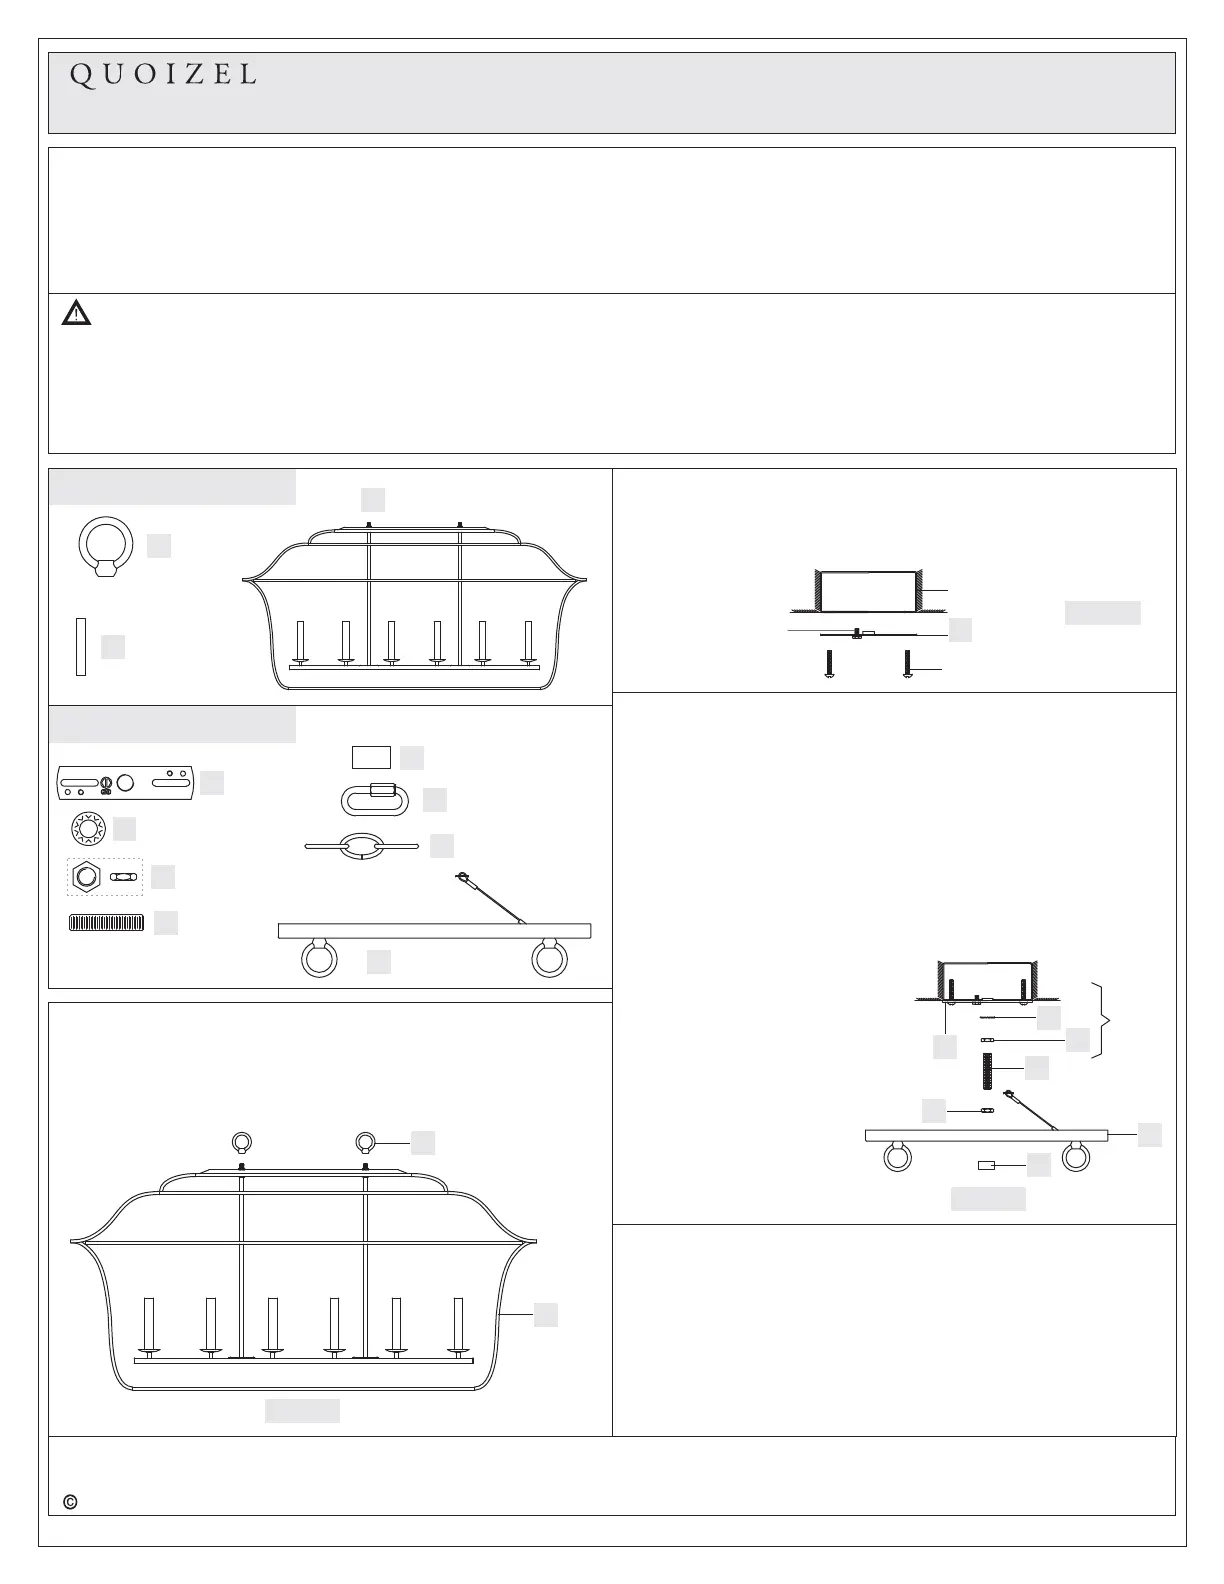
PackageContents
HardwareContents
AA
BB
CC
DD
Crossbar
x1
LockWasher
x1
HexNut
x3
Nipple
x1
GG
QuickLink
x4
CeilingCanopy
x1
ReleasedDate:2016-12-07
B
FixtureBody
x1
EE
A
Fixture
Loop
x2
STEP2InstallCrossbar-
A.AA)AttachtheCrossbar(totheOutletBoxwiththeheadofthe
GreenGroundScrewfacingyou.SecureitwithOutletBoxScrews
(notincluded).Tightenuntilsnug.
Figure2
OutletBox
OutletBoxScrew
(notincluded)
GreenGround
Screw
AA
STEP3InstallNippletoCrossbar-
*Pliersisrequiredforthisstep.
A.ThreadoneHexNut(CC)tothemiddleoftheNipple(DD).Placethe
LockWasher(BB)overtheNipple(DD)andthenthreadtheNipple
(DD)intotheCrossbar(AA)untiltheNipple(DD)isabout0.375”
abovetheCrossbar(AA).
B.PlacetheCeilingCanopy(HH)overtheNipple(DD)againstthe
ceilingtodeterminethecorrectpositionoftheNipple(DD).Thread
theLockBall(FF)ontotheNipple(DD).AdjusttheNipple(DD)to
allowtheCeilingCanopy(HH)torestagainsttheceilingwhenheld
inplacebytheLockBall(FF).
C.RemovetheCeilingCanopy(HH)andthentightentheHexNut(CC)
againsttheCrossbar(AA)tosecureinplace.
AA
BB
CC
DD
StepA
Figure3
CC
D.ThreadanotherHexNut
(CC)ontotheendofthe
Nipple(DD).ThreadthisHex
Nut(CC)onjustenoughso
theinsidesurfaceofthe
CeilingCanopy(HH)rests
againstit.*Youmayhaveto
trialfittheCeilingCanopy
(HH)onemoretimesto
insurethisdistancealso.
ThisHexNut(CC)isneeded
heretopreventyoufrom
crushingdownthecenterof
theCeilingCanopy(HH).
ThankyouforpurchasingaQuoizelproduct.
Needassistancewithpartsorassembly?CallQuoizelcustomerserviceat1-800-645-3184
orvisituson-lineatwww.quoizel.com
FF
LockNut
x1
HH
FixtureChain
x2
STEP1AssembleFixtureLooptoFixtureBody-
A.ThreadtheFixtureLoop(A)ontothetopoftheFixtureBody(B).
Handtightenuntilsnug.Makesure(2)FixtureLoops(A)areinthe
samedirectionaftertighten.
A
B
Figure1
FF
STEP4-InstallFixtureChain
A.AdjusttheFixtureChain(GG)toyourdesiredlengthbyremoving
linksifneeded.
Pliersisrequiredforthisstep.
B.WiththeFixtureChains(GG)notattachedtotheFixtureLoopson
thetopoftheFixtureBody(B)andonthebottomoftheCeiling
Canopy(HH),pullthesupplywiresandgroundwirethroughoneof
theFixtureChain(GG)alternatinglinks.Afterthesupplywiresand
groundwirearethroughtheFixtureChain(GG),pulltheSupply
*
HH
C
Optional
CandleCover
x6
Product specificaties
| Merk: | Quoizel |
| Categorie: | Lamp |
| Model: | GLY648CS |
Heb je hulp nodig?
Als je hulp nodig hebt met Quoizel GLY648CS stel dan hieronder een vraag en andere gebruikers zullen je antwoorden
Handleiding Lamp Quoizel

15 Maart 2026
15 Maart 2026
14 Maart 2026
14 Maart 2026
14 Maart 2026
14 Maart 2026
14 Maart 2026
14 Maart 2026
14 Maart 2026
14 Maart 2026
Handleiding Lamp
Nieuwste handleidingen voor Lamp
12 Maart 2026
12 Maart 2026
10 Maart 2026
10 Maart 2026
10 Maart 2026
8 Maart 2026
8 Maart 2026
7 Maart 2026
7 Maart 2026
7 Maart 2026