Quoizel KAN440EK Handleiding
Bekijk gratis de handleiding van Quoizel KAN440EK (3 pagina’s), behorend tot de categorie Lamp. Deze gids werd als nuttig beoordeeld door 4 mensen en kreeg gemiddeld 4.3 sterren uit 7 reviews. Heb je een vraag over Quoizel KAN440EK of wil je andere gebruikers van dit product iets vragen? Stel een vraag
Pagina 1/3
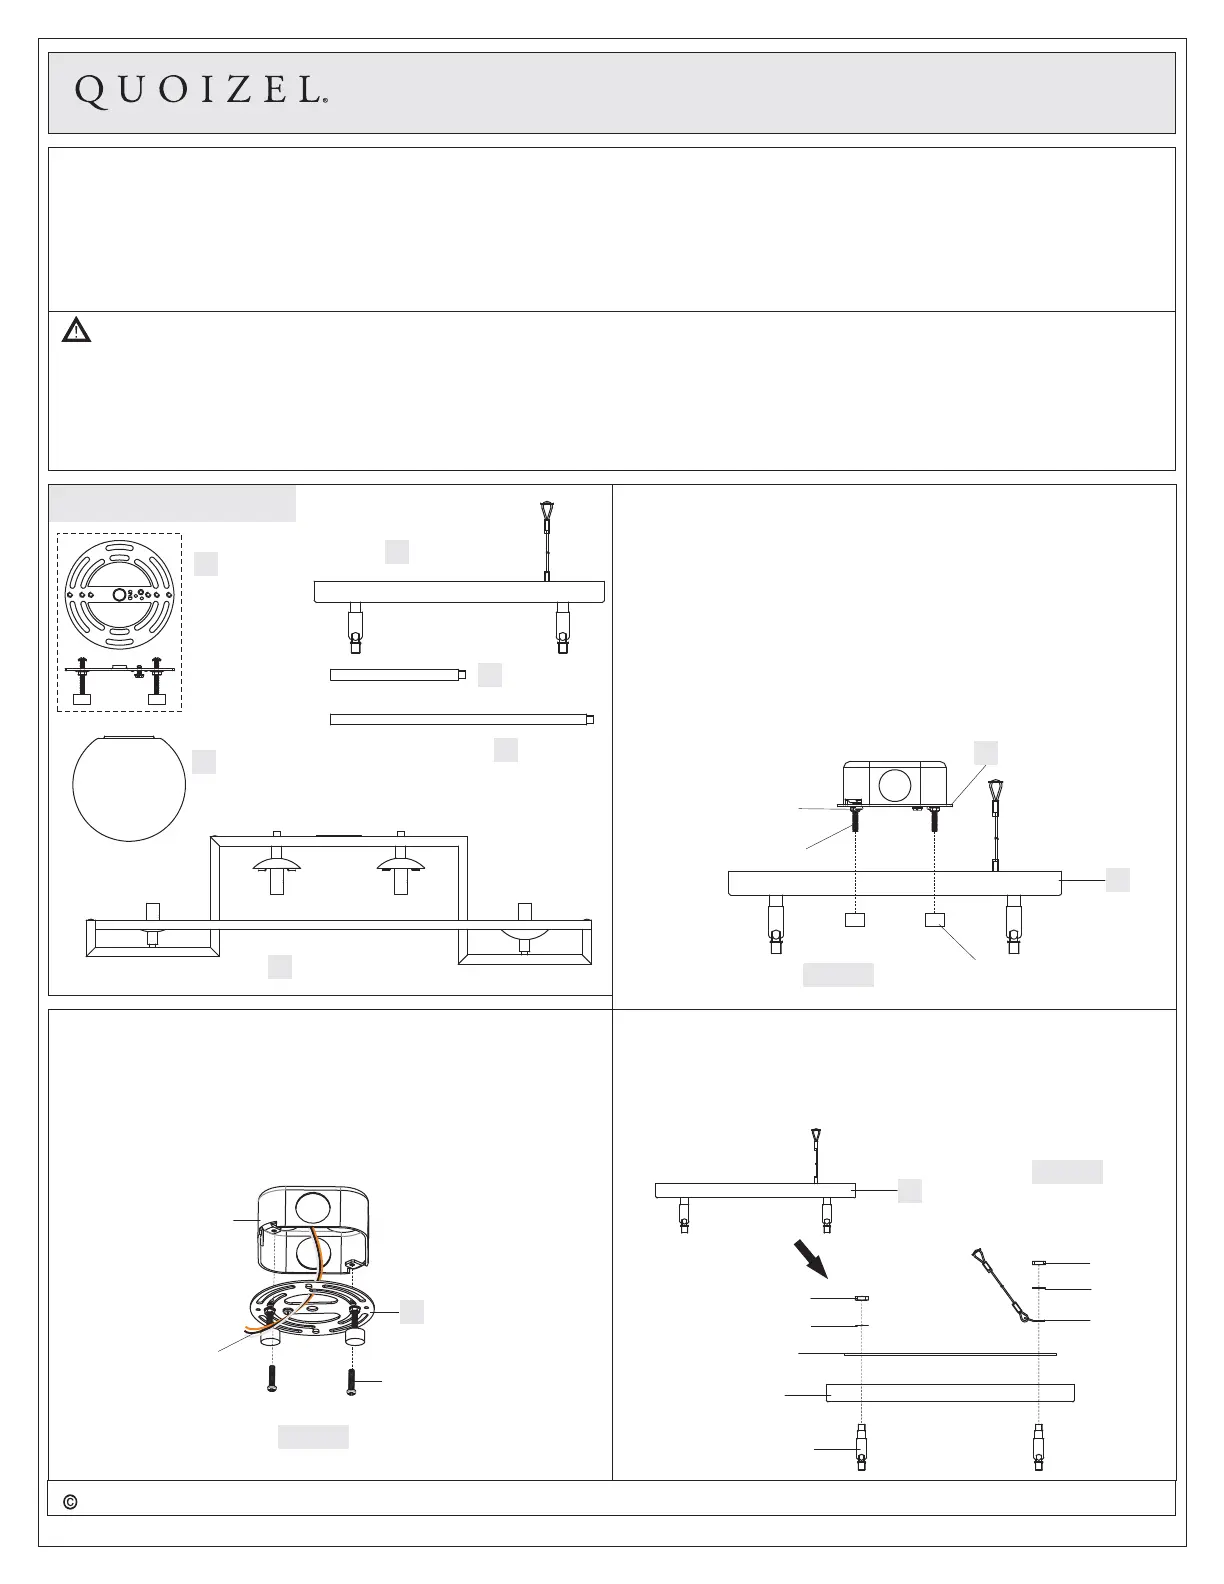
PackageContents
1of3
ForStyleKAN440EK
Pleasegotoforproductcleaningtips.Gototheselection.
(4)B10CandelabraBaseBulbs60WMaximum,CandelabraBaseT8VintageBulbsarerecommended,bulbsnotincluded.
MinimumHangingHeightis13”,MaximumHangingHeightis49”.
20-30minutes
Identifyandinspectallpartsbeforebeginninginstallation.Checkpackagecontentlistanddiagramsbelowtoensureallpartsare
present.Ifanypartsaremissingordamaged,donotattempttoassemble,install,oroperatethefixture.Contactyouroriginalplaceofpurchase.
www.quoizel.comCare+Maintenance
LightSource:
FixtureHangingHeight:
EstimatedAssemblyTime:
Preparation:
ToolsRequired:Flatheadscrewdriver,Phillipsscrewdriver,pliers,wirecutters,wirestrippers,electricaltape,safetyglasses.
InstallationGuide#IS-KAN440EK
2019QuoizelInc.
ReleasedDate:2019-02-28
visituson-lineatwww.quoizel.com
E
WarningsandCautions
Turnoffelectricityatcircuitbreakerormainfuseboxbeforeinstallation.Consultalicensedelectricianifindoubt.
Theseinstructionsareprovidedforyoursafety.Itisveryimportantyoureadthemcompletelybeforeinstallingthefixture.Westrongly
recommendthatalicensed,professionalelectricianperformtheinstallation.
Disconnectfixturefrompowersourcebeforereplacingbulbs.Makesurebulbsaregivensufficienttimetocoolbeforeremoval.
GlassShade
x4
F
FixtureBody
x1
A
Crossbar
Assembly
x1
C
D
6”LRod
x4
12”LRod
x4
B
CeilingCanopy
x1
Figure1
STEP1InstallingtheCrossbarAssembly-
A.PassthesupplywiresthroughtheCrossbarAssembly(A).Attach
theCrossbarAssembly(A)totheoutletboxwiththeheadofthe
greengroundscrewfacingyou.SecuretheCrossbarAssembly(A)
withoutletboxscrews(notincluded).Tightenuntilsnug.
SupplyWires
withGroundWire
OutletBoxScrews
(notincluded)
OutletBox
A
MountingBall
A
HexNutand
LockWasher
MountingScrew
STEP2-TestFittheCeilingCanopytotheCrossbarAssembly
A.RemovethemountingballsfromtheCrossbarAssembly(A).
PlacetheCeilingCanopy(B)ontotheCrossbarAssembly(A)and
securewithmountingballs.Note:TheCeilingCanopy(B)should
besnugagainsttheceilingandheldtightwiththemountingballs.
Ifitisnot,adjustthelengthofthemountingscrewsonthe
CrossbarAssembly(A)byunscrewingthepreassembledhexnut
andlockwasherandthenscrewingthemountingscrewsinorout
ofthecrossbaruntilthecorrectlengthisachieved.Oncethe
CeilingCanopy(B)issecure,removethemountingballand
CeilingCanopy(B)andproceedtoStep3.
B
Figure2
STEP3SeparateSwivelsfromCeilingCanopy-
A.Byusingpliers,unlockhexnutsinsideoftheCeilingCanopy(B)and
removeswivelsfromtheCeilingCanopy(B).
B
CeilingCanopy
ReinforcedPlate
Washer
HexNut
HexNut
Washer
Lanyard
Swivel
Figure3
Product specificaties
| Merk: | Quoizel |
| Categorie: | Lamp |
| Model: | KAN440EK |
Heb je hulp nodig?
Als je hulp nodig hebt met Quoizel KAN440EK stel dan hieronder een vraag en andere gebruikers zullen je antwoorden
Handleiding Lamp Quoizel

15 Maart 2026
15 Maart 2026
14 Maart 2026
14 Maart 2026
14 Maart 2026
14 Maart 2026
14 Maart 2026
14 Maart 2026
14 Maart 2026
14 Maart 2026
Handleiding Lamp
Nieuwste handleidingen voor Lamp
12 Maart 2026
12 Maart 2026
10 Maart 2026
10 Maart 2026
10 Maart 2026
8 Maart 2026
8 Maart 2026
7 Maart 2026
7 Maart 2026
7 Maart 2026