QTX ADMX-512 Handleiding

QTX Verlichting ADMX-512

Lees hieronder de đź“– handleiding in het Nederlandse voor QTX ADMX-512 (12 pagina's) in de categorie Verlichting. Deze handleiding was nuttig voor 16 personen en werd door 2 gebruikers gemiddeld met 4.5 sterren beoordeeld

Pagina 1/12
www.avsl.com 154.105UK User Manual
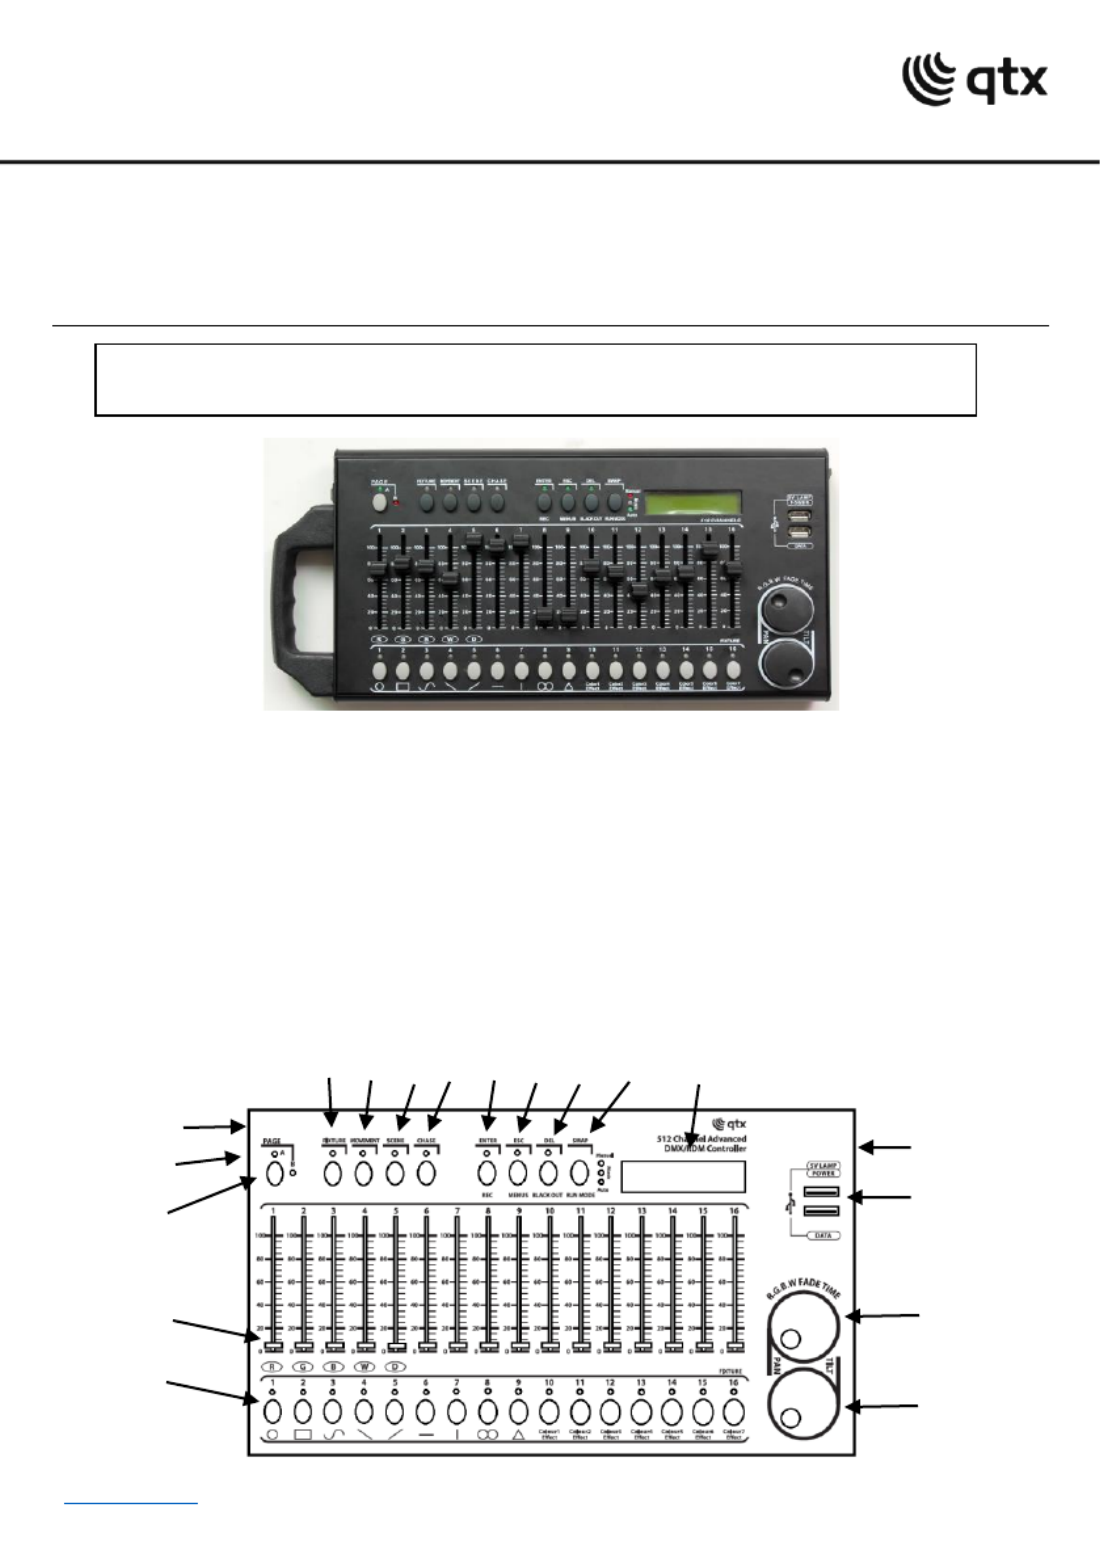
ADMX- 512
512 Channel DMX/RDM Controller
Item ref: 4.105 15 UK
User Manual
A powerful 512 channel DMX/RDM controller with 32 fixtures. Each fixture controls up to 32 channels per
unit. There are 32 storable scenes and 32 storable chases, each with up to 100 steps which can be
triggered manually, by sound or automatically using the time faders between 0.1 seconds and 10 minutes.
An integrated USB port provides back up of up to 16 banks of DMX settings, scenes and chases on an
attached USB storage device. The hardwearing metal chassis can be used standalone or 3U rackmount if
preferred and the detachable carry handle makes the unit easy to move from event to event.
In the box:
Your ADMX- 2 should arrive with you in a single carton in goo cond The carton should contain 51 d ition.
1 x main unit, 1 x UK power adaptor and 1 x user guide.
Controls Overview:
Please read through this manual thoroughly before use, y damage an
cause by misuse of product will be covered by warrantd not y.
1.
2.
3.
4.
5.
6.
7.
8.
9.
11.
14.
17.
18.
www.avsl.com 154.105UK User Ma l nua
1. Channel faders 1-16: For adjusting the DMX values of the connected light effect units. The current
D value is indicated in the display. Controls 1- also adjust the brightness ratio of the red, green, blue MX 4
and white LEDs of the connected light effect units and control 5 adjusts the total brightness.
2. Number buttons 1- (with LED16 ’s): These buttons control different functions depending on the
selected mode and have a dual occupancy; the button PAGE allows to switch between the two channel
groups 1-16 and 17 32- :
•FIXTURE: To select and deselect connected fixtures
•MOVEMENT: To activate and deactivate movement patterns (button 1-9) or color effects (button 10-16).
•SCENE: To activate or deactivate illumination scenes.
•CHASE: To activate or deactivate chases.
3. PAGE button with LEDs: To switch the number buttons between the two channel groups 1-16 and
17 32.-
•Red LED A: channel group 1-16 is selected.
•Green LED B: channel group 17-32 is selected.
4. FIXTURE button with LED:
• With the button active (Blue LED) the number buttons allow selection and deselection of connected
fixtures.
• With the button held down, for adjusting the fade in time for the RGBW color channels together with the
pan wheel.
5. MOVEMENT button with LED: With the button active (blue LED) the number buttons allow
activat and deactivation of movement patterns or color effects. ion
6. SCENE button with LED: With the button active (blue LED) the number buttons allow activation and
deactivation of illumination scenes.
7. CHASE button with LED: With the button active (Blue LED) the number buttons allow activation and
deactivation of chases.
8. Data wheel PAN: For controlling the pan movement of moving heads or scanners and for
programming functions.
9. Data wheel TILT: For controlling the tilt movement of moving heads or scanners and for
programming functions.
10. USB ports:
•POWER ovides additional power to connected USB devices. : Pr
•DATA For connecting a USB storage device for storing and importing data and firmware updates. :
11. REC/ENTER button with LED:
•Long press: To activate or deactivate the programming mode.
•Short press: For storing individual confirming adjustments. illumination scenes or chases and for
12. MENU/ESC button with LED:
•Long press: To call and exit the system settings.
•Short press: To abort a setting procedure and jumping back to a higher menu level.
13. ACK OUT/DEL button with LED: BL
•Sets all control channels to the value zero ( . for turning off the fixtures e.g ).
•For deleting illumination scenes or chases.
•For inserting a scene into a chase.
14. RUN MODE/SWAP button with LEDs:
•For setting the running mode of a chase. A short press switches between manual, sound-controlled and
automatic mode. The LEDs next to the button indicate the current setting.
-MANUAL: The chase can be manually advanced step by step with the pan wheel.
-MUSIC: The individual steps of the chase run to the rhythm of the music picked up via the internal
microphone.
-AUTO: The individual steps of the chase run at the adjusted speed and fade time.
•For switching between the parameters when editing movement patterns.
15. LCD Display: Shows the current setting or operation parameters.
16. DMX connection: 3-pin XLR jack for connecting the DMX input of the first light effect unit.
www.avsl.com 154.105UK User Ma l nua
17. Power input: Insert the jack plug of the supplied PSU.
18. Power on/off switch: itches the controller on and off. Sw
Setting up:
1. Connect the power supply to the socket on the side of the unit and plug into a mains socket.
2. Connect a DMX lead to the socket on the side of the unit and a compatible D -512 device. MX
3. Switch on the controller using the switch on the side of the uni t.
4. The LCD display will display Manual indicating the controller is in Manual mode and ready for use
Operation:
Switch on the controller with the rear power switch. The unit is in manual mode and the display indicates
“Manual” on the upper line.
Manual Adjustment of an Illumination Scene:
An illumination scene contains the values of all control channels including the pan and tilt settings of the
connected light effect units.
1. Press the FIXTURE button.
•The control LED lights . up
2. Use the number buttons 1-16 to select the units to be controlled.
•The corresponding LEDs of the buttons light.
•If a number button is pressed once again, the corresponding device is deselected. Instead of selecting
each device individually, devices with consecutive numbers can be selected simultaneously. For this, press
the first and last number button simultaneously. Example: For selecting the devices 1 to 8, press the
number buttons 1 and 8 simultaneously. Thus, all 8 devices will be selected simultaneously. In the same
way, it is possible to deselect all the devices again.
3 Adjust the desired DMX values (0-255) for the DMX channels using the sliding controls and, if .
necessary, the pan and tilt wheels.
•As soon as a fader is moved, the display indicates the number of the control channel in the lower line
and the current output value as a DMX value.
4. The 32 light effect units are combined in 2 groups (channel pages) of 16 channels each. If necessary,
use the PAGE button to switch between the two channel groups 1-16 (LED A lights ) and 17-32 (LED B up
lights ) and repeat steps 2 and 3, until the desired values are assigned to all channels. up
Adjusting an Illumination Scene with Movement Patterns and Color effects:
The built-in effect generator allows creating 9 different movement patterns for pan and tilt movement of
moving heads or scanners as well as 7 additional color effects for LED light effect units. The effects can be
saved together with other DMX values in a scene.
1. Press the FIXTURE button (control LED ligh ) and use the number buttons 1-16 to select the ts up
devices to be assigned to an effect.
•If necessary, use the PAGE button switch between the two channel groups 1-6 (LED A lights ) and to up
17-32 (LED B lights up).
2. Call the effect mode with the MOVEMENT button.
•The control LED lights . up
3. Select the desired movement patterns or color effect with the number buttons 1- 16.
•The selected devices will begin to perform the movement pattern or color effect.
•Number buttons 1-9: Create movement patterns designed for pan and tilt movement of moving heads or
scanners.
•Number buttons 10-16: Create color effects for all kinds of LED light effect units.


Product specificaties

Merk: QTX
Categorie: Verlichting
Model: ADMX-512

Heb je hulp nodig?

Als je hulp nodig hebt met QTX ADMX-512 stel dan hieronder een vraag en andere gebruikers zullen je antwoorden


Handleiding Verlichting QTX

QTX

QTX Wash & Beam Handleiding

4 September 2023
QTX

QTX TetraCube Handleiding

4 September 2023
QTX

QTX BATPAR-18W Handleiding

4 September 2023
QTX

QTX TinyMover Handleiding

4 September 2023
QTX

QTX Recharge DJ Handleiding

4 September 2023
QTX

QTX Multi-Bar Handleiding

4 September 2023
QTX

QTX SpectraWash Handleiding

4 September 2023
QTX

QTX DP4 Handleiding

20 Juni 2023
QTX

QTX MBM-1 Handleiding

18 Juni 2023

Handleiding Verlichting

Nieuwste handleidingen voor Verlichting