Primacoustic Saturna LP Handleiding
Primacoustic
Niet gecategoriseerd
Saturna LP
Bekijk gratis de handleiding van Primacoustic Saturna LP (2 pagina’s), behorend tot de categorie Niet gecategoriseerd. Deze gids werd als nuttig beoordeeld door 4 mensen en kreeg gemiddeld 4.4 sterren uit 2.5 reviews. Heb je een vraag over Primacoustic Saturna LP of wil je andere gebruikers van dit product iets vragen? Stel een vraag
Pagina 1/2

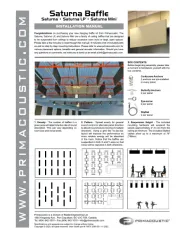
INSTALLATION MANUAL
Congratulations on purchasing your new hanging bafe kit from Primacoustic. The
Saturna, Saturna LP, and Saturna Mini are a family of ceiling bafes that are designed
to be suspended from ceilings to reduce excessive room echo in large, open spaces.
Please take a few minutes to read through this manual. It includes a list of included parts
as well as step by step mounting instructions. Please refer to www.primacoustic.com for
various placement options, benets and general acoustic information. Should you have
any questions or comments, we invite you to send us an email at info@primacoustic.com.
1. Density - The number of bafes in a
given area will determine the rate of sound
absorption. This can vary depending on
room size and noise levels.
2. Pattern - Spread evenly for general
sound control or alternate panel direction
to absorb sound waves moving in multiple
directions. Using a grid like ‘tic-tac-toe’
layout will improve the performance as
more random energy will be absorbed
in the room. Notice that the bafes are
suspended in both X and Y axes so that
noise will be captured in both directions.
3. Suspension Height - The included
mounting hardware will suspend the
panels approximately 2” (5 cm) from the
ceiling at minimum. The included SlipNot
cables allow up to a maximum of 78”
(198cm)
w w w . p r i m a c o u s t i c . c o m
Primacoustic is a division of Radial Engineering Ltd.
1845 Kingsway Ave., Port Coquitlam, BC V3C 1S9, Canada
Tel: (604) 942-1001 • Fax (604) 942-1010 • info@primacoustic.com
Specications and appearances subject to change without notice.
Copyright © 2020, all rights reserved. User Guide part #: R870 2069 00 / 11-2022
BAR
BAR
BOX CONTENTS:
Before beginning assembly, please take
a moment to familiarize yourself with the
box contents.
Corkscrew Anchors
2 anchors are pre-installed
in every panel
Buttery Anchors
2 per panel
Eye-screw
2 per panel
SlipNot
2 per panel
TMTMTM
Saturna Baffle
Saturna • Saturna LP • Saturna Mini

4. SOLID BACKED CEILING
If one or more of your ceiling anchor
locations is on a solid backing, such as a
joist, you don’t need to use the included
buttery anchors. In such a case, use a
1/8” (3.2mm) drill bit to make a pilot hole
and screw the eye-screw in directly.
5. HOLLOW BACKED CEILING
If the backing above your ceiling is
hollow, use a 5/16” (7.9mm) drill bit
to make a hole for the buttery anchor
and follow the steps below. Repeat the
anchor and eye-screw installation until
all your suspension points are ready.
3. INSTALLING CEILING ANCHORS
If a stud-nder is not available, probe
your ceiling to nd out if there is a solid
or hollow backing. Using a hammer, tap
a nail into each ceiling anchor location
to determine the backing. If the backing
is solid continue to the next step. If the
backing is hollow, skip to step 5.
1. CEILING ANCHOR LOCATIONS
Measure and mark your ceiling for
suspension point locations. Pay close
attention to where you want the panel
to be situated. This way the included
Corkscrew anchors will be directly below
each ceiling mounting point. All cables
should hang perfectly straight to create
a dead hang.
6. ATTACH THE CEILING EYLETS
Remove the hook from the SlipNot cable
by pushing in the center pin. Feed the
wire through the ceiling eyelet, then
through the looped end of the wire.
Reattach the hook by pushing the wire
through the center pin.
Fold. Tap. Screw.
A B C
7. ATTACH THE PANEL
Clip the SlipNot hook through the
opening on the Corkscrew anchor. Pull
the cable to adjust the height.
8 . SUSPEND AND LEVEL
With the panel suspended, you can
ne tune the lengths of the SlipNot
by pressing the center pin to release
the cable. Level the panel and set the
spacing between ceiling and the panel.
2. PANEL ANCHOR LOCATIONS
The Corkscrew anchors are pre-installed
on the longest edge of each bafe. If
desired, the anchors can be moved to
the shorter edge of the panel. Turn the
anchor counter-clockwise to remove
from the panel. Mark the desired location
for each anchor on the short edge of the
panel. Ensure the markings are of equal
distance to each side to ensure balanced
weight distribution.
Carefully center the Corkscrew on the
edge of the panel. Twist and push the
anchor into the edge until it breaks
through the coating and is ush with the
panel. Be sure to keep the anchor as
straight as possible and proceed slowly
to avoid pushing through the face of the
panel.
Min 2”
(51mm)
LIMITED WARRANTY
Please inspect products immediately after receiving your purchase. Primacoustic acoustic products are guaranteed to be free of manufacturing defects for a period of 3 years after purchase. In the unlikely
event that a defect is uncovered, please call 604-942-1001 to obtain a RA number (Return Authorization number) from Primacoustic before the 3 year warranty period expires. Once you have obtained a RA
number you must return the product, freight prepaid, within fteen (15) days after the date the RA number is issued. Please return the product in the original packaging (or another, affording an equal degree
of protection) with all of the following: (1) RA number clearly marked on the returned package; (2) a receipt or bill of sale showing proof of purchase from an authorized seller; plus (3) a letter describing
the defect. Please include your name, address, telephone number and the applicable RA number. You are solely responsible for all shipping and insurance costs for returning the product to Primacoustic,
and you will not be reimbursed or compensated for any loss or damage incurred during return shipping. Primacoustic will at its sole discretion repair or replace the product. Should the product no longer
be available, Primacoustic reserves the right to exchange this with a product of similar performance and value. Due to different dye lots, Primacoustic cannot guarantee exact color match. This Warranty
shall solely extend to the original owner and is limited to manufacturing defects and excludes damage due to improper installation, freight handling, wear and tear, abuse, misuse, misapplication, color
fading or deterioration due to prolonged exposure to ultra violet light, smoke, humidity or other environmental factors. It is understood that the use and suitability of the product is entirely the responsibility
of the buyer or specifying engineer and as such, these parties agree to hold Primacoustic, or its associated company, and/or ofcers, harmless from any responsibility whatsoever other than what is clearly
outlined in this warranty.
Product specificaties
| Merk: | Primacoustic |
| Categorie: | Niet gecategoriseerd |
| Model: | Saturna LP |
Heb je hulp nodig?
Als je hulp nodig hebt met Primacoustic Saturna LP stel dan hieronder een vraag en andere gebruikers zullen je antwoorden
Handleiding Niet gecategoriseerd Primacoustic
2 April 2025

27 Januari 2025

23 Augustus 2024
Handleiding Niet gecategoriseerd
- Huion
- Rosco
- Bluemarina
- Happy Plugs
- West Elm
- Hugo Muller
- Trekstor
- Yli Electronic
- Jupio
- Lifenaxx
- HQ Power
- Cadac
- Alden
- Rival
- Tiny Love
Nieuwste handleidingen voor Niet gecategoriseerd

19 Augustus 2025

19 Augustus 2025
19 Augustus 2025

19 Augustus 2025
19 Augustus 2025

19 Augustus 2025
19 Augustus 2025
19 Augustus 2025
19 Augustus 2025

19 Augustus 2025