PowerWalker VI 3000 RLE Handleiding

PowerWalker UPS VI 3000 RLE

Lees hieronder de 📖 handleiding in het Nederlandse voor PowerWalker VI 3000 RLE (6 pagina's) in de categorie UPS. Deze handleiding was nuttig voor 16 personen en werd door 2 gebruikers gemiddeld met 4.5 sterren beoordeeld

Pagina 1/6
Line-interactive UPS
PowerWalker VI 1200- RLE 3000
User Manual
IMPORTANT SAFETY INSTRUCTIONS
(SAVE THESE INSTRUCTIONS)
This manual contains important safety instructions. Please read and follow all instructions carefully during installation and operation of the unit. Read this
manual thoroughly before attempting to unpack, install, or operate your UPS.
CAUTION! T prevent the risk of re or electric shock, install in a temperature a humidity controlled indoor area free of conductive contaminants. (See the ond
specications for the acceptable temperature and humidity range.)
CAUTION! To reduce the risk of overheating the UPS, do not cover the UPS' cooling vents and avoid exposing the unit to direct sunlight or installing the unit
near heat emitting appliances such as space heaters or furnaces.
CAUTION! Do not attach non-computer-related items, such as medical equipment life-support equipment, microwave ovens, or vacuum cleaners to UPS. ,
CAUTION! Do not plug the UPS input into its own output.
CAUTION! Do not allow liquids or any foreign object to enter the UPS. Do not place beverages or any other liquid-containing vessels on or near the unit.
CAUTION! In the event of an emergency, press the OFF button and disconnect the power cord from the AC power supply to properly disable the UPS.
CAUTION! Do not attach a power strip or surge suppressor to the UPS.
CAUTION! Unplug the UPS prior to cleaning and do not use liquid or spray detergent.
INSTALLING YOUR UPS SYSTEM
UNPACKING
The box should contain the following:
(1) UPS Unit x 1 (2) User Manual; 1; (3) USB Cable x 1; (4) RS232 Cable x 1;
HOW TO DETERMINE THE POWER REQUIREMENTS OF YOUR EQUIPMENT
1. Ensure that the equipment plugged into the battery power-supplied outlets does not exceed the UPS unit’s rated capacity. If rated unit capacities are
exceeded, an overload condition may occur and cause the UPS unit to shut down or the fuse blow.
2. There are many factors that can aect the amount of power that your computer system will require. For optimal system performance keep the load
below 80% of the unit’s rated capacity.
HARDWARE INSTALLATION GUIDE
1. Your new UPS may be used immediately upon receipt. However, recharging the battery for at least 8 hours is recommended to ensure that the battery's
maximum charge capacity is achieved. Charge loss may occur during shipping and storage. To recharge the battery, simply leave the unit plugged into
an AC outlet. The unit will charge in both the on and o position.
2. With the UPS unit o and unplugged, connect the computer, monitor, and any externally powered data storage device.
3. Plug the UPS into a 2 pole, 3 wire grounded receptacle (wall outlet). Make sure the wall branch outlet is protected by a fuse or circuit breaker and does
not service equipment with large electrical demands.
4. Depress the power switch to turn the unit on. The LCD indicator light will illuminate and the unit will "beep".
5. To maintain optimal battery charge, leave the UPS plugged into an AC outlet at all times.
6. To store your UPS for an extended period, cover it and store with the battery fully charged. Recharge the battery every three months to ensure battery
life.
ROUTINE MAINTENANCE AND STORAGE
ROUTINE MAINTENANCE
1. Use dry soft clothes to clean the front panel and plastic parts. Do not use any detergent that contains alcoholic ingredient.
2. The expected lifetime of the battery is around 3 years. Improper operation and harsh environment will reduce the actual lifetime.
3. Unplug the UPS from power inlet if the UPS will not operate for long period of time.
STORAGE
1. First turn o your UPS and disconnect its power cord from the wall outlet. Disconnect all cables connected the UPS to avoid battery drain.
2. The UPS should be stored in a cool dry location.
3. Make sure the battery is fully charged before the UPS is stored.
4. For extended storage in moderate climates, the battery should be charged for 12 hours every 3 months by plugging the power cord into the wall
receptacle and turning on the main switch. Repeat it every 2 months in high temperature locations.
BASIC OPERATION
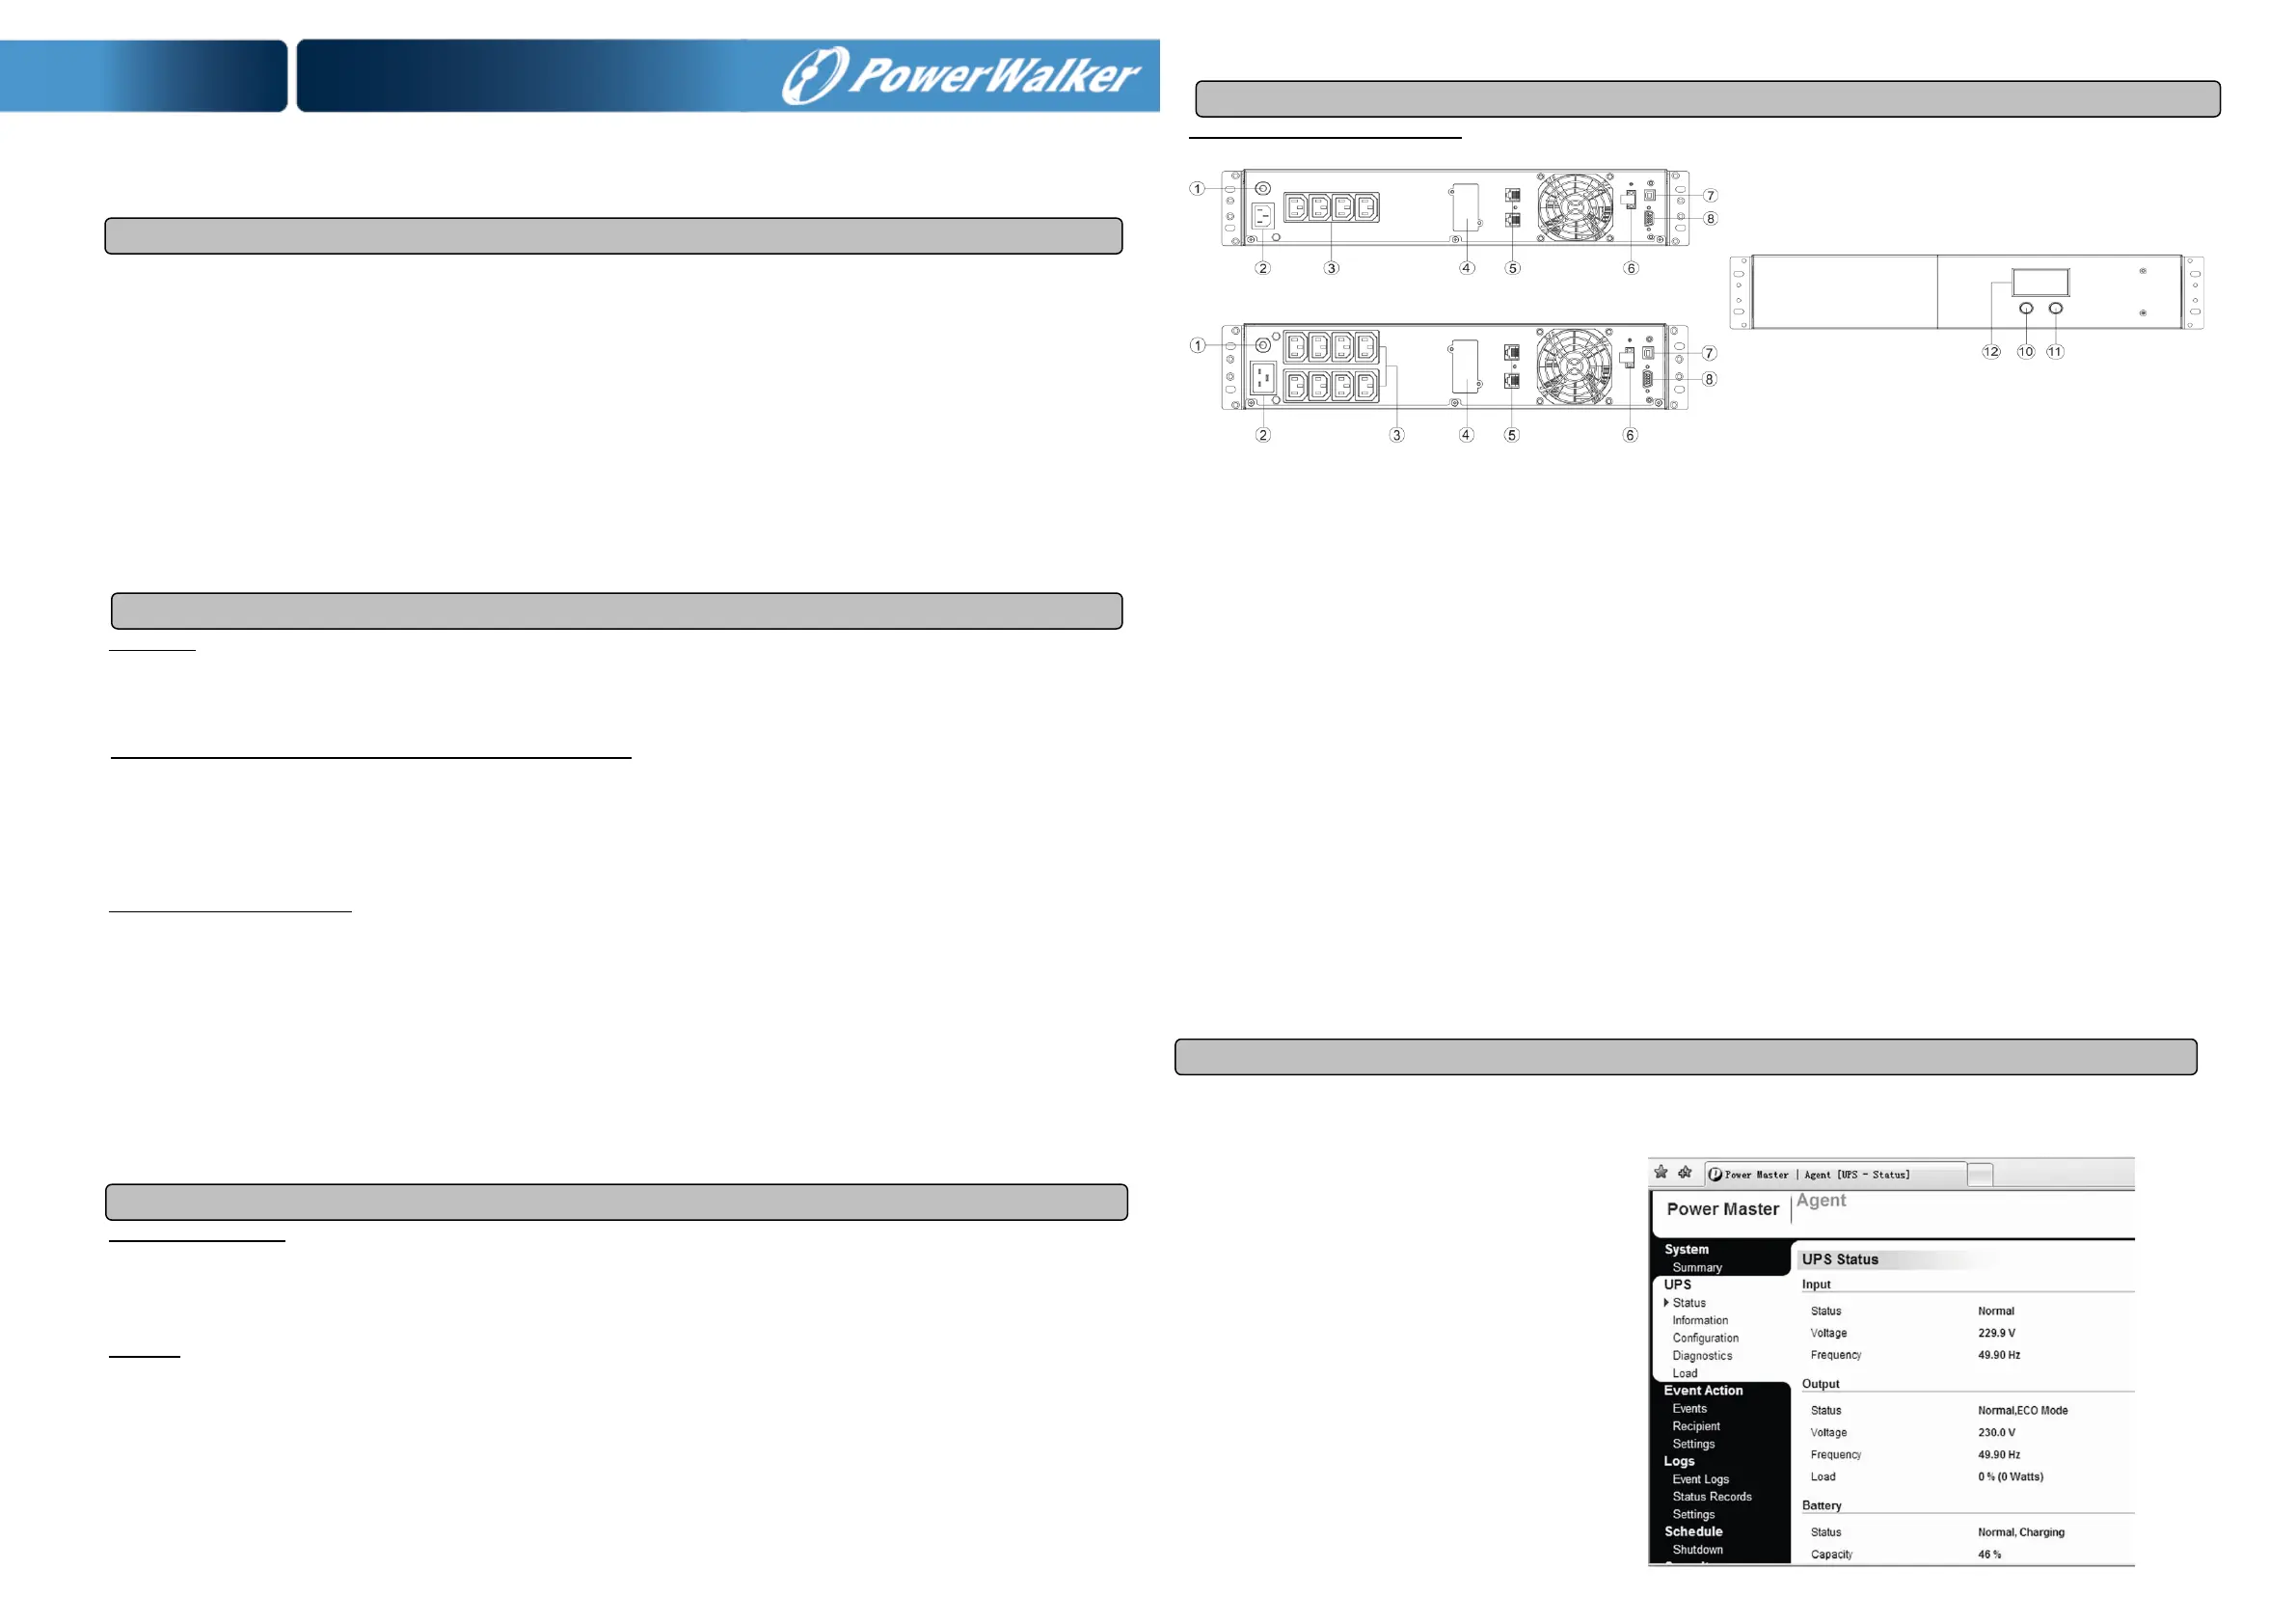
FRONT AND TOP PANEL DESCRIPTION
PowerWalker VI 1200/ 2200 RLE Front View
PowerWalker VI 3000 RLE
1. Input Circuit Breaker
The circuit breaker provides optimal overload protection.
2. AC Inlet
Connect to utility power through the input power cord.
3. AC outlet
The UPS provides outlets for connected equipment to insure temporary uninterrupted operation during a power failure and against surges and spikes.
4. SNMP/HTTP Network Port
The SNMP/HTTP port provides remote monitoring and management of your UPS over a network.
5. RJ45/11 Communication Protection Ports
Communication protection ports will protect any standard modem, fax, telephone line, or network cable.
6. EPO Port
Enables an emergency UPS Power-O from a remote location. EPO terminal open, the UPS will turn off and the output shutdown immediately.
7. USB Port
This port allows connection and communication form the USB port on the computer to the UPS unit.
8. Serial Port
This port allows connection and communication from the DB9 serial on the computer to the UPS unit. The UPS communicates its status to the
software.
9. Not used
10. Power On/O Switch
Press the power switch to turn the UPS ON or OFF.
11. Mute Button
The audible alarm can be turned o/on by pressing this button.
12. LCD Display
The LCD will display the UPS status including input voltage, output voltage, runtime, percentage of load and battery, etc.
SOFTWARE DOWNLOAD
Power Master management software provides a user-friendly interface for your power systems. The graphic user-interface is intuitive and displays essential
power information at a glance. Please follow procedure below to install the software.
Installation procedure:
1.Download Power Master from the website:
http://www.powermaster. powerwalker.com
2.Double-click the le and follow the installation steps.
3.When your computer restarts, the Power Master
software will appear as a blue icon located in the
system tray.
TECHNICAL SPECIFICATIONS
LCD Indication
Line mode
Bat-mode
Alarm/Fault
Sound disable
(Press the mute key 3s to disable
and enable the buzzer sound)
Bat mode: battery capacity
Line mode:
1. Battery charging: cycle lighting
2. Battery full charged: lighting
3. Line mode without charger:
battery capacity
Load capacity
Setting Item
PV Mode
AC INPUT(Voltage)
V
OUTPUT
(Voltage)
V
TROUBLE SHOOTING
Problem
Possible Cause
Solution
The UPS does not perform
expected runtime.
Batteries are not fully charged.
Recharge the battery by leaving the UPS plugged in.
Battery is slightly worn out.
Contact Technical Support.
The UPS will not turn on.
The on/off switch is designed to prevent
damage by rapidly turning it o and on.
Turn the UPS o. Wait 10 seconds and then turn the UPS on.
The unit is not connected to an AC outlet.
The unit must be connected to a 220-240V 50Hz outlet.
The battery is worn out.
Contact Technical Support.
Mechanical problem.
Contact Technical Support.
Outlets do not provide power to
equipment
Fuse is blown due to overload
Turn the UPS o and unplug at least one piece connected
equipment. Unplug the power cord of the UPS then remove the fuse
compartment beneath the power inlet of the UPS and replace the
blown fuse with a spare one. Lock the compartment back to the UPS.
Connect power cord then turn the UPS on. Make sure that your spare
fuse meets the specication.
Batteries are discharged
Allow the unit to recharge for at least 4 hours.
Unit has been damaged by a surge or spike.
Contact Technical Support.
Software is inactive
The network cable is not connected.
Connect the network cable to the UPS unit and a network port on the
hub.
Software setting problem.
Please read and follow NetAgent utility instruction during installation
and operation of the NetAgent software, or contact technical support.
Fault
Fault code F09
Output Short :
Output circuit short.
1. Shut down the UPS
2. Your attached equipment may have problems, please remove
them and check again.
Fault code F11
Battery high: Battery voltage is too high.
1 Shut down the UPS .
2.Check the counts of Battery
Fault code F12
Battery Low :
Battery voltage is too low.
1. Shut down the UPS
2. Check the counts of Battery
3.Check battery connector when use battery packages.
Fault code F14
Overload in line Mode:
Your equipment requires more power than the
UPS can provide. It will transfer to Bypass
Mode.
Shut o non-essential equipment.If this solves the overload problem,
the UPS will transfer to normal operation.
Fault code F14
Overload in Battery Mode : Your equipment
requires more power than the UPS can provide.
It will shutdown.
Shut o non-essential equipment.If this solves the overload problem,
the UPS will transfer to normal operation.
Fault code F18
Fan fail :
Fan has been damaged.
1.Shut down the UPS
2.Replace the fan
Fault code F19
Over Temperature :
High ambient temperature The LCD will display
E11
1. Shut down the UPS. Restart the UPS to Check the fan for operation
and if the ventilation hole has been covered
2. Contact Technical Support.
All rights reserved. Reproduction without permission is prohibited.
Model
PowerWalker
VI 1200 RLE
PowerWalker
VI 2200 RLE
PowerWalker
VI3000 RLE
Capacity (VA)
1200VA
2200VA
3000VA
Capacity (Watts)
720W
1320W
1800W
Input
Input Voltage Range
165V~29 0V
Frequency Range
50Hz +/- 5 Hz
Output
On Battery Output Voltage
Sine Wave at 230Vac +/-10%
On Battery Output Frequency
50Hz - +/ 1%
Overload Protection
On Utility: Fuse, On Battery: Internal Current Limiting
AVR Function
Boost Function
Yes
Buck Function
Yes
Physical
Total # of UPS Receptacles
IEC C13 x 4
IEC C13 x 8
Maximum Dimensions (H x W) D x
88mm x 430mm x 438 mm
Weight (Kg)
11.93
16.47
21.78
Battery
Sealed Maintenance Free Lead Acid Battery
24V (2x12V/7.2Ah)
24V (2x12V/9Ah)
24V (4x12V/7.2Ah)
Typical Recharge Time
4 Hours
Warning Diagnostics
Indicators
Using AC / Using Battery / Fault
Communication
Software
Yes
Environmental
Operating Temperature
0 C to 40  C
Operating Relative Humidity
0 to 90% NON-CONDENSING
Management
Auto-Charger
Yes
Auto-Restart
Yes
DEFINITIONS FOR ILLUMINATED LCD INDICATORS
Line-interactive USV
PowerWalker VI 1200-3 R 000 LE
Anleitung
WICHTIGE SICHERHEITSHINWEISE
(Bewahren Sie diese Anleitung auf)
Dieses Handbuch enthÀlt wichtige Sicherheitshinweise. Bitte lesen und befolgen Sie alle Anweisungen wÀhrend der Installation und des Betriebs des
GerÀtes sorgfÀltig. Lesen Sie dieses Handbuch sorgfÀltig durch, bevor Sie Ihre USV auspacken, installieren oder betreiben.
ACHTUNG! Um die Gefahr eines Brandes oder eines elektrischen Schlages zu vermeiden, installieren Sie das GerÀt in einem temperatur- und
feuchtigkeitskontrollierten Innenbereich, der frei von leitfĂ€higen Verunreinigungen ist. (Siehe Spezikationen fĂŒr den zulĂ€ssigen Temperatur- und
Feuchtebereich.)
ACHTUNG! Um das Risiko einer Überhitzung der USV zu verringern, sollten Sie die KĂŒhlöffnungen der USV nicht abdecken und das GerĂ€t nicht direkter
Sonneneinstrahlung aussetzen oder in der NĂ€he von wĂ€rmeabgebenden GerĂ€ten wie Raumheizungen oder Öfen installieren.
ACHTUNG! Schließen Sie keine nicht computerbezogenen GerĂ€te wie medizinische GerĂ€te, lebenserhaltende GerĂ€te, Mikrowellenherde oder Staubsauger
an UPS an.
ACHTUNG! Schließen Sie den USV-Eingang nicht an seinen eigenen Ausgang an.
ACHTUNG! Lassen Sie keine FlĂŒssigkeiten oder Fremdkörper in die USV eindringen. Stellen Sie keine GetrĂ€nke oder andere FlĂŒssigkeitsbehĂ€lter auf oder
neben das GerÀt.
ACHTUNG! DrĂŒcken Sie im Notfall die OFF-Taste und ziehen Sie das Netzkabel aus der Steckdose, um die USV ordnungsgemĂ€ĂŸ zu deaktivieren.
ACHTUNG! Schließen Sie keine Steckdosenleiste oder Überspannungsschutz an die USV an.
ACHTUNG! Ziehen Sie vor der Reinigung den Netzstecker und verwenden Sie keine FlĂŒssig- oder SprĂŒhreiniger.
INSTALLATION IHRES USV SYSTE MS
Auspacken
Die Verkaufsverpackung sollte folgenden Inhalt haben:
(1) USV Einheit 1 (2) Bedienungsanleitung; 1; (3) USB Kabel x 1; (4) RS232 Kabel x 1
Wie Sie den Leistungsbedarf Ihrer Anlage ermitteln
1. Vergewissern Sie sich, dass das an die Steckdosen angeschlossene GerĂ€t die NennkapazitĂ€t der USV-Anlage nicht ĂŒberschreitet. Bei Überschreitung
der GerĂ€te-NennkapazitĂ€ten kann es zu einer Überlastung kommen, die zum Abschalten der USV-Anlage oder zum Auslösen der Sicherung fĂŒhren
kann.
2. Es gibt viele Faktoren, die den Stromverbrauch Ihres Computersystems beeinussen können. FĂŒr eine optimale Systemleistung halten Sie die Last
unter 80% der NennkapazitÀt des GerÀtes.
HARDWARE INSTALLATIONSANLEITUNG
1. Ihre neue USV kann sofort nach Erhalt verwendet werden. Es wird jedoch empfohlen, den Akku mindestens 8 Stunden lang aufzuladen, um
sicherzustellen, dass die maximale LadekapazitÀt des Akkus erreicht wird. WÀhrend des Transports und der Lagerung kann es zu Ladungsverlusten
kommen. Um den Akku aufzuladen, lassen Sie das GerÀt einfach an eine Steckdose angeschlossen. Das GerÀt lÀdt sowohl in der Ein- als auch in der
Aus-Position.
2. Schließen Sie bei ausgeschalteter, und nicht ans Stromnetz angeschlossener USV den Computer, Monitor und ggf. andere GerĂ€t an.
3. Schließen Sie die USV an eine 2-polige, 3-adrige geerdete Steckdose (Wandsteckdose) an. Stellen Sie sicher, dass die Wandsteckdose durch eine
Sicherung oder einen Schutzschalter geschĂŒtzt ist und keine GerĂ€te mit hohen elektrischen Anforderungen versorgt werden.
4. DrĂŒcken Sie den Netzschalter um das GerĂ€t einzuschalten. Die LCD-Anzeige leuchtet auf und das GerĂ€t „piept“ kurz
5. Um einen optimalen Batterieladezustand zu erhalten lassen Sie die USV immer ans Netz angeschlossen.
ROUTINEWARTUNG UND LAGERUNG
ROUTINEWARTUNG
1. Reinigen Sie die Kunststoffteile mit trockenem, weichem Tuch. Verwenden Sie kein Reinigungsmittel, das alkoholische Bestandteile enthÀlt.
2. Die erwartete Lebensdauer der Batterien betrĂ€gt ca. 3 Jahre. UnsachgemĂ€ĂŸer Betrieb und ungĂŒnstige Umgebungsbedingungen reduzieren die
tatsÀchliche Lebensdauer.
3. Trennen Sie die USV vom Stromnetz, wenn die USV ĂŒber einen lĂ€ngeren Zeitraum nicht genutzt wird.
LAGERUNG
1. Schalten Sie Ihre USV aus und trennen Sie das Netzkabel. Trennen Sie alle Ausgangskabel, um eine Entladung der Batterie zu vermeiden.
2. Die USV sollte an einem kĂŒhlen, trockenen Ort gelagert werden.
3. Stellen Sie sicher, dass die Batterien vollstÀndig geladen sind, bevor Sie die USV lagern.
4. Bei lĂ€ngerer Lagerung in gemĂ€ĂŸigten Klimazonen sollte der Akku alle 3 Monate fĂŒr 12 Stunden geladen werden, indem das Netzkabel in die
Wandsteckdose gesteckt und der Hauptschalter eingeschaltet wird. Bei hohen Temperaturen alle 2 Monate wiederholen.
GRUNDLEGENDE FUNKTIONSWEISE
VORDER- UND RÜCKSEITENBESCHREIBUNG
PowerWalker VI 1200/ 2200 RLE Forderansicht
PowerWalker VI 3000 RLE
1. Eingangsstromsicherung
Die Sicherung bietet einen optimalen Überlastschutz.
2. Netzeingang
Anschluss an das Stromnetz ĂŒber das Eingangskabel.
3. Netzausgang
AnschlĂŒsse fĂŒr zu versorgende GerĂ€te. GewĂ€hrleisten einen geschĂŒtzten ununterbrochenen Betrieb bei Stromausfall.
4. SNMP/HTTP Netzwerkanschluss
Einschub fĂŒr eine optional erhĂ€ltliche Netzwerkkarte zu FernĂŒberwachung
5. RJ45/11 Überspannungsschutz fĂŒr Netzwerkanschluss
Netzwerkanschluss Ports fĂŒr Standardmodem, Fax, Telefonleitung oder Netzwerkkabel.
6. EPO Port (Notabschaltung)
Ermöglicht eine Notabschaltung der USV von einem entfernten Standort. EPO-Port geĂ¶î€net, die USV sich und alle AusgĂ€ e sofort ab. ng
7. USB Anschluss
Dieser Anschluss ermöglicht die Kommunikation zwischen USB-Anschluss des Computers und USV-GerÀt.
8. Serieller Anschluss
Dieser Anschluss ermöglicht die Softwarekommunikation zwischen dem seriellen DB9 Anschluss des Computers und der USV-Einheit.
9. Nicht genutzt
10. AN/AUS Schalter
DrĂŒcken Sie den Netzschalter um die USV an- und auszuschalten.
11. Stummschalttaste
Der akustische Alarm mit dieser Taste an- und ausgeschaltet werden.
12. LCD Anzeige
The Die LCD-Anzeige zeigt den USV-Status wie Eingangsspannung, Ausgangsspannung, Laufzeit, Prozentsatz der Last und Batterie usw. an
SOFTWARE DOWNLOAD
Die Power Master Software bietet eine benutzerfreundliche Oberî‹ŽĂ€che fĂŒr Ihre USV. Die grasche Benutzeroberî‹ŽĂ€che ist intuitiv bedienbar und zeigt
wesentliche Leistungsinformationen auf einen Blick. Bitte gehen Sie wie folgt vor, um die Software zu installieren.
Installationsablauf:
1. Laden Sie die Power Master Software von der Website herunter:
http://www.powermaster. powerwalker.com
2. Doppelklicken Sie auf die Datei und folgen Sie den
Installationsanweisungen .
3. Nach dem Neustart erscheint die Power Master Software
als blaues Symbol in der Systemablage.


Product specificaties

Merk: PowerWalker
Categorie: UPS
Model: VI 3000 RLE

Heb je hulp nodig?

Als je hulp nodig hebt met PowerWalker VI 3000 RLE stel dan hieronder een vraag en andere gebruikers zullen je antwoorden


Handleiding UPS PowerWalker

Handleiding UPS

Nieuwste handleidingen voor UPS