Pheanoo D6 Handleiding
Bekijk gratis de handleiding van Pheanoo D6 (2 pagina’s), behorend tot de categorie Soundbar. Deze gids werd als nuttig beoordeeld door 11 mensen en kreeg gemiddeld 4.7 sterren uit 6 reviews. Heb je een vraag over Pheanoo D6 of wil je andere gebruikers van dit product iets vragen? Stel een vraag
Pagina 1/2

T k u for g the D6 Shan yo purchasin oundbar P. leas reae d t s r hi use manua carl ef y ull an keed p for fut e ref nce. ur ere
Warning
Caution:
To reduce the k of ris ele rict c ck, do not ntle the uct sho disma prod and do not e the atus to n or st e. expos appar rai moi ur
No user-serviceabl pae rts inside.
Refer servicing to qualified personnel only
The htlig ning flash wit n an hi equil eraat l t e is intriangl ended to rt u to the nce of ated ale yo prese uninsul
dangerou vos lt e witag hin the product’s cen lo urs e that y be of suff nt it e to c stitute an ma icie magn ud on
electric shock to a n or perso persons.
I rtanmpo t! T s hi symbo alel rts u to d yo rea and
observ impoe rtant s d struct ns on the warning an in io unit
or in t s hi manual.
Notice:
T s hi appliance is not int d for use by ns g c ) with d ys l s y or ntal ende perso (includin hildren reduce ph ica ensor me
capabil ieit s, or k of e lac experienc an knowledgd e, ess they have n unl bee give supern vis n or stio in ru ioct n c con erning
use of the ce by a n applian perso responsible for t r safety.hei
Childre shouln d be sed to ssupervi en ure that t y do not y with the he pla appliance.
1. To prevent possibl hearine g e, do not sten at damag li high
volum levele s for g t e s or a n h lon im period sudde hig volume level.
2. r e the vNeve us de ice uns rv dupe ise ! Switc
h off the vice r you e not g i n if not us g it de wheneve ar usin t, eve in only for
a rt e.sho whil
3. The nce is not intapplia ended to be ated by oper means of an ext l t r or s ate ote erna ime epar rem co ront l system.
4. the ly cIf supp ord is d, it st be d by the damage mu replace manufact r, its ure service nt or age similarly qual ieif d sons per
in order to d a hazavoi ard.
5. Befor opere at g t s stem, ck the in hi sy che vo aglt e o tf hi sys stem to see if it is ntide ical to the volt e oag f y r local ou
powe supplr y.
Important Safety Instruction
6. The it d not be un shoul impeded by covering the ve ilnt atio openinn g with it s s h as em uc newspaper t, able-cloths,
cu ainrt s etc. Make e tha tsur t her are e at st 20 cm of ace e d at lea sp abov an least 5 cm of e on each s e o the spac id f unit.
7. The atus appar must not be exposed to g or g d that drippin splashin an objects f d with s,such a vases, ille liquid s
must not be d on the atus.place appar
8. To preven ft ire or ck haz d, do not e t s n to ct asho ar expos hi equipme t dire he t, n, strai moi ure or st.du
9. Do not ate tloc hi uns it r y water nea an sources e.g. t s, bathtap ubs,
washing mac s or g hine swimmin pools.
E e thansur t you e the it on a plac un dry, st e surf e.abl ac
10. Do not ace tpl hi uns it c e to a st g etic f d.los ron magn iel
11. Do not ace the pl unit on a if r or ampl ie receiver.
12. Do not ace tpl hi uns it in a p dam area as the moistur wile l affect the life of ectric cel omponents.
13. Do not att pem t to c n the it with c ical s vents as t s ht e the f ishlea un hem ol hi mig damag in . W e with a c n, y ip lea dr
or s htly lig damp cloth.
14. W n he removing the powe plur g f m the l outle ro wal t, always pul direl ctly on the g, neplu
ver l on the c d.pul or
15. g on the ect etic Dependin el romagn waves used by a televisio broadcn ast, if a is t d on TV urne near this it e it is un whil
also on, line migs ht r on the LED appea TV. Ne heit r this unit nor the is TV ma unlf ct g you see such e k p thisionin . If lin s, ee
unit wel awal y f m the set.ro TV
16. The ns g is used to disc emai plu onn ct the vicede , the scdi onnected device should n ly remai readi operable.
Important Safety Instructions
1. Read these instructions. Keep these instructions. Follow all instructions. Heed all warnings.
2. Do not use this atus appar near water.
3. n ly with dr cloth.Clea on y
4. Do not ock y vent at n bl an il io opening Insts. all in accordan
ce with the manufact r's ure in rust ct ns.io
5. Do not inst l r any at s ce such as atal nea he our s radi ors, he erat s, stoves, or othe apparr atus c g if(in ludin ampl iers)
that uce prod heat.
6 Protec. t the r c d f m powe or ro bein wag lked on or ncpi he pad rt ly at gicular plu s, conv nce receptac s or a the enie le t
point where they exi ft rom the apparatus.
7 Only use attac nts/access e. hme ori s s cif d by the ufact r.pe ie man ure
8. g this Unplu apparatus g durin lig ninht g storms or n used for g whe un lon periods of t e.im
9. Refer all servicing to if d serv e qual ie ic pe onars l. S vic g is d er in require when the apparatus s n ha bee damage in y way, an
for example, when the -s y c d or power uppl or plug is d, d has n s d or damage liqui bee pille obje hac ts ve f n into the alle
apparatus, the atus s appar ha been exposed to n or rai moisture, does not ate loper normal y, or s ha bee droppen d.
10. The AC g is used to sc eplu di onn ct the device the disc cted device s d n , onne houl remai readil operably e. In r to orde
disc conne t the atu fappar s rom the AC power compl elet y, the AC g muplu st be oved f m the AC outlrem ro
et c etely.ompl
Preparation for Use
Unpacking and Set Up
•ove the SRem oun bad r f m the carton ro an remod ve l ckal pa ing mat l f m the Seria ro oun bad r. Save the c g mat l, pa kin eria
if po iblss e, in case the S d oun bar ever dnee s to be s viced or t rteder ranspo . The l carton d pack g mat l is the origina an in eria
onl safe way y to cpa k y r S d ou oun bar to otect i f m e in t nsit.pr ro damag ra
•ove y Rem an de risc ptive ls or stick s on the f nt or top o the c e Do not ve y labe er ro f abin t. remo an labels or st keric s f m the ro
back or bottom o the c et.f abin
•P e y r S d lac ou oun bar o
n a level surface such as a t e, abl desk or s lhe f, conv nenie t to an AC outlet,out of ct s ht, dire unlig
an awad y f m s rces of excess aro ou he t, t, rdi du mos t, ist e, iur humid ty, or v at n.ibr io
•d the Unwin Line cord conne inct g the AC pter d extada an end it to its f l ul length.
Protect Your Furniture
This l is d with -skid rmode equippe non rubbe 'feet' to prevent the uprod ct f m mov g ro in when you ate the cont s. oper rol
These 'feet' e ar mad roe f m atnon-migr in rubbeg r mat l spec l feria ial y ormulated to av d oi le inav g any rks or st s on ma ain
y r f itou urn ure. However cert n types ai
of oil based f it e urn ur polishe d servatives, or c g s s mas, woo pre leanin pray y c seau
the rrubbe 'feet' to soften, d e an leav marks or a r res e on the f itrubbe idu urn ure To event y e to y. pr an damag our
f iturn ure we t s rongly rec d that you ommen pu harc se s l self esive felt d av e at mal -adh pa s, ailabl hardware t s ores an hod me
improvement center ever whery e, d an apply these s to the bottom o the pad f rubber fee bef ' t' ore you place the it.un
Power Source
This s d r is des d to ate on l AC P r s rce For E e, it ks oun ba igne oper norma owe ou . urop wor only under SM 0V 0VPS 11 -24
~50hz/ H60 z.
Do not att pem t to ate the S d oper oun bar on any ot r r s cehe powe our . You could cause e to the damag
S d oun bar that is not covered by y r nty.ou warra
• This s d oun bar was es c ly dev d for LED/ D/P ape ial elope LC lasm TV : It's s d not be used in c at n with CR s houl ombin io TTV'
(C hodat e Ray T eub TV's) in r to av d e interforde oi imag erence.
• Safety and operating instruction manual should be retained for future reference.
• The apparatus should not be exposed to dripping, splashing or placed in a humid atmosphere such as a bathroom.
• Do not install the product in the following areas:
• Places exposed to direct sunlight or close to radiators.
• On top of other stereo equipment that radiate too much heat -Blocking ventilation or in a dusty area.
• Areas where there is constant vibration.
• Humid or moist places.
• Do not place near candles or other flames.
• Operate the product only as instructed in this manual.
• Before turning on the power for the first time, make sure the sound bar is plugged to power outlet.
• For safety reasons, do not remove any covers or attempt to gain access to the inside of the product. Refer any
servicing to qualified personnel.
• Do not attempt to remove any screws, or open the casing of the unit; there are no user serviceable parts inside.
Refer all servicing to qualified service personnel.
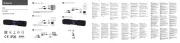
Soundbar accessories
Place on a flat Surface
Place the s d oun ba horizor nt y on a flaall t surface such as a it or s ves d n i TV un hel an alig t centr ly with the n. al TV scree
A w s e space bet n the sllo om wee peaker d the l. ’t ce s e a can wal Don pla in id abinet or an a d s lwalle he f. F w t s ce ollo hi guidan
for best s d output d oun an goo aid rf w ar d the s d bar.lo oun oun
Remote Control
D6
2.1CH Dolby
Soundbar System
Specifications
Drivers
Audio Output Power
Frequency Response
Signal-to-Noise Ratio
lmpedance
Power lnput
bluetooth Version
Dimensions
Bluetooth Frequency
Technology
Model
5090*2 SB + 5.25inch SW
240W
55Hz-20KHz
66dB
AC 110V-240V~50Hz/60Hz
R.M.S 100W
Version: 5.0 Range:up to 10m
Soundbar: 62H*73D*750 Lmm
Subwoofer: H360*W135*D210 mm
2402MHz - 2480MHz
BT/AUX/HDMI(ARC)/OPTICAL/DOLBY
D6
Soundbar assembly details
Important Notes
3.5 to RCmm A AUX cable
Adapter(1)
wall brackets (2)
TREB+
AUX
OPT
I
C
AL
VOL+
VOL
-
BASS-
T
RE
B
-
MUSIC D
IA
L
OGUE
M
O
VI
E
PAIR DIS CO
N
NECT
IND
IC
A
T
O
RRE
S
ET
3
D
BA
S
S+
HDMI(A
RC)
B
LU
ET
O
OTH
MUTE
×
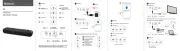
WARNING
:
If you don’t feel confident to correctly and securely wall-mount the sound bar, Seek the assistance of an
experienced person of professional.Install the speaker on a vertical, fast, reinforced area of wall. For plaster walls, it is
recommended to screw into wall studs for greater security. For optimum performance, allow at least 25mm/1’’distance
between the sound bar and the TV.
25mm / 1”
25mm / 1”
Mount on the wall
Follow below steps to mount the sound bar on the wall
1: Paste 2 pieces of EVA f m oa (with es) on the two hol wall brackets aligning at the e hol position of wall brackets.
2: Remove 4 screws from the rear hous g of s d in oun bar, then insert the 4 sc ws over the l re wal bracket screw holes ngaligni
n the s(o ide of EVA f m past ), d t n fasten the scoa ed an he rews n. agai
3 c: Ac ording to the two hanging wall positions on the r orea f soundbar, c ate alibr and k the two mar hanging ackebr ts hole
position on the lwal. T n drhe ill two holes on the lwal , firstly insert two expansion stic scpla rews on the wall, then fasten the
ghangin sc ws into exre pansion screw holes.
backing paper
EVA foam
(with holes)
EVA foam
w hithout oles
560±5mm
4: Then Paste the 2 pieces of EVA foam it(w hout holes) on the two wall brackets downward. Then ace the pl hollow cross in
the center of the bracket against the screws on the wall d an hang the sound r on the l fba wal inally.
Manufactured under license from Dolby Laboratories. Dolby,
Dolby Audio,and the double-D symbol are trademarks of
Dolby Laboratories.
Audio input(Aux)Connection
1. Use either the buttons on the SoundBar or the "
AUX
" button on the remote to activate AUX mode.A green
LED indicator will indicate that AUX mode has been selected.
2.Playback functions (play/pause, tracks, pair) cannot be adjusted through the SoundBar remote when in
AUX mode.Others playback functions can be controlled from the buttons on the SoundBar.
Playing Audio via BT Connection
1. e eitUs her the butt s on the S dBar or the BLU TH" button on the on oun " ETOO remote to act ateiv BT emod .A B e LED lu
indicator l icate tha wil ind t BTmod hae s n s ected. bee el
2 ctivate the . A pairing funct n on r e of ot r io you phon he compatible ce devi an seled ct“ D6 ”
3. W n successfhe ull pairey d, u l yo wil hear a ton ane d the LED l stay onwil
4. The remote nt l inc s co ro lude BT mod playbae ck controls
.
Notes:
• y r P g device Switc d o If ou airin he ff or l discManua onnected, the soun bad r l aut atic ly enter wil om al pairin mog de
•the c ected vice is switc d o or l disc If onn de he ff manua onnected the s d r , oun ba will aut atic ly enter g om al pairin
successfully connected device l be est swil re- abli he ond ce you re-enter wireless
range(10 meters). to c eonn ct to
other device s, repeat the above g stepspairin
• T e is no aut ati shuther om c down in pairin modg e. The s d oun ba wilr l n in g remai pairin mode even if no ice is dev
paired, so switch off if not in use
S ting the Soundbaret
Blue: in Bluetooth mode
Green: in AUX mode
Pink: in USB mode Cyan: in HDMI(ARC) mode
3. When indicator light on, press INDICATOR button to turn off; when the indicator light off, press any button on the
remote control to turn on it.
1. Plug the power cord in and the LED will light up.
2. Press the BLUETOOTH/OPTICAL/AUX/HDMI(ARC) button on the remote control to switch the input mode
The indicator can change into 5 different colors, representing different input mode:
Yellow: in Optical mode
Powering On/Off
1. Plug the power cord of the soundbar into a wall outlet, it will automatically enter standby mode;
2. Press the STANDBY button on the soundbar or POWER button on the remote control to
turn the soundbar on. Make your selection of the desired input modes by pressing the BLUETOOTH
/OPTICAL/AUX/HDMI(ARC) button on the remote control or the standby button on the soundbar.
3. To turn off, press and hold the STANDBY button or POWER button on remote control for about 2 seconds,
the soundbar will enter standby mode, and then unplug it from the wall outlet.
Pl Dolby Digi l Plus via I ay ta HDM
Pl Dolby Digi l Plus via Opti lay ta ca
1. The soundbar supports HDMI (ARC) with audio return channel (ARC). You can hear the TV audio through your
soundbar by using a single HDMI cable. But on condition that your TV is ARC compliant.
2. Using a high speed HDMI cable, connect the HDMI (ARC) connector on the soundbar to the
HDMI (ARC) connector on the TV. The HDMI (ARC) connector on the TV might be labeled differently. For
details, see the user manual of your TV.
3. Press “HDMI(ARC)” button on the remote control or “STANDBY” button on soundbar to select HDMI (ARC) mode.
Different TV might be different setting, please refer to your TV .USER MANUAL
4. Use the volume buttons to adjust the volume to your requirements.
5. You can also change the audio settings by using the relevant buttons on the remote control.
6. When HDMI (ARC) is connected, TV sound setting in “sound output” mode should be set as <external Dolby or
Auto mode>, in addition, digital audio output mode should be set as <automatic> or <decoded output as Dolby>.
When the HDMI (ARC) cable is connected, the TV digital audio output is set as Dolby or Auto mode.
Then start playing music on the TV.
2. The TV is connected to a HDMI (ARC) port with sound bar. Different TVs might have different setup menus,
1. When connecting a device such as a TV/Set-top box/DVD/ game console with HDMI (ARC) cable, set the audio
output mode of the device to Dolby or Auto mode <digital HDMI (ARC) output>.
but the operation approach is the same.
3. If needs to connect TV box meanwhile, please firstly connect the HDMI (ARC) connector and paired to the soundbar.
Then connect the TV box
Optical lnput
Optical Output
Use this operating mode to play music from the optical digital input for example from a TV on your soundbar .
The TV must have an optical digital output. Use the optical cable supplied to make the connection.
Proceed as follows:
• Connect the optical cable to the optical digital output of your TV.
• Then connect the optical cable to the optical digital input of your soundbar.
• Start playing on the TV.
•
Press the OPTICAL button on the remote control to select OPTICAL mode
• You can use the volume buttons to adjust the volume to your requirements.
• If you wish, you can change the audio settings using the relevant buttons on the remote control.
HDMI ARC) Output(
HDMI (ARC) lnput
Another input source is selected.
The mute function is activated.
The volume of sound bar or TV/other device
is adjusted too low.
The power cable of the unit is not
connected properly.
Input jacks on a playback device are connected.
There is no sound
output from sound
bar.
The sound is distorted
or echoed.
TV volume is not muted.
If you play audio from TV through the sound bar,
make sure that the TV is muted.
The volume decreases
when the unit is turned
on.
The automatic volume adjustment function is
activated. To prevent excessive loudness, the
unit automatically controlls its volume within
a certain level when the unit is turned on.
Turn up the volume as required.
A device cannot
connect the sound
bar or the unit cannot
be connected to a
Bluetooth device.
B etooth f ct n o the v e is not act ated, lu un io f de ic iv
not paired or connected correctly.
A device emitting electromagnetic waves
(such as a microwave oven, a wireless
device and so on) may be placed nearby.
Do not use this unit near devices that emit
electromagnetic waves.
Restart the sound bar and try pairing again. You have
not enabled the Bluetooth function of the device; see
the user manual of the device on how to enable the
funct n d ectly c ected the ce The ndio an corr onn devi . sou
bar is dy c cted with ot r Balrea onne an he luetooth device.
Disconnect the connected device, and then try again.
The unit is out of the operating range. Use the remote control within the operating range.
The batteries are weak. Replace with new batteries.
The remote control sensor of the sound bar
is exposed to direct sunlight or strong lighting.
Adjust the lighting angle or reposition the sound bar.
Make sure our product cannot be used in sunlight.
The unit cannot be
operated by using
the remote control.
The TV cannot be
operated by using the
TV’s remote control.
The unit is blocking the TV’s remote
control sensor.
Position the unit so that it does not obstruct the TV’s
remote control sensor.
When sound bar and TV or other devices are
connected by an audio cable through TV (ARC)
port output, Select the correct audio input and
output. Make sure the digital audio output setting
on the playback device to PCM format. Since the
output format of our sound bar is PCM, if it is used,
the decoding format of TV or other devices will be
adjusted to PCM state.
Make sure that the power cable of the unit is
connected to an AC wall outlet securely.
Connect the input jack on the sound bar and
the output jack on the playback device.
Select an appropriate input source.
Cancel the mute function.
Increase the volume level on sound bar or
by remote control or on TV.
PROBLEM/TROUBLE
POSSIBLE CAUSE SOLUTION
Noise is heard.
The sound bar is too close to another
digital or high-frequency device.
Move those devices away from the sound bar.
Bluetooth is not selected as the input source.
Select Bluetooth as the input source.
The unit is connected to a different Bluetooth
device.
The it is too far y f m the B etooth un awa ro lu device.
Un-pair the Bluetooth e that is devic currently connected
and pair with the desired Bluetooth device.
Move the Bluetooth device closer to this unit.
The Bluetooth device that you are using
may not support the protocol.
Use a Bluetooth device that supports the protocol.
The connection profile registered in the
Bluetooth device may not be functioning
correctly for some reason.
Delete the connection profile in the Bluetooth
device and then connect the Bluetooth device to
this unit.
PROBLEM/TROUBLE POSSIBLE CAUSE SOLUTION
Sound quality of audio
play from a connected
Bluetooth device is
poor and connection
is not stable.
The Bluetooth reception is poor.
Move the device closer to the sound bar,
or remove any obstacle between the device and
the sound bar.
,
:
FCC Warning This device complies with part 15 of the FCC Rules. Operation is subject to the following two conditions:
(1) This device may not cause harmful interference, and (2) this device must accept any interference received, including
interference that may cause undesired operation. Note: This equipment has been tested and found to comply with the
limits
for a Class B digital device, pursuant to part 15 of the FCC Rules. These limits are designed to provide reasonable
protection
against harmful interference in a residential installation. This equipment generates, uses and can radiate radio frequency
energy and, if not installed and used in accordance with the instructions, may cause harmful interference to radio
communications.
However, there is no guarantee that interference will not occur in a particular installation.
If this equipment does cause harmful interference to radio or television reception, which can be determined by turning the
equipment off and on, the user is encouraged to try to correct the interference by one or more of the following measures:
—Reorient or relocate the receiving antenna.
—Increase the separation between the equipment and receiver.
—Connect the equipment into an outlet on a circuit different from that to which the receiver is connected.
—Consult the dealer or an experienced radio/TV technician for help.
Note: The Grantee is not responsible for any changes or modifications not expressly approved by the party responsible
for compliance. such modifications could void the user's authority to operate the equipment. The device has been
evaluated
to meet general RF exposure requirement. To maintain compliance with FCC's RF exposure guidelines, the distance
must be
at least 20 cm between the radiator and your body, and fully supported by the operating and installation configurations of
the
transmitter and its antenna(s).
IC Warning This device complies with Industry Canada license-exempt RSS standard(s).
Operation is subject to the following two conditions: (1) this device may not cause interference, and (2) this device must
accept
any interference, including interference that may cause undesired operation of the device. Le présent appareil est
conforme
aux CNR d'Industrie Canada applicables aux appareils radio exempts de licence. L'exploitation est autorisée aux deux
conditions suivantes : (1) l'appareil ne doit pas produire de brouillage, et (2) l'utilisateur de l'appareil doit accepter tout
brouillage
radioélectrique subi, même si le brouillage est susceptible d'en compromettre le fonctionnement. The device has been
evaluated
to meet general RF exposure requirement. To maintain compliance with RSS-102 — Radio Frequency (RF) Exposure
guidelines,
this equipment should be installed and operated with a minimum distance of 20cm between the radiator and your body.
le dispositif de a été évalué à répondre général rf exposition exigence.pour maintenir la conformité avec les directives d
'exposition du RSS-102-Radio Fréquence (RF). ce matériel doit être installé et exploité à une distance minimale de 20 cm
entre
le radiateur et votre corps.
1. When connecting a device such as a TV/Set-top box/ DVD/ game console with optical cable, set the
audio output mode of the device to Dolby or Auto mode (digital optical output).
2. Do not bend the optical cable, otherwise the cable inside will be damaged.
3. Sometimes users may hear an echo sound when connecting the soundbar to TV via optical cable. To eliminate the
echo effect, your TV speakers should be disabled. Refer to your TV's audio menu options to make the necessary
changes to the speaker settings.
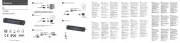
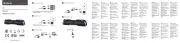
Soundbar(1) set
Step lug 1: P the audio onnector in c to the audio input port on ano her main t unit
Step lign 2: A the arrows on he t two sti scker
Step wi lockwise 3: T st c about 20 degrees un til locks se curely
Step 1 Step 2 Step 3
EN
Overview of the Sound Bar main unit
1: LED Display 2: AUX 3: OPTICAL 4: HDMI(ARC) 5:USB(For urgrade only)
6: DC IN 7: SW OUTPUT 8: Standby 9: VOL- 10: VOL+
User manual (1) Setup Guide (1)
D6
2.1CH Dolby
Soundbar System
Manufactured under license from Dolby Laboratories. Dolby,
Dolby Audio,and the double-D symbol are trademarks of
Dolby Laboratories.
D6
The volume on the Bluetooth device may
be too low.
Raise the volume on the Bluetooth device.
Bluetooth is not selected as the input source.
Select the Bluetooth as the input source.
P yla back on he device t has not been per ormedf .
Perform playback on the device.
The sound output on the Bluetooth
device may not be set to this unit.
Select this unit as the output device on
the Bluetooth device.
The connection to the Bluetooth device
was cut off.
Connect with the Bluetooth device one more time.
Move the Bluetooth device near this unit.
The unit may be too far away from the
Bluetooth device.
Do not use this unit near device that emit
electromagnetic waves.
A device emitting electromagnetic waves
(such as a microwave oven, a wireless
device and so on) may be placed nearby.
No sound can be heard
or sound breaks
(Bluetooth mode)
PROBLEM/TROUBLE POSSIBLE CAUSE SOLUTION
1. Make sure that the user connected TV and
sound bar by a 19-core HD ARC cable.
2. The sound bar and TV are connected through
TV (ARC) port output; make sure that the TV is
ARC compliant.
3. Set the TV to HDMI ARC (CEC).
Set the audio output mode of TV to PCM format.
(Or refer to your TV user manual)
Incorrect HDMI cable is used causing no
signal to be sent to soundbar.
Incorrect input mode is selected.
There is no sound from
sound bar -
HDMI TV (ARC) Mode
1.Replace the OPTICAL cable with a new one
to connect.
2. Set your TV audio output to PCM format.
(Pls refer to your TV user manual)
OPTICAL cable might be damaged and no
signal is received by the soundbar due to
a failed connection and incorrect operation
mode selected.
There is no sound from
sound bar
(OPTICAL Mode)
1. Turn off sound bar and subwoofer by removing
the AC plug from the socket.
2. Make sure that sound bar and subwoofer are
connected to the electricity power at the same time,
and switch on sound bar and subwoofer again.
3. Press and hold the subwoofer’s rear plate WPS
button to reset the connection, so that the sound bar
and subwoofer can be reconnected again.
Connection is not correct between
subwoofer and sound bar
Disconnected between
subwoofer and
sound bar

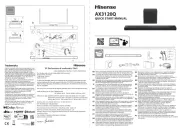
D6
2.1-Kanal Dolby
Soundbar-System
5090*2 SB + 5,25“ SW
240W
55Hz-20KHz
66dB
AC 110V-240V~50Hz/60Hz
100W
Version: 5.0 Reichweite: bis zu 10 m
"Soundbar: 62 x 73 x 750 mm (H x T x L)
Subwoofer: 360 x 135 x 210 mm (B x H x T)"
2402MHz - 2480MHz
BT/AUX/HDMI(ARC)/OPTISCH/DOLBY
D6
×
25mm / 1”
25mm / 1”
560±5mm
Hergestellt unter Lizenz von Dolby Laboratories. Dolby, Dolby
Audio und das Doppel-D-Symbol sind Warenzeichen von
Dolby Laboratories
Dolby Digi l Plu Wied gabe üb Opti lta s- er er ca
6. Wenn HDMI (ARC) angeschlossen ist, sollte die Toneinstellung des Fernsehers im Modus „Tonausgabe“ auf ,
eingestellt werden, außerdem sollte der digitale Audioausgangsmodus auf oder eingestellt werden. Wenn das HDMI
(ARC)-Kabel angeschlossen ist, ist der digitale Audioausgang des Fernsehers als Dolby- oder Auto-Modus eingestellt.
Starten Sie dann die Musikwiedergabe auf dem Fernsehgerät.
Optical lnput
Optical Output
HDMI ARC) Output(
HDMI (ARC) lnput
,
:
1. Wenn Sie ein Gerät wie z. B. einen Fernseher/Set-Top-Box/DVD/Spielkonsole mit optischem Kabel anschließen,
stellen Sie den Audio-Ausgangsmodus des Geräts auf Dolby oder Auto-Modus (digitaler optischer Ausgang).
2. Biegen Sie das Optical-Kabel nicht, sonst wird das Kabel im Inneren beschädigt.
3. Manchmal können Benutzer ein Echo hören, wenn sie die Soundbar über ein optisches Kabel an den Fernseher
anschließen. Um den Echo-Effekt zu eliminieren, sollten die Lautsprecher Ihres Fernsehers deaktiviert werden.
Schauen Sie in den Audio-Menüoptionen Ihres Fernsehers nach, um die notwendigen Änderungen an den
Lautsprechereinstellungen vorzunehmen.
BEDIENUNGSANLEITUNG
Vielen Dank, dass Sie sich für den Kauf der D6 Soundbar entschieden haben. Bitte lesen Sie sich dieses
Benutzerhandbuch sorgfältig durch und bewahren Sie es zum späteren Nachschlagen auf.
Warnung
Um da Risiko s eines elek rischen t Schlags zu erringern v , zerlegen ie das S Produ nich undkt t setzen Sie da erä weder s G t
Regen noch euch F tigkei aust . Im Inneren be inden f sich keine om enu v B tzer zu war tenden eile T .
Überlassen Sie die Wartung qualifiziertem Fachpersonal.
Der li B tz in einem gleichsei igen Dreiec ollt k s Sie au das f Vorhandensein einer nich t isolier en get fährli henc
S pannung innerhalb des roduk gehäuses P t hinweisen die, st ark genug sein kann um , einen elek ri hen t sc
S chlag für eine erson oder P Personen zu verursachen .
W tich ig! Dieses ymbol weis ie S t S darau hin wichf , tige arnhinwei W se und Anweisungen au dem eräf G t
oder in diesem Handbuch zu lesen und zu beach ten.
Hinweis:
Dieses erä is G t t nich da ürt f be imm durch ersonenst t, P (einschlie lich inder)ß K mi einges hrän ent c kt phy is hens c ,
sensori chen oders geis igen ähigkeit F ten oder ohne Erf ahrung und is en W s benutz u et z werden, s sei denn , sie werden
durch eine ür f ihre Sicherhei zus ändiget t Person beau sich f tig oder erhielt ten nweisungen darüber A , wie das erä G t zu
benu entz ist, von dieser .
K tinder soll en beau si f chtigt werden um icherzu ellen, s st , das
s sie nicht t mi dem erä spielen G t .
1. Um möglichen Gehörschäden vorzubeugen, sollten Sie nicht über einen längeren
Zeitraum mit hoher Lautstärke oder einem plötzlich hohen Lautstärkepegel hören.
2. Betreiben Sie das Gerät niemals unbeaufsichtigt! Schalten Sie das Gerät aus, wenn Sie es nicht benutzen, auch
wenn Sie es nur für eine kurze Zeit nicht benutzen.
3. Das Gerät ist nicht für den Betrieb mit einer externen Zeitschaltuhr oder einem separaten Fernbedienungssystem
vorgesehen.
4. Wenn das Netzkabel beschädigt ist, muss es durch den Hersteller, seinen Kundenservice oder ähnlich qualifizierte
Personen ersetzt werden, um eine Gefährdung zu vermeiden.
5. Prüfen Sie vor dem Betrieb dieses Systems, ob die Spannung dieses Systems mit der Spannung Ihrer örtlichen
Stromversorgung übereinstimmt. Wichtige Sicherheitshinweise
Wichtige Sicherheitshinweise
6. Das Gerät sollte nicht durch Abdecken der Lüftungsöffnung mit Gegenständen wie Zeitungen, Tischdecken,
Vorhängen usw. behindert werden. Stellen Sie sicher, dass oberhalb des Geräts mindestens 20 cm und an jeder
Seite mindestens 5 cm Platz sind.
7. Das Gerät darf keinen Tropfen oder Spritzern ausgesetzt werden und es dürfen keine mit Flüssigkeiten gefüllten
Gegenstände, wie z. B. Vasen, auf das Gerät gestellt werden.
8. Um eine Brand- oder Stromschlaggefahr zu vermeiden, setzen Sie dieses Gerät nicht direkter Hitze, Regen,
Feuchtigkeit oder Staub aus.
9. Stellen Sie das Gerät nicht in der Nähe von Wasserquellen, wie z. B. Wasserhähnen, Badewannen,
Waschmaschinen oder Schwimmbecken, auf. Stellen Sie sicher, dass Sie das Gerät auf einer trockenen, stabilen
Oberfläche steht.
10. Stellen Sie das Gerät nicht in der Nähe eines starken Magnetfeldes auf.
11. Stellen Sie das Gerät nicht auf einen Verstärker oder Receiver.
12. Stellen Sie das Gerät nicht in einer feuchten Umgebung auf, da die Feuchtigkeit die Lebensdauer der elektrischen
Komponenten verkürzt.
Achtung:
ACHTUNG!
GEFAHR EINES ELEKTRISCHEN
SCHLAGES
NICHT ÖFFNEN
UM DAS RISIKO EINES STROMSCHLAGS ZU VERRINGERN
ABDECKUNG (ODER RÜCKSEITE) NICHT ENTFERNEN
13. Versuchen Sie nicht, das Gerät mit chemischen Lösungsmitteln zu reinigen, da diese die Oberfläche beschädigen
können. Wischen Sie es mit einem sauberen, trockenen oder leicht feuchten Tuch ab.
14. Wenn Sie den Netzstecker aus der Steckdose ziehen, ziehen Sie immer direkt am Stecker, niemals am Kabel.
15 bhängig von den. A ele romagnekt tischen ellen die W , von einem ernseher F au gehen önnen Liniens , k auf LED-
F cernsehern ers heinen wenn ein, Fernsehgerä in dert Nähe dieses erä G ts teeinge halsc t , wird während es eben allsf
einge chals tet ist. Weder sdie es erä no G t ch sdas Fern eher haben eine Fehl unk ion ennf t . W Sie olche Linien s sehen, stellen
S seie die s Gerät t mi au rei hendems c Abs and zumt Fernseher au f.
16. Der AC-Stecker wird zum Trennen des Geräts verwendet, das getrennte Gerät sollte betriebsbereit bleiben.
Wichtige Sicherheitshinweise
1. Lesen Sie sich diese Anleitung durch. Bewahren Sie diese Hinweise auf. Befolgen Sie alle Hinweise. Beachten
Sie alle Warnungen.
2 . Verwenden Sie die es eräs G t nich in dert Nähe on v Was .ser
3. Reinigen Sie es nur mit einem trockenen Tuch.
4 k. Bloc ieren Sie keine Lü ungsö nungen ft ff . Installieren ie das S Gerä gemä dert ß Anwei ungen des s Her ellersst .
5 n. I stallieren Sie da erä ni s G t ch t in der Nähe von Wärmequellen wie Heiz körpern Heizungen en oder, , Öf anderen erä en G t
(ein hlie lisc ß ch Verstärkern), die ärme erzeugen W .
6 t. Schü zen Sie da Ne abel s tzk vor dem Darau re ft ten oder in E klemmen in besondere, s an kern eckdosenlei en Stec , St st oder
an der elle an St , der sie da erä s G t verlas ens .
7 . Verwenden Sie nur nbau- ubehör eile A /Z t , die om Hers v teller pezi s fiziert
wurden.
8. Ziehen Sie den Netzstecker bei Gewitter oder wenn Sie das Gerät längere Zeit nicht benutzen.
9 s. Überla sen ie alle S War ung arbeit s ten quali izier f tem ervi eper S c sonal ine ar ung. E W t is er orderlit f ch , wenn das erä in G t
irgendeiner ei W se cbes hädigt wurde wenn das Ne, z. B. tzk abel oder der ec er St k bes hädig wurden lüsc t , F sigkei vers hüt c ttet
wurde oder egens G tände in da erä s G t ge allen indf s , das erä Regen G t oder euch ig F t kei ausgeset tzt , t war nich normal
f tunk ioniert oder herun erge t fallen i .st
10 Der C-. A Stec ker wird zum rennen des T Geräts verwende das get, trennte Gerä sollt te t sbe rieb berei bleiben Umt . das
G erä voll ändigt st vom romne rennen St tz zu t , mus der Nes tzst kec er volls ändig aust der kdo Stec se zge ogen werden .
Vorbereitung für die Verwendung
Auspacken und Einrichten
• Entnehmen Sie die Soundbar aus dem Karton und entfernen Sie jegliches Verpackungsmaterial von der Soundbar.
Heben Sie das Verpackungsmaterial nach Möglichkeit auf, falls die Soundbar in der Zukunft gewartet oder transportiert
werden muss. Die Originalverpackung und das Verpackungsmaterial sind die einzige sichere Art, Ihre Soundbar zu
verpacken, um sie vor Transportschäden zu schützen.
• Entfernen Sie alle beschreibenden Etiketten oder Aufkleber auf der Vorder- oder Oberseite des Gehäuses. Entfernen
Sie keine Etiketten oder Aufkleber von der Rückseite oder Unterseite des Gehäuses.
• Stellen Sie Ihre Soundbar auf eine ebene Fläche wie einen Tisch, einen Schreibtisch oder ein Regal, die sich in der
Nähe einer Steckdose befindet, vor direkter Sonneneinstrahlung geschützt ist und nicht in der Nähe von Quellen
übermäßiger Hitze, Schmutz, Staub, Feuchtigkeit oder Vibrationen liegt.
• Wickeln Sie das Netzkabel des AC-Netzteils ab und ziehen Sie es auf seine volle Länge.
Schützen Sie Ihren Möbel
Dieses Modell ist t mi rutschfesten Gummi-„Füßen“au ge s statt t, e um z vu erhindern dass, sich da rodu beweg wenns P kt t, Sie
die edienelemen B te tät se „Füßbe igen Die. e“be ehen au st s abrieb reiem ummimaf G terial das speziell, da ür enf twi kel wurdec t ,
k eine Spuren
oder le ken F c au hren Möbelnf I zu t shin erlas en es imm. B t te Arten on Möbelpoli v turen au lba f Ö sis,
Holz hu mi el oder Reinigungssc tz tt sprays können jedo ch zuda führen da, ss die ummi-„ G Füß ch e“wei werden und bdrüc A ke
oder ummirü G ckstände au Möbeln f hin erla sent s . Um häden an hren Sc I Möbeln zu ermeiden v , emp ehlen wirf Ihnen dringend ,
k tleine selbs klebende ilzpad F s zu kau en dief , in jedem aumark B t erhäl lit ch sind und, diese ads au P f der Un er t seite der
G Füß zummi-„e“an ubringen bevor ie, S da erä aus G t fst .ellen
Stromquelle
Diese oundbar S ist für et den B rieb an einer normalen ech W sels romquelle ausgeleg ürt t. F Europa un ionier ie nur f kt t s un ert
SMPS 110 - 240 V~50/ H c60 z. Versu hen Sie ni cht, die oundbar S an einer anderen romquelle St zu tbe reiben ie önn en. S k t
S chäden an der oundbar verur S sachen, die ni cht durch die Gewährlei ung abgedest ckt sind.
• se Die Soundbar wurde peziell ür s f LED/ tLCD lasma- en/P TVs wic el ie ollk t: S s te nicht in ombina ion K t mi CR (Cat TTVs thode
Ra ube s) erwende werdeny T TV v t , um ilds örungen B t zu vermeiden .
• Die Sicherheits- und Bedienungsanleitung sollte zum späteren Nachschlagen aufbewahrt werden.
• Das Gerät sollte keinen tropfenden oder spritzenden Flüssigkeiten ausgesetzt und nicht in einer feuchten Umgebung
wie z. B. einem Badezimmer aufgestellt werden.
• Installieren Sie das Produkt nicht in den folgenden Bereichen:
• Orte, die direktem Sonnenlicht ausgesetzt sind oder in der Nähe von Heizkörpern liegen.
• Auf anderen Stereoanlagen, die zu viel Wärme abstrahlen oder an denen die Belüftung blockiert ist oder die sehr
staubig sind.
• Bereiche, in denen permanente Vibrationen auftreten.
• Feuchte oder nasse Orte.
• Nicht in der Nähe von Kerzen oder anderen Flammen aufstellen.
• Betreiben Sie das Produkt nur wie in dieser Anleitung beschrieben.
• Vergewissern Sie sich vor dem ersten Einschalten des Geräts, dass die Soundbar an eine Steckdose angeschlossen ist.
• Entfernen Sie aus Sicherheitsgründen keine Abdeckungen und versuchen Sie nicht, sich Zugang zum Inneren des
Produkts zu verschaffen. Überlassen Sie alle Wartungsarbeiten qualifiziertem Personal.
• Versuchen Sie nicht, irgendwelche Schrauben zu entfernen oder das Gehäuse des Geräts zu öffnen; im Geräteinneren
befinden sich keine vom Benutzer zu wartenden Teile. Überlassen Sie alle Wartungsarbeiten qualifiziertem
Servicepersonal.
Wichtige Hinweise
Spezifikationen
Treiber
Audio-Ausgangsleistung
Frequenzgang
Signal-Rausch-Verhältnis
Impedanz
Stromeingang
Bluetooth-Version
Abmessungen
Bluetooth-Frequenz
Technologie
Modell
R.M.S
Soundbar-Zubehör
TREB+
AUX
OPT I
C
AL
VOL+
VO
L
-
BASS-TREB
-
M ICUS DI
A
LOG U
E
M
OVI
E
P
A
IR CONDIS NECT
IND
ICA
TO
R RESET
3D
BAS
S+
H
DMI( C)AR
BL
UE
TOOTH
MUTE
Fernbediengung
Führen Si die e folg nde en Schritte aus, u di Soundbm e ar
an der Wa mnd zu ontieren
1: Kleben Sie 2 üc - o St ke EVA Schaumst ff (mit Löchern) auf die beiden Wandhal erungen, die an dert Lochposit ion der
W tandhalerungen ausgeri chtet sind.
2 n: E tfernen ie die S 4 Schrauben am hinteren ehäu G se der Soundbar, setzen ie S dann die 4 Schrauben fluch endt über die
Schraublö herc der andhal erung W t ein (auf der ei S te fdes au gekleb ent EVA-Schau s) undm ziehen Sie die hrauben Sc wieder fe .st
3: Mar ieren iek S die beiden Positionen ür die f Auf hängungan der and W entsprechend den beiden Positionen für die Auf hängung
auf der Rückseite der Soundbar ohren ie. B S dann zwei Lö cher in die Wand, setzen ie S zunä weichst z Kunststoffdübel in die
W andein und be festigen ie S dann die Auf hängeschrauben in den Lö hernc .
Abdeckpapier
EVA-Schaum
(mit Löchern)
4: Kleben Sie dann die 2 Stücke EVA-Schaumstoff (ohne Lö her)c auf die beiden Wandhal erungen nacht unten. Setzen ie S
dann das hohle reuz in K der Mi e ttt der Halerung gegen die hrauben Sc an der and W und hängen ie S die Soundbar sc ß ch hlie li
an die Wand.
EVA-Schaum
(ohne Löcher)
Auf eine ebene Fläche stellen
Stellen ie die S Soundba waagerech aur t f eine ebene läche F , wie ein z. B. TV- Möbel oder ein Regal , und ri cht en Sie sie
mi ig mi dem ild hirmtt t TV-B sc aus La sen. s Sie etwas Pla zwis tz chen dem Lau tspre he undc r der and ellen ie W . St S das
G ch erä nit t in einen hrank oder andregal Sc W . Bef olgen Sie diese Anlei ung ürt f eine op imale t Tonau gabe unds einen
gu en Lu omt ftstr um die oundbar S .
Wenn Sie sich nicht zutrauen, die Soundbar korrekt und sicher an der Wand zu befestigen, sollten
Sie die Hilfe eines erfahrenen Experten in Anspruch nehmen. Installieren Sie den Lautsprecher an einer
senkrechten, festen, verstärkten Stelle der Wand. Bei Gipswänden empfiehlt es sich, für mehr Stabilität in die
Streben zu schrauben. Für eine optimale Leistung sollten Sie einen Abstand von mindestens 25 mm zwischen der
Soundbar und dem Fernseher einhalten.
An der Wand montieren
WARNUNG:
Ein llung d Soundbarste er
Blau: im Bluetooth-Modus
Grün: im AUX-Modus
Rosa: im USB-Modus Cyan: im HDMI (ARC)-Modus
3. Wenn die Anzeigelampe an ist, drücken Sie die INDICATOR-Taste, um sie auszuschalten; Wenn die Kontrollleuchte
erloschen ist, drücken Sie eine beliebige Taste auf dem fernbedienung, um es einzuschalten.
1. Stecken Sie das Netzkabel ein und die LED leuchtet auf.
2. Drücken Sie die Taste BLUETOOTH/OPTICAL/AUX/HDMI (ARC) auf der Fernbedienung, um den Eingangsmodus
umzuschalten Die Anzeige kann in 5 verschiedene Farben wechseln, die die unterschiedlichen Eingangsmodi darstellen:
Gelb: im optischen Modus
Audio-Wiedergabe über BT-Verbindung
1. Verwenden Sie en weder t die Tas ent auf dem oundbar S oder die as T te „B LU H“ETOOT auf der Fernbedienung um, den
BT-Modus zu a ktivieren. Eine blaue LED- nzeige zeigA t an, das der -Moduss BT ausgewählt wurde.
2 kt . A ivieren Sie die Kopplungs unkf tion au hrem elef I T fon oder einem anderen kompa iblent Gerä und wählent Sie „D6 “
3 . Wenndie opplung er K folgreich war hören, Sie einen on T und die LED bleibt an
4. Die ernbedienung en F thäl euerelement St te für die -Modus- iedergab BT W e
Anmerkungen:
• W Ienn hr opplung gerä K s t ausgeschaltet oder manuell ge trenn wird wechselt , t die oundbar au S tomati h sc in den
K s sopplung modu
• Wenn da ange hlo ene s sc ss Gerät au ge hals sc tet oder manuell ge renn t t wird, wech els t die oundbar au S tomatisch inden
K sopplung modu olgreis Erf ch v Gerbundene eräte verbinden sich erneut, sobald ie wieder S in Fun reichweik te (10Me er)t
sind. Um sich mit anderen erä en G t zu verbinden, wiederholen Sie die obigen airing- chri P S tte
• Es t kgib eineau omat tische Ab tschalung im opplung K smodus. Die oundbar S bleibt im opplung K smodu auch wenns, kein
Gerät ge oppel isk t t, also t schalen ie ie S s aus, wenn sie nicht benutzt wird
Ein-/Au hal nssc te
1. Stecken Sie das Netzkabel der Soundbar in eine Steckdose, sie geht automatisch in den Standby-Modus;
2. Drücken Sie die Taste STANDBY an der Soundbar oder die Taste POWER auf der Fernbedienung, um die
Soundbar einzuschalten. Wählen Sie die gewünschten Eingangsmodi aus, indem Sie die Taste BLUETOOTH
/OPTICAL/AUX/HDMI(ARC) auf der Fernbedienung oder die Standby-Taste an der Soundbar drücken.
3. Zum Ausschalten halten Sie die STANDBY-Taste oder die POWER-Taste auf der Fernbedienung ca. 2
Sekunden lang gedrückt, die Soundbar wechselt in den Standby-Modus; ziehen Sie dann den Netzstecker
aus der Steckdose.
Audio-Eingang (Aux-)Anschluss
1. Verwenden Sie entweder die Tasten am SoundBar oder die „AUX“-Taste auf der Fernbedienung, um den
AUX-Modus zu aktivieren.Eine grüne LED-Anzeige zeigt an, dass der AUX-Modus ausgewählt wurde.
2. Die Wiedergabefunktionen (Wiedergabe/Pause, Titel, Paarung) können im AUX-Modus nicht über die
Soundbar-Fernbedienung eingestellt werden.Andere Wiedergabefunktionen können über die Tasten am
Soundbar gesteuert werden.
Verwenden Sie diese Betriebsart, um Musik vom optischen Digitaleingang, z. B. von einem Fernseher, auf
Ihrer Soundbar (A) abzuspielen. Der Fernseher muss über einen optischen Digitalausgang verfügen.
Verwenden Sie das mitgelieferte optische Kabel, um die Verbindung herzustellen. Gehen Sie wie folgt vor:
• Schließen Sie das optische Kabel an den optischen Digitalausgang Ihres Fernsehers an.
• Schließen Sie dann das optische Kabel an den optischen Digitaleingang Ihrer Soundbar an.
• Starten Sie die Wiedergabe auf dem Fernseher.
• Drücken Sie die OPTICAL-Taste auf der Fernbedienung, um den OPTICAL-Modus auszuwählen.
• Mit den Lautstärketasten können Sie die Lautstärke an Ihre Bedürfnisse anpassen.
• Wenn Sie möchten, können Sie die Audioeinstellungen mit den entsprechenden Tasten auf der Fernbedienung
ändern
Hinweis:
1. Wenn Sie ein Gerät wie z. B. einen Fernseher/Set-Top-Box/DVD/eine Spielkonsole mit einem HDMI-Kabel (ARC)
anschließen, stellen Sie den Audio-Ausgangsmodus des Geräts auf Dolby- oder Auto-Modus.
2. Der Fernseher ist an einen HDMI (ARC)-Anschluss mit Soundbar angeschlossen. Verschiedene Fernsehgeräte
können unterschiedliche Einstellungsmenüs haben,
3. Wenn Sie in der Zwischenzeit eine TV-Box anschließen müssen, schließen Sie bitte zuerst den HDMI
(ARC)-Anschluss an und verbinden Sie ihn mit der Soundbar. Schließen Sie dann die TV-Box an
Hinweis:
Wied gabe von Dolby Digi l Plus üb Ier ta er HDM
1. Die Soundbar unterstützt HDMI (ARC) mit Audio-Rückkanal (ARC). Sie können den TV-Ton über Ihre Soundbar hören,
indem Sie ein einziges HDMI-Kabel verwenden. Aber unter der Voraussetzung, dass Ihr Fernseher ARC-kompatibel ist.
2. Verbinden Sie mit einem High Speed HDMI-Kabel den HDMI (ARC)-Anschluss der Soundbar mit dem HDMI (ARC-)
Anschluss des Fernsehers. Der HDMI (ARC)-Anschluss am Fernseher könnte anders beschriftet sein. Details finden Sie
in der Bedienungsanleitung Ihres Fernsehers.
3. Drücken Sie die Taste „HDMI(ARC)“ auf der Fernbedienung oder die Taste „STANDBY“ an der Soundbar, um den Modus
HDMI (ARC) auszuwählen. Verschiedene Fernseher können unterschiedliche Einstellungen haben, bitte lesen Sie in der
Bedienungsanleitung Ihres Fernsehers nach.
4. Mit den Lautstärketasten können Sie die Laustärke an Ihre Bedürfnisse anpassen.
5. Sie können die Audioeinstellungen auch mit den entsprechenden Tasten auf der Fernbedienung ändern.
Eine andere Eingangsquelle ist gewählt.
Die Stummschaltfunktion ist aktiviert.
Die Lautstärke von Soundbar oder TV/anderem
Gerät ist zu niedrig eingestellt.
Das Netzkabel des Geräts ist nicht richtig
angeschlossen.
Eingangsbuchsen an einem Wiedergabegerät
sind angeschlossen.
Es erfolgt keine
Tonausgabe von
der Soundbar.
Der Ton ist verzerrt
oder hallt.
Die TV-Lautstärke ist nicht stumm geschaltet.
Wenn Sie udio A vom ernseher F über die Soundbar wiedergeben ,
stellen ie S sicher, dass der ernseher F stummges hal t isc te t.
Die Lautstärke verringert
sich, wenn das Gerät
eingeschaltet wird.
Die au toma ischet Lautstär eanpask sung ist ak iviert. Um t
übermä igeß Lautst ärkezu vermeiden, regelt da erä s G t
seine Lautstär ke au omat tisch innerhalb eines bestimm ent
Pegels, wenn das Gerät eingeschaltet wird.
Drehen Sie die Lautstärke nach Bedarf hoch.
Ein Gerät kann sich
nicht mit der Soundbar
verbinden oder das
Gerät kann nicht mit
einem Bluetooth-Gerät
verbunden werden.
Die lue oo h- unk ion de B t t F t s Geräts t ist nich
ak iviert, nicht gepaart oder nich igt t richt
ve bundenr .
Ein Gerät, das elektromagnetische Wellen
aussendet (z. B. ein Mikrowellenherd, ein
drahtloses Gerät usw.), kann in der Nähe
platziert werden.
Verwenden Sie dieses Gerät nicht in der Nähe von
Geräten, die elektromagnetische Wellen aussenden.
St rtena Sie die Soundbar neu und ver suchen Sie die Kopplung erneut.
S ie haben die Blue oot th- unkF tion des Geräts nicht ak iviert; lesen iet S
in der Bedienungsanlei ungt des Geräts nach, wie Sie die unk F tion a
ktivieren und das erät ko rekt anschlie en. Die Soundbar ist berei G r ß ts
mit einem ande enr Blue oot th erä-G t verbunden rennen. T Sie das
angeschlossene erät und ve G rsuchen ie S es dann erneut.
Das Gerät befindet sich außerhalb des
Betriebsbereichs.
Verwenden Sie die Fernbedienung innerhalb des
Betriebsbereichs.
Die Batterien sind schwach. Ersetzen Sie sie durch neue Batterien.
Der ernbedienung F ssen ors der oundbar ist direk S t
em
S chonnenli t oder star erk Beleuch ungt ausgesetzt.
Stellen Sie den eleu B chtung wins kel ein oder posi tionieren
S iedie Soundbar neu ellen ie. St S sicher, dass unser Produkt
nicht im Sonnenlicht verwendet werden kann.
Das Gerät kann nicht mit
der Fernbedienung
bedient werden.
Der Fernseher kann nicht
mit der Fernbedienung
des Fernsehers bedient
werden.
Das Gerät blockiert den Fernbedienungssensor
des Fernsehers.
Stellen Sie das Gerät so auf, dass es den
Fernbedienungssensor des Fernsehers nicht
behindert.
Wenn S Foundbar und erns eher oder andere Geräte
mit einem udiokabel über den A TV-Ans (Achluss RC)
verbunden ind, wählen ie s S den ri cht igen Audioeingang
und ausgang ergewis ern ie - . V s S sich, dass die digi tale
A udioausgabe am Wiedergabegerät auf da CM-Formas P t
eingestellt st. Dai da gangsformat unserer oundbars Aus S
P iCM st, wird das De kodier mat des ern ehefor F s rs
oder anderer Geräte auf den CM- us P Z tand einges ellt, t
wenn ie s verwendet wird.
V sergewi sern ie S sich, dass das Ne zkabelt des
G tserä sic her an eine Netzsteckdose ange chlossen s ist
V erbinden Sie die Eingang bus chse an der
S oundbar und die Aus sgang bu hsec am Abspielgerät.
Wählen Sie eine geeignete Eingangsquelle.
Heben Sie die Stummschaltfunktion auf.
Erhöhen Sie die Lautstärke an der Soundbar
oder mit der Fernbedienung oder am Fernseher.
PROBLEM/FEHLER
MÖGLICHE URSACHE LÖSUNG
Ein Geräusch ist zu
hören.
Die Soundbar befindet sich zu nahe an einem
anderen digitalen oder hochfrequenten Gerät.
Entfernen Sie diese Geräte von der Soundbar.
Bluetooth ist nicht als Eingangsquelle gewählt
Wählen Sie Bluetooth als Eingangsquelle.
Das Gerät ist mit einem anderen Bluetooth-Gerät
verbunden.
Das erät ist zu wei om G t v Blue oo h-t t Gerät entfernt.
Heben ie die S Kopplung des aktuell verbundenen Blue oo t th-
G ts erä auf und koppeln ie es mi S t dem gewünschten
B t tlue oo h- eräG t.
Bringen Sie da lue s B too h-t Gerät näher an die ses erät heran G .
Das Bluetooth-Gerät, das Sie verwenden,
unterstützt das Protokoll möglicherweise nicht.
Verwenden Sie ein Bluetooth-Gerät, das das
Protokoll unterstützt.
Das im Bluetooth-Gerät registrierte
Verbindungsprofil funktioniert möglicherweise
aus irgendeinem Grund nicht richtig.
Löschen Sie das Verbindungsprofil im Bluetooth-
Gerät und verbinden Sie dann das Bluetooth-Gerät
mit diesem Gerät.
PROBLEM/FEHLER MÖGLICHE URSACHE LÖSUNG
Die onquali T tät der
A udiowiedergabe von
einem erbundenen v
B t t Glue oo h- erät sti
schle t undch die
V ch st .erbindung ist ni t abil
Der Bluetooth-Empfang ist schlecht.
Stellen Sie das Gerät näher an die Soundbar, oder
entfernen Sie ein Hindernis zwischen dem Gerät
und der Soundbar.
"FCC-Warnung Dieses Gerät entspricht Teil 15 der FCC-Bestimmungen. Der Betrieb unterliegt den folgenden zwei
Bedingungen:
(1) Dieses Gerät darf keine schädlichen Interferenzen verursachen, und (2) dieses Gerät muss alle empfangenen
Interferenzen akzeptieren, einschließlich Interferenzen, die einen unerwünschten Betrieb verursachen können.
Hinweis: Dieses Gerät wurde getestet und entspricht den Grenzwerten für ein digitales Gerät der Klasse B, gemäß Teil 15
der FCC-Vorschriften. Diese Grenzwerte sind so ausgelegt, dass sie einen angemessenen Schutz gegen schädliche
Störungen in einer Wohnanlage bieten. Dieses Gerät erzeugt und verwendet Hochfrequenzenergie und kann diese
abstrahlen. Wenn es nicht gemäß den Anweisungen installiert und verwendet wird, kann es schädliche Störungen im
Funkverkehr verursachen. Es kann jedoch nicht garantiert werden, dass bei einer bestimmten Installation keine
Störungen auftreten. Wenn dieses Gerät den Radio- oder Fernsehempfang stört, was durch Aus- und Einschalten des
Geräts festgestellt werden kann, sollte der Benutzer versuchen, die Störung durch eine oder mehrere der folgenden
Maßnahmen zu beheben:
- Richten Sie die Empfangsantenne neu aus oder verlegen Sie sie. - Vergrößern Sie den Abstand zwischen dem Gerät
und dem Empfänger.
- Schließen Sie das Gerät an eine Steckdose an, die zu einem anderen Stromkreis gehört als die, an die der Empfänger
angeschlossen ist.
- Konsultieren Sie den Händler oder einen erfahrenen Radio-/Fernsehtechniker um Hilfe.
Hinweis: Der Empfänger ist nicht verantwortlich für Änderungen oder Modifikationen, die nicht ausdrücklich von der für die
Einhaltung der Vorschriften verantwortlichen Partei genehmigt wurden. Solche Modifikationen könnten die Berechtigung
des Benutzers zum Betrieb des Geräts aufheben. Das Gerät wurde so bewertet, dass es die allgemeinen RF-Belastung-
sanforderungen erfüllt. Um die FCC-Richtlinien zur HF-Belastung einzuhalten, muss der Abstand zwischen dem Strahler
und Ihrem Körper mindestens 20 cm betragen und durch die Betriebs- und Installationskonfiguration des Senders und
seiner Antenne(n) vollständig unterstützt werden.
IC-Warnung Dieses Gerät erfüllt die lizenzfreie(n) RSS-Norm(en) von Industry Canada.
Der Betrieb unterliegt den folgenden zwei Bedingungen: (1) dieses Gerät darf keine Interferenzen verursachen und (2)
dieses Gerät muss alle Interferenzen akzeptieren, einschließlich Interferenzen, die einen unerwünschten Betrieb des
Geräts verursachen können."
Le présent appareil est conforme
aux CNR d'Industrie Canada applicables aux appareils radio exempts de licence. L'exploitation est autorisée aux deux
conditions suivantes : (1) l'appareil ne doit pas produire de brouillage, et (2) l'utilisateur de l'appareil doit accepter tout
brouillage
radioélectrique subi, même si le brouillage est susceptible d'en compromettre le fonctionnement. The device has been
evaluated
to meet general RF exposure requirement. To maintain compliance with RSS-102 — Radio Frequency (RF) Exposure
guidelines,
this equipment should be installed and operated with a minimum distance of 20cm between the radiator and your body.
le dispositif de a été évalué à répondre général rf exposition exigence.pour maintenir la conformité avec les directives d
'exposition du RSS-102-Radio Fréquence (RF). ce matériel doit être installé et exploité à une distance minimale de 20 cm
entre
le radiateur et votre corps.
FEHLE EHE GRB BUN
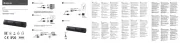
Details zur Montage der Soundbar
Schritt 1 ec : St ken Sie den udioanschlu A ss in den udioeingang A einer anderen Haup teinheit.
Schritt : Ri2 chten ie die eile auf den fklebern S Pf Au aus.
Schritt : Drehen ie3 S ca. 20 rad im G Uhr eiger inn, bis die zweiz s Teile st ein sten fe ra .
Schritt 1 Schritt 2 Schritt 3
DE
Übersicht über das Hauptgerät der Soundbar
1: LED-DISPLAY 2: AUX 3: OPTISCH 4: HDMI(ARC) 5:USB(NUR FÜR AKTUALISIERUNG)
6: DC IN 7: SW-AUSGANG 8: Standby 9: VOL- 10: VOL+
D6
2.1CH Dolby
Soundbar System
Manufactured under license from Dolby Laboratories. Dolby,
Dolby Audio,and the double-D symbol are trademarks of
Dolby Laboratories.
Bedienungsanleitung (1) Setup Guide (1)
D6
Die Lautstärke am Bluetooth-Gerät ist
möglicherweise zu niedrig.
Erhöhen Sie die Lautstärke am Bluetooth-Gerät.
Bluetooth ist nicht als Eingangsquelle gewählt.
Wählen Sie das Bluetooth als Eingangsquelle.
Die Wiedergabe auf de erät wurdem G nicht durchgeführt.
Führen Sie die Wiedergabe auf dem Gerät durch.
Die Tonausgabe am Bluetooth-Gerät ist
möglicherweise nicht auf dieses Gerät eingestellt.
Wählen Sie dieses Gerät als Ausgabegerät auf dem
Bluetooth-Gerät.
Die Verbindung zum Bluetooth-Gerät wurde
unterbrochen.
Verbinden Sie sich ein weiteres Mal mit dem
Bluetooth-Gerät.
B tringen Sie da lues B oo h- erät int G die Nähe die ses
G .eräts
Das Gerät ist möglicherweise zu weit vom
Bluetooth-Gerät entfernt.
V se ch erwenden Sie die s Gerät ni t in der Nähe on v
G t erä en, die elektro agnem tische ellen aussenden W .
Ein Gerät, das elektromagnetische Wellen
aussendet (z. B. ein Mikrowellenherd, ein
drahtloses Gerät usw.), kann in der Nähe
platziert werden.
Es ist kein Ton zu hören
oder der Ton wird
unterbrochen
(Bluetooth-Modus)
PROBLEM/TROUBLE MÖGLICHE URSACHE LÖSUNG
1. Make sure that the user connected TV and
sound bar by a 19-core HD ARC cable.
2. The sound bar and TV are connected through
TV (ARC) port output; make sure that the TV is
ARC compliant.
3. Set the TV to HDMI ARC (CEC).
Set the audio output mode of TV to PCM format.
(Or refer to your TV user manual)
Es wird ein falsches HDMI-Kabel verwendet,
wodurch kein Signal an die Soundbar
gesendet wird. Falscher Eingabemodus ist
gewählt.
Es kommt kein Ton von
der Soundbar (HDMI
TV (ARC) Modus)
1. Ersetzen Sie das OPTICAL-Kabel durch ein neues
Kabel zum Anschließen.
2. Stellen Sie den Audioausgang Ihres Fernsehers
auf das PCM-Format ein. (Schlagen Sie bitte in der
Bedienungsanleitung Ihres Fernsehers nach)
Das OPTICAL-Kabel ist möglicherweise
beschädigt und es wird kein Signal von der
Soundbar empfangen, weil die Verbindung
fehlgeschlagen ist und der falsche
Betriebsmodus gewählt wurde.
Es kommt kein Ton von
der Soundbar
(OPTICAL-Modus)
1 t. Schal en ie S Soundbar und Subwoofer aus, indem ie S
den Netzst ecker aus der ec dose iehen St k z .
2 s. Vergewis ern ie S sich, dass Soundbar und ubwoo er S f
gleichz teiig mit dem romne erbunden St tz v sind, und
schal ent Sie oundbar S und ubwoo er S f wieder ein .
3. Hal ent Sie die WPS-Ta e st auf der Rückseite s de
S fubwoo ers gedrück t, um die erbindung V zurückzuse , tzen
so dass die oundbar und S der ubwoo S fer wieder
v erbundenwerden önnen k .
Verbindung zwischen Subwoofer und
Soundbar ist nicht korrekt
Keine Verbindung
zwischen Subwoofer
und Soundbar
Product specificaties
| Merk: | Pheanoo |
| Categorie: | Soundbar |
| Model: | D6 |
Heb je hulp nodig?
Als je hulp nodig hebt met Pheanoo D6 stel dan hieronder een vraag en andere gebruikers zullen je antwoorden
Handleiding Soundbar Pheanoo
15 Juni 2025

15 Juni 2025
Handleiding Soundbar
- Martin Logan
- Xoro
- Bticino
- Cello
- Hama
- Integra
- GoldenEar Technology
- Cambridge
- ILive
- Bigben Interactive
- Karcher
- Creative
- Technaxx
- JBL
- Devialet
Nieuwste handleidingen voor Soundbar
16 September 2025
16 September 2025
15 September 2025

15 September 2025
15 September 2025
15 September 2025
15 September 2025

9 September 2025
9 September 2025

2 September 2025