Paasche RG-1AS Handleiding
Paasche
Niet gecategoriseerd
RG-1AS
Bekijk gratis de handleiding van Paasche RG-1AS (2 pagina’s), behorend tot de categorie Niet gecategoriseerd. Deze gids werd als nuttig beoordeeld door 39 mensen en kreeg gemiddeld 4.3 sterren uit 20 reviews. Heb je een vraag over Paasche RG-1AS of wil je andere gebruikers van dit product iets vragen? Stel een vraag
Pagina 1/2

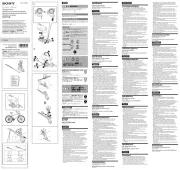
INSTRUCTIONS & PARTS LIST RAPTOR- 9-25-2020
RAPTOR
RAPTOR
RAPTOR
RAPTORRAPTOR
Double A c t i on- I n t er nal M ix- G r avi t y Feed-
PTFE Packings.
Si z e Needle, T i p , and Ai r c a p Inst al l ed# 1 .
WARNING: Spray materials may be harmful if inhaled or allow
ed
to come into contact with the skin or eyes. Consult the product
label and Material Safety Data Sheet supplied for the spray
material. Follow all safety precautions. CAUTION: Well Ventilated
Area Required to remove fumes, dust or overspray. Secure airhose
to Airbrush with V-62 Wrench for safety and to prevent air leaks.
M P S a x A i u m m i r r s e s u . r 7 e 5 P . I .
*Note: Etch on Items lines
2 3 2 . and 1 size. All should indicate
match when on airbrush.installed
For Multi-Language Manuals go to: www.paascheairbrush.com
1. Attach to to air hose air supply and airbrush. 20-55 If using pressure a regulator set between psi .
2. Press down on Finger Button to air and pull back on button to control quantity of color.release
3. Speed of movement controls color density of and end fading effects at beginning and of strokes.
4. Practice this movement until you can spray a fine line or a broad pattern without heavy build up at the beginning or end of your
strokes.
5. For detail, the very to the hold airbrush close surface push down for air and pull back very slowly on the Finger Button to release a
small amount of paint.
6. For background work and away broad hold effects, the airbrush from the work surface and pull back on Finger Button to release
required amount of color.
• Dual Action • Gravity Feed • Internal M x • Cutaway Handle w/ Pre-set Needle Stop •i • 1/10th gravity cup ounce PTFE Packing
•TT-1 , and TN-1, TA-1 components come the Installed on Raptor.
Options for :Raptor
.2mm head (TT- TN- TA-1 fine detail0, 0 and components) Great for jobs requiring the "extremely "
.25mm head (TT-1, TN-1, and TA-1 component
.38mm head (TT-2, TN-2 and TA-2 ) components
.66mm head and TA-3 ) Great for spraying Metallics, Pearlescent and Thicker Paints(T -3 T ,TN-3 components .
Working Pressures:
Operating pressures 15-55 PSI; Maximum pressure 85 PSI. aircap needs 20 PSI more.Fan or
20-30 PSI best for detail spraying w/ properly paintis thinned .
Use the is not higher pressures detail for thicker material where fine critical or thin the paint for lower pressures.
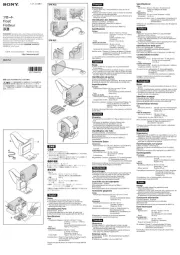
RG Specifications:
NO. PART
1. XI-41
2. *TA-1, TA-2, TA-3* *
3. 0 1*TT- , TT-*, TT-2, TT-3* *
4. MIL-12
5. RG-30
6. RG-8
7. TAL-8
8. TAL-37
9. TAL-14
10. TAL-36
11. A-22
12. TAL-26
13. TAL-15
14. TAL-18
15. MIL-11
16. TAL-17
17. TAL-19
18. MIL-12
19. RG-20
20. TAL-33
21. *TN-1
22. TAL-35
23. TAL-28
24. 3A-4
DESCRIPTION
Needle Protection Cap
Head (.25mm, .38mm, .66mm)
(Size TA-1 is used size 0 1 Tip)Head with and
Tip (.2mm, .25mm, .38mm, .66mm)
"O" Ring
Shell
Cup Cover
Packing assembly PTFE
Trigger
Air Valve Casing
Air Valve Plunger
Air Valve Spring
"O" Ring
Air Valve Adapter
Rocker Assembly
Needle Spring
Spring Housing
Needle Locknut
"O" Ring
Handle
Needle Stop
Needle (.25mm)
Allen Wrench
Wrench
"O" Ring
Airbrush Operation:
)
NO. PART DESCRIPTION

Page 2
Paasche® Gravity Feed, Double Action AirbrushRG
Phone: (800)621-1907 Website: E-Mail: paascheairbrush.com info@paascheairbrush.com
REMOVING / REPLAClNG THE NEEDLE AND HANDLE:
1. Unscrew the handle and loosen the Locknut- #TAL-19 by turning counterclockwise. Depress the
Trigger- #TAL-37 and hold in down position while removing or inserting the needle. This assures the
needle moves freely through the trigger. Gently remove the needle, rotating if necessary.
2. Inspect the condition of the needle. If it is bent or misshapen in any way, replace it with a new needle.
A bent needle can damage or split the Tip- #TT causing bubbles or a rough spray pattern.
3. Hold trigger in down position, insert the new needle into the Rocker Assembly- #TAL-18. Gently push
needle forward until the needle stops in the front of the tip.
4. Release trigger and tighten locknut by turning clockwise.
REPLACING THE FINGER LEVER ASSEMBLY:
If the Trigger- #TAL-37 is removed, it is easiest to replace before the Rocker Assembly- #TAL-18 is
inserted. The needle must be removed.
1. Hold trigger so the round side of the stem is to the front and at side to the back of the airbrush
2. Insert trigger straight DOWN through the opening in the top of the airbrush shell.
3. You want the bottom of the trigger to cover the round ball on top of the exposed plunger. Once the
connection is made you should have spring action when pushing down on the trigger. Proceed to
replace Rocker Assembly- #TAL-18 and balance of parts as above. When the needle is inserted it
will prevent the removal of the trigger.
REPLACING THE TIP:
1. Remove handle, loosen Locknut- #TAL-19 and withdraw needle about one inch (1”).
2. Un-screw the Aircap- #TA and remove. The Tip- #TT can now be unscrewed with Wrench- #TAL-28.
3. Replace tip and tighten with wrench. The tip must be wrench tight. Push needle forward and lock.
ADJUSTING WORN PACKING WASHER:
1. If Packing Assembly- #TAL-8 becomes worn or loose it must be tightened or replaced.
2. Tighten packing nut with small screwdriver. To reach packing all internal parts must be removed.
3. Replace needle and make sure packing nut is not too tight. Slight resistance is needed when needle
passes through.
CLEANING THE AIRBRUSH:
1. Spray airbrush cleaner through airbrush until it has no more color spraying out of airbrush.
2. Remove needle and wipe clean then replace.
3. If paint has dried for a time you can remove the front tip, and aircap for soaking or soak just the front of the
airbrush in cleaner.
4. Any paint cleaner is ne. Keep trigger area dry if soaking.
PERSONAL SETTINGS:
Spring Housing- #TAL-17 Used to increase or decrease spring tension for the trigger pull back. Thread
into the shell until the trigger stroke feels comfortable. Threading in until it stops can cause the trigger
to jam.
TROUBLESHOOTING:
Bubbling in cup:
1. Aircap- #TA needs to be tightened
2. Tip- #TT needs to be tightened further
Skipping or Spitting:
1. Paint too thick -reduce with thinner
2. Tip not seated -tighten Tip- #TT with wrench
3. Tip split or damaged needle -replace tip or needle
4. Needle or tip dirty -clean and replace
5. Air pressure too low -increase pressure or thin paint further (need 20 or more PSI to spray most
paints)
Airbrush Not Spraying:
1. Clogged Tip- #TT -remove tip and clean
2. Needle not moving -tighten needle locknut
3. Low air pressure -increase pressure (need 20 or more PSI to spray most paint)
Sprays double line or heavy to one side:
1. Split Tip- #TT or bent Needle- #TN - replace
2. Dirty tip or needle - remove and clean
Jammed trigger or poor trigger motion:
1. Adjust #TAL-17 screw or unscrew Spring Housing- - the spring housing to lessen or increase tension on
trigger motion
2. Paint leaking to trigger - remove guts of airbrush tighten packing or replace if neededarea and slightly
3. Lubricate needle and trigger - apply Paasche Airbrush Lube (AL-2) to needle shaft and trigger slot area.
Printed in the U.S.A.
Product specificaties
| Merk: | Paasche |
| Categorie: | Niet gecategoriseerd |
| Model: | RG-1AS |
Heb je hulp nodig?
Als je hulp nodig hebt met Paasche RG-1AS stel dan hieronder een vraag en andere gebruikers zullen je antwoorden
Handleiding Niet gecategoriseerd Paasche

24 Juli 2023

24 Juli 2023

24 Juli 2023

24 Juli 2023

24 Juli 2023

24 Juli 2023

24 Juli 2023

24 Juli 2023

24 Juli 2023

24 Juli 2023
Handleiding Niet gecategoriseerd
- AMT
- AMX
- Valera
- Fishman
- META
- Crofton
- Goldtouch
- Creative
- AsVIVA
- Diamond Audio
- Raymarine
- Vornado
- Scancool
- Howard Leight
- Maico
Nieuwste handleidingen voor Niet gecategoriseerd
16 September 2025
16 September 2025
16 September 2025

16 September 2025
16 September 2025
16 September 2025

16 September 2025

16 September 2025
16 September 2025

16 September 2025