Paasche FP-1/32 Handleiding
Paasche
Niet gecategoriseerd
FP-1/32
Bekijk gratis de handleiding van Paasche FP-1/32 (2 pagina’s), behorend tot de categorie Niet gecategoriseerd. Deze gids werd als nuttig beoordeeld door 34 mensen en kreeg gemiddeld 4.9 sterren uit 17.5 reviews. Heb je een vraag over Paasche FP-1/32 of wil je andere gebruikers van dit product iets vragen? Stel een vraag
Pagina 1/2

FP-1/32
Flow Pencil
OPERATING INSTRUCTIONS & REPLACEMENT
PARTS
INSTRUCTION AND PARTS LIST FP-1/32 1/5/2018
Paasche Airbrush Co.
9511 58th Place
Kenosha, WI 53144
Phone: (800) 621-1907
Website: www.paascheairbrush.com
E-Mail: info@paascheairbrush.com
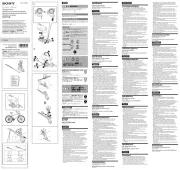
Comes with LN-1/32 (Assembled) and LN-1/64, 3/64, and 1/16 Nibs loose
Total Length of Flow Pencil is 5 -1/2 inches.
HAPK Kit comes with one size nib only
Printed in the U.S.A.
INTRODUCTION:
The FP-1/32 Flow Pencil is used extensively by Designers,
Sculptors, Hobbyists, Crafters, Ceramicists, Artists, Furniture
Manufacturers, and others to beautify their products. The Flow
Pencil is easy to control and operate.
MIXING COLORS:
1. Proper mixing of colors is essential for continuous and
uninterrupted striping.
2. Mix colors into a free flowing consistency, strain to remove
any lumps.
3. Do not mix color in cup of Flow Pencil, use a separate
container and pour into cup only when color flows freely.
COLOR ADJUSTMENTS:
1. Remove FP-10 Cover, and pour premixed free flowing color
into cup, then replace cover.
2. Turning the MU-72 Adjusting Screw will control the stroke
of the which controls theMU-65 Finger Lever Assembly
flow of color.
OPERATION:
1. Hold the FP-1/32 Flow Pencil in your hand as you would a
pencil or brush and place your finger lightly over the MU-65
Finger Lever. When ready to stripe, pull back on the
MU-65 Finger Lever. The Flow Pencil should be moved in
a backward motion (away from the paint) after the color has
begun to flow, never push it into the paint.
2. Regulate the flow to the desired feed rate by turning MU-72
Adjusting Screw.
3. Keep vent hole in the open.FP-10 Cover
4. Practice striping before working on finished product.
5. Correct adjustment of controls and skill of operation will
result in uninterrupted and continuous striping.
CARE AND CLEANING:
1. Before storing FP-1/32 Flow Pencil clean it thoroughly. Empty
remaining color from the cup and rinse it with solvent. Pull back
on the MU-65 Finger Lever and allow solvent to flow through
cup, shell and nib.
2. If color has hardened in hole of nib use a tooth pick or needle
dipped in solvent to remove accumulation.
3. MU-49L Needle is held in position by MU-57 Needle Chuck
and VL-141 Locknut. Remove the needle by unscrewing the
MU-71 Handle and removing the spring. Loosen the VL-141
Locknut and then remove the needle for cleaning.
ADJUSTING OR REPLACING WORN PACKING WASHER:
1. If PTFE Packing-#6 becomes worn or loose it must be
tightened or replaced.
2. You will need a small screwdriver to remove or tighten the
Packing Nut.
3. When replacing your PTFE Packing press Packing onto the
Packing Nut-#6. Use a small screwdriver to tighten packing nut
into shell until it is tight then back out one-half turn, may vary.
4. Now insert needle - you should feel a slight resistance. If too
loose or too tight adjust the Packing Nut with screwdriver until
you feel some slight resistance.
5. Now completely re-assemble guts of Flow Pencil.
WARNING: Striping materials may be harmful if inhaled or
allowed to come into contact with the skin or eyes. Consult
the product label and Material Safety Data Sheet supplied for
the spray material. Follow all safety precautions. CAUTION:
Well Ventilated Area Required to remove fumes.
CAUTION: OVER TIGHTENING CUP WILL
CAUSE TRIGGER TO MALFUNCTION.

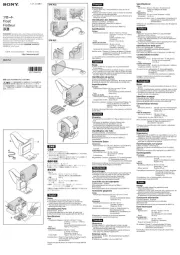
Page 2 FP-1/32 Flow Pencil Parts List
No. Part No. Description
3. Tip Nut *MU-9
4. Nib (1/64, 3/64 & 1/16 Sizes)**LN-1/32
5. Shell Assembly*MU-48A
6. **MU-612 PTFE Packing & Packing Nut
8. Finger Lever Assembly**MU-65
10. Basic Cover (only) *FP-10
11. MU-71 Handle
12. 3A-4 “O” Ring
13. **MU-72 Adjusting Screw
14. **MU-57 Needle Chuck
15.***MU-49L Needle
16. **VL-141 Locknut
18.***VL-140 Spring
No. Part No. Description
31. Cup (only) Aluminum *FP-6
32. StandMU-77
33. “O” RingAE-43
(OPTIONAL PRESSURE CUP)
24. (Complete assembly)FP-45
25. Rod & Cap Assembly**MU-25
26. Nut*MU-69
27. Pressure Cover (only)*FP-5
28. SpringMU-26
29. Piston*FP-9
30. (FDA) “O” Ring****FP-8
31. Cup (only) Aluminum*FP-6
33. “O” Ring (rubber)AE-43
FP-1/32 FLOW PENCIL (WITH EXTRA NIBS: LN-1/64, 3/64 AND 1/16)
HAPK KIT comes with one size nib only
Nibs are grooved as follows:
LN-1/64 has one (1) groove
LN-1/32 has two (2) grooves
LN-3/64 has three (3) grooves
LN-1/16 has four (4) grooves
Contains Aluminum....*
Contains Brass....**
Contains Stainless Steel....***
Contains FDA Approved Silicone....****
Product specificaties
| Merk: | Paasche |
| Categorie: | Niet gecategoriseerd |
| Model: | FP-1/32 |
Heb je hulp nodig?
Als je hulp nodig hebt met Paasche FP-1/32 stel dan hieronder een vraag en andere gebruikers zullen je antwoorden
Handleiding Niet gecategoriseerd Paasche

24 Juli 2023

24 Juli 2023

24 Juli 2023

24 Juli 2023

24 Juli 2023

24 Juli 2023

24 Juli 2023

24 Juli 2023

24 Juli 2023

24 Juli 2023
Handleiding Niet gecategoriseerd
- Metronic
- Mobicool
- Balderia
- Astropet
- Robens
- Blue Sky
- Aqua Computer
- Gra-Vue
- Heylo
- UClear
- Y-brush
- Nordic Winter
- Invacare
- KONFTEL
- Kiano
Nieuwste handleidingen voor Niet gecategoriseerd
16 September 2025
16 September 2025
16 September 2025

16 September 2025
16 September 2025
16 September 2025

16 September 2025

16 September 2025
16 September 2025

16 September 2025