Ozito OGT-0185 Handleiding
Ozito
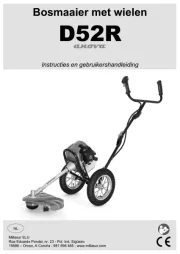
Grastrimmer
OGT-0185
Bekijk gratis de handleiding van Ozito OGT-0185 (8 pagina’s), behorend tot de categorie Grastrimmer. Deze gids werd als nuttig beoordeeld door 30 mensen en kreeg gemiddeld 4.4 sterren uit 15.5 reviews. Heb je een vraag over Ozito OGT-0185 of wil je andere gebruikers van dit product iets vragen? Stel een vraag
Pagina 1/8

ChargingCharged ChargingCharged
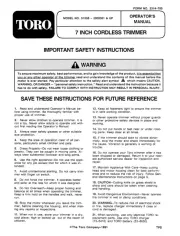
CORDLESS
GRASS
TRIMMER KIT
18V Lithium Ion
INSTRUCTION MANUAL
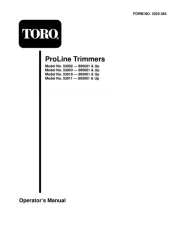
SPECIFICATIONS
Voltage: 18V
Max. Width of Cut: 240mm
Battery: 1.5Ah Li-ion
Charge Time: 4-5 Hours
No Load Speed: 8,500/min
Weight: 1.9kg
OGT-
0185
STANDARD EQUIPMENT
ozito.com.au
Safety Guard
Battery Charger
1.5Ah Battery Pack
IN ORDER TO MAKE A CLAIM UNDER THIS
WARRANTY YOU MUST RETURN THE PRODUCT
TO YOUR NEAREST BUNNINGS WAREHOUSE WITH
YOUR BUNNINGS REGISTER RECEIPT. PRIOR TO
RETURNING YOUR PRODUCT FOR WARRANTY
PLEASE TELEPHONE OUR CUSTOMER SERVICE
HELPLINE:
Australia 1800 069 486
New Zealand 0508 069 486
WARRANTY
TO ENSURE A SPEEDY RESPONSE PLEASE
HAVE THE MODEL NUMBER AND DATE OF
PURCHASE AVAILABLE. A CUSTOMER SERVICE
REPRESENTATIVE WILL TAKE YOUR CALL
AND ANSWER ANY QUESTIONS YOU MAY
HAVE RELATING TO THE WARRANTY POLICY
OR PROCEDURE.
OZITO Australia/New Zealand (Head Office) 1-23 Letcon Drive, Bangholme, Victoria, Australia 3175.
The benefits provided under this warranty are in addition
to other rights and remedies which are available to you at law.
Our goods come with guarantees that cannot be excluded
at law. You are entitled to a replacement or refund for a major
failure and for compensation for any other reasonably foreseeable
loss or damage. You are also entitled to have the goods repaired
or replaced if the goods fail to be of acceptable quality and the
failure does not amount to a major failure.
Generally you will be responsible for all costs associated with
a claim under this warranty, however, where you have suffered
any additional direct loss as a result of a defective product you
may be able to claim such expenses by contacting our customer
service helpline above.
0119
3 YEAR REPLACEMENT WARRANTY
Your product is guaranteed for a period of 36 months from the
original date of purchase and is intended for DIY (Do It Yourself)
use only. If a product is defective it will be replaced in accordance
with the terms of this warranty. Lithium Ion batteries are covered
by a 12 month warranty. Warranty excludes consumable parts, for
example: blades.
WARNING
The following actions will result in the warranty being void.
• If the tool has been operated on a supply voltage other
than that specified on the tool.
• If the tool shows signs of damage or defects caused
by or resulting from abuse, accidents or alterations.
• Failure to perform maintenance as set out within the
instruction manual.
• If the tool is disassembled or tampered with in any way.
• Professional, industrial or high frequency use
Grass Trimmer
Replacement Blade

ONLINE MANUAL
Scan this QR Code with your
mobile device to take you to
the online manual.
Cha rgingCha rge d Cha rgingCha rge d
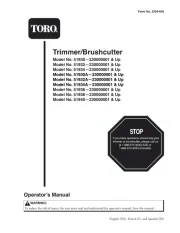
1. Tree/ower guard
2. Motor housing
3. Telescopic shaft
4. Shaft adjustment collar
5. Adjustable handle
6. On/off trigger
7. Lock-off switch
8. Sure grip handle
9. Blade
10. Spindle plate
11. Safety guard
12. Battery seating
13. Battery release button
14. Battery charge indicators
15. Charger indicator button
16. Charging cradle
17. Charger LED indicators
18. Charger adaptor
19. Replacement blade
CORDLESS GRASS TRIMMER
ACCESSORIES
KNOW YOUR PRODUCT
1. ASSEMBLY
SETUP & PREPARATION
15
76
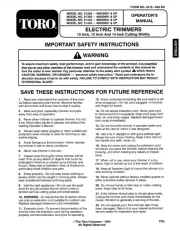
WARNING! NEVER USE THE GRASS TRIMMER
UNLESS THE SAFETY GUARD IS PROPERLY
FITTED.
CAUTION! ENSURE THE TOOL IS OFF & THE BATTERY
REMOVED BEFORE PERFORMING ANY OF THE
FOLLOWING OPERATIONS.
8
9
4321 5
10 11
12
13 14 16 17 18
WARNING!: STONES, PIECES OF METAL AND
OTHER OBJECTS CAN BE THROWN OUT AT HIGH
SPEED BY THE BLADES.
Fitting the Safety Guard
Turn the grass trimmer
upside down. Align the
recess in the safety guard
with the tabs of the cutter
head. Slide in until it clicks
into place.
1. Place the big hole in the
blade onto the blade mount
on the bottom of the
spindle plate.
3. To remove the blade push
the blade towards the
centre of the spindle and
then slide off.
2. Pull the blade
outwards so that the
small hole is tted
into the mount.
Attaching and Replacing Blade
19

2. BATTERY CHARGING
Allow at least 3 hours of charge time before initial use of the
battery. Charge the battery pack only with the charger provided.
The battery should be charged in a cool dry place. It will take
2 to 3 charging/discharging cycles before the battery achieves
maximum run time capacity.
Charging the Li-Ion Battery
1. Connect the charging adaptor into the mains power outlet.
3. With the battery sitting on a
at surface, align the raised
ribs on the battery with the
recess in the charger cradle
and slide onto the battery
ensuring a rm connection.
Note: The battery will not develop a memory, it does not have to
be fully discharged before recharging.
2. The charger LED will ash
green showing power
is being supplied to the
charger.
ChargingCharged ChargingCharged
4. The charger LED will illuminate red signifying that the battery
is charging. Battery is fully charged after 4-5 hours, green
LED will turn on.
CAUTION: TO REDUCE THE RISK OF ELECTRICAL SHOCK,
WE RECOMMEND THE USE OF A RESIDUAL CURRENT
DEVICE (RATED 30mA OR LESS).
ChargingCharged
5. When removing the charger
from the battery, rst press
the battery release tab, then
slide the cradle from its
position.
ChargingCharged
Charger LED Indicator
LED Indicator Situation
GREEN (Flashing) Stand By (no battery pack is inserted)
RED (Illuminated) Battery is charging (low charge)
GREEN (Illuminated) Battery is fully charged.
GREEN & RED (Flashing) Battery is faulty.
GREEN & RED (Illuminated)
Battery is too hot. Remove battery from
charger a let cool. Insert battery again
when at room temperature.
Battery Charge Indicator
1 GREEN LED indicates that the
battery has only a low charge and
requires charging.
2 GREEN LEDs indicate that the
battery has mid state of charge.
3 GREEN LEDs indicate that the
battery is fully charged.
The included battery is
equipped with a battery charge
indicator to show the state of
the battery charge.
Press the charge indicator
button and check to see which
LED light is on.
Note: The battery needs to be removed from the tool to check
the state of charge.
Battery Protection System
The tool is equipped with the battery protection system, which
helps to ensure a long service life.
The output power automatically cuts off during operation when
the tool and battery are placed under the following situations:
• When tool is overloaded:
If this occurs, turn off the tool and let it cool down for 10 mins,
remove the cause of overload, then resume operation.
• When the remaining battery capacity becomes low:
Recharge the battery pack.
Note: The battery protection system does not in any way
damage the tool.
Note: The indicated capacity may be lower than the actual level
during use or immediately after using the tool.
Product specificaties
| Merk: | Ozito |
| Categorie: | Grastrimmer |
| Model: | OGT-0185 |
Heb je hulp nodig?
Als je hulp nodig hebt met Ozito OGT-0185 stel dan hieronder een vraag en andere gebruikers zullen je antwoorden
Handleiding Grastrimmer Ozito

3 Juli 2025

16 Maart 2024

16 Maart 2024

13 December 2023

17 Juni 2023

5 Juni 2023

12 Mei 2023

12 Mei 2023

11 Mei 2023

19 April 2023
Handleiding Grastrimmer
- Dolmar
- Varo
- Proviel
- ELECTROLUX FLYMO PARTNER McCULLOCH
- Go On
- Pattfield
- Gloria
- AYCE
- Maxbear
- Fiskars
- Cramer
- Challenge Xtreme
- NEO Tools
- Lümme
- Atika
Nieuwste handleidingen voor Grastrimmer
10 September 2025
8 September 2025
7 September 2025

2 September 2025
2 September 2025
2 September 2025
2 September 2025
2 September 2025
2 September 2025
2 September 2025