NightStick TAC-300 Handleiding
NightStick Lamp TAC-300
Bekijk gratis de handleiding van NightStick TAC-300 (2 pagina’s), behorend tot de categorie Lamp. Deze gids werd als nuttig beoordeeld door 8 mensen en kreeg gemiddeld 4.5 sterren uit 3 reviews. Heb je een vraag over NightStick TAC-300 of wil je andere gebruikers van dit product iets vragen? Stel een vraag
Pagina 1/2
Bayco Products, Inc. • 640 South Sanden Blvd. • Wylie, TX 75098 • 1-800-233-2155 • 1-469-326-9400 • www.nightstick.com
INS-T300B-K01-21
Instruction Manual
TAC-300B-K01
WARNINGS
•NOT FOR USE ABOVE HAZARDOUS LOCATIONS
•DONOTuseinexplosiveatmospheres,nearammableliquids,orwhereexplosion
prooflampsarerequired.
•DONOTuseintheproximityofvehiclesorequipmentwhenthereisariskofammable
liquidscomingintocontactwiththeashlight.
•DONOTexposethebatteriestowaterorsaltwater,orallowthebatteriestogetwet.
•DONOTstorethebatterieswithmetallicobjectsthatmaycauseashortcircuit.
•Immediatelydiscontinueuseofthebatteriesiftheyemitanunusualsmell,feelhot,
changecolor,changeshapeorappearabnormalinanyway.
•Keep out of the reach of children.
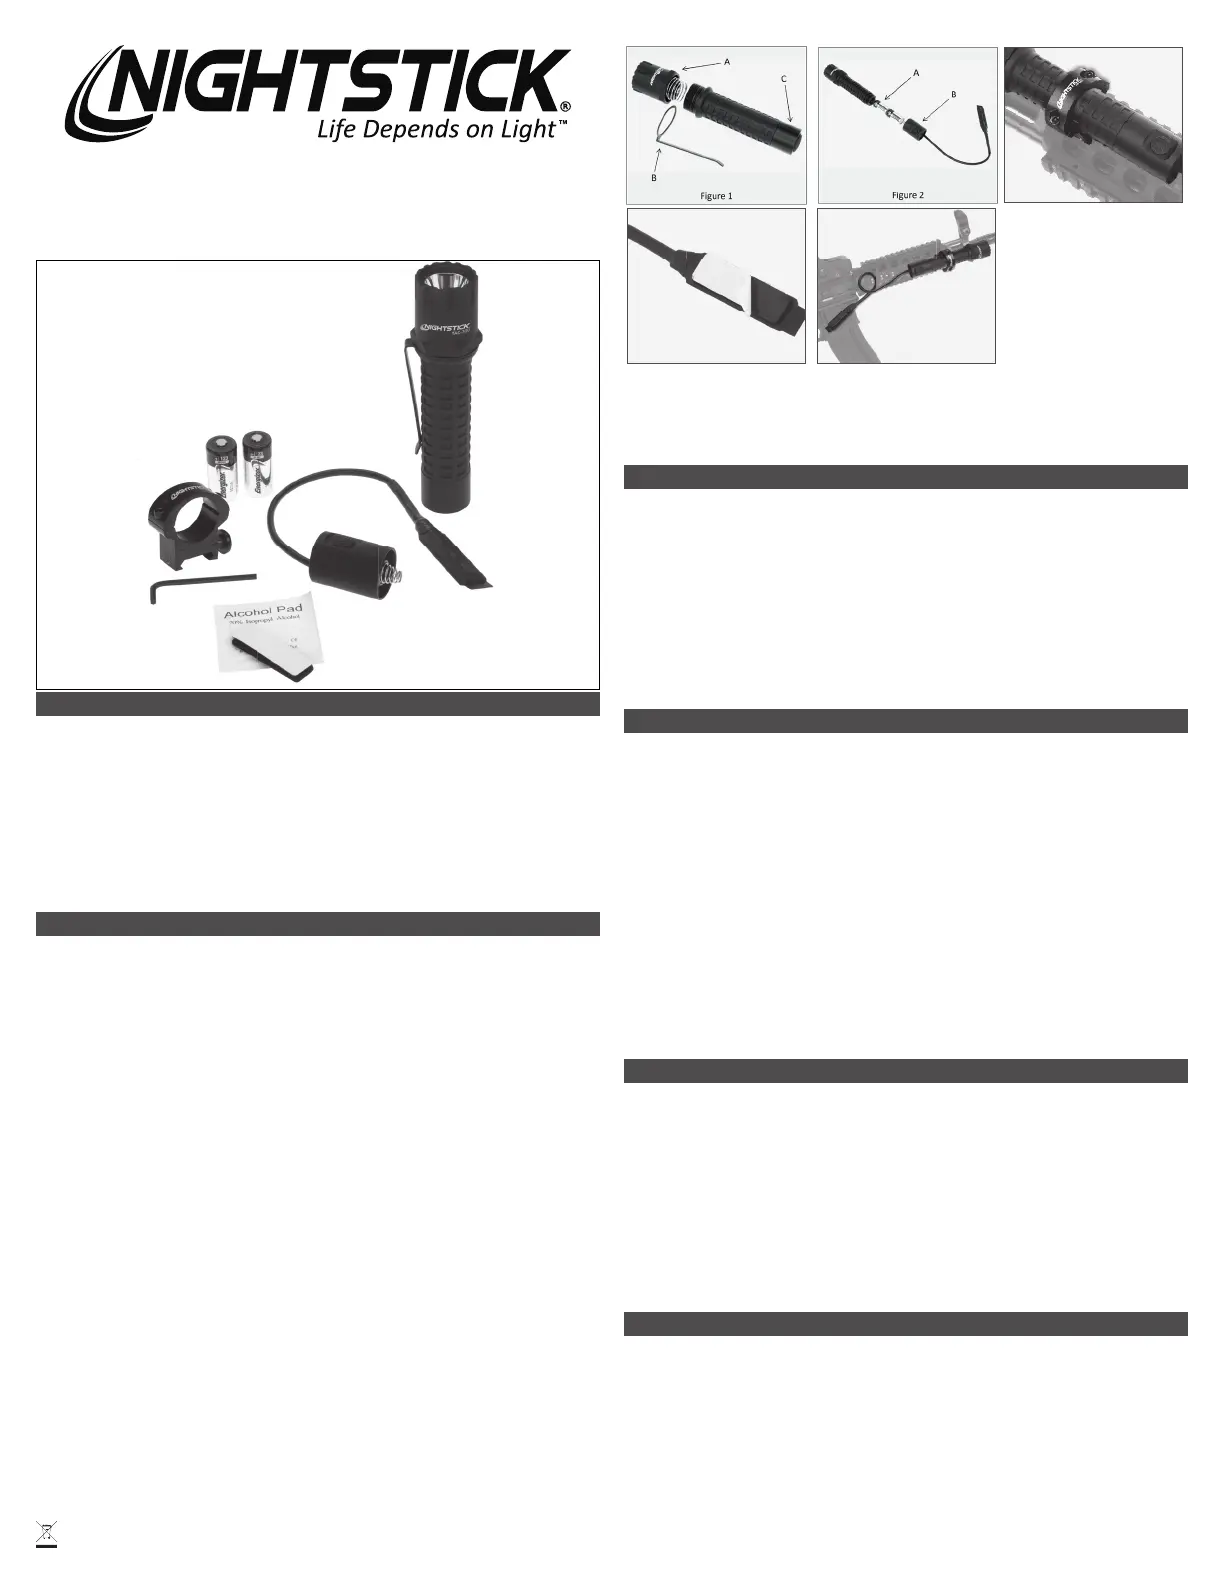
ASSEMBLY INSTRUCTIONS
The TAC-300B includes the pocket clip and the tail cap switch already attached. The
lightcanbeusedimmediatelyasaconventionaltacticalashlightoncethebatteriesare
installed.Thislightmaybeconvertedbacktothiscongurationatanytime.
1.Removethepocketclip(Figure1-B)byunscrewingandremovingthelightbezel(Figure1-A).
2.Reinstallthelightbezel(Figure1-A).
3. Remove the tail cap switch (Figure 1-C). NOTE: Keep the tail cap switch and pocket clip
forfutureuseforthelightistobeconvertedbacktoaconventionaltacticalashlight.
4.InstallthetwoincludedCR123batteries(Figure2-A).Thepositiveterminalsoneach
batteryshouldbeorientedinthedirectionoftheLightBezel.
5. Install the Remote Pressure Switch (Figure 2-B) and tighten into place.
6. Test the operation of the Remote Pressure Switch and the side switch. See section titled
Operation for how the switches work.
7.Determinelocationoftherailmountonthebodyofthelight.Keepthemountclearofthe
switchcap,otherwisechangingthebatterieswillrequireremovingthemount.
8.Oncethelocationofthemounthasbeendetermined,loosenthescrewsusingthe
supplied Allen wrench and slide the mount onto the handle of the light (Figure 3).
Partially tighten the screws.
9.TesttthemountontothePicatinnyorWeaverrailofthelonggun.Determinethe
desiredlocationoftheRPS(Figure5)onthelonggun.Itcanbeattachedtoanyclean,
dry,atsurface.Figure5isoneexample;choosethebestlocationforyourweapon’s
congurationandpersonalpreferences.
10.Finishtighteningthemountscrews,alternatingbetweeneachasmallamountatatime
untilthegapisequalonbothsides(Figure3).
11.OncethelocationofthemountandtheRPShavebeendetermined,thoroughlyclean
thelocationontheweaponwheretheRPSwillbelocatedaswellastheinsidesurface
oftheRPSusingthesuppliedalcoholswab.
12.PeeloffthepaperbackingononesideoftheVelcro
®
adhesive strip and press it into
placeonthebacksideoftheRPS(Figure4).
13.Attachthelightwithmountontotherailoftheweaponandtightenthethumbscrew.
14.PeeloffthepaperbackingontheothersideoftheVelcro
®
adhesive strip and press it
onto onto the clean area of the long gun. (Figure 5).
NOTE:Donotmoveorremovetheadhesivestripsoncetheyhavebeenplaced.The
Velcro
®
adhesiverequiresabout24hourstomakeasemi-permanentbond.Donotattempt
to separate the two Velcro
®
sections until it is set.
OPERATION
The Nightstick Tactical Long Gun Kit is now fully installed and ready for use.
•The Remote Pressure Switch provides momentary On/Off operation of the light only.
Using this switch gives the operator instant control when the light is on and off.
•ThesideswitchprovidesmomentaryOn/Offoperationbypressingslightlyonthebutton,
orconstant-onbypressinguntilthebuttonclicks.
•Ifthemountispositionedcorrectly(seeStep7above),changingthebatteriesmaybe
accomplished without removing the light from the mount. Depending on the installation location,
itmaybepossibletochangethebatterieswithoutremovingthemountfromtheweapon.
•Tochangethebatteries,rstseparatethetwohalvesoftheVelcro
®
strip from each other
sothatonehalfstaysadheredtoyourweaponandtheotherremainsattachedtotheback
side of the Remote Pressure Switch. Next, unscrew the Remote Pressure Switch and
replacethebatteries(seeStep4above).
WARRANTY
LIMITED LIFETIME WARRANTY
BaycoProducts,Inc.warrantsthisproducttobefreefromdefectsinworkmanshipand
materialsfortheoriginalpurchaser’slifetime.TheLimitedLifetimeWarrantyincludesthe
LEDs,housingandlenses.Rechargeablebatteries,chargers,switches,electronicsand
included accessories are warranted for a period of two years with proof of purchase. Normal
wearandfailureswhicharecausedbyaccidents,misuse,abuse,faultyinstallationand
lightning damage are excluded.
Wewillrepairorreplacethisproductshouldwedetermineittobedefective.Thisisthe
onlywarranty,expressedorimplied,includinganywarrantyofmerchantabilityortnessfor
a particular purpose.
Foracompletecopyofthewarranty,gotowww.baycoproducts.com/bayco-product-
support/warranties. Retain your receipt for proof of purchase.
Mode d’emploi
TAC-300B-K01
AVERTISSEMENTS
•NEPASUTILISERAU-DESSUSD’ENDROITSDANGEREUX.
•NEPASutiliserceproduitdansuneatmosphèreexplosive,àproximitédeliquides
inammables,oudansdesendroitsexigeantunéclairageantidéagrant.
•NEPASutiliserceproduitàproximitédevéhiculesoud’équipementquanddesliquides
inammablespourraiententrerencontactaveclalampetorche.
•NEPASexposerlesbatteriesàl’eauouàl’eausalée,etnepaslaisserlesbatteries
se mouiller.
•NEPASrangerlesbatteriesàproximitéd’objetsmétalliquesquipourraientcauserun
court-circuit.
•Arrêtezimmédiatementd’utiliserlesbatteriessiellesémettentuneodeurinhabituelle,
sontbrûlantesautoucher,changentdeforme,ouencasdetouteautreanomalie.
•Ne pas laisser pas à la portée des enfants
INSTRUCTIONS DE MONTAGE
LalampetorchetactiqueTAC-300Bestfournieavecl’agrafepourpocheetle
capuchonarrièredéjàenplace.Latorchepeutdoncêtreutiliséedèsquevouslasortez
desonemballageentantquelampetorchetactiqueconventionnelleunefoisqueles
batteriesCR-123inclusessontenplace.Lacongurationdecettetorchepeutêtre
changée à tout moment.
1.Enlevezl’agrafedepoche(illustration1-B)endévissantetretirantlatêtelumineuse
(illustration 1-A).
2.Unefoisl’agrafedepocheretirée,réinstallezlatêtelumineuse(illustration1-A).
Figure 5Figure 4
Figure 3
Product specificaties
| Merk: | NightStick |
| Categorie: | Lamp |
| Model: | TAC-300 |
Heb je hulp nodig?
Als je hulp nodig hebt met NightStick TAC-300 stel dan hieronder een vraag en andere gebruikers zullen je antwoorden
Handleiding Lamp NightStick

9 Januari 2026
8 Januari 2026
8 Januari 2026
7 Januari 2026
7 Januari 2026
7 Januari 2026
6 Januari 2026
6 Januari 2026
6 Januari 2026
6 Januari 2026
Handleiding Lamp
Nieuwste handleidingen voor Lamp
24 Maart 2026
24 Maart 2026
24 Maart 2026
24 Maart 2026
24 Maart 2026
24 Maart 2026
24 Maart 2026
24 Maart 2026
24 Maart 2026
24 Maart 2026