NightStick 1160-ACKIT Handleiding
NightStick Lamp 1160-ACKIT
Bekijk gratis de handleiding van NightStick 1160-ACKIT (1 pagina’s), behorend tot de categorie Lamp. Deze gids werd als nuttig beoordeeld door 10 mensen en kreeg gemiddeld 4.2 sterren uit 5 reviews. Heb je een vraag over NightStick 1160-ACKIT of wil je andere gebruikers van dit product iets vragen? Stel een vraag
Pagina 1/1
BAYCO • 640 South Sanden Blvd. • Wylie, TX 75098 • 1-800-233-2155 • www.baycoproducts.com
Model 1160-ACKIT Battery Eliminator and Magnetic Stand
for 116X / 7X / 8X Series Safety Lights
INS-1160ACKIT-12
CAUTION: DO NOT use in explosive atmospheres, near flammable liquids, or
where explosion proof lamps are required
DO NOT use in the proximity of vehicles or equipment when there is a risk of
flammable liquids coming into contact with the hand-lamp
CAUTION: For Light Duty Use Only
WARNING: NOT FOR USE ABOVE HAZARDOUS LOCATIONS
Thank you for purchasing this Nightstick flashlight. Save these instructions.
Please read these instructions before using your flashlight.
INCLUDED IN THE KIT
Battery eliminator module
AC power adapter
Large magnet base
INSTALLING THE BATTERY ELIMINATOR
The battery eliminator accessory is used to power the NSP-116X / 7X / 8X series
safety lights without the use of four AA batteries. The primary application is for
product showcase and display purposes.
The battery eliminator module is powered by a 120V AC wall adapter.
1.Slide off the battery compartment door and remove all batteries from the safety
light.
2.Connect the power adapter plug into the battery eliminator module socket.
3.Install the battery eliminator module into the battery compartment. The module is
keyed and will only fit one way.
4.To hold the battery eliminator module in place, install one AA battery in the slot
next to power adapter plug.
5.Route the power cord toward the top of the battery compartment and install the
sliding battery door. THE BATTERY DOOR WILL NOT CLOSE COMPLETELY.
DO NOT USE EXCESSIVE FORCE OR THE CORD WILL BE CUT.
6.For a stand-up counter display, install the safety light into the large magnetic
base.
7.Plug the power adapter into a 120V AC outlet. The safety light is now ready for
use. Activate the light functions as needed.
SAFETY
CAUTION BRIGHT LED RADIATION: AVOID DIRECT EYE EXPOSURE. The
light is a Class 2 LED product per IEC 60825-1 Edition 1.2.2001.
Do not use this FLASHLIGHT in explosive or hazardous areas.
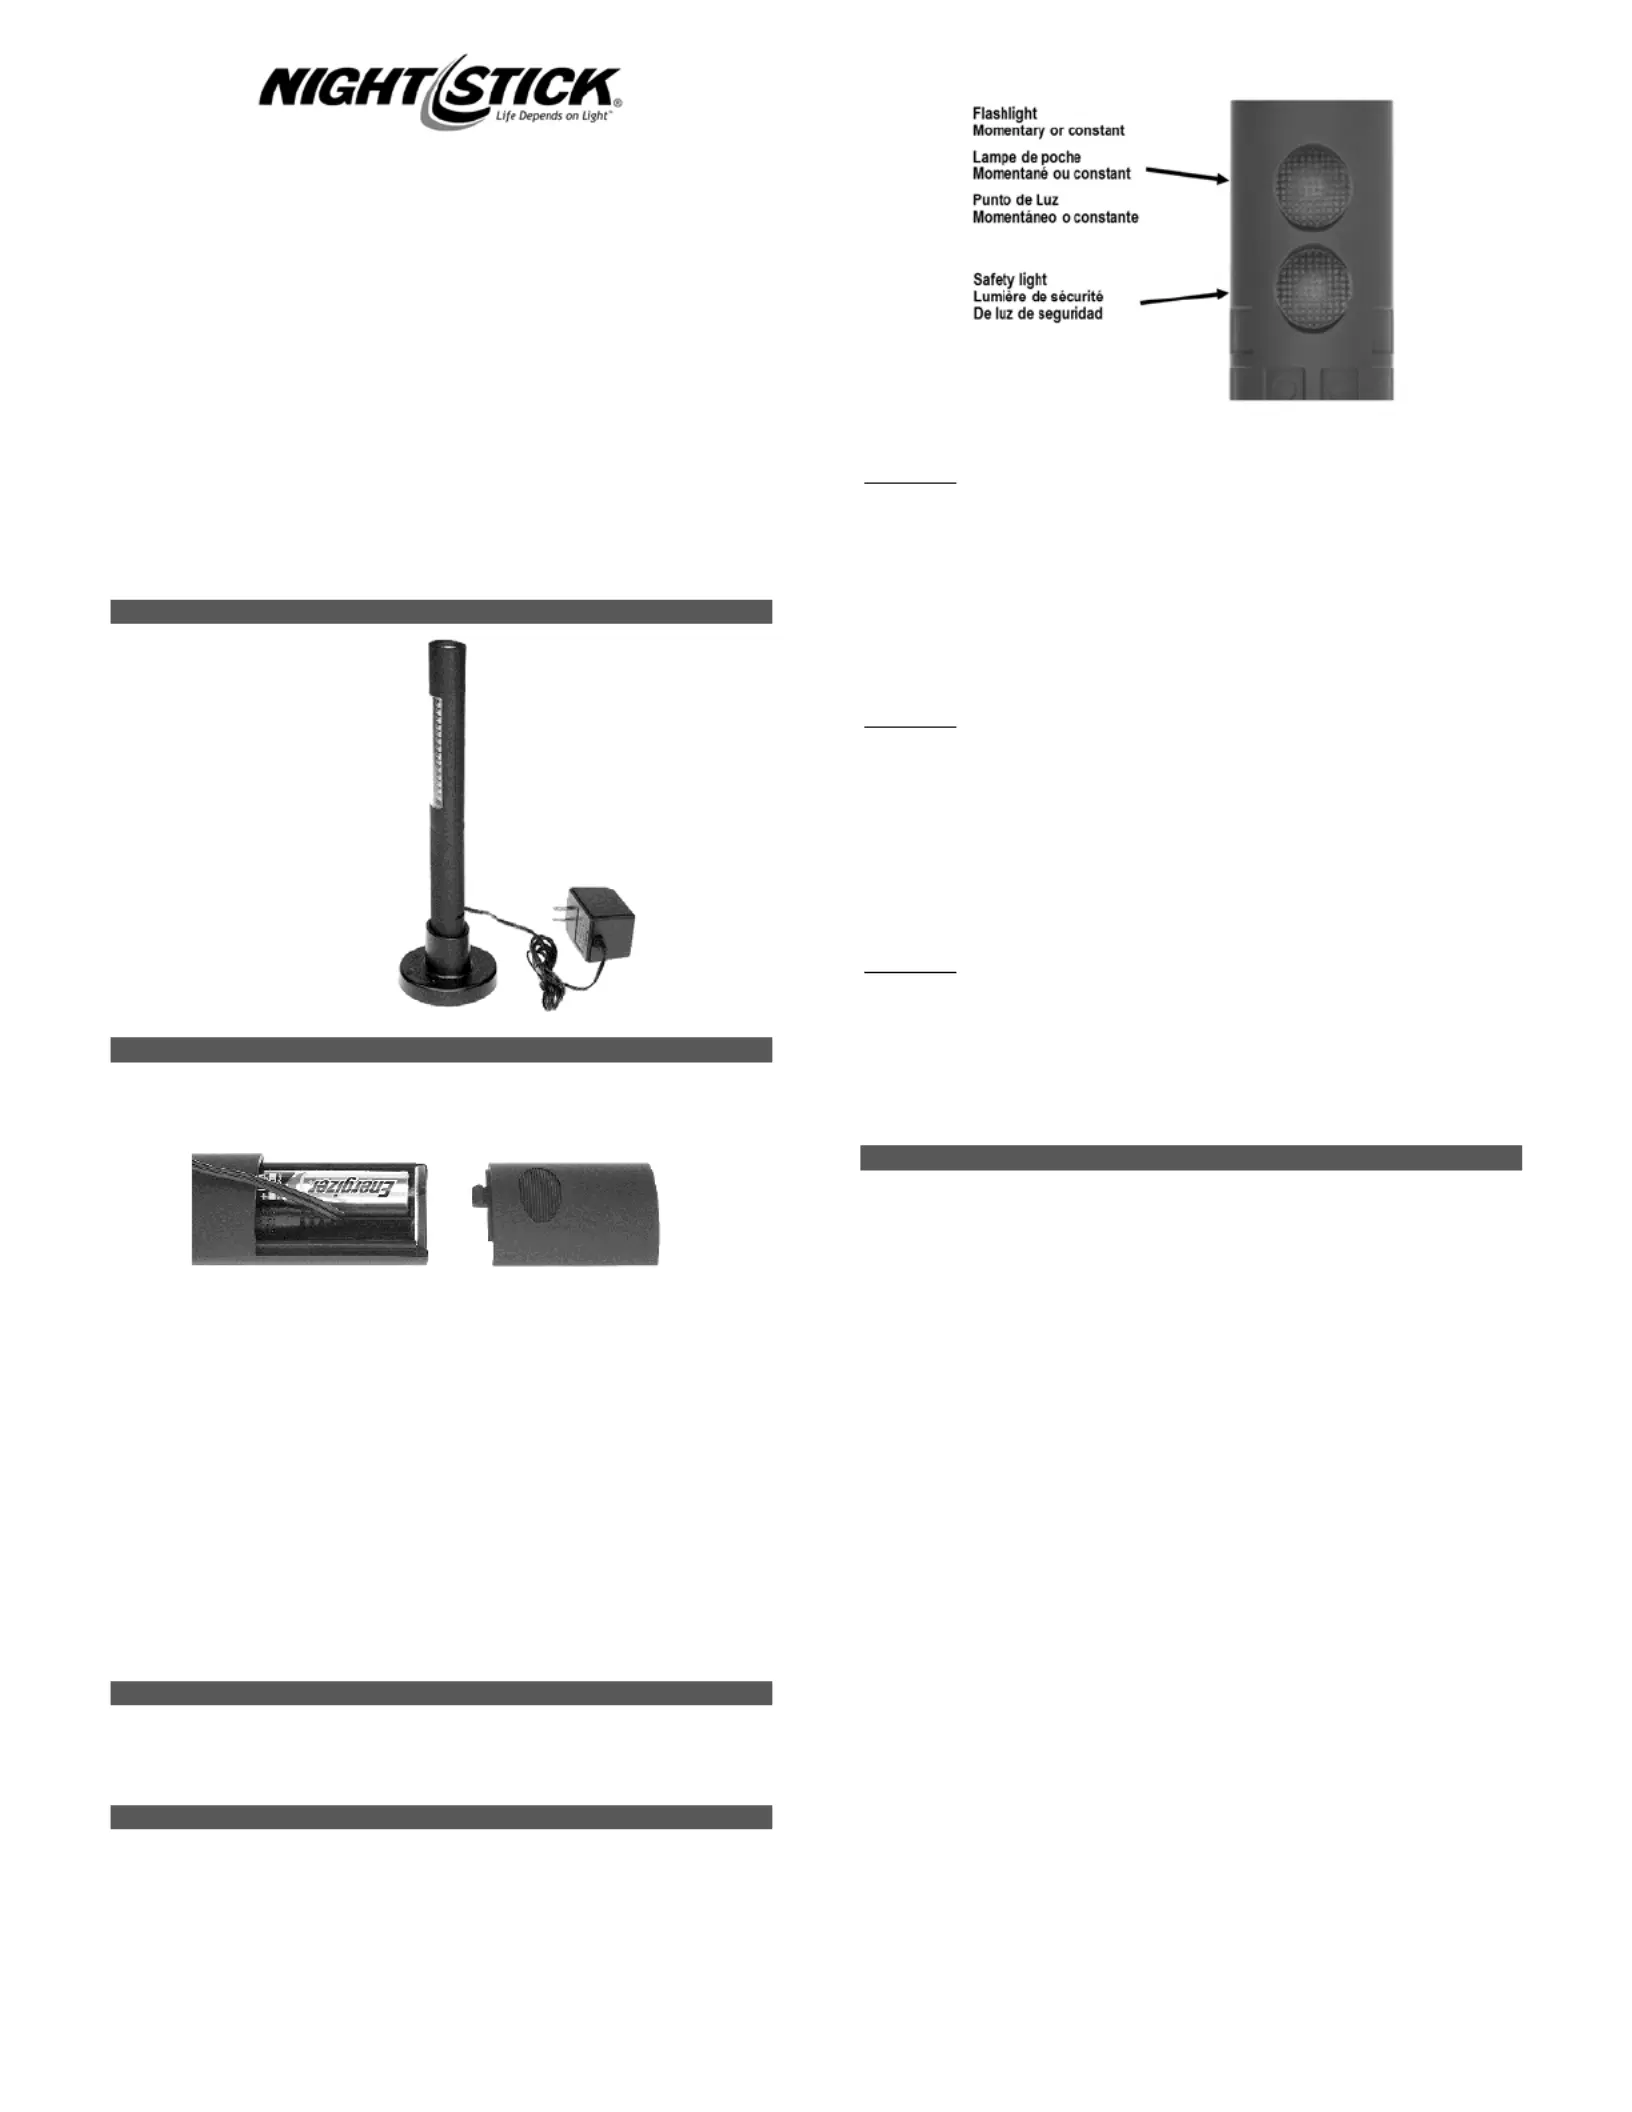
OPERATING THE LIGHT
All models have two body switches that control the flashlight and the safety light.
The flashlight and safety light functions can be operated independently and
together.
Models 1162 / 1164 / 1166 / 1168
Safety Light
1162-red, 1164 –blue, 1166-white, 1168-amber
1.The upper switch controls the flashlight. Lightly press the switch for momentary
flashlight operation. For constant on, press the switch until it clicks. Press again
for off.
2.The lower switch controls the safety light. Press for full power.
3.Press again for half-power. Press again to activate flashing safety light. Press
again for off.
Models 1170 / 1172 / 1176 / 1178 /1180 /1182
Safety Light
1170-blue/red, 1172-white/red, 1176-white/amber, 1178-white/blue, 1180-
amber/green, 1182-blue/green
1.The upper switch controls the flashlight. Lightly press the switch for momentary
flashlight operation. For constant on, press the switch until it clicks. Press again
for off.
2.The lower switch controls the safety light. Press for constant (non-flashing)
safety light. Press again to activate alternating flasher. Press again for off.
Model 1174
Safety Light
1174-amber
1.The upper switch controls the flashlight. Lightly press the switch for momentary
flashlight operation. For constant on, press the switch until it clicks. Press again
for off.
2.The lower switch controls the flood /safety light. Press for floodlight. Press
again to activate flashing amber light. Press again for off.
WARRANTY
Limited Lifetime Warranty
Product is warranted to be free from defects in workmanship and materials for the
lifetime of the original owner. Includes the housing, lenses, electronics and switches.
Batteries, normal wear and abuse are excluded.
Not Covered
Consequential damages, incidental damages or incidental expenses, including
damage to property. Some states do not allow the exclusion or limitation of
incidental or consequential damages, so the above limitation or exclusion may not
apply to you. This warranty gives you specific legal rights, which may vary from
state to state.
Warranty Claims - USA
Contact Bayco for USA warranty claims. Call 800-233-2155 or email
cs@baycoproducts.com and Bayco Customer Service will provide a Return Goods
Authorization (RGA) to facilitate rapid warranty action. After receiving the RGA,
send the product (shipping prepaid) to BAYCO • 640 S. SANDEN BLVD • WYLIE,
TEXAS • 75098. Include a dated proof of purchase and a brief description of the
defect with your name, address and phone number. Your product will either be
repaired or replaced at the option of Bayco and returned as soon as practical, but no
later than 45 days after being received by Bayco.
Warranty questions and international claims
If you live outside the USA or have questions about this warranty or an inquiry about
other Bayco products contact BAYCO • 640 S. SANDEN BLVD • WYLIE, TEXAS •
75098 or call 800-233-2155
Light not included
Product specificaties
| Merk: | NightStick |
| Categorie: | Lamp |
| Model: | 1160-ACKIT |
Heb je hulp nodig?
Als je hulp nodig hebt met NightStick 1160-ACKIT stel dan hieronder een vraag en andere gebruikers zullen je antwoorden
Handleiding Lamp NightStick

9 Januari 2026
8 Januari 2026
8 Januari 2026
7 Januari 2026
7 Januari 2026
7 Januari 2026
6 Januari 2026
6 Januari 2026
6 Januari 2026
6 Januari 2026
Handleiding Lamp
Nieuwste handleidingen voor Lamp
24 Maart 2026
24 Maart 2026
24 Maart 2026
24 Maart 2026
24 Maart 2026
24 Maart 2026
24 Maart 2026
24 Maart 2026
24 Maart 2026
24 Maart 2026