Muller SC 24.10 pro Handleiding


Lees hieronder de 📖 handleiding in het Nederlandse voor Muller SC 24.10 pro (4 pagina's) in de categorie Niet gecategoriseerd. Deze handleiding was nuttig voor 69 personen en werd door 2 gebruikers gemiddeld met 4.5 sterren beoordeeld

Pagina 1/4
BA_SC24pro_NEUTRAL_DE_GB_FR_IT_WEB
*OPTIONAL
Bedienungsanleitung
D
Schaltcomputer / Elektronische Schaltuhr
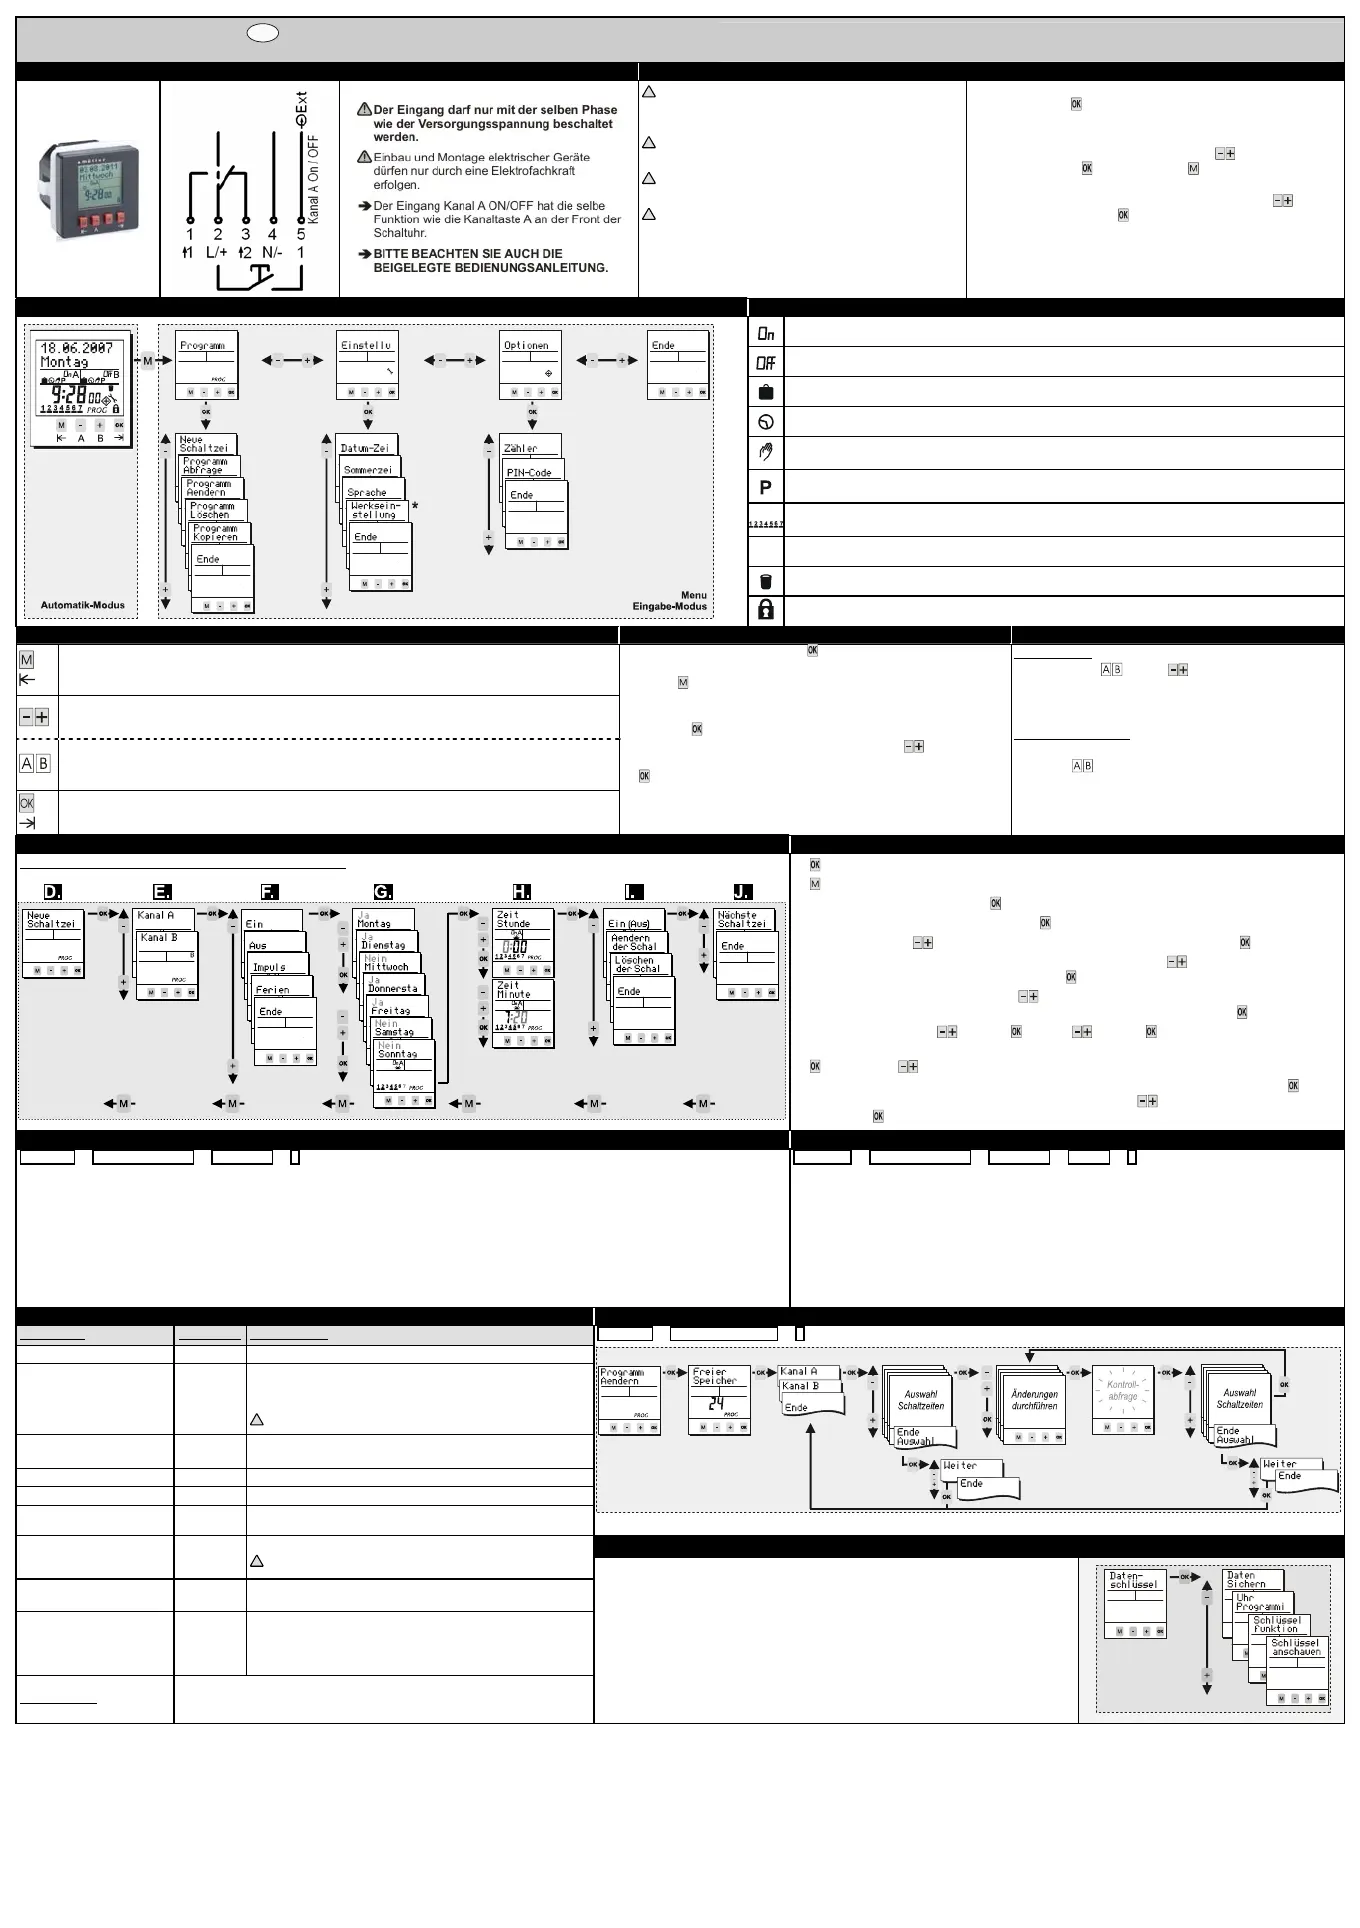
Anschlussbilder 1. Sicherheitshinweise 2. Erstinbetriebnahme
!
Einbau und Montage dürfen nur von einer Elektrofachkraft
durchgeführt werden! Anderenfalls besteht Brandgefahr
oder die Gefahr eines elektrischen Schlages!
!
Nur an die auf dem Typenschild angegebene Spannung
und Frequenz anschließen!
!
Bei Eingriffen oder Änderungen an der Schaltuhr erlischt
die Garantie!
!
Die Schaltuhr ist so zu installieren, dass außergehnlich
hohe Störstrahlung die Funktion nicht beeintchtigen kann!
Die Schaltuhr wird im Sleep-Modus ausgeliefert. Das Display ist aus.
Drücken Sie die -Taste (1 Sekunde). Die Displayanzeige erscheint.
Die Schaltuhr ist mit dem aktuellen Datum, der Uhrzeit und der
europäischen Sommerzeitregel voreingestellt.
Stellen Sie die genschte Sprache mit den -Tasten ein und
bestigen Sie mit . (Hinweis: Mit der -Taste können Sie jederzeit
einen Schritt zurück)
Datum, Uhrzeit und Sommerzeitregel falls nötig mit den -Tasten
einstellen und jeweils mit bestätigen.
3. Funktionsübersicht 4. Symbolerklärung
Kanal eingeschaltet / Programmierung EIN
Kanal ausgeschaltet / Programmierung AUS
Für das aktuelle Datum ist eine Ferien- / Datums-Schaltung aktiv.
Aktueller Schaltzustand beruht auf programmierter Standardschaltzeit.
Akt. Schaltzustand beruht auf manueller Umschaltung des Programms und wird durch das gespeicherte
Programm bei der nächsten Schaltzeit geändert.
Akt. Schaltzustand beruht auf manueller Umschaltung und bleibt erhalten,
bis manuell zurückgesetzt wird (7).
Wochentage Montag ... Sonntag; im Programmier-Modus zeigen Unterstriche an, welche Wochentage
aktiviert sind.
I
Aktueller Schaltzustand beruht auf einer Impuls-Schalzeit
Wird bei Programm löschen angezeigt.
Schaltuhr ist über PIN gesperrt; PIN-Eingabe erforderlich (12).
5. Tastenfunktion 6. Bedienhinweise 7. Kanal ON
ON
ON
ONON OFF
OFF
OFF
OFF OFF / Permanent P
1. Wechsel von Automatik-Modus in den Eingabe-Modus.
2. Zurück-Funktion (Eine Ebene zurück).
1. Eingabe-Modus: Auswahlglichkeit zwischen verschiedenen Optionen.
2. Eingabe-Modus: Verändern der blinkenden Stelle.
1. Automatik-Modus: Ein- oder Ausschalten eines Kanals bis zur nächsten programmierten Schaltzeit.
2. Automatik-Modus: Tastendruck nger als 3 sec. = Permanentschaltung (7).
1. Aktivieren der Schaltuhr durch Betätigen nger als 1 Sekunde (Ohne Netzspannung).
2. Bestigen der Auswahl oder der Programmierung (Eine Ebene tiefer).
Gangreserve (ohne Netz): Taste für eine Sekunde betätigen, das
Display schaltet ein.
Mit der -Taste gelangen Sie in der Programmierung immer einen
Schritt / eine Ebene zurück.
Am Schluss einer kompletten Eingabe erscheint Ende. Bestigen sie
Ende mit wechseln Sie zum Automatik-Modus zurück.
Am Schluss mancher Eingaben können Sie mit den -Tasten
zwischen Ende Weiter Weiter oder wählen. Bestätigen Sie mit der
-Taste werden die Daten übernommen und Sie wechseln zum Anfang
der Eingabe zurück.
Bei Auswahl Ende hrend der Eingabe geht die Uhr ohne Übernahme
der Daten in den Automatik-Modus.
Kanal ON OFF
Durch Druck der -Tasten ( -Tasten) können Sie Kanäle
manuell schalten. Diese manuelle Schaltung wird durch das
Hand-Symbol dargestellt und bleibt bis zurchsten
programmierten Schaltung gültig.
Permanentschaltung P
Permanentschaltung durch 3-Sek.-Druck auf die entsprechende
Kanaltaste . Kanal ist dauernd an bzw. dauernd aus.
Schaltzustand bleibt bis zur erneuten manuellen Umschaltung
(3-Sek.-Druck) erhalten.
8. Schaltzeit programmieren (Siehe auch Programmierbeispiel Punkt (9)) 9. Beispiel einer Programmierung für normale Schaltzeiten (Standard)
Schritt A. bis C. siehe Punkt 9. (Beispiel einer Programmierung) A. -Taste r eine Sekunde drücken. Die Displayanzeige erscheint (Automatik-Modus).
B. -Taste drücken. Sie befinden sich nun eine Ebene tiefer im Eingabe-Modus.
C. Bestigen Sie Programm mit der -Taste.
D. Bestigen Sie Neue Schaltzeit
mit der -Taste.
E. hlen Sie mit den -Tasten den gewünschten Kanal aus und bestigen Sie mit .
F. r eine normale Einschaltzeit oder Ausschaltzeit wählen Sie mit den -Tasten den Menupunkt Ein
oder Aus an und bestigen Sie Ihre Auswahl mit .
G. In dieser Ebene ssen Sie anhand der -Tasten r jeden Wochentag wählen, ob geschaltet wird
Ja oder ob nicht geschaltet wirdNein. Bestätigen sie jeweils Ihre Auswahl mit .
H. Zeiteinstellung: Stunden und dann . Minuten und dann .
I. Kontrollabfrage: Ist die blinkende Schaltzeit-Zusammenfassung richtig, bestigen Sie die Abfrage mit der
-Taste. Mit der Taste stehen weitere Optionen zur Auswahl (Aendern/ /Löschen Ende).
J. chten Sie die Programmierung fortsetzten, bestätigen Sie Naechste Schaltzeit mit .
chten Sie die Programmierungen beenden, wechseln Sie mit zum Punkt Ende und bestigen
Sie dies mit .
10. Impuls 11. Ferienschaltung
Programm Neue Schaltzeit Kanal A/B -> -> ->
Die Impuls-Funktion bietet Ihnen die glichkeit eine Ein-Schaltzeit mit festgelegter Schaltdauer zu programmieren. Die Uhr schaltet nach der
programmierten Impuls-Dauer (Impuls bis zu 59:59 mm:ss) wieder aus. Die Programmierung erfolgt entsprechend einer normalen Standard-Schaltzeit
(Siehe Punkt 8 / 9) mit folgenden Unterschieden:
Wählen Sie die Impuls-Funktion (9F).
Legen Sie die Einschaltdauer fest (Impuls Minute / Impuls Sekunde).
Legen Sie die Wochentage Ihrer Impuls-Schaltzeit fest
Legen Sie die Einschaltzeit fest (Zeit Stunde / Zeit Minute)
Kontrollabfrage: Bestätigen Sie die blinkende Impuls-Schaltzeit
Programm Neue Schaltzeit Kanal A/B Ferien -> -> -> ->
Pro Kanal steht die Eingabe einer Ferienzeit zur Verfügung. Sie haben die Möglichkeiten einen Zeitraum
(tageweise) permanent auszuschalten (Ferien AUS) oder permanent einzuschalten (Ferien EIN).
Die Bearbeitung der Ferienschaltzeit erfolgt entsprechend der Schaltzeitprogrammierung in Punkt (8/9).
Die Auswahl Ferien wird im Menu Neue Schaltzeit
nicht mehr angeboten, wenn die
Ferienschaltung bereits verwendet wird. Die Ferienschaltzeit kann dann über das Menu Programm
Aendern (13) oder Menu Programm Löschen (12) bearbeitet werden.
12. Weitere Einstellungen 13. Programm Ändern
Menu-Punkt Hauptmenu Anwendungen
Programm Abfrage Programm Abfrage Schaltzeiten / Abfrage Speicherplatz
Programm Kopieren Programm
Kopie der Schaltzeiten von einem Kanal zum anderen. Kanal wird
dabei nicht überschrieben, sondern mit zusätzlichen Schaltzeiten
gefüllt.
!
Ferienschaltzeiten werden nicht kopiert!!
Programm Löschen Programm Löschen der Schaltzeit(en). Sie haben die glichkeiten alle
Kanäle, einen Kanal oder einzelne Schaltzeiten zu löschen.
Datum Einstellungen Einstellung Datum und Uhrzeit
Sommerzeit Einstellungen Sommerzeiteinstellungen
Sprache Einstellungen Sprachauswahl
Programm Programm Aendern -> ->
Im Menu Programm Aendern haben Sie die glichkeiten programmierte Schalzeiten je Kanal zu ändern.
14. Datenschlüssel*
Werkseinstellungen* Einstellungen Zurücksetzen auf Auslieferungszustand.
!
Datum, Uhrzeit und Schaltzeiten gehen verloren
Zähler Optionen Anzeige der Betriebsstunden und Schaltimpulse je Kanal und r
Schaltuhr gesamt
PIN-Code Optionen
Sie können die Schaltuhr mit einem 4-stelligen PIN-Code sperren.
Diesen Code können Sie bearbeiten, aktivieren oder deaktivieren.
Sollten Sie ihn vergessen haben, wenden Sie sich bitte an unseren
Kundendienst.
Reset-Funktion Betätigen Sie gleichzeitig alle 4 Fronttasten r 2 Sekunden. Die Schaltuhr wird
zurückgesetzt. Schaltzeiten werden nicht gescht! Datum und Uhrzeit werden
gelöscht -> Ansonsten wie Erstinbetriebnahme (2).
Folgende Optionen stehen Ihnen bei Anschluss des Datenschlüssels zur Verfügung:
Daten Sichern: Speichern der Daten von der Uhr auf den Datenschssel.
Vorhandene Daten-Sicherung wird überschrieben. (Bei gleichem Uhrentyp).
Uhr programmieren: Speichern der Daten vom Datenschssel auf die Uhr. Alle
gespeicherten Schaltzeiten auf der Uhr werden überschrieben.
Schlüssel Funktion: Abspielen der auf dem Schlüssel gespeicherten Schaltzeiten.
Die interne Programmierung wird unterdckt.
Schlüssel anschauen: Abfrage der auf dem Schssel gespeicherten Schaltzeiten /
Speicherplatz.
BA_SC24pro_NEUTRAL_DE_GB_FR_IT_WEB
*OPTIONAL
Instruction Manual
GB
Time switch
Connection diagram 1. Safety instructions 2. Initial operation
!
The installation and assembly of electrical equipment
must be only carried out only by a skilled Person!
Otherwise fire danger or danger of an electric shock
exists!
!
Connect the supply voltage/frequency as stated on the
product label!
!
Warranty void if housing opened by unauthorised
person!
!
The electronic circuit is protected against a wide range
of external influences. Incorrect operating may occur if
external influences exceed certain limits!
The time switch is delivered in sleep-mode, the display is switched off.
Press -button for 1 second.
The current date and time is already programmed and European daylight
savings time is activated.
Select the desired language by pressing -buttons and confirm it by
pressing . (Remark: By pressing you move one step backwards from the
current position)
If required, date, time and daylight savings time mode can be adjusted also by
pressing -buttons and a subsequent confirmation with .
3. Menu overview 4. Symbol legend
Channel is switched ON
Channel is switched OFF
For the current date the “holiday program” /permanent by date” is activated
Standard programming step
Current state is based on a manual over-ride. The state will be cancelled with the next programming step.
Current state is based on a manual over-ride. The state is permanent until terminated manually (7).
Days of the week Monday, Tuesday, ... Sunday;
The underscores indicate if the program is active for the days above.
I
Current state is based on a switching time with pulse function
Element within sub-menu program delete
The time switch is locked; to unlock the device the PIN has to be entered (12).
5. Key function 6. Handling advice 7. Channel ON OFF
/ Permanent P
1. To access the Enter-mode (program, adjustments, options) from the automatic-mode.
2. To revert to the beginning of the current (sub-) menu.
1. To adjust the flashing digit.
2. To scroll through a choice
1. Automatic-mode: To switch the channel ON or OFF until the next programming step occurs.
2. Automatic-mode: A push longer than 3 sec. = Permanent switching status (7).
1. To activate the time switch when operated without power supply.
2. To confirm the selection or the entered data.
The time switch is programmable without external power supply after
pressing the -button.
To revert one step or one level back while in the Enter-Mode press .
After completion of a (sub-) menu confirming end will return the device
into the automatic-mode.
With to the choice changes from end continue. By confirming
continue the time switch returns to the beginning of the current
(sub-) menu.
When confirming end before completion, the time switch returns to the
automatic-mode without saving the entered data.
Channel ON OFF
By pushing -buttons ( -buttons) a manual switch of the
channels take place. The resulting switching status is marked with
the hand-symbol and remains until the next programming step
occurs. (temporary over-ride)
Permanent switching status P
By pressing the corresponding channel button for more than 3
sec. the channel is permanently switched ON or OFF. The status
remains until the next manual switching occurs (> 3 sec.).
(permanent over-ride)
8. New Program (See also the example (9)) 9. Example „New Program“ (For a regular switching time)
Step A. to C. please refer to point 9. (ExampleNew Program)
A. If power supply is disconnected press for one second. The display appears in Automatic-Mode.
B. Press , the time switch is now in the Enter-Mode.
C. Confirm Program with .
D. Confirm new program
with .
E. Choose the desired channel with and confirm with .
F. For regular switching times choose on off or with -buttons and confirm with .
G. Within this level you activate the days of the week (1…7) on which the switching time should happen. With
you activateyes or deactivate nothe corresponding date. Confirm each day with .
H. Adjustment of the time: Hours and . Minutes and .
I. Verify the entered switching time: If the flashing summary of the programming step is correct, verify on or
off with . After verification you have the choice between edit/delete and end with .
J. If you want to proceed with programming, confirm next switching with .
To leave the programming menu confirm end.
10. Pulse 11. Program permanent
Program New program Channel A/B -> -> ->
The pulse function provides you the opportunity of programming a switching time with a defined duration.
As soon as the pulse-duration has expired the time switch switches OFF automatically (the duration of the pulse is up to 59:59 mm:ss).
The programming is carried out like a standard switching time (see point 8 / 9) with following differences
Choose Pulse function (9F).
Define the duration of the pulse (pulstime minute / pulstime second).
Program the days of the week
Program the switching time (time hour / time minute)
Validation: Confirm the blinking summary of the pulse program
Program new program channel A/B permanent -> -> -> ->
One permanent by date programming step (holiday function) for each channel is possible. During the
desired period (The function is valid for the whole days) the channel can be switched off ( permanent
off) or on (permanent on).
The programming of this function is as described in (8 / 9).
The choice permanent will not be offered anymore within the menu new program
when already in use.
The switching time can be modified and deleted within Program modify (13) and Program delete
(12) respectively.
12. Additional adjustments 13. Program modify
Menu Main menu Application
Program query Program To query the programming steps and remaining memory locations
Program copy Program
Copy from one channel to another. Memory of the channel won’t
be overwritten; the copied switching steps appear additionally.
!
Permanent by date function is not copied!
Program delete Program
Deletion of switching time(s). The program for all channels, single
channels and single programming steps within on channel can be
deleted.
Date-Time Adjustment Adjustment of date and time
Summertime Adjustment Adjustment of the daylight saving time mode (ON/OFF)
Language Adjustment Choice of languages
Program Program modify -> ->
Within Program modify each single switching time can be modified.
Factory Defaults* Adjustment Reset to the state of delivery.
!
Date, time and switching program will be lost! 14. Data-key*
Counter Options Displays the hour counter and pulse counter for each channel and
the time switch itself.
PIN-Code Options
The time switch can be locked with a 4-digit PIN-Code. The code
can be adjusted, activated and deactivated. If you have forgotten
the Code please call customer service.
Reset-Function
Press all front keys for 2 seconds. The time switch is reset. The values for
date and time will be deleted and have to be re-entered. The switching
program has not been deleted!
With a Data-key following activities are possible:
Save data: Writes the data from the time switch into the memory of the Data-key.
Program timeswitch: Writes the data located inside the Key into the memory.
Key function: The time switch will solely apply programming steps from the Data-
key. The switching program of the time switch is suppressed.
Key readout: To query the switching program of the Data-key.
BA_SC24pro_NEUTRAL_DE_GB_FR_IT_WEB
*OPTION
Mode d´emploi
F
Interrupteur horaire
Schéma de raccordement 1. Instructions de sécurité 2. Mise en service
!
L´ installation et le montage ne doivent être
effects que par les électriciens! Sinon il y a
danger d´incendie ou d´électrocution.
!
Strictement respecter les indications de tension et
de fréquence mentionnées sur la plaque d´identité!
!
Aucun droit de garantie en cas de manipulations et
de modifications de l´appareil.
!
L´interrupteur est à installer de telle façon que
celui-ci ne soit pas soumis aux rayonnements
pertubateurs pouvant nuire à sa fonction.
A sa fourniture, interrupteur horaire est àétat de veille, afficheur est etteint.
Actionner la touche pendant 1 seconde.pour activer appareil.
La date et l´heure correspondent à la gle européenne pour horaire d´é.
lectionner le langage souhai avec les touches et valider avec .
(Remarque:Avec la touche vous pouvez toujours revenir un pas en arrière)
Si nécessaire sélectionner la date, heure et la règle pour l´horaire é avec
les touches et valider en actionnant .
3. Sommaire des fonctions 4. . Légende des symboles
Canal marche
Canal arrêt
Un programme vacances ou daté est activé pour la date actuelle.
état actuel est basé sur un horaire de commutation standard.
état actuel est issu d´une commutation manuelle. Cet état sera modif par le programme à la prochaine
commutation.
L´état actuel est basé sur une commutation manuelle. Cet état sera modifié par la prochaine action manuelle
(7)
Jours de semaine lundi dimanche; les jours soulignés sont activés.
I
L´état actuel correspond à une commutation par impulsion.
Ce symbole est visualisé s´il y a effacement du programme
L´interrupteur horaire est verrouillé; la connaissance du PIN est indispensable pour déverrouiller
appareil(12).
5. Fonction des touches 6. Notes de service 7. Canal ON OFF / Permanent P
1. Passage du mode automatique au mode entrée de dones.
2. Fonction un pas en arrière
1. Mode entrée de données: lection de plusieurs options.
2. Mode entrée de données: placement de la position clignotante.
1. Mode automatique: Marche/arrêt un canal jusqu´à la prochaine commutation programmée.
2. Mode automatique : Touche actione plus de 3 secondes = état permanent (7).
1. Activer interrupteur en actionnant la touche pendant plus de 1 seconde (appareil hors-tension)
2. Valider la sélection ou la programmation.
serve de marche (hors-tension): Actionner la touche pendant une
seconde, afficheur est activé.
La touche permet avancer ou de reculer un pas dans la
programmation.
fin est visualisé à la fin d´une entrée de données. Valider fin
avec pour revenir au mode automatique.
A aide des touches passer de fin à continuer et valider avec
pour revenir à entrée des dones.
La sélection fin pendant l´entrée des données déclenche le passage
au mode automatique, les données ne sont pas enregistrées.
Canal ON/OFF
Actionner les touches (touches ) pour provoquer une
commutation manuelle des canaux correspondants. Cette action
est symbolisée par la main, qui reste visualie jusqu´à la
prochaine commutation programmée.
Commutation permanente P
La commutation est permanente en actionnant pendant 3
secondes la touche du canal correspondant. L´état de la
sortie (contact fer ou contact ouvert) est maintenu jusqu´à
une nouvelle commutation manuelle (3 secondes sur la touche)
8. Programmer une commutation (voir aussi l´exemple de programmation au point (9)) 9. Exemple de programmation pour commutations normales marche / arrêt (Standard)
Actions A. à C. voir point 9. (exemple de programmation) A. Actionner la touche pendant une seconde. Visualisation du mode automatique.
B. Actionner la touche pour acder au niveau ente de données.
C. Valider Programme avec la touche
D. Activer nouveau programme avec la touche .
E. Sélectionner àaide des touches le canal souhai et valider avec .
F. Pour aliser une commutation normale sélectionner avec les touches le menu marche ou arrêt
et valider le choix avec .
G. A cette étape vous pouvez / devez confirmer à aide des touches et pour chaque jour de semaine
si une commutation est souhaitée Oui ou non souhaitée Non. Valider avec .
H. Réglage de heure suivit de et des minutes suivit de .
I. Vériification: Si le contenu clignotant est correct, valider les données avec la touche .
La touche offre plusieurs options (Modifier/ /effacer fin).
J. Pour continuer la programmation confirmer prochaine heure de commutation avec Pour .
terminer la programmation passer au point fin en utilisant et valider avec .
10. Impulsion 11. Programme vacances
Programme Nouveau programme Canal A/B -> -> ->
La fonction impulsion permet de réaliser une commutation de durée determinée.
A la fin de impulsion( Impulsion jusqà 59:59 mm:ss ), interrupteur horaire revient automatiquement à sa position initiale.
La programmation est effectuée comme pour une commutation standard (voir point 8 / 9) avec les rogations suivantes:
lectionner la fonction Impulsion (9F).
terminer la durée enclenchement (impulsion minute / impulsion seconde).
Programmer les jours de semaine
Programmer l´heure d´enclenchement (Horaire heure / Horaire minute)
Contle: Valider la commutation par impulsion clignotante
Programme nouveau programme Canal A/B permanent -> -> -> ->
Chaque canal peut être associé à un programme vacances. Il est possible de mettre une sortie hors
service (permanent arrêt ) ou d´activer une sortie (permanent marche) en permanence pour
une certaine période (jour par jour).
Le programme vacances est trai conformément à la programmation pour commutation mentionnée au
point (8 / 9).
La sélection permanent au niveau du menu nouveau programme n´est plus accessible, lorsque
le programme vacances est déjà utilisé.
La commutation vacances peut alors être traitée au niveau du menu Programme demande (13) ou
Programme effacer (12).
12. Autres réglages 13. Modifier le programme
Menu Menu
principal Applications
Programme demande Programme Heures de commutation / nombre de pas de programme
Programme copier Programme
Copie des heures de commutation d´un canal à un autre. Le canal
n´est pas effacé, les heures de commutation copiées sont tout
simplement ajoues.
!
Les programmes vacances ne sont pas cops!!
Programme effacer Programme Permet effacer le programme sur tous les canaux, ou sur un seul
canal ou seulement des pas de programme.
Date-Heure Réglages Programmation de la date et de heure
Heure d été Réglages Réglage de horaire é / hiver
Langage Réglages Choix du langage
Programme Programme modifier -> ->
Le menu Programme modifier permet de modifier les commutations programmées au niveau de chaque canal.
14. Données clé-mémoire*
Réglages usine* Réglages
Remise à zero, c´est à dire retour à état de livraison.
!
La date, heure et les pas de programme sont finitivement
effas
Compteur Options Affichage des heures de marche et du nombre de commutations
pour chaque canal et affichage du total de interrupteur horaire
PIN-Code Options
L´interrupteur horaire peut être verrouillé grâce à un code PIN de
6 chiffres. Ce code peut être modifié, acti ou désactivé. En cas
d´oubli ou de perte de ce code, contacter notre service àprès-
vente.
Fonction remise à ro
Appuyer simultanément sur les 4 touches pendant 2 secondes. L´interrupteur est
remis à zéro. Les heures de commutation ne sont pas effacées! La date et l´heure
sont effacées -> sinon procéder comme à la mise en service (2).
Les options suivantes sont disponibles lors de utilisation de la clé-mémoire:
Données sauvegarder: Sauvegarde du programme de l´interrupteur sur la c de
programmation. Le programme actuellement enregist sur la c est remplacé.
(interrupteur de version identique).
Horloge programmer: Charger les données de la c sur l´interrupteur horaire. Le
programme actuellement contenu dans la mémoire de interrupteur est remplacé.
Clé fonction: Permet de faire fonctionner et de tester le programme enregistré sur
la c. Dans ce cas de figure, le programme actuellement instal sur interrupteur est inhibé.
Clé lire: Lecture des pas de programme et de la capacité mémoire de la clé.


Product specificaties

Merk: Muller
Categorie: Niet gecategoriseerd
Model: SC 24.10 pro

Heb je hulp nodig?

Als je hulp nodig hebt met Muller SC 24.10 pro stel dan hieronder een vraag en andere gebruikers zullen je antwoorden


Handleiding Niet gecategoriseerd Muller

Handleiding Niet gecategoriseerd

Nieuwste handleidingen voor Niet gecategoriseerd