Monacor ECM-306BU/WS Handleiding
Bekijk gratis de handleiding van Monacor ECM-306BU/WS (33 pagina’s), behorend tot de categorie Microfoon. Deze gids werd als nuttig beoordeeld door 74 mensen en kreeg gemiddeld 4.9 sterren uit 3 reviews. Heb je een vraag over Monacor ECM-306BU/WS of wil je andere gebruikers van dit product iets vragen? Stel een vraag
Pagina 1/33
MONACOR INTERNATIONAL GmbH & Co. KG • Zum Falsch 36 • 28307 Bremen • Germany Copyright© by MONACOR INTERNATIONAL. All rights reserved. A-2034.99.01.12.2019
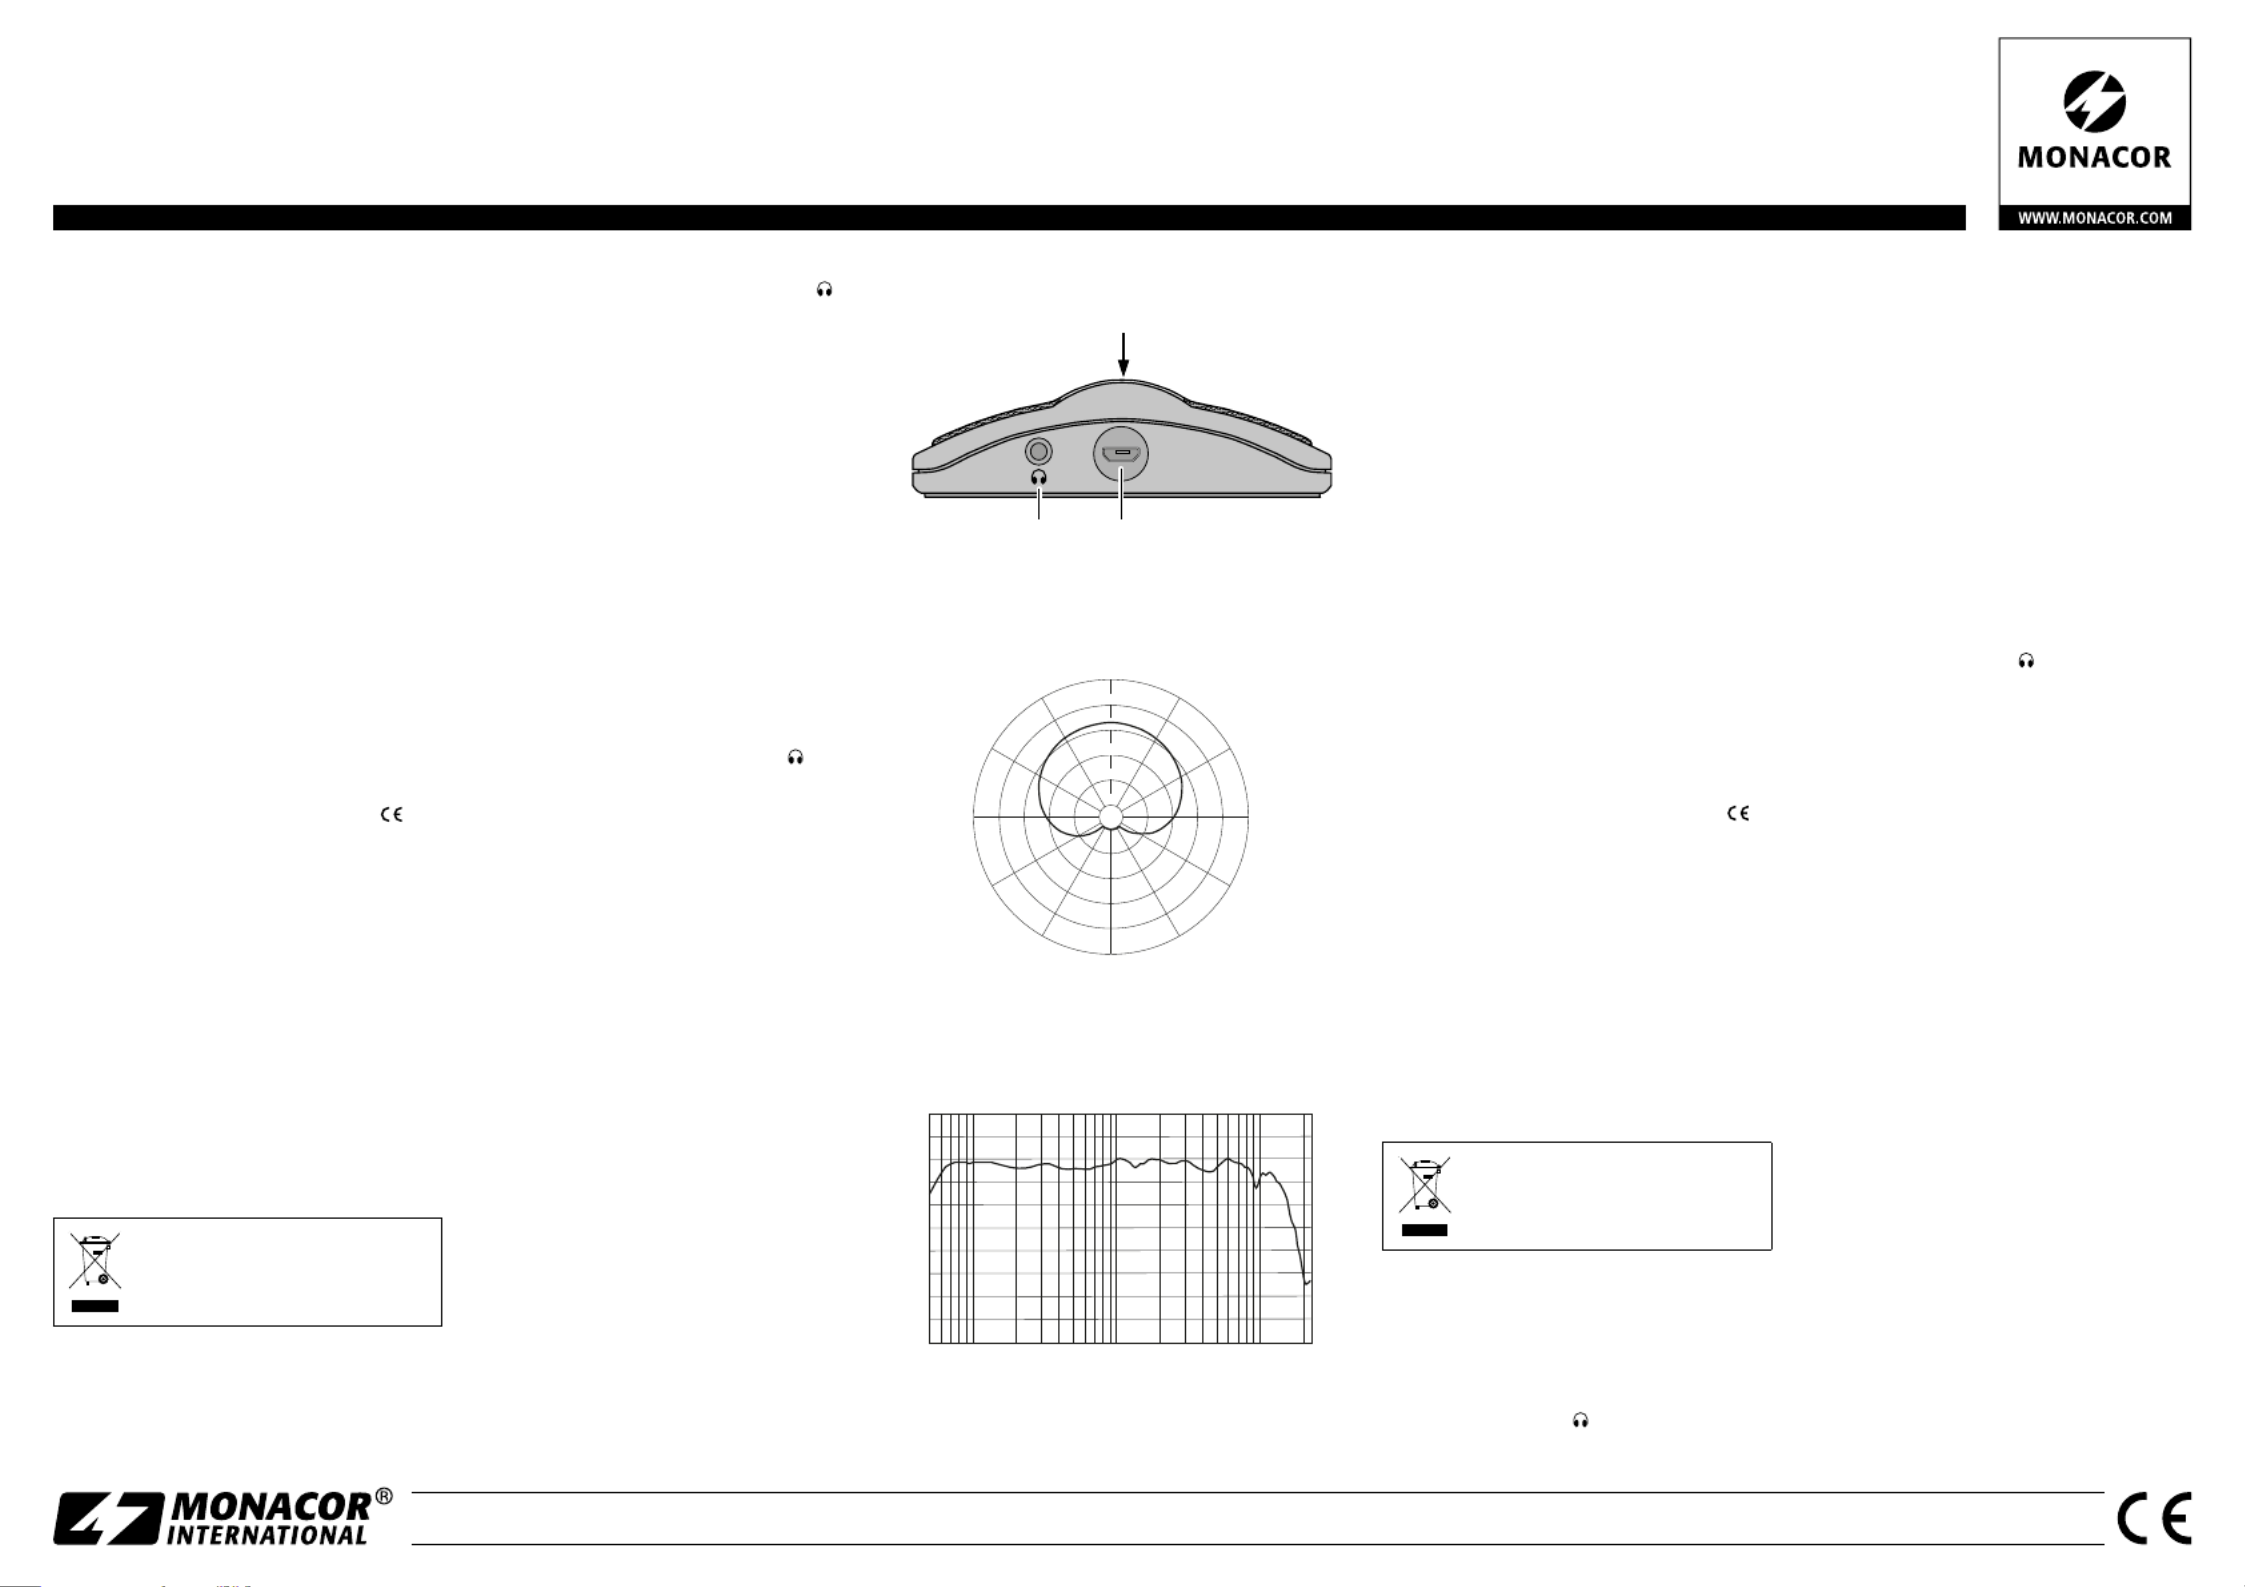
➀
Rückseite • Rear
ECM-306BU / SW Bestell-Nr. • Order No. 0237270
ECM-306BU / WS Bestell-Nr. • Order No. 0237280
ELECTRONICS FOR SPECIALISTS ELECTRONICS FOR SPECIALISTS ELECTRONICS FOR SPECIALISTS ELECTRONICS FOR SPECIALISTS ELECTRONICS FOR SPECIALISTS ELECTRONICS FOR SPECIALISTS ELECTRONICS FOR
1
32
➁
Polardiagramm • Polar pattern
330°
300°
230°
240°
210°
180°
150°
120°
90°
60°
30°
-24
-18
-12
dB
0
6
-6
➂Frequenzgang • Frequency response
−
60
−
70
−
20
−
30
−
40
−
50
(dBV)
50100 2005001k2k5k
10k
20k(Hz)
USB Boundary Microphone
These instructions are intended for users
without any specific technical knowl-
edge. Please read these instructions
carefully prior to operation and keep
them for later reference.
1 Applications
This USB boundary microphone with head-
phone output can be used as a desktop mi-
crophone or wall microphone and is directly
connected to a computer. Thus, it is ideally
suited for video / web conferences and for
audio recordings of discussions, conferences,
etc. on the computer. For recording, it is
possible to use a software provided with the
operating system or a software additionally
installed (e. g. “Audacity”, available as a free-
ware on the Internet).
2 Important Notes
The unit corresponds to all relevant directives
of the EU and is therefore marked with .
•
The unit is suitable for indoor use only. Pro-
tect it against dripping water, splash water
and high air humidity. The admissible ambi-
ent temperature range is 0 – 40 °C.
•
For cleaning only use a dry, soft cloth; never
use water or chemicals.
•
No guarantee claims for the unit and no li-
ability for any resulting personal damage or
material damage will be accepted if the unit
is used for other purposes than originally
intended, if it is not correctly connected, or
if it is not repaired in an expert way.
If the unit is to be put out of ope-
ration definitively, take it to a local
recycling plant for a disposal which
is not harmful to the environment.
3 Operation
1) -Lay the microphone flat on the table. How
ever, it may also be suspended on the wall
via the mounting holes on the rear.
2) For audio playback, connect headphones
to the 3.5 mm jack (2).
Caution:Never adjust the headphones to a very
high volume. Permanent high volumes may damage
your hearing!
3) Start the computer. Connect the cable
supplied to the micro USB port (3) of the
microphone and to a USB port at the
computer. The blue LED power indicator
(1) will light up. The computer will auto-
matically recognise the microphone as a
device for audio input and audio output
(“USB PnP Sound Device”). The drivers re-
quired (standard drivers of the operating
system) will be automatically installed.
4) In the settings of the operating system
and /or of the audio software used, the
microphone must have been selected for
audio input; for playback via headphones
connected to the jack , it must also have
been selected for audio output. With the
appropriate setting at the computer, it is
possible to monitor the input signal of
the microphone via the headphones while
talking.
5) After operation, disconnect the USB cable
of the microphone from the computer.
4 Specifications
Type/Polar pattern: � � � � electret /semi-cardioid
Frequency range: � � � � � 50 –18 000 Hz
Sensitivity: � � � � � � � � � � 3�2 mV/ Pa at 1 kHz
A /D converter: � � � � � � � 16 bit, 48 kHz max�
Max� SPL: � � � � � � � � � � 110 dB
S/N ratio: � � � � � � � � � � � 55 dB
Power supply: � � � � � � �
⎓
5 V via USB port
Dimensions, weight: � � 90 × 25 × 90 mm, 187 g
USB interface: � � � � � � � USB 2�0
1�2 m connection cable: micro USB connector, type B /
USB connector, type A
Suitable
operating systems: � � � � Windows 7 / 8 / 10 or
Mac OS 9 / OS X
Subject to technical modification.
Windows is a registered trademark of Microsoft Corporation in
the USA and other countries. Mac OS is a registered trademark
of AppleInc. in the USA and other countries.
USB-Grenzflächenmikrofon
Diese Anleitung richtet sich an Benutzer
ohne besondere Fachkenntnisse. Bitte
lesen Sie die Anleitung vor dem Betrieb
gründlich durch und heben Sie sie für
ein späteres Nachlesen auf.
1 Einsatzmöglichkeiten
Dieses USB-Grenzflächenmikrofon mit Kopf-
hörerausgang ist als Tisch- oder Wandmik-
rofon verwendbar und wird direkt an einen
Computer angeschlossen. Es lässt sich damit
optimal für Video- / Webkonferenzen einset-
zen sowie für Tonaufnahmen von Bespre-
chungen, Konferenzen etc. am Computer. Für
Aufnahmen kann eine mit dem Betriebssys-
tem mitgelieferte Software verwendet wer-
den oder eine zusätzlich installierte (z. B. „Au-
dacity“, als Freeware im Internet erhältlich).
2 Wichtige Hinweise
Das Gerät entspricht allen relevanten Richt-
linien der EU und trägt deshalb das -Zei-
chen.
•
Das Gerät ist nur zur Verwendung im In-
nenbereich geeignet. Schützen Sie es vor
Tropf- und Spritzwasser sowie vor hoher
Luftfeuchtigkeit. Der zulässige Einsatztem-
peraturbereich beträgt 0 – 40 °C.
•
Verwenden Sie zum Reinigen nur ein tro-
ckenes, weiches Tuch, auf keinen Fall Che-
mikalien oder Wasser.
•
Wird das Gerät zweckentfremdet, falsch
angeschlossen oder nicht fachgerecht repa-
riert, kann keine Haftung für daraus resul-
tierende Sach- oder Personenschäden und
keine Garantie für das Gerät übernommen
werden.
Soll das Gerät endgültig aus dem
Betrieb genommen werden, ent-
sorgen Sie es gemäß den örtlichen
Vorschriften.
3 Inbetriebnahme
1) Das Gerät flach auf den Tisch legen. Es
lässt sich aber auch über die rückseitigen
Montagelöcher an einer Wand aufhängen.
2) Für die Tonwiedergabe lässt sich ein Kopf-
hörer an die 3,5-mm-Klinkenbuchse (2)
anschließen.
Vorsicht:Stellen Sie die Lautstärke für den Kopf-
hörer nicht zu hoch ein. Hohe Lautstärken können
auf Dauer das Gehör schädigen!
3) -Den Computer hochfahren. Das beilie
gende Kabel an die Micro-USB-Buchse(3)
des Geräts anschließen und mit einem
USB-Port am Computer verbinden: Die
blaue Betriebsanzeige (1) leuchtet. Das
Gerät wird vom Computer als Toneingabe-
und Tonausgabegerät erkannt (als „USB
PnP Sound Device“). Die erforderlichen
Treiber (Standardtreiber des Betriebssys-
tems) werden automatisch installiert.
4) In den Einstellungen des Betriebssystems
und / oder der verwendeten Audio-Soft-
ware muss das Gerät für die Toneingabe
ausgewählt sein und, wenn die Wieder-
gabe über einen an der Buchse ange-
schlossenen Kopfhörer erfolgen soll, auch
für die Tonausgabe. Es ist möglich, bei ent-
sprechender Einstellung am Computer, das
Eingangssignal des Mikrofons während des
Sprechens über den Kopfhörer abzuhören.
5) -Nach dem Betrieb das USB-Kabel des Mik
rofons vom Computer abziehen.
4 Technische Daten
Typ / Richtcharakteristik:Elektret / Halbniere �
Frequenzbereich: � � � � � � 50 –18 000 Hz
Empfindlichkeit: � � � � � � �3,2 mV/ Pa bei 1 kHz
A / D-Wandler: � � � � � � � �16 Bit, max� 48 kHz
Max� Schalldruck:� � � � � �110 dB
Signal -Rausch-Abstand: � 55 dB
Stromversorgung: � � � � �
⎓
5 V über USB-Port
Maße, Gewicht: � � � � � � �90 × 25 × 90 mm, 187 g
USB-Schnittstelle: � � � � � USB 2�0
1,2-m-Anschlusskabel: � �Micro-USB-Stecker, Typ B/
USB-Stecker, Typ A
geeign� Betriebssysteme: Windows 7 / 8 / 10oder
Mac OS 9 / OS X
Änderungen vorbehalten.
Windows ist ein registriertes Warenzeichen der Microsoft Corpo-
ration in den USA und anderen Ländern. MacOS ist ein registrier-
tes Warenzeichen von Apple Inc. in den USA und anderen Ländern.
Deutsch
English
Product specificaties
| Merk: | Monacor |
| Categorie: | Microfoon |
| Model: | ECM-306BU/WS |
Heb je hulp nodig?
Als je hulp nodig hebt met Monacor ECM-306BU/WS stel dan hieronder een vraag en andere gebruikers zullen je antwoorden
Handleiding Microfoon Monacor

22 Juni 2023
19 Juni 2023
19 Juni 2023
19 Juni 2023
18 Juni 2023
16 Juni 2023
15 Juni 2023
11 Juni 2023
11 Juni 2023
11 Juni 2023
Handleiding Microfoon
Nieuwste handleidingen voor Microfoon
23 Juli 2026
21 Juli 2026
20 Juli 2026
14 Juli 2026
13 Juli 2026
10 Juli 2026
10 Juli 2026
9 Juli 2026
9 Juli 2026
9 Juli 2026