Martin Thrill Vertical Fogger Handleiding
Martin Verlichting Thrill Vertical Fogger
Bekijk gratis de handleiding van Martin Thrill Vertical Fogger (51 pagina’s), behorend tot de categorie Verlichting. Deze gids werd als nuttig beoordeeld door 41 mensen en kreeg gemiddeld 4.1 sterren uit 9 reviews. Heb je een vraag over Martin Thrill Vertical Fogger of wil je andere gebruikers van dit product iets vragen? Stel een vraag
Pagina 1/51
THRILL Vertical Fogger
User Guide
Introduction
Congratulations on your purchase of this Martin atmospheric
effect machine. The THRILL Vertical Fogger combines brilliant
color-mixing LEDs with powerful fog output to produce stunning
atmospheric effects. Its flexible rigging and control options make
it well suited for a wide range of applications.
This guide describes how to operate and maintain the product.
Read the Safety and Installation Guide before using the product.
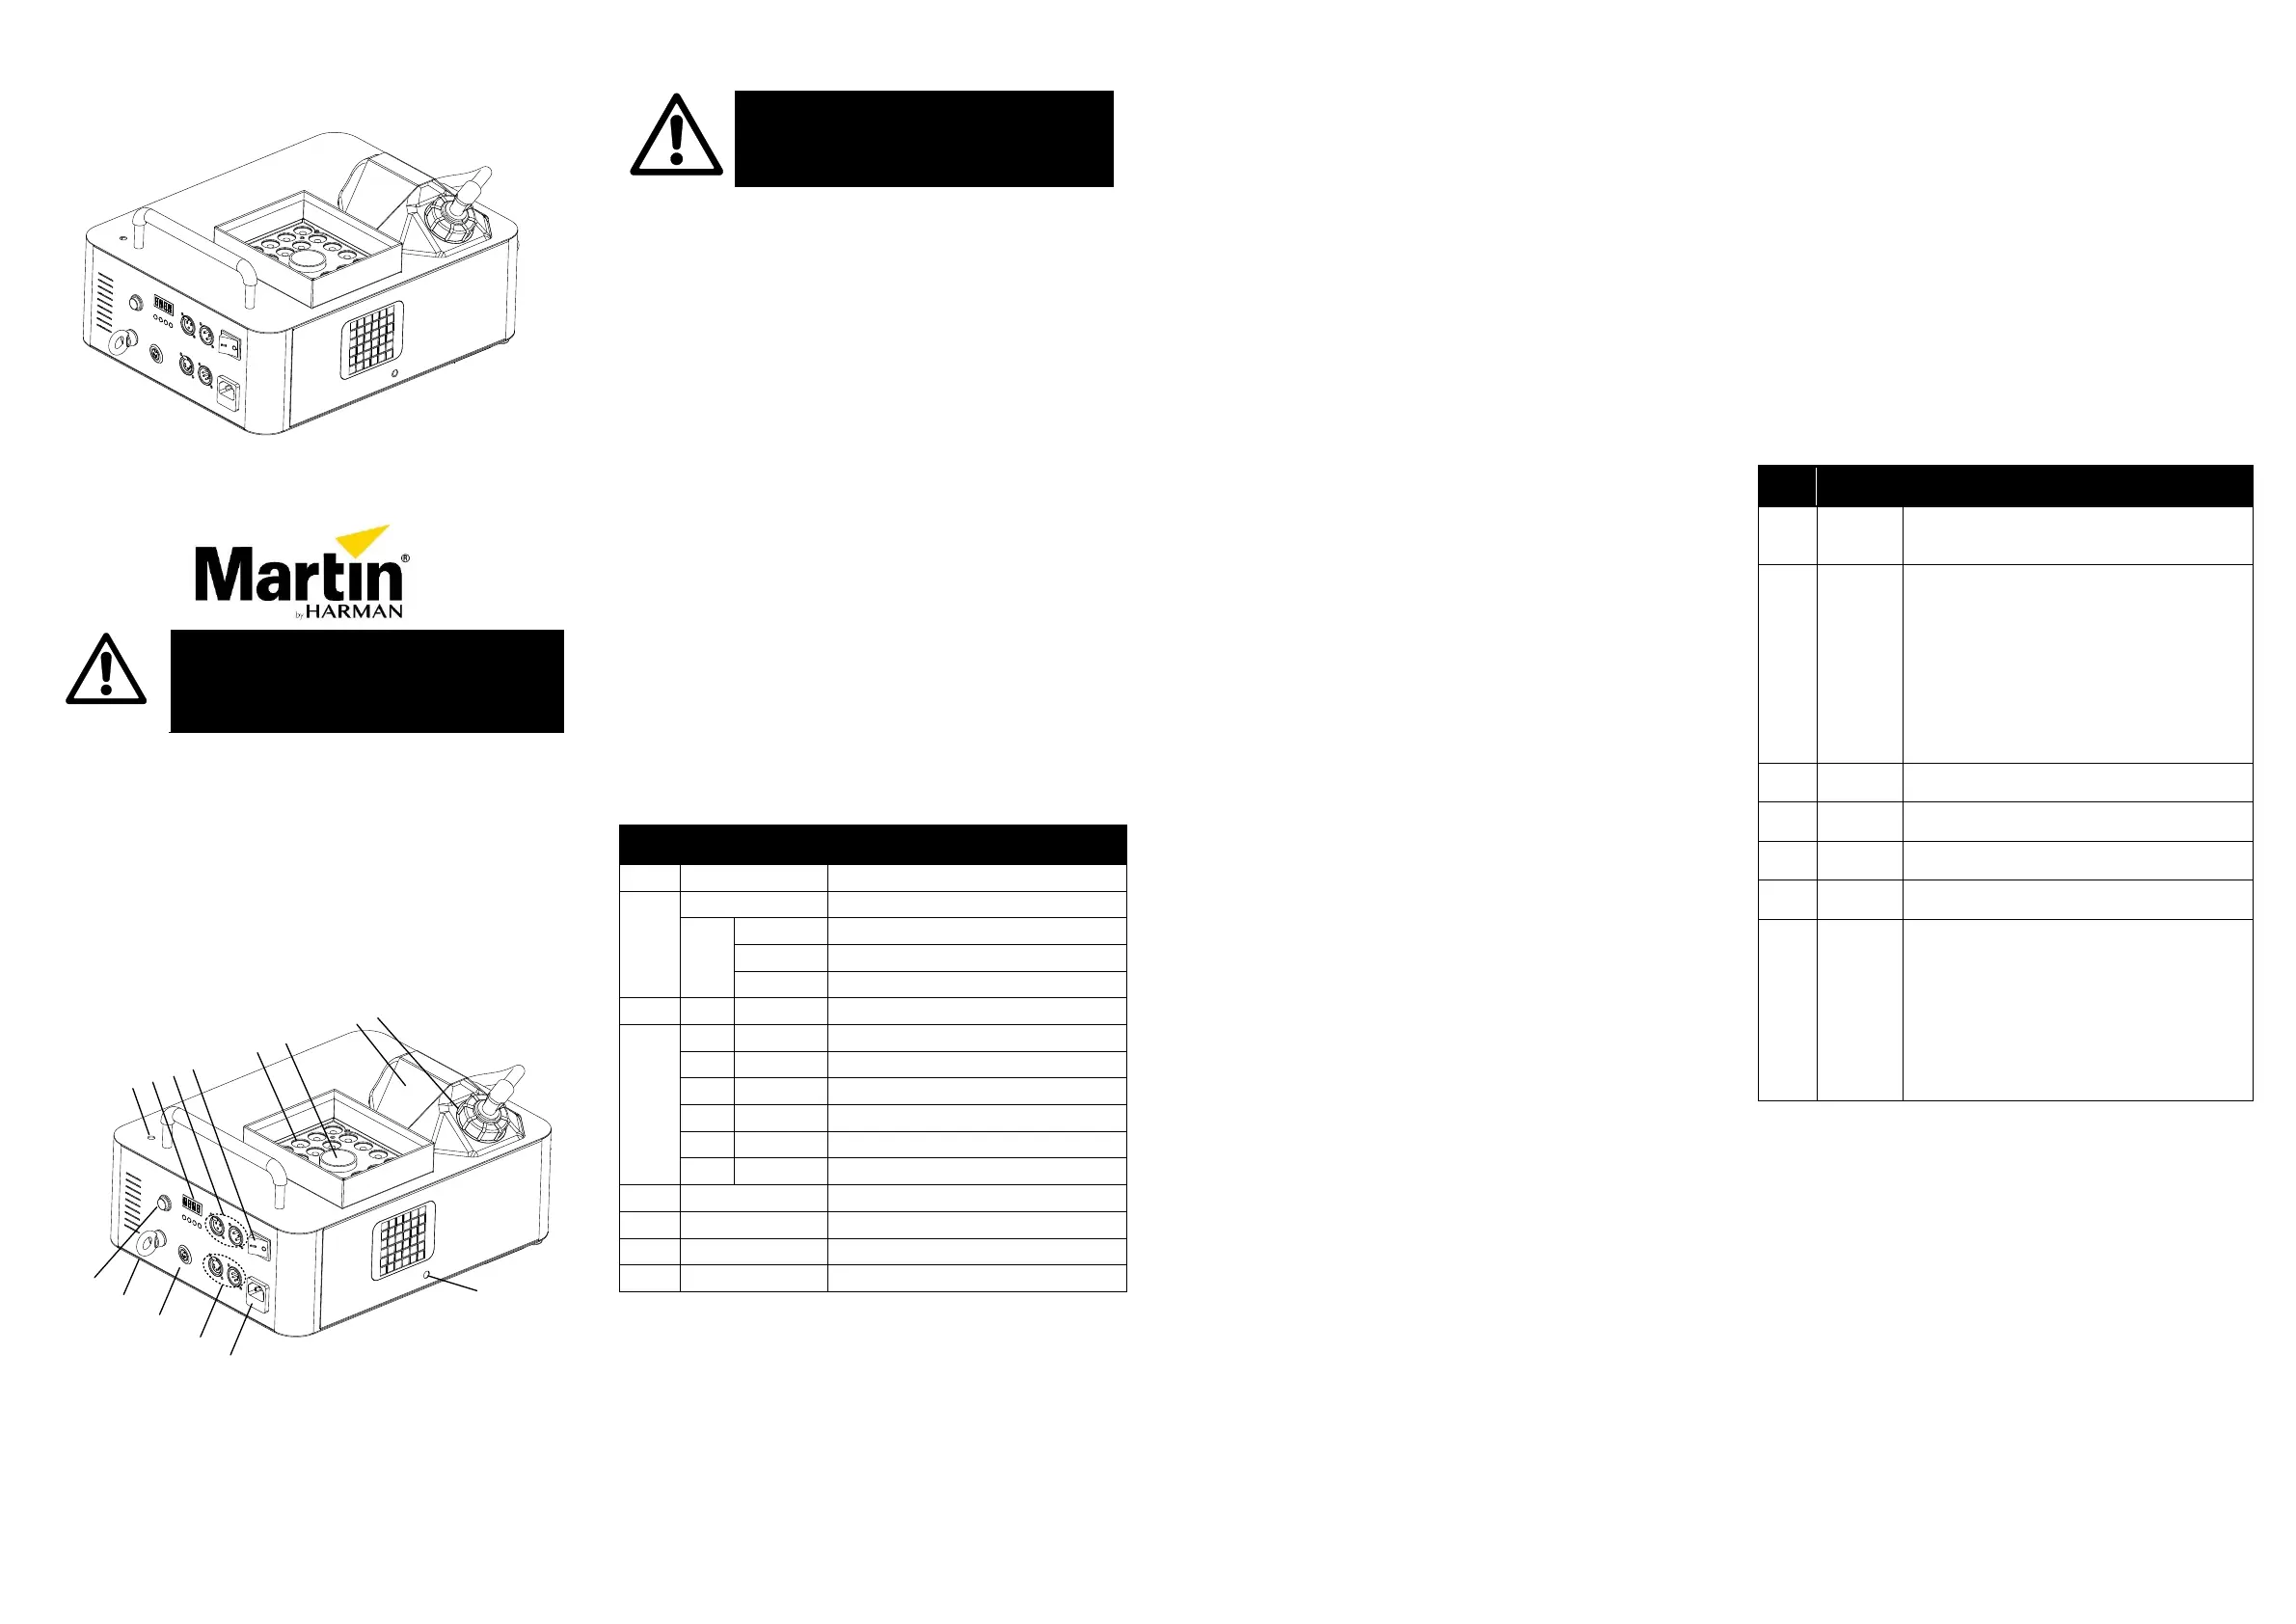
Overview
1
Eye-bolt attachment point
8
Fluid tank filler cap
2
User Interface
9
Pushbutton
3
3-pin XLR DMX sockets
10
Safety cable attachment point
4
Power switch
11
Remote control socket
5
LEDs
12
5-pin XLR DMX sockets
6
Fog output nozzle
13
AC power input / fuseholder
7
Fluid tank bracket
14
Bracket attachment point
Filling the fluid tank
Warning! Use only fog fluids specifically
approved for this machine.
Important! Monitor the fluid level frequently. Do not run the
machine without fluid, or you may damage the machine.
Fill the fluid tank only with RUSH™ Fog Fluid. Other fluids may
damage the machine or cause the release of toxic gases,
presenting a severe health hazard.
Always keep the fluid below the level of the filler cap. See the
Safety and Installation Guide to flip the fluid tank for upside-down
operation from a truss.
To fill the fluid tank:
1.Check that the effect machine is turned off.
2.Remove the filler cap.
3.Use a funnel to fill the fluid tank with RUSH™ Fog Fluid. Do
not overfill.
4.Replace the filler cap, making sure that the feed hose
touches the bottom of the fluid tank.
5.Wipe up any spills or drips before turning on the machine.
User settings
Using the control menu
To access the control menu, press the MENU button. Scroll
through the menu options using the (down) and (up)
buttons. Press ENTER to select an option. To return to a higher
level in the menu without making a change, press MENU. To exit
the control menu, press and hold MENU.
Control menu
Menu
Sub-menu
Explanation
Set DMX address
Remote control button 1-4
No light
Premixed color 1-36
Random color
/
Inverted/normal display
Set strobe value
Set dimmer value
Set red LED value
Set green LED value
Set blue LED value
Set premixed color value
/
Enable/disable pushbutton
/
Run test of all effects
Readout firmware version
/
Reset all settings to default values
DMX address
A DMX controller uses 7 DMX channels to control the THRILL
Vertical Fogger. The DMX address is the first channel used. If the
Vertical Fogger’s DMX address is set to 25, then the controller
sends DMX commands on channels 25 - 31. DMX channel 25 on
the controller corresponds to DMX channel 1 on the THRILL
Vertical Fogger.
For independent control, each Vertical Fogger must have its own
unique control channels. Two or more Vertical Foggers may be
set to the same address and share control channels for diagnostic
purposes or if symmetric control is desired.
To set the DMX address:
1.Press MENU to enter the control menu.
2.Press or to scroll to . Press ENTER.
3.Scroll to an address from 1 to 506.
4.Press ENTER to save the address setting.
Manual settings
The THRILL Vertical Fogger has a pushbutton that releases fog
and activates the LEDs with the settings programmed for remote
control channel 1. The button can be disabled to prevent
unintended firing.
To enable or disable the manual pushbutton:
1.Press MENU to enter the control menu.
2.Press or to scroll to . Press ENTER.
3.Select to enable the button, or to disable it.
4.Press ENTER to save the setting.
The LEDs can also be controlled from the control panel. The
settings are retained until the effect machine is operated by
remote control or DMX, or is turned off.
To set the LEDs manually:
1.Press MENU to enter the control menu.
2.Press or to scroll to . Press ENTER.
3.Select an effect to set: strobe (), dimmer (), red
(), green (), blue (), or premixed colors ().
Press ENTER.
4.Referring to the DMX commands below, scroll to the value
from to that gives the desired look.
5.Press ENTER to save the setting.
6.Repeat steps 3-5 for each desired effect.
Remote control settings
Pressing a button on the remote control releases fog and lights
the LEDs with a programmed or random color. The pushbutton
uses the color programmed for button 1.
To program a color for each button:
1.Press MENU to enter the control menu.
2.Scroll to . Press ENTER.
3.Scroll to . Press ENTER.
4.Select to select no light, a number from to to select a
premixed color, or for a random color.
5.Press ENTER to save the options for button 1.
6.Repeat steps 3-5 to program buttons 2, 3, and 4.
Display setting
The setting under flips the display for easier
reading.
Note that the display automatically enters sleep mode after a
short period if no buttons are pressed. Pressing any button
reactivates the display.
DMX operation
DMX operation provides access to the full range of features
provided by the THRILL Vertical Fogger. The effect machine can
be operated using any DMX compliant controller. Both 3-pin and
5-pin sockets are provided for data connection.
DMX control features
Fog
Fog output is controlled on channel 1. Output is either on or off.
To prevent damage to the pump, monitor fluid level. Do not run
the pump without fluid.
Strobe effects
A variable strobe effect is available on channel 2 along with pulse
effects and random flash. Select one of the “open” values for
steady light. At values from 0-7, the LEDs are off.
Dimming
The intensity of the light is controlled on channel 3 and increases
with fader level.
Custom color mixing
The LEDs are individually controllable on channels 4, 5, and 6,
allowing you to mix them in any combination. The amount of each
color in the mix increases with fader level. To use custom color
mixing, the premixed color function on channel 7 must be off.
Premixed colors
Channel 7 provides a “color wheel” effect with 36 premixed
colors. You can also scroll continuously up or down through the
colors or select random colors at slow, medium, or fast speeds.
When selected, premixed colors override custom colors.
DMX commands
Ch.
Value
Function
1
0-127
128-255
Fog
Fog output off
Fog output on
2
0-7
8-15
16-131
132-139
140-181
182-189
190-231
232-239
240-247
248-255
Strobe Effects
Light off (blackout)
Light on (no flash)
Strobe, slow to fast
Light on
Pulse effect, fast close/slow open
Light on
Pulse effect, fast open/slow close
Light on
Random strobe
Open
3
0-255
Dimmer
Dimmer intensity, 0-100%
4
0-255
Red
Red intensity, 0-100%
5
0-255
Green
Green intensity, 0-100%
6
0-255
Blue
Blue intensity, 0-100%
7
0-10
11-190
191-192
193-214
215-221
222-243
244-247
248-251
252-255
Premixed Colors
No premixed color
Stepped scroll, colors 1-36
No premixed color
Continuous scroll, increasing, fast to slow
Scroll stop
Continuous scroll, decreasing, slow to fast
Random color, fast
Random color, medium
Random color, slow
Getting started
1.Connect the Vertical Fogger effect machine to the controller
as described in the Safety and Installation Guide.
2.At the controller, assign a DMX address to the machine.
3.Use the machine’s control panel to set the same DMX
address on the machine (see ‘User Settings’).
4.Check that the machine has fluid, is ready ( is
displayed on control panel), and can safely be triggered.
5.Trigger the machine’s effects from the controller.
6.Monitor the fluid level. Refill the tank when low to avoid
running the pump dry. A flashing display indicates an empty
fluid tank. Do not release fog until you have refilled the
tank.
7.When finished, turn off the machine and allow it to cool
before handling. The nozzle remains hot for three hours.
WARNING!
Read the safety precautions in the Safety
and Installation Guide before installing or
using this product.
1
2
3
4
5
7
8
6
12
13
9
10
11
14
Product specificaties
| Merk: | Martin |
| Categorie: | Verlichting |
| Model: | Thrill Vertical Fogger |
Heb je hulp nodig?
Als je hulp nodig hebt met Martin Thrill Vertical Fogger stel dan hieronder een vraag en andere gebruikers zullen je antwoorden
Handleiding Verlichting Martin

23 December 2025
17 November 2024
17 November 2024
11 Februari 2024
11 Februari 2024
11 Februari 2024
11 Februari 2024
11 Februari 2024
11 Februari 2024
11 Februari 2024
Handleiding Verlichting
Nieuwste handleidingen voor Verlichting
15 Juli 2026
15 Juli 2026
15 Juli 2026
12 Juli 2026
11 Juli 2026
10 Juli 2026
10 Juli 2026
9 Juli 2026
9 Juli 2026
9 Juli 2026