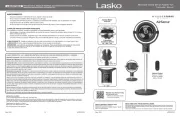
Lasko 2155A Handleiding
Lasko
Ventilator
2155A
Bekijk gratis de handleiding van Lasko 2155A (2 pagina’s), behorend tot de categorie Ventilator. Deze gids werd als nuttig beoordeeld door 135 mensen en kreeg gemiddeld 4.9 sterren uit 68 reviews. Heb je een vraag over Lasko 2155A of wil je andere gebruikers van dit product iets vragen? Stel een vraag
Pagina 1/2

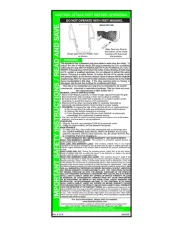
TEMPLATE • PLANTILLA
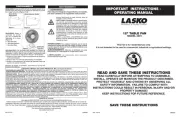
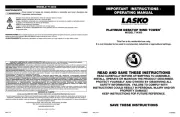
READ AND SAVE THESE INSTRUCTIONS
INSTALLATION INSTRUCTIONS
The large number of window styles and types
make it impossible to describe one universal
installation procedure.
The methods outlined below are recommend-
ed as being well suited for the most common
styles of double hung windows. Whichever
method you choose should allow the window
to be closed easily for security and protection
of home furnishing against the weather.
5. Tighten screws "B" on housing to
secure fan in position.
5. Apriete los tornillos “B” en la mol-
dura para asegurar el
ventilador en esta posicion.
LOCATION FOR MOUNTING SCREWS • LUGAR PARA LA COLOCACION DE LOS TORNILLOS
4. Mount fan in window by engaging slots
"C" with screws "A" on inside edge of trim.
Lower fan on screws "A" until it rests on
window sill or sash moulding.
4. Monte el ventilador en la ventana ajustando
las ranuras “C” con los tornillos “A” por
la cara interna de la moldura de la ven-
tana. Baje el ventilador sobre los tornillos
“A” hasta que se quede apoyado sobre la
repisa o la moldura del marco corredizo de
la ventana.
Debido al amplio numero de estilos y tipos de
ventanas, resulta imposible describir un solo
procedimiento universal de instalacion.
Los metodos abajo descritos son recomen-
dados por ser los mejores adaptados para el
estilo mas comun de ventana doble. Cualquier
metodo que Usted elija debe permitir que la
ventana se cierre facilmente para la seguridad
y proteccion de los muebles del hogar contra
el mal tiempo.
Refer to illustrations while following
methods 1 or 2 below:
METHOD 1. (Inside of Trim)
Tools required: Hardware provided:
Screwdrivers
Slotted Head (4-) 3/4" slotted head screws
Phillips Head
Observe las ilustraciones mientras sigue
los metodos1 y 2 abajo indicados:
METODO 1. (dentro de la moldura)
Herramientas
necesarias:
Desarmadores
Punta Plana (4) tornillos de cabeza plana 3/4"
Punta Cruciforme
Material Proporcionado:
1. Be sure that template is placed on window
sill with arrow pointing down. BOTTOM
1. Asegurese de que esta plantilla esta situada
en la repisa de la ventana con la flecha
apuntando hacia abajo. PARTE INFERIOR
2. Mark screw locations on inside edges of
window trim using this template as shown
in illustrations.
Drive 4 screws "A" into trim. DO NOT
TIGHTEN FLUSH. Leave 1/8" space be-
tween screw heads and window trim.
2. Marque los lugares de los tornillos en el
interior de la moldura de la ventana usando
esta plantilla como muestra la ilustracion.
Clave 4 tornillos “A” dentro de la moldura.
NO APRIETE AL MAXIMO. Deje 1/8" de
espacio entre la cabeza del tornillo y la
moldura de la ventana.
3. Loosen 4 screws "B" and extend panels
on each side of housing until the fan fits
snugly between right and left window
trim.
3. Afloje los 4 tornillos “B” y extienda los
paneles de cada cara de la caja hasta
que el ventilador se ajuste perfecta-
mente entre el lado derecho y el izqui-
erdo de la moldura de la ventana.
3. With panels in position, mark screw loca-
tions at top of slot and drive in the 4 retain-
ing screws until tight.
4. Tighten 4 screws "B" in fan housing to com-
plete installation.
Slot "C"
Ranura “C”
"B"
"B"
"B"
"B"
"A"
3. Con los paneles en posicion, marque los lu-
gares de los tornillos en la parte mas alta de
la ranura y clave a fondo los 4 tornillos.
4. Apriete los 4 tornillos “B” en la moldura del
ventilador para completar la instalacion.
"B"
"B"
Slot "C"
Ranura “C”
"A"
1. Loosen screws "B" and extend side panels
to clean the outer edge of trim on each
side of window.
1. Afloje los tornillos “B” y extienda los pan-
eles laterales para que sobresalgan por el
borde externo de la moldura en cada lado
de la ventana.
2. Rest fan on window sill with flange of side
panels over trim. Push in side panels tight
against outer edge of trim.
2. Apoye el ventilador sobre la repisa de la
ventana con el reborde de los paneles
laterales sobre la moldura. Empuje los
paneles laterales ajustandolos contra el
borde externo de la moldura.
METHOD 2. (Outside of trim) • METODO 2. (Fuera de la moldura)
Slot "C"
Ranura “C”
"B"
"B"
PLANTILLA
"A"
1/8"
LEA Y CONSERVE ESTAS INSTRUCCIONES
INSTRUCCIONES PARA LA INSTALACION
BOTTOM • PARTE INFERIOR
Slot "C"
Ranura “C”
Slot "C"
Ranura “C”
Rev. D 8/09 2084021A

MODO DE EMPLEO
1. Asegurese de que el conjunto esta rigi-
damente montado en laventana segun se
explica en la plantilla.
2. Abra la ventana detras del ventilador.
3. Conectelo a una toma de corriente estan-
dar de 120 voltios.
4. El control del motor se encuentra en la cu-
bierta del motor. Ajuste la perilla al sentido
y velocidad deseados.
OPERATING INSTRUCTIONS
1. Make certain that the unit is mounted
rigidly to the window as specified on the
Template.
2. Open the window behind the fan.
3. Plug into a standard 120 volt outlet.
4. The motor control switch is located on the
motor cover. Adjust knob to direction and
speed desired.
WINDOW FAN - SAFETY & MAINTENANCE
VENTILADOR DE VENTANA - SEGURIDAD Y MANTENIMENTO
Rev. D 8/09 2084021A
1. Read all instructions before using Fan.
2. Make certain that the power source conforms
to the electrical requirements of the Fan.
3. Use this Fan only as described in this manual.
Any other use not recommended by the
manufacturer may cause fire, electrical
shock, or injury to persons.
4. To reduce the risk of personal injury and
electric shock, the Fan should not be played
with or placed where small children can reach it.
5. Unplug power cord before installing, servicing,
or moving the Fan.
WARNING: DO NOT DEPEND UPON THE
ON-OFF SWITCH AS THE SOLE MEANS OF
DISCONNECTING POWER WHEN INSTALLING
6. This Fan must NOT be used in potentially dan-
gerous locations such as flammable, explosive,
chemical-laden or wet atmospheres.
7. Completely assemble Fan, according to instruc-
tions, before connecting to power supply.
WARNING: THIS APPLIANCE HAS A
POLARIZED PLUG (ONE BLADE IS WIDER
MATCH WIDE BLADE OF PLUG TO WIDE
IF THE PLUG DOES NOT
WARNING:
8. Where possible, avoid the use of extension
cords. If they must be used, minimize the
risk of overheating by ensuring that they
are UL listed. Never use a single extension
cord to operate more than one Fan.
9. Do not operate any Fan with a damaged cord
or plug or after the Fan malfunctions, has
been dropped or damaged in any manner.
Return Fan to authorized service facility
for examination, electrical or mechanical
adjustment or repair.
10.Do not insert or allow ngers or foreign objects
to enter any ventilation or exhaust opening as it
may cause an electric shock or fire, or damage
the Fan. Do not block or tamper with the Fan
in any manner while it is in operation.
11.Always place the Fan on a stable, at, level
surface when operating, to avoid the chance
of the Fan overturning. Locate the Power Cord
so the Fan or other objects are not resting on
it. Do not run Power Cord under carpeting.
Do not cover Power Cord with throw rugs,
runners, or the like. Arrange Power Cord
away from room traffic and where it will not
be tripped over.
12.This Fan is not intended for use in wet or damp
locations. Never locate a Fan where it may fall
into a bathtub or other water container.
13. Do not use Fan outdoors.
14.This Fan is not suitable for use in agricultural
facilities including areas where livestock,
poultry or other animals are confined. Please
refer to National Electric Code (NEC) Article
547-7 (2002), or applicable state or local codes
or standards relating to electrical requirements
for Agricultural Buildings. THIS FAN DOES
NOT MEET THE REQUIREMENTS OF NEC
15. This Fan is not suitable for use in hazardous
locations. Please refer to National Electric
Code (NEC) Article 500 or applicable state or
local codes or standards relating to electrical
requirements for Hazardous locations. THIS
FAN DOES NOT MEET THE REQUIREMENTS
WARNING:
1. Lea todas las instrucciones antes de utilizar el
Ventilador.
2. Cerciórese de que la fuente de poder sea
compatible con las demandas eléctricas del
Ventilador.
3. Use este Ventilador sólo en la forma que se describe
en el manual. Cualquier otro uso no recomendado
por el fabricante podría ocasionar un incendio,
golpes de electricidad o lesiones a personas.
4. Para disminuir el riesgo de lesiones físicas y
golpes de electricidad, no debe jugarse con el
ventilador no deberá éste ser ubicado al alcance
de los niños pequeños.
5. Desenchufe el cable eléctrico antes de instalar,
proporcionar servicio o mover el Ventilador.
ADVERTENCIA: NO DEPENDA DEL INTERRUPTOR
DE ENCENDIDO-APAGADO COMO EL ÚNICO MEDIO
PARA DESCONECTAR LA POTENCIA AL INSTALAR
6. Este Ventilador NO debe usarse en ubicaciones
potencialmente peligrosas, tales como en
ambientes inflamables, explosivos, cargados
de sustancias químicas o húmedos.
7. Vuelva a armar el ventilador por completo,
siguiendo las instrucciones, antes de reconectarse
a la fuente de poder.
ADVERTENCIA: E ST E ART EFA CTO PO SE E UN
ENCHUFE POLARIZADO (UNA ESPIGA ES MáS ANCHA
INTRODUCIRSE EN UN TOMACORRIENTE POLARIZADO
LA ESPIGA ANCHA DEL ENCHUFE EN LA RANURA
ADVERTENCIA: ESTE ENCHUFE ES UNA MEDIDA DE
PUEDE DEBERSE AL DISPOSITIVO DE SEGURIDAD
UN CENTRO DE SERVICIOS AUTORIZADO O LLAME
LLAME AL NÚMERO DE CONSULTA GRATUITO PARA
8. De ser posible, evite el uso de cables de
extensión. Si debieran usarse, minimice el riesgo
de sobrecalentamiento procurando que estén
aprobados por UL. Nunca use un solo cable
de extensión para hacer funcionar más de un
Ventilador.
9. No haga funcionar ningún Ventilador con un cable
o enchufe dañado o después de que el ventilador
presente algún desperfecto o haya sido dejado
caer o sufriera cualquier tipo de daño. Regrese el
Ventilador a un servicio de reparación autorizado
para examinar el Ventilador, efectuarle ajustes
eléctricos o mecánicos o repararlo.
10.No introduzca ni permita que se introduzcan
dedos u objetos extraños en ninguna abertura
de ventilación o escape, puesto que podría
provocar un golpe de electricidad, incendio, o
daños al ventilador. No bloquee ni manipule el
Ventilador de ninguna manera mientras esté en
funcionamiento.
11.Siempre coloque el Ventilador sobre una
superficie, estable, plana y horizontal mientras
esté en funcionamiento, para evitar la posibilidad
de que el Ventilador se dé vuelta. Ubique el cable
eléctrico de tal modo que el ventilador u otros
objetos no descansen sobre él. No disponga el
cable eléctrico debajo de alfombras. No cubra el
cable eléctrico con tapetes, alfombras continuas
u objetos similares. Coloque el cable eléctrico
fuera del paso de las personas y donde nadie
se tropiece con el mismo.
12.Este Ventilador no ha sido diseñado para usarse
en lugares mojados o húmedos. Nunca coloque
un Ventilador donde quepa la posibilidad de que
caiga en una bañera u otro recipiente con agua.
13.No use el Ventilador en exteriores.
14.Este Ventilador no es adecuado para usar en
instalaciones de agricultura incluyendo áreas
donde se almacene ganado, aves de corral u
otros animales. Por favor consulte el Articulo
547-7 (2008) del Código Eléctrico Nacional
(NEC), o los códigos o normas estatales o
locales aplicables con relación a los requisitos
eléctricos para edificios destinados a las
agricultura. ESTE VENTILADOR NO CUMPLE
CON LOS REQUISITOS DEL ARTICULO 547-7
15.Este Ventilador no es adecuado para usar en
lugares peligrosos. Por favor consulte el Artículo
500 del Código Eléctrico Nacional (NEC), o los
códigos o normas estatales o locales aplicables
con relación a los requisitos eléctricos para
lugares peligrosos. ESTE VENTILADOR
NO CUMPLE CON LOS REQUISITOS DEL
CON ARTEFACTOS DE CONTROL DE VELOCIDAD EN
ESTADO SÓLID
WARNING:
WARNING: DO NOT IMMERSE FAN IN WATER!
CLEANING: IMPORTANT! DO NOT immerse
electrical parts in water! Wipe all parts
with soft cloth moistened with water and
mild detergent only. DRY ALL PARTS
COMPLETELY BEFORE REASSEMBLING.
Af ter an y m ain tenan ce or s er vicing,
completely reassemble unit as described in
this instruction manual before reconnecting
to the power supply.
CAUTION:
SERVICING: All other servicing, with the ex-
ception of general user maintenance, should
be performed by an authorized service rep-
resentative. Call 1-800-233-0268, Monday
through Friday, between the hours of 8:00
a.m.and 5:00 p.m. Eastern for the location
of your nearest service center.
LUBRICATION: Motor i s permanently
lubricated.
MAINTENANCE
ADVERTENCIA:SIEMPRE DESCONECTE EL
ENCHUFE ANTES DE MOVER O PROPORCIONAR
EN AGUA!
LIMPIEZA: Esto eliminará la suciedad y el polvo
que se pueden acumular con el paso del tiempo.
NO INTENTE DESARMAR EL VENTILADOR.
Limpie el cuerpo del Ventilador con un paño
suave.
ADVERTENCIA:
SERVICIO: Cualquier otro servicio, con la excepción
de mantenimiento general por parte del usuario,
deberá ser realizado por un representante de
servicio autorizado. Llamar al 1-800 -233-0268,
de lunes a viernes, entre las 8 a.m. y las 5 p.m.
(Horario Estándar del Este de los Estados Unidos),
para averiguar la dirección de su centro de servicio
más cercano.
ALMACENAMIENTO: Guarde el Ventilador, con
estas instrucciones, en su caja original en un lugar
fresco y seco.
MANTENIMIENTO
Product specificaties
| Merk: | Lasko |
| Categorie: | Ventilator |
| Model: | 2155A |
Heb je hulp nodig?
Als je hulp nodig hebt met Lasko 2155A stel dan hieronder een vraag en andere gebruikers zullen je antwoorden
Handleiding Ventilator Lasko
14 Juni 2025

13 Juni 2025
17 Maart 2025

17 Maart 2025

17 Maart 2025
17 Maart 2025
17 Maart 2025

17 Maart 2025

17 Maart 2025

17 Maart 2025
Handleiding Ventilator
- NewAir
- Velleman
- Cli-Mate
- Middle Atlantic
- SpeedComfort
- Nedis
- Milwaukee
- Salco
- Alpine
- Fanimation
- Korona
- Airis
- Rok
- Basetech
- Einhell
Nieuwste handleidingen voor Ventilator
13 September 2025
12 September 2025
12 September 2025

12 September 2025
12 September 2025
12 September 2025

8 September 2025
8 September 2025
2 September 2025
2 September 2025