JOBY Fly X Handleiding
Bekijk gratis de handleiding van JOBY Fly X (1 pagina’s), behorend tot de categorie Drone. Deze gids werd als nuttig beoordeeld door 55 mensen en kreeg gemiddeld 4.5 sterren uit 7 reviews. Heb je een vraag over JOBY Fly X of wil je andere gebruikers van dit product iets vragen? Stel een vraag
Pagina 1/1
1. Scan the corresponding QR code using your smartphone to download and install the "VS FPV"
app.
2. First, pair the drone with the controller as previously instructed. Enable Wi-Fi in the Settings
menu on your phone and locate the "JOBY-*****" network. Click to connect, and exit the settings
once it’s connected.
3. Open the "VS FPV" app to access the welcome screen (Fig. 1). Click on the "CONNECT" button
to enter the main interface (Fig. 2). The drone camera image should show up on the screen soon.
4. Insert the phone holder into the slot on top of the controller, then secure your phone in the
holder. When you don't need to use the phone holder, you can remove it by unplugging it from the
controller.
5. Click the “Photo Camera” icon on the top menu to capture photos. Click the “Video Camera”
icon to start recording the video. To stop recording, click the "Video Camera" icon again. You can
click the “Folder” icon to view your photos and videos.
6. If you want to control the drone using your smartphone, simply turn off the controller and
remove your phone from the holder. Click the "On/Off" icon on the top menu to enter smartphone
control mode where virtual control sticks will show up. Follow the same takeoff and landing proce-
dures as the physical controller.
7. Click the “?” icon on the welcome screen to enter app help to learn more about the app.
1. Low Power Warning: this drone has a safety alert feature designed specifically for situations where the
battery is low, causing the drone to land in distant or unsafe areas. When the battery is low, the LED light
on the drone changes from steady to flashing as a warning. At this point, you should promptly retrieve
the drone, replace the battery, or charge the battery before flying again.
2. Headless mode: a feature that eliminates the need to understand the orientation of the drone when it
is in flight. In headless mode, the controls are relative to the user's position rather than that of the drone
itself. It can be activated or deactivated by pressing the headless mode button (Fig. 1).
3. Reset Leveling: When the drone hovers significantly off-center, you can recalibrate the drone's
midpoint to improve its hover state. Place the drone on a flat surface, then simultaneously moving both
control sticks on the controller to the lower-left corner for about 3 seconds (Fig. 2). Once the indicator
lights on the drone flash and then return to a steady state after approximately 3 seconds, the recalibra-
tion is complete.
4. Throw Launch: The drone utilizes a 6-axis gyroscope, enhancing its playability. By throwing the drone
outward or flipping it upwards while pushing the throttle stick up, the drone can smoothly hover in
mid-air.
5. Flip Mode: Press the flip button to activate flip, the controller's indicator light will flash and emit a
continuous "beep" sound. Ascend the drone to an altitude of over 2 meters, then push the right control
stick in any direction and release it. The drone will flip in the corresponding direction. Press the flip
button again to deactivate flip mode.
1. Choose an open indoor space or an outdoor environment with no rain, snow, and wind less
than level 4 to fly. Avoid crowded places with people, animals, traffics and obstacles.
2. Slide and lift open the battery compartment door on the bottom of the drone. Plug the drone
battery into the power plug (in white) in the battery compartment (Fig. 1). Pay attention to the plug
orientation and don’t force in. Close the battery compartment door and then press the power
button (Fig. 2) to turn on the drone. The indicator light on the back of the drone will start flashing.
Place it on a flat surface and wait for pairing.
3. Press the power button ,push the left control stick(throttle) up to the highest position and
hold for 1-2 seconds , then push the throttle down to the lowest position . When you hear a
"beep" sound, and the indicator light on the drone becomes steady, release the throttle. At this
point, the pairing process is complete, and you are ready to fly.
AAA Alkaline Batteries
JOBY Fly X
Instruction manual
Please be sure to read this manual carefully before operating
the drone. Do keep this manual for future reference.
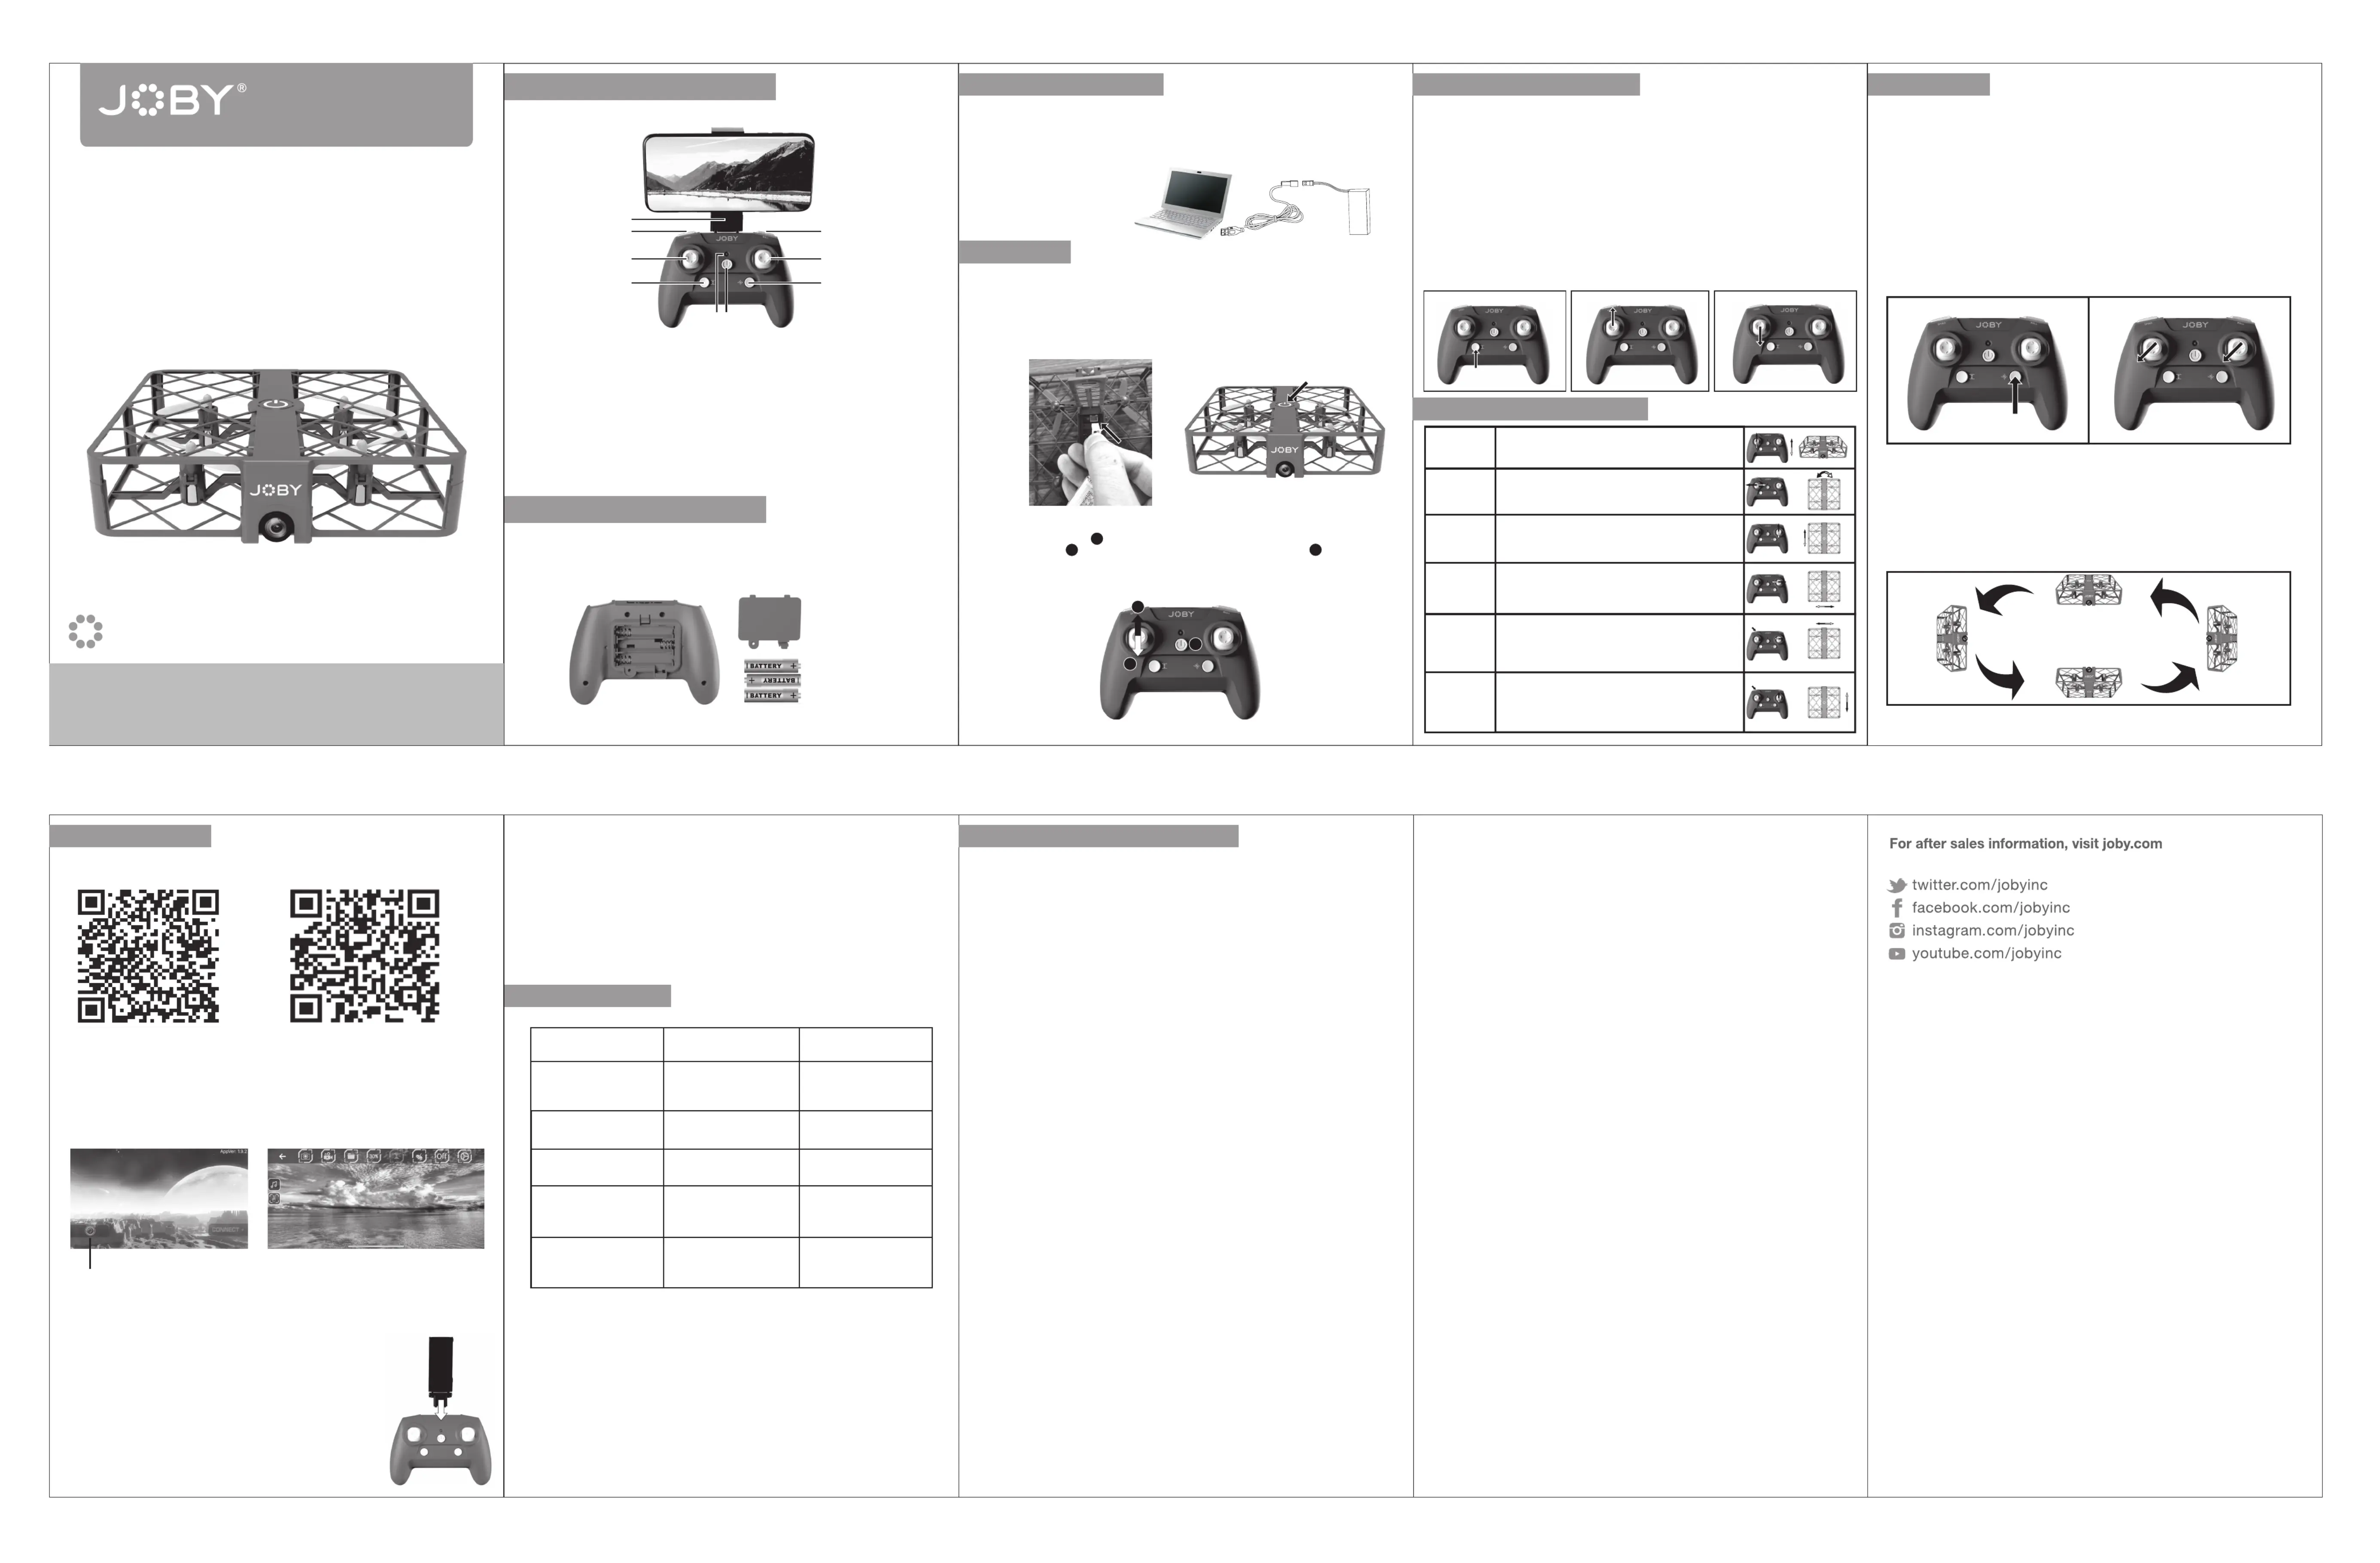
Remote Controller Introduction
Charging the Drone Battery
Takeoff, Landing and Power Off
Other Features
Wi-Fi FPV Instruction
1. The use of lithium batteries carries inherent risks and may lead to significant harm to individu-
als and property. Users assume all related responsibilities. Manufacturers and distributors do not
control battery usage (charging, discharging, and storage), nor do they accept liability for any
harm to individuals or property caused by such usage.
2. In case of battery leakage, avoid contact between the liquid and your skin or eyes. If it comes
into contact with your skin, immediately wash it with soap and water. If it comes into contact with
your eyes, rinse with plenty of cold water and seek medical attention immediately.
3. If the charger emits suspicious odors, noise, or smoke, disconnect the power source immedi-
ately.
4. Strictly adhere to the following requirements to avoid fire, electrical shock, or explosions.
5. Charge the battery only with the specialized charger provided by the manufacturer, and do not
use damaged or other chargers.
6. Do not charge swollen, leaking, or damaged batteries.
7. Do not overcharge the battery. Once the battery is fully charged, please unplug the charger.
After charging is complete, do not recharge the battery to prevent overheating.
8. Do not charge the battery near flammable materials or on the surfaces of flammable (carpets,
wooden floors, solid wood furniture, etc.) or conductive objects. Always monitor the battery while
charging.
9. Do not charge the battery immediately after use when it is still hot.
10. Charge the battery only in the location with temperature between 0°C and 40°C.
11. Do not use batteries that are swollen, leaking, damaged, or emitting odors.
12. Keep batteries out of the reach of children.
13. Do not place the battery in a fire, avoid contact between the battery and liquids. The device
should not be exposed to rain or placed in a humid environment. Do not put the battery in a micro-
wave or pressure cooker.
14. Do not disassemble, drill, deform, or cut the battery. The battery or charger should not bear
heavy objects. Avoid dropping the battery.
15. Do not use solvents, industrial alcohol, or other flammable solvents to clean the charger.
16. Prevent short circuits. Avoid direct contact with the electrolyte substance in the battery;
electrolyte and electrolyte vapors can be harmful to the body.
17. Store the device indoors. Do not expose the device to extreme temperatures. Avoid significant
temperature changes in the storage location of the device.
18. Do not place the product near heat sources.
19. Remove the battery when the device is not in use. Keep a 50% charge during storage to
prolong the life of the battery.
20. Unplug the charger when not charging the battery.
Thank you for purchasing a JOBY product.
JOBY products are warranted to be fit for the purpose for which they have been
designed, and to be free from defects in materials and workmanship. This guarantee
does not cover the product against subsequent damage or misuse. The period of validi-
ty of the Standard Limited Warranty is defined by the law in force in the country, state
or region where the product is sold. Please retain your receipt as proof of purchase to
repair your product under warranty.
Precautions for Using Lithium Batteries
FAQ and Troubleshoot
In-flight Control and Adjustment
Prepare to fly
Install the Controller Batteries
App Help
AndroidiOS
Up/Down
(Fig. 1)
(Fig. 1)(Fig. 2)
(Fig. 1)(Fig. 2)
(Fig. 1)(Fig. 2)
(Fig. 3)
(Fig. 2)
[1]
[1] Phone Clamp
[2] Speed Adjustment Button
[3] Left Control Stick (Throttle/Pan)
[4] Takeoff/Landing Button (Emergency Stop when press and hold)
[5] Power Indicator Light
[6] Power Button
[7] FlipButton
[8] Right Control Stick (Pitch/Roll)
[9] Headless Mode Button
[2]
[3]
[4]
[7]
[8]
[9]
[5][6]
Press and hold the power button
for 3 seconds
3
2
1
Open the battery cover on the back of the remote controller. Install three AAA alkaline
batteries according to the polarity indicated in the battery compartment. Then securely
close the battery cover. (Batteries not included. Do not mix new and old or different types
of battery).
Battery Cover
Connect the supplied USB charging cable to an USB-A power supply (Not included.
5V/0.6A). At this time, the charging indicator light will not illuminate. Then, connect the
drone battery to the charging cable, and the red indicator light will come on, meaning it’s
charging. The indicator light will go off when the battery is fully charged in about 90
minutes.
1. To take off, there are two methods. (a) Press the takeoff/landing button (Fig. 1).(b) Push the
throttle stick upward gradually(Fig. 2),the propellers will start spinning at low speed, then push the
throttle stick upward gradually again(Fig. 2), the drone will take off. When the drone reaches the
specific altitude you like, release the throttle stick, and the drone will hover at around that altitude.
2. To land, press the takeoff/landing button (Fig. 1) during the flight, or continuously pull the throttle
stick down (Fig. 3). It will descend slowly to the ground and the propellers will shut down.
3. Emergency Stop: In case of emergency that requires an immediate stop of flight, press and hold
the takeoff/landing button (Fig. 1) to activate the emergency stop. The propellers will shut down
immediately and the drone will quickly cease operation and fall. Use this only in an emergency when
you need to avoid further damage to the surrounding objects.
4. To turn off the drone, press and hold the power button of the drone for 3 seconds. To turn off the
controller, press the power button of the controller.
Push the left control stick up to ascend.
Pull it down to descend.
Turn Left/
Right
Push the left control stick left to turn left.
Push it right to turn right
Forward/
Backward
Push the right control stick up to fly forward.
Pull it down to fly backward.
Slide Left/
Right
Push the right control stick left to slide left.
Push it right to slide right.
Slide
Left/Right
Adjustment
If the drone veers to the left or right while hovering,
hold down the speed adjustment button and then
move the right control stick to the right or left until
it stabilizes.
Forward/
Backward
Adjustment
If the drone tilts forward or backward while hovering,
hold down the speed adjustment button and then
push the right control stick down or up until it
stabilizes.
ProblemReasonSolution
Drone indicator light blinking
Not responding to controls.
1. The drone and the controller
haven't successfully paired.
2. Insufficient battery power in the
drone.
1. Refer to the “Prepare to fly”
section to pair the devices again
2. Charge the battery.
Drone’s propellers are spinning
but it doesn't takeoff.
1. Insufficient battery power.
2. Damaged propellers.
1. Charge the battery.
2. Replace the propellers.
The drone still drift while hovering
even though the slide and pitch
adjustment are maxed out.
1. Damaged propellers.
2. Cause by wind.
1. Replace the propellers.
2. Drifting is inevitable since it’s
not a GPS-powered drone so it will
be pushed by wind.
After a collision, the drone flies
erratically in the next flight.
The 3-axis accelerometer lost
balance due to the collision.
Let the drone sit still for 3-5
seconds, and it should return to
normal.
Drone shakes intensely.
Damaged propellers.
Replace the propellers.
DECLARATION OF CONFORMITY
Compliance for USA
FCC Class B Information
This equipment has been tested and found to comply with the limits for a Class B digital device,
pursuant to part 15 of the FCC Rules. These limits are designed to provide reasonable protection
against harmful interference in a residential installation. This equipment generates, uses and can
radiate radio frequency energy and, if not installed and used in accordance with the instructions,
may cause harmful interference to radio communications. However, there is no guarantee that
interference will not occur in a particular installation.
If this equipment does cause harmful interference to radio or television reception, which can be
determined by turning the equipment off and on, the user is encouraged to try to correct the
interference by one or more of the following measures:
• Reorient or relocate the receiving antenna.
• Increase the separation between the equipment and receiver.
• Connect the equipment into an outlet on a circuit different from that to which the receiver is
connected.
• Consult the dealer or an experienced radio/TV technician for help.
CERTIFICATIONS
FCC ID: 2AQK5-JB01966
This device complies with Part 15 of the FCC Rules. Operation is subject to the following two
conditions:
(1) this device may not cause harmful interference, and (2) this device must accept any interfer-
ence received, including interference that may cause undesired operation.
FCC RF Radiation Exposure Statement:
This equipment complies with FCC radiation exposure limits set forth for an uncontrolled enviorn-
ment. End users must follow the specific operating instructions for satisfying RF exposure
compliance. This transmitter must not be co-located or operating in conjunction with any other
antenna or transmitter.
JOBY is a registered trademark
of Videndum Media Solutions Spa
Videndum Media Solutions Spa
Via Valsugana 100
36022 Cassola (VI) - Italy
© 2023 Videndum Media Solutions Spa
Cod. 1080744
3
2
1
Product specificaties
| Merk: | JOBY |
| Categorie: | Drone |
| Model: | Fly X |
Heb je hulp nodig?
Als je hulp nodig hebt met JOBY Fly X stel dan hieronder een vraag en andere gebruikers zullen je antwoorden
Handleiding Drone JOBY

18 Maart 2024
Handleiding Drone
Nieuwste handleidingen voor Drone
15 Mei 2026
12 Mei 2026
7 Mei 2026
27 April 2026
16 Maart 2026
27 Februari 2026
20 Januari 2026
7 Januari 2026
29 December 2026
27 December 2025