JL Audio Stealthbox SB-F-EXPED/10W1v3 Handleiding
JL Audio Niet gecategoriseerd Stealthbox SB-F-EXPED/10W1v3
Bekijk gratis de handleiding van JL Audio Stealthbox SB-F-EXPED/10W1v3 (6 pagina’s), behorend tot de categorie Niet gecategoriseerd. Deze gids werd als nuttig beoordeeld door 39 mensen en kreeg gemiddeld 4.5 sterren uit 3 reviews. Heb je een vraag over JL Audio Stealthbox SB-F-EXPED/10W1v3 of wil je andere gebruikers van dit product iets vragen? Stel een vraag
Pagina 1/6
➔
➔
➔
➔
Stealthbox
®
INSTALLATION GUIDE
SB-F-EXPED/10W6AE, JL AUDIO, Inc 2004
Sheet SKU#011106 Revision6/29/2004 Page 1
for the
SB-F-EXPED/10W6AE
(1997-2002 Ford Expedition &
1998-2002 Lincoln Navigator)
This Stealthbox is a product which
requires professional installation skills and
tools.
Please read this installation guide thor-
oughly before beginning the project.It
will guide you step by step through the
installation.Several of the steps in this
process may require two people to
accomplish.
It is absolutely vital that the enclosure
be properly mounted to the vehicle
according to these instructions.Failure
to mount the enclosure properly pres-
ents two problems:1) The sub-bass
performance will suffer due to the
movement of the enclosure caused by
the force exerted by the woofer(s) and
2) A loose enclosure presents a serious
safety hazard in the event of a collision
or sudden deceleration.
Please enjoy your JL Audio Stealthbox
responsibly.
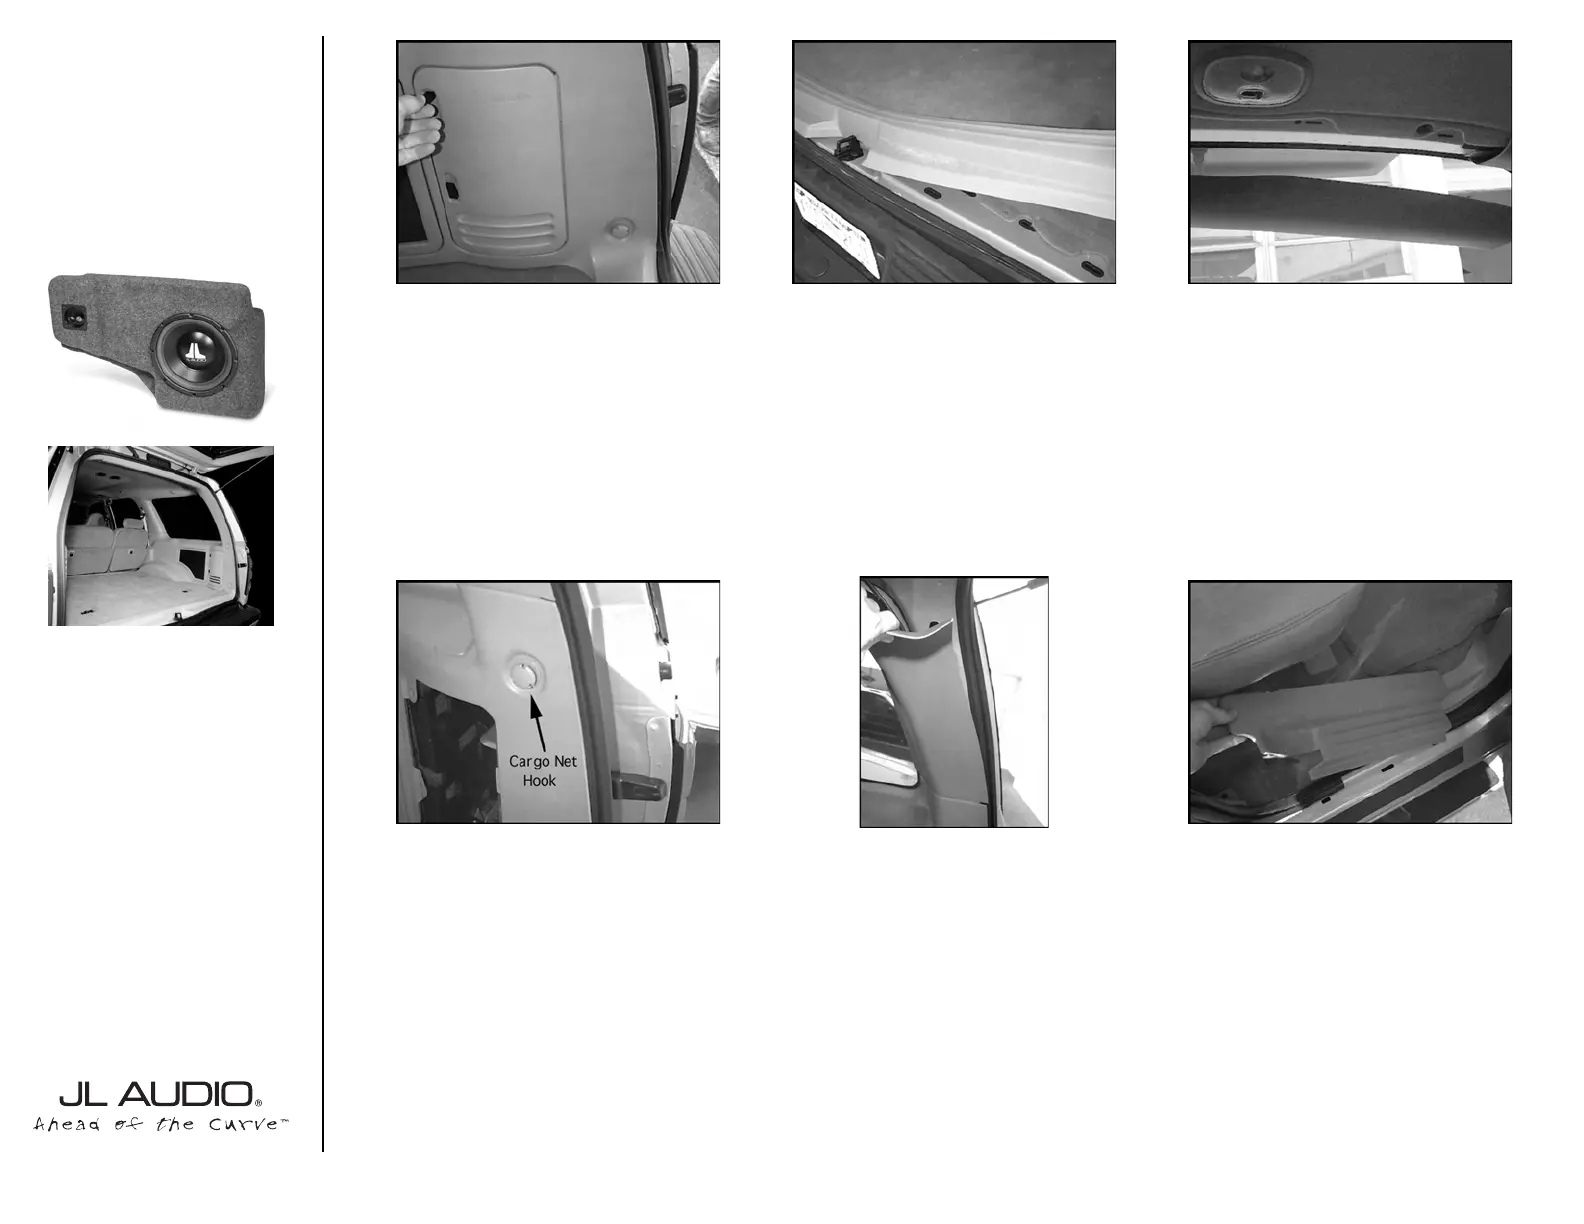
STEP 1:
Remove the tool access panel,from
the passenger’s side rear cargo panel.
Remove all contents.
STEP 2:
Remove the hatch floor sill.
STEP 3:
Remove the cargo hatch ceiling trim.
STEP 4:
Unscrew the pair of cargo net
hooks,from the passenger’side cargo panel.
STEP 5:
Remove the D-pillar trim.This is the
panel that is directly behind the passenger’s
rear side window.
STEP 6:
Remove the rear passenger’s side
door sill.
START
HERE
Continued on Next Page➔
www.jlaudio.com
➔
➔
Product specificaties
| Merk: | JL Audio |
| Categorie: | Niet gecategoriseerd |
| Model: | Stealthbox SB-F-EXPED/10W1v3 |
Heb je hulp nodig?
Als je hulp nodig hebt met JL Audio Stealthbox SB-F-EXPED/10W1v3 stel dan hieronder een vraag en andere gebruikers zullen je antwoorden
Handleiding Niet gecategoriseerd JL Audio

10 April 2025
10 Maart 2025
7 December 2024
15 November 2024
15 November 2024
7 Augustus 2024
7 Augustus 2024
9 Juli 2024
9 Juli 2024
10 Juni 2024
Handleiding Niet gecategoriseerd
Nieuwste handleidingen voor Niet gecategoriseerd
8 Juni 2026
8 Juni 2026
8 Juni 2026
8 Juni 2026
8 Juni 2026
8 Juni 2026
8 Juni 2026
8 Juni 2026
8 Juni 2026
8 Juni 2026