IMG Stage Line MPX-20USB Handleiding
IMG Stage Line Mengpaneel MPX-20USB
Bekijk gratis de handleiding van IMG Stage Line MPX-20USB (7 pagina’s), behorend tot de categorie Mengpaneel. Deze gids werd als nuttig beoordeeld door 12 mensen en kreeg gemiddeld 4.5 sterren uit 6 reviews. Heb je een vraag over IMG Stage Line MPX-20USB of wil je andere gebruikers van dit product iets vragen? Stel een vraag
Pagina 1/7
ELECTRONICS FOR SPECIALISTS ELECTRONICS FOR SPECIALISTS ELECTRONICS FOR SPECIALISTS ELECTRONICS FOR SPECIALISTS ELECTRONICS FOR SPECIALISTS ELECTRONICS FOR SPECIALISTS ELECTRONICS
MPX-20USB
Bestellnummer 20.2860
MONACOR INTERNATIONAL GmbH & Co. KG • Zum Falsch 36 • 28307 Bremen • Germany
Copyright© by MONACOR INTERNATIONAL. All rights reserved.A-1486.99.02.01.2016
PFL
USB
TO CH2
CH 1
CH 2
ON
OFF
0
1
2
3
4
5
6
7
8
9
10
0
1
2
3
4
5
6
7
8
9
10
CROSSFADER
ON
+3 dB
–3 dB
L R
MPX-20USB
LINE 2O 2PHON
CH 2MAST ERCH 1
L INE1O 1PH ON
MIN MAX
MIC PHONES
MIC
GND
INPUT 2
LINE 2PHONO 2RECMASTER
OUTPUTINPUT 1
LI NE1PHO NO 1
L
R
L
R
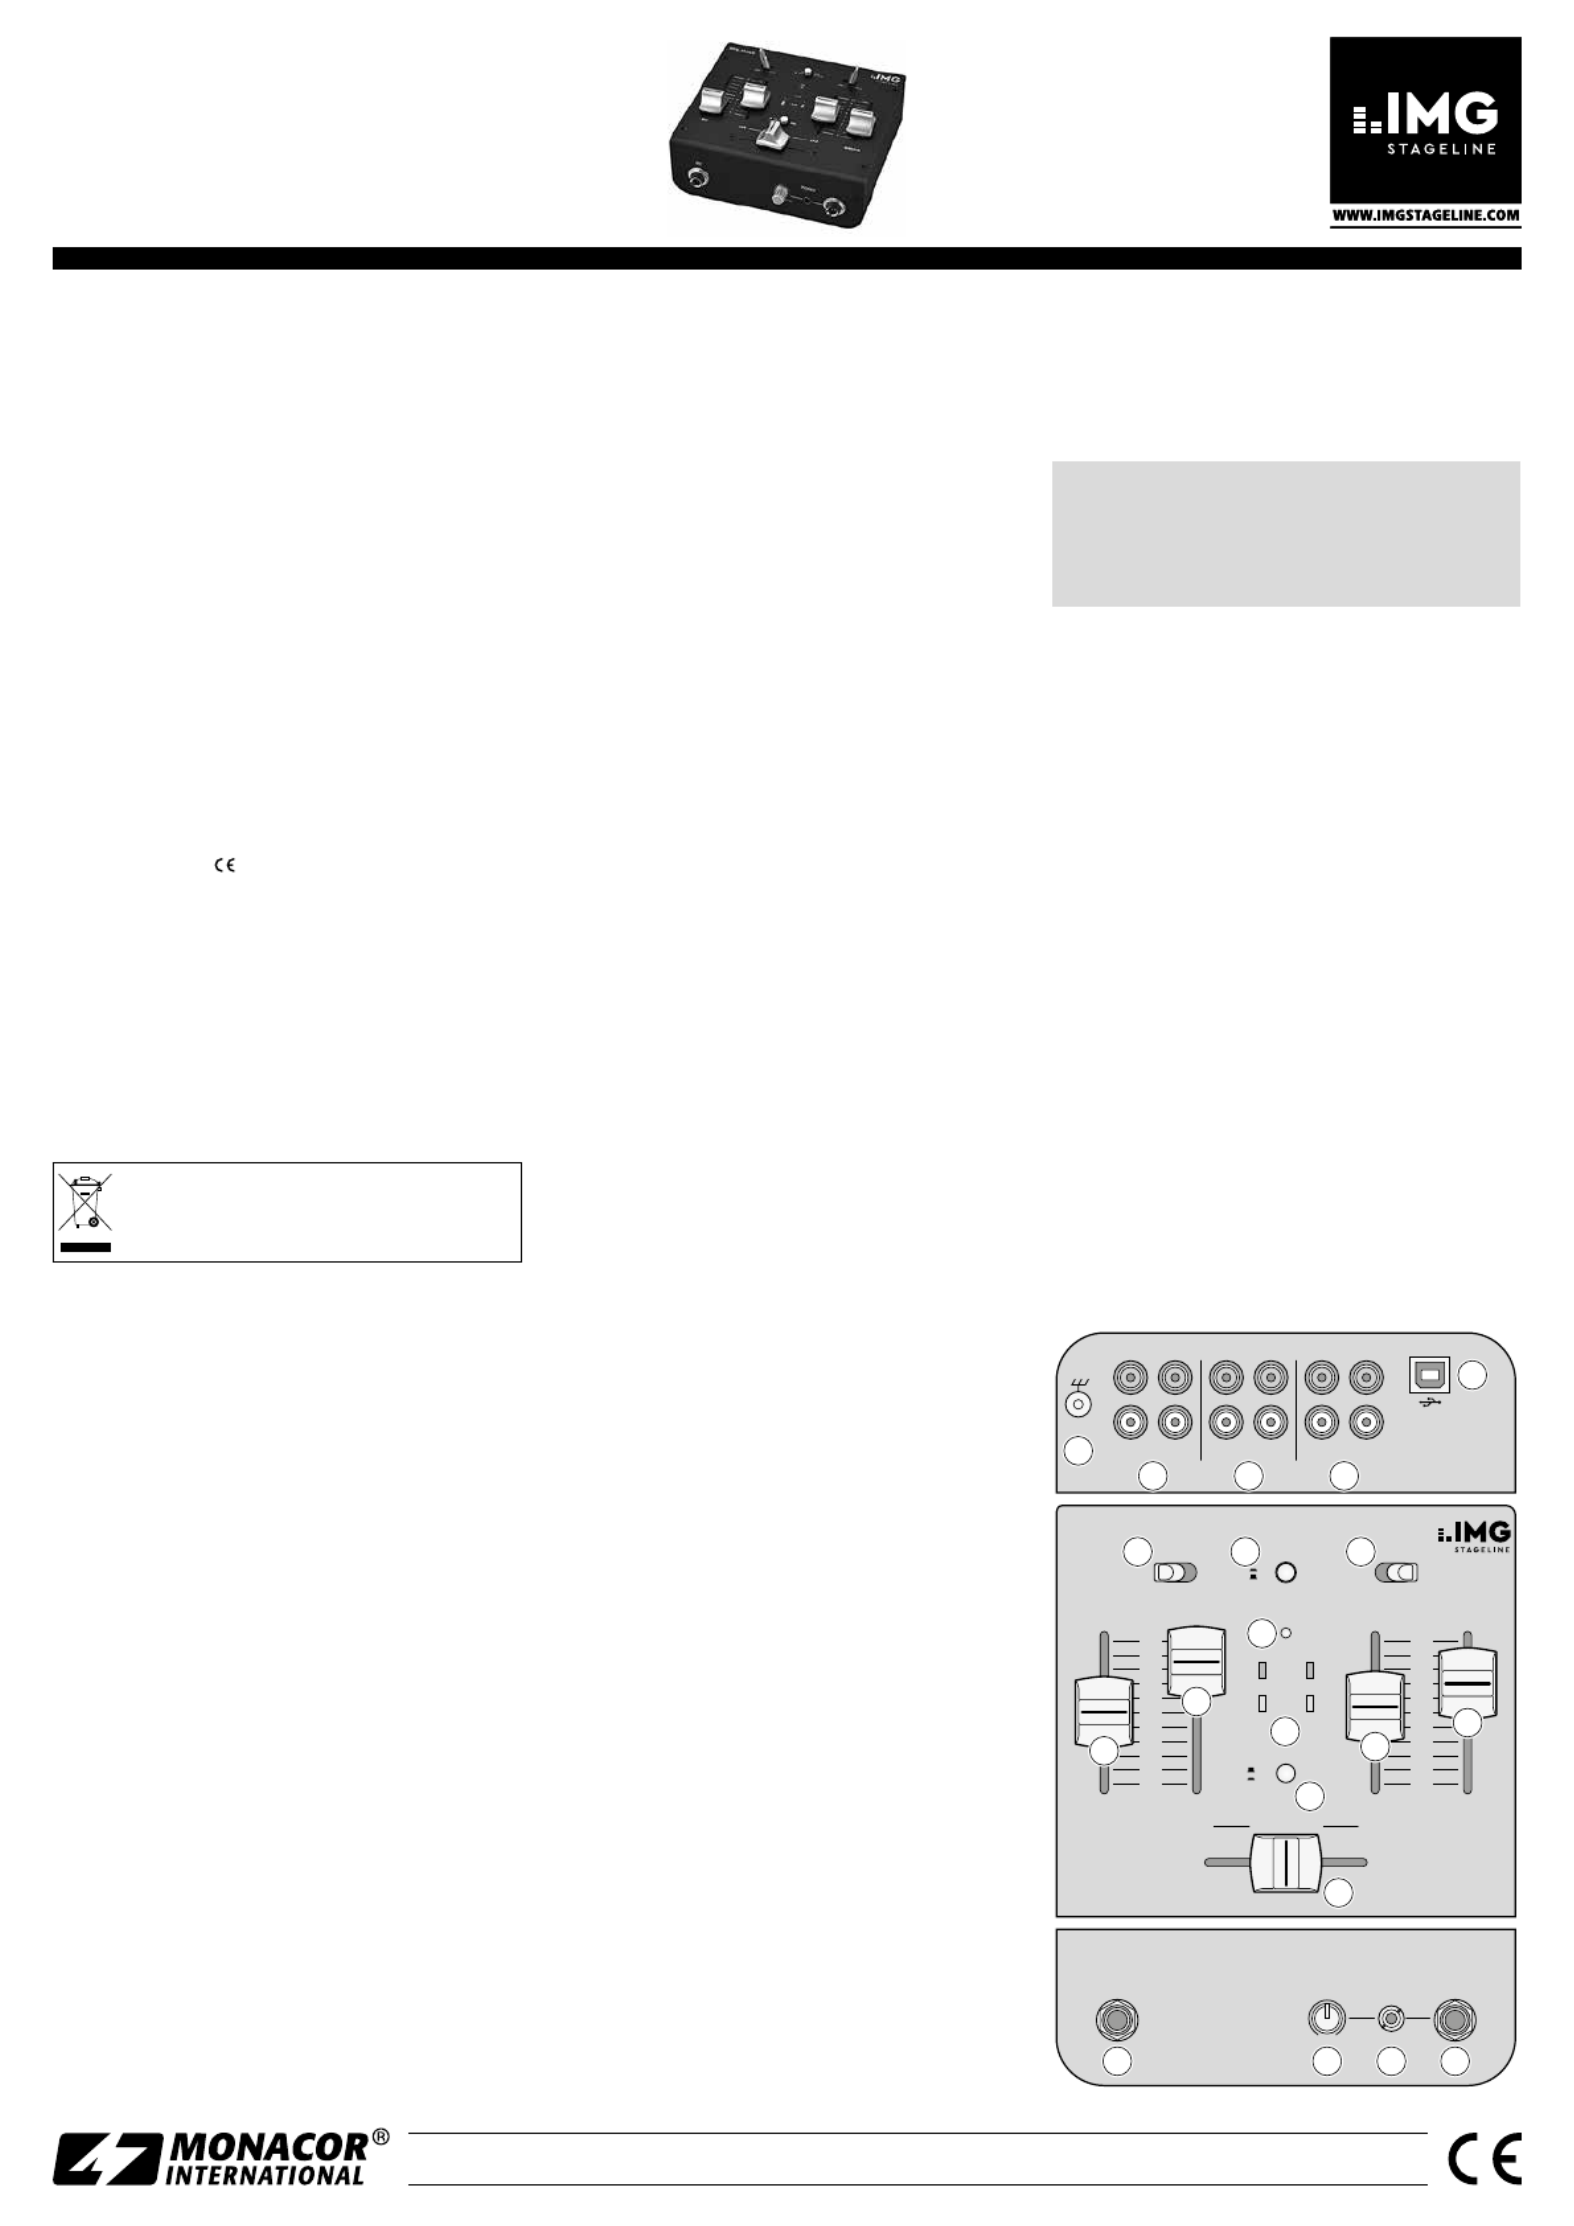
1718 2019
16
15
14
9
10
11
12
13
6 78
2 3 4
5
1
Netzgerät über das beiliegende USB-Kabel mit der
USB-Buchse (5) verbinden und an eine Steckdose an-
schließen. Nach dem Anschluss der Stromversorgung
ist das Mischpult eingeschaltet und die Betriebsanzeige
ON (11) leuchtet.
3.1 Betrieb mit Computer
Für den Betrieb des Mischers mit einem Computer kann
die mit dem Betriebssystem mitgelieferte Audio-Soft-
ware verwendet werden oder eine zu sätzlich installierte
Audio-Software.
1) Den Computer hochfahren und die USB-Buchse (5)
über das beiliegende USB-Kabel mit einem USB-An-
schluss am Computer verbinden. Der eingeschaltete
Mischer wird vom Computer als USB-Audiogerät für
die Toneingabe und Tonausgabe erkannt.
Hinweis:Wird der Mischer nicht als USB-Audiogerät erkannt,
müssen die erforderlichen Treiber (Standard-Treiber des Be-
triebssystems) nachinstalliert werden, z. B. über die Betriebs-
system-Original-CD. Nach der Installation den Computer ggf.
neu starten.
2) Das verwendete Abspiel- /Aufnahmeprogramm auf-
rufen und dort die erforderlichen Einstellungen für
die Tonwiedergabe über den Mischer bzw. Tonauf-
nahme vom Mischer vornehmen (☞ Anleitung des
Programms). Der Mischer kann dann anhand des
Kapitels4 bedient werden.
Findet keine Tonaufnahme bzw. Tonwiedergabe statt, in
den Systemeinstellungen des Computer-Betriebssystems
überprüfen, ob die USB-Schnittstelle für die Toneingabe
bzw. Tonausgabe angewählt ist.
Tipp: Ist der Mischer mit einem Computer verbunden sowie mit
Geräten, die über ihr Netzkabel geerdet sind (z. B. Verstärker),
können aufgrund von Masseschleifen Brummstörungen auftre-
ten. Um diese zu beseitigen, den Mischer über ein Massetrenn-
filter (z. B. FGA-40 von MONACOR) mit dem jeweiligen Gerät
verbinden.
4 Bedienung
1) Die Signalquellen für die Eingangskanäle CH 1 und
CH 2 mit den Schaltern LINE / PHONO (6 und 8) wählen.
2) Mit der Taste USB TO CH 2 (7) wählen, welches Ein-
gangssignal auf den Kanal CH 2 ge geben werden soll:
Taste ausgerastet = Eingangssignal der Cinch-Buchsen
INPUT 2 (3)
Taste hineingedrückt = Eingangssignal der USB-
Buchse(5).
Hinweis: Beachten Sie bei Aufnahmen über die USB-Buchse
die Gefahr von Rückkopplungen, wenn das Aufnahmesignal
des Computers als Eingangssignal auf den Kanal CH 2 ge-
schaltet wird.
3) Zur Grundeinstellung den Fader MASTER (15) vorerst
auf ca. aufziehen.2⁄3
4) Den Crossfader (16) ganz nach links schieben und ein
Tonsignal auf den Kanal CH 1 geben. Den Kanal mit
dem Fader (10) aussteuern. Der Ausgangspegel lässt
sich an der Signalanzeige (12) ablesen. Die roten LEDs
+3 dB sollten nur bei Pegelspitzen kurz aufleuchten.
Leuchten sie permanent, den Fader entsprechend zu-
ziehen.
5) Den Crossfader ganz nach rechts schieben und den
Kanal CH 2 genauso einstellen. Danach kann mit dem
Crossfader zwischen den Kanälen CH 1 und CH 2
übergeblendet werden. Sollen die Signale der beiden
Kanäle gemischt werden, den Crossfader in die Mitte
schieben.
6) Die endgültige Lautstärke des Ausgangssignals an den
Buchsen OUTPUT (4) und an der USB-Buchse (5) mit
dem Fader MASTER einstellen, ohne dass Verzerrungen
auftreten.
7) Für eine Durchsage über ein an der Buchse MIC (17)
angeschlossenes Mikrofon die Lautstärke mit dem
Fader MIC (9) einstellen.
8) Die Eingangskanäle CH 1und CH 2 können einzeln
über einen Kopfhörer abgehört werden, auch wenn
gerade ein Kanal mit dem Crossfader ausgeblendet ist.
3-Kanal-Audio-Mischer
Diese Bedienungsanleitung richtet sich an Benut-
zer ohne besondere Fachkenntnisse. Bitte lesen Sie
die Anleitung vor dem Betrieb gründlich durch und
heben Sie sie für ein späteres Nachlesen auf.
1 Einsatzmöglichkeiten
Der Audio-Mischer MPX-20USB eignet sich für beliebige
DJ-Anwendungen im professionellen und privaten Be-
reich. Er ist mit zwei Stereo-Eingangskanälen und einem
DJ-Mikrofonkanal ausgestattet. Zum Vorhören der Ein-
gangssignale kann ein Kopfhörer angeschlossen werden.
Zur Verbindung mit einem Computer ist eine USB-
Audio-Schnittstelle vorhanden. Diese lässt sich sowohl
als Ausgang zur digitalen Aufnahme der Tonabmischung
als auch als Eingang zum Einspeisen von Audiodaten ver-
wenden.
Die Stromversorgung erfolgt beim Anschluss an einen
Computer über die USB-Verbindung. Beim Betrieb ohne
Computer muss ein Netzgerät mit USB-Anschluss verwen-
det werden.
2 Wichtige Hinweise für den Gebrauch
Das Gerät entspricht allen relevanten Richtlinien der EU
und ist deshalb mit gekennzeichnet.
•
Verwenden Sie das Gerät nur im Innenbereich und
schützen Sie es vor Tropf- und Spritzwasser, hoher Luft-
feuchtigkeit und Hitze (zulässiger Einsatztemperaturbe-
reich 0 – 40 °C).
•
Verwenden Sie zum Reinigen nur ein trockenes, weiches
Tuch, niemals Chemikalien oder Wasser.
•
Wird das Gerät zweckentfremdet, nicht richtig ange-
schlossen, falsch bedient oder nicht fachgerecht repa-
riert, kann keine Haftung für daraus resultierende Sach-
oder Personenschäden und keine Garantie für das Gerät
übernommen werden.
Soll das Gerät endgültig aus dem Betrieb ge-
nommen werden, übergeben Sie es zur um-
weltgerechten Entsorgung einem ört lichen
Recyclingbetrieb.
3 Inbetriebnahme
Um Störgeräusche beim Herstellen / Trennen von Verbin-
dungen und eine zu hohe Lautstärke bei der Inbetriebnah-
me zu vermeiden, die Regler MASTER (15) und PHONES
(18) auf Minimum stellen.
1) Die Tonquellen an die zugehörigen Eingangsbuchsen
(2 und 3) anschließen:
– Buchsen LINE für den Anschluss von Geräten mit
Line-Pegel (z. B. MP3- / CD-Spieler)
– Buchsen PHONO für den Anschluss von Plattenspie-
lern mit Magnetsystem; die Plattenspieler-Masse-
leitung (falls vorhanden) an der Masseschraube GND
(1) festklemmen.
An die Eingangskanäle CH 1 und CH 2 lassen sich
jeweils zwei Tonquellen anschließen. Mit den zuge-
hörigen Wahlschaltern (6 und 8) kann zwischen den
Tonquellen umgeschaltet werden.
2) Ein Mikrofon lässt sich an die Buchse MIC (17) an-
schließen.
3) Zum Abhören der Eingangssignale kann ein Stereo-
Kopfhörer (Impedanz min. 8 Ω) an eine der Buchsen
PHONES angeschlossen werden: 3,5-mm-Klinkenbuchse
(19) oder 6,3-mm-Klin kenbuchse (20).
4) An den Stereo-Ausgängen MASTER und REC (4) steht
das mit dem Fader MASTER (15) eingestellte Summen-
signal zur Verfügung. Hier kann der Verstärker für die
Publikumsbeschallung und z. B. ein Aufnahmegerät
angeschlossen werden.
5) Beim Betrieb ohne Computer muss die Stromversor-
gung des Mischpults über ein Netzgerät mit USB-
Anschluss erfolgen, das eine Ausgangsspannung von
5 V⎓ und einen Ausgangsstrom von 500 mA liefert
(z. B. das Modell PSS-1005USB von MONACOR). Das
Deutsch
Damit kann z. B. der nächste zu spielende Titel ausge-
sucht werden. Mit der Taste PFL (13) den Kanal wählen:
Taste ausgerastet = CH 1
Taste hineingedrückt = CH 2
Die Kopfhörerlautstärke mit dem Regler PHONES (18)
einstellen.
WARNUNG! Stellen Sie die Lautstärke der Audioanlage
und des Kopfhörers nie sehr hoch ein. Hohe Lautstärken
können auf Dauer das Gehör schädigen! Das Ohr ge-
wöhnt sich an große Lautstärken und empfindet sie nach
einiger Zeit als nicht mehr so hoch. Darum eine hohe
Lautstärke nach der Gewöhnung nicht weiter erhöhen.
5 Technische Daten
Eingänge
(Empfindlichkeit / Impedanz)
MIC: . . . . . . . . . . 1 mV/1 kΩ
PHONO:. . . . . . . . . 9 mV/ 63 kΩ
LINE: . . . . . . . . . . 450 mV/17 kΩ
Ausgangspegel
MASTER, REC:. . . . . . 1 V
Kopfhörerimpedanz: . . . . . . . ≥ 8 Ω
USB-Schnittstelle: . . . . . . . . . USB 2.0, Buchse Typ B
Frequenzbereich:. . . . . . . . . . 20 – 20 000 Hz
Klirrfaktor: . . . . . . . . . . . . . . < 0,1 %
Störabstand: . . . . . . . . . . . . . 63 dB (unbewertet)
Stromversorgung: . . . . . . . . . 5 V⎓ / 500 mA über
USB-Schnittstelle
Abmessungen: . . . . . . . . . . . 150 × 70 × 140 mm
Gewicht: . . . . . . . . . . . . . . . . 700 g
Geeign. Betriebssystem
für USB-Betrieb:. . . . . . . Windows 2000, Windows XP,
Windows Vista, Windows 7,
Mac OS X
Windows ist ein registriertes Warenzeichen der Microsoft Corporation
in den USA und anderen Ländern.
Mac OS ist ein registriertes Warenzeichen von Apple Computer, Inc. in
den USA und anderen Ländern.
Änderungen vorbehalten.
Product specificaties
| Merk: | IMG Stage Line |
| Categorie: | Mengpaneel |
| Model: | MPX-20USB |
| Kleur van het product: | Zwart |
| Gewicht: | 700 g |
| Breedte: | 150 mm |
| Diepte: | 140 mm |
| Hoogte: | 70 mm |
| USB-poort: | Ja |
| USB-connectortype: | USB Type-B |
| Type aansluitplug: | 3.5 mm/6.35 mm |
| Microfoon, line-in ingang: | Ja |
| Videomogelijkheid: | Nee |
| Frequentiebereik: | 20 - 20000 Hz |
| Aantal kanalen: | 3 kanalen |
| Totale harmonische vervorming (THD): | 0.1 procent |
| Aantal microfooningangen: | 1 |
| Phono ingang (RCA): | 2 |
| Master (L, R) out: | 1 |
| Line inputs (RCA): | 2 |
| Digitaal geluid verwerken: | - Bit |
| DJ mixer: | Ja |
| Line Signal-to-Noise Ratio (SNR): | 63 dB |
| Record out: | 1 |
Heb je hulp nodig?
Als je hulp nodig hebt met IMG Stage Line MPX-20USB stel dan hieronder een vraag en andere gebruikers zullen je antwoorden
Handleiding Mengpaneel IMG Stage Line

4 Juli 2023
3 Juli 2023
1 Juli 2023
30 Juni 2023
25 Juni 2023
25 Juni 2023
23 Juni 2023
Handleiding Mengpaneel
Nieuwste handleidingen voor Mengpaneel
11 Juli 2026
9 Juli 2026
8 Juli 2026
22 Juni 2026
12 Juni 2026
19 Mei 2026
19 Mei 2026
18 Mei 2026
14 Mei 2026
7 Mei 2026