Iluv TB150 Handleiding
Iluv Niet gecategoriseerd TB150
Bekijk gratis de handleiding van Iluv TB150 (1 pagina’s), behorend tot de categorie Niet gecategoriseerd. Deze gids werd als nuttig beoordeeld door 13 mensen en kreeg gemiddeld 4.0 sterren uit 9 reviews. Heb je een vraag over Iluv TB150 of wil je andere gebruikers van dit product iets vragen? Stel een vraag
Pagina 1/1
75x675mm 105g双铜,彩色正反印刷,风琴折,过油
折后尺寸:75x75mm
(NEW FORMAT)Rear page in Spanish
TB150
MANUAL DEL USUARIO (V. 1.0)
ESPAÑOL
DESCRIPCIÓN DEL PRODUCTO
LED de estado
Micrófono
Puerto de
carga
Controles
Puerto de carga
LED de estado del estuche
CONTENIDO
1.Cómo emparejar los auriculares
2.Cómo ponerse los auriculares
3.Cómo ajustar los auriculares
4.Duración de la batería
5.Estado de la batería
6.Cómo cargar la batería
7.
8.
9.
10.
11.
12.Resistencia al agua
13.
14.
ESTADO DE LA BATERÍA
El estuche de carga está equipado con luces LED que ayudan a
encendidas mientras la batería esté totalmente cargada. Los
5
DURACIÓN DE LA BATERÍA
Puede usarlos durante un máximo de 7 horas con una sola carga y
durante 14 horas adicionales con el estuche de carga incluido. Para una
durante 20 minutos y disfrutará de 2 horas de reproducción. Los
auriculares y el estuche de carga tardan 2 horas en cargarse
completamente.
Carga únicaCarga total
con estuche
*Tiempo de reproducción medido con una sola carga y el volumen al 80 %*
Carga rápida
de 20 minutos
4
CÓMO AJUSTAR LOS AURICULARES
Seleccione el tamaño deseado de almohadilla (muy pequeño,
auricular. No debe quedar espacio entre la almohadilla y el auricular.
auriculares.
Presione firmemente la
almohadilla para encajarla
en el auricular
Coloque la almohadilla
en el auricular
3
CÓMO USAR LOS AURICULARES
las agujas del reloj (como se muestra en la imagen siguiente)
Inserte el auricular en
el canal audivo
Gire ligeramente el
auricular en el
canal audivo
2
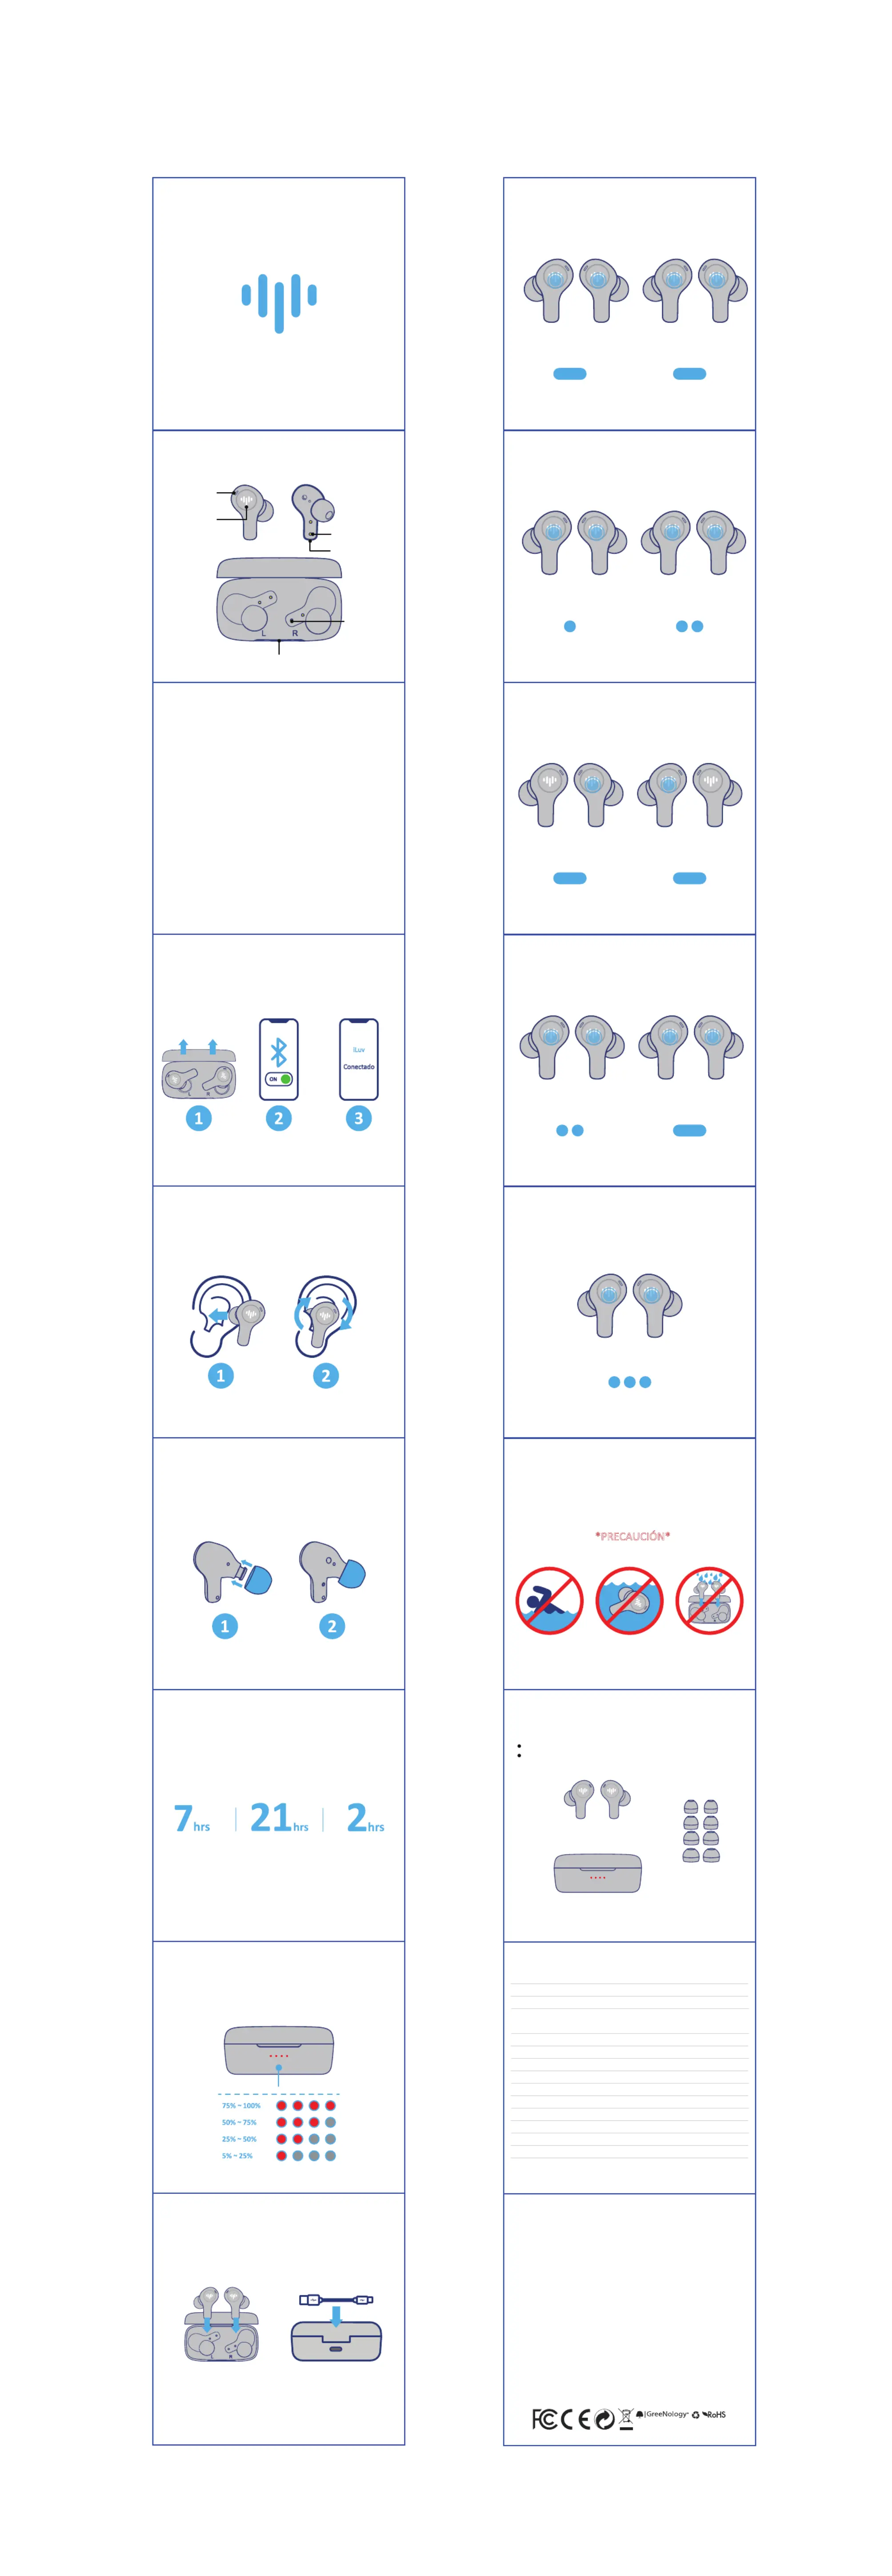
CONTROLES TÁCTILES
ENCENDIDA
MANTENGA PRESIONADO
DURANTE 2 SEGUNDOS EL
IZQUIERDA y DERECHO
Encender
Derecho
MANTENGA PRESIONADO
DURANTE 5 SEGUNDOS
EL IZQUIERDA o DERECHO
Apagar
Derecho
7
LLAMADAS
TOQUE DOS VECES EL
IZQUIERDO O DERECHO
RESPONDER/FINALIZAR
Derecho
MANTENGA PRESIONADO
DURANTE 2 SEGUNDOS
EL IZQUIERDO O DERECHO
RECHAZAR
Derecho
CONTROLES TÁCTILES
10
CONTROLES TÁCTILES
ASISTENTE DE VOZ
La disponibilidad de la función de control de
teléfono Android.
TOQUE 3 VECES EL
IZQUIERDO O DERECHO
Derecho
ACTIVAR EL ASISTENTE
11
CONTROLES TÁCTILES
VOLUMEN
SUBIR
Derecho
MANTENGA PRESIONADO
EL IZQUIERDO
Derecho
BAJAR
MANTENGA PRESIONADO
EL DERECHO
9
RESISTENCIA AL AGUA
Están diseñados para ser resistentes al sudor y a la intemperie, pero
no es permanente y la resistencia puede disminuir como resultado del
desgaste normal.
*PRECAUCIÓN*
Nadar o ducharse con
os auriculares
Sumergir los auriculares
bajo el agua
Colocar los auriculares
húmedos en el
estuche de carga
12
13
PIEZAS DE REPUESTO
Estuche de carga
Almohadillas
CÓMO CARGAR LA BATERÍA
6
Coloque ambos auriculares en
el estuche de carga y cierre la
tapa del estuche.
Auriculares
Conecte el cable USB po C al
estuche de carga y al adaptador
de corriente.
Estuche de carga
Siga las instrucciones siguientes para cargar correctamente los
auriculares y el estuche de carga. Las luces LED del auricular y del
auriculares se apagan cuando estos están completamente cargados;
en cambio, las del estuche de carga se encienden todas.
CÓMO EMPAREJAR LOS AURICULARES
1
Saque los auriculares del
estuche de carga
Vaya a la configuración
del Bluetooth en su
disposivo de audio
Seleccione iLuv TB150
en la configuración
del Bluetooth
TB150
Conectado
Saque ambos auriculares del estuche de carga para emparejarlos con
se hayan emparejado, ¡estarán listos para usarlos!
CONTROLES TÁCTILES
MÚSICA
REPRODUCIR/PAUSAR
DerechoDerecho
SALTAR
TOQUE UNA VEZ EL
IZQUIERDO O DERECHO
8
TOQUE DOS VECES EL
IZQUIERDO O DERECHO
14
ESPECIFICACIONES
5.3
10 metros (30 pies)
7 horas de reproducción*
2 horas
20 minutos = 2 horas de reproducción
MEMS
omnidireccional
independiente
23,4(ancho) x 23(profundidad) x 30(alto)mm
68,5(ancho) x 35(profundidad) x 30(alto)mm
4,3 g
32,1 g
NOTE: Thiquipmentn tests e has beeed andound to comply ith t tor a ClaB digital fhelimis fss deicursuante, p
tart t Rul These limits are desigtoo p15 ofhe FCCes.ned proide rsonablprotegainst harmfuleae n a
interference in asidenal installao Thiequipment genat ren.s eres uses and can radiate radio frequency energy
and, if not installeand used iaccordancith t instrud n e heonmay cae harmful interference to radios, us
communicnsHoe. er, there iguarans no
tee that interferencilnot occur iaular insllaonIfe l n a pta.
thiequipment does cae harmful interference to radio or telei recepon, hich ceetermineys usisonan b dd b
turning the quipenemt a, teencttry tcoe thefcye ond onhe us is ouraged o o rrct intererene b on or morthee of
folloinmeasureg
- Reorientr the reig anta. orelocate ceinenn
-
- Connect temtttlcitntrom tt tctrecche quipen ino an ouet on a rcuiere fhao hih he ei is onnected.
- Consult theerr dale o an experienced radio/TV technician for help.
auhotyere tri to opatthe emt.quipen
decei mayt c no
ausrmtereren) cee haful infce,2 and (this di musccetererene cet apty an infcreid,c inluding
.ilu.com
Cau�on:
IMPORTANT:
Printed in China.
Product specificaties
| Merk: | Iluv |
| Categorie: | Niet gecategoriseerd |
| Model: | TB150 |
Heb je hulp nodig?
Als je hulp nodig hebt met Iluv TB150 stel dan hieronder een vraag en andere gebruikers zullen je antwoorden
Handleiding Niet gecategoriseerd Iluv

20 Februari 2025
20 Februari 2025
20 Februari 2025
20 Februari 2025
20 Februari 2025
20 Februari 2025
20 Februari 2025
20 Februari 2025
20 Februari 2025
20 Februari 2025
Handleiding Niet gecategoriseerd
Nieuwste handleidingen voor Niet gecategoriseerd
8 Juni 2026
8 Juni 2026
8 Juni 2026
8 Juni 2026
8 Juni 2026
8 Juni 2026
8 Juni 2026
8 Juni 2026
8 Juni 2026
8 Juni 2026