Hiberr YU-E40 Handleiding
Bekijk gratis de handleiding van Hiberr YU-E40 (2 pagina’s), behorend tot de categorie Microfoon. Deze gids werd als nuttig beoordeeld door 33 mensen en kreeg gemiddeld 4.9 sterren uit 17 reviews. Heb je een vraag over Hiberr YU-E40 of wil je andere gebruikers van dit product iets vragen? Stel een vraag
Pagina 1/2

YU-E40
PROFESSIONAL
WIRELESS MICROPHONE SYSTEM
USER GUIDE
Please read the instruction manual carefully before operating the
equipment, and keep the instruction manual properly.
This equipment has been tested and found to comply with the limits for a Class B digital device, pursuant to Part 15 of
the FCC Rules. These limits are designed to provide reasonable protection against harmful interference in a residential
installation. This equipment generates, uses and can radiate radio frequency energy and, if not installed and used in
accordance with the instruction manual, may cause harmful interference to radio communications. However, there is no
guarantee that interference will not occur in a specific installation.
If this equipment does cause harmful interference to radio or television reception. (can be determined by turning the
device off and on)
Users are advised to try one or more of the following measures to eliminate the distraction:
1. Adjust the direction or position of the receiving antenna.
2. Increase the separation between the equipment and receiver.
3. Connect the equipment into an outlet on a circuit different from that to which the receiver is connected.
4. Consult the dealer or an experienced radio/TV technician for help.
Notice:
Any changes or modifications to this equipment not expressly approved by the manufacturer could void your authority
to operate the equipment. This device complies with Part 15 of the FCC Rules. The operation is subject to the following
two conditions:
(1) this device may not cause harmful interference;
(2) This device must accept any interference received, including interference that may cause undesired operation
Radio Frequency Exposure Information:
This equipment has been evaluated and found to comply with general RF exposure requirements. This device may be
used in portable exposure conditions without any restrictions.
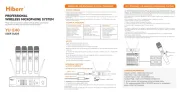
CONTACT INFORMATION
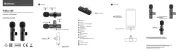
WIRELESS MICROPHONE SYSTEM OVERVIEW
FCC STATEMENT FOR WIRELESS MICROPHONE SYSTEMS
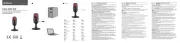
POWER
IR
FREQ
CHAN
MHZ
PILOT
IR
FREQ
CHAN
MHZ
PILOT
IR
FREQ
CHAN
MHZ
PILOT
IR
FREQ
CHAN
MHZ
PILOT
CH-1
CH-2
CH-3
CH-4
VOL-LOCK
31
RF
31
RF
31
RF
31
RF
SYSTEM FEATURES
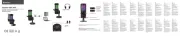
TECHNICAL INDICATORS
Frequency range: 520~570MHz
Total number of channels: 200CH
Frequency interval: 250KHz
Effective use distance: 90m
Frequency width: 50MHz
Frequency module: 100 groups
Oscillation mode:
Signal to noise ratio: >90dB
Frequency stability: ±5KHz
Receive mode: CPU
Frequency selection + pilot reception
Display mode: TFT
Power supply: 12VDC, 500mA
Frequency range: 520~570MHz
Total number of channels: 200CH
Frequency interval: 250KHz
Frequency width: 50MHz
Oscillation mode:
Frequency stability: ±4KHz
SYSTEM SPECIFICATIONS RECEIVER TRANSMITTER
Please unplug the receiver from the device during thunderstorms or when the device will not be used for
NOTICE
RECORDING FUNCTION
(6.35MM INTERFACE)
6.35mm mono
3.55mm dual channel
Receiver
Computer / Mobile Phone
message comes across loud and clear.
compromising on performance.
environment.
making every event a success.

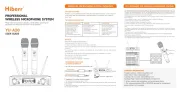
TRANSMITTER (HANDHELD)
TRANSMITTER (BODYPACK)
1. Pickup: It is used to pick up the original sound of
human voice or musical instrument.
(battery, frequency/channel, mute, etc.).
off the handheld transmitter.
4. Battery compartment: Unscrew the lower part of the
tube body to see, used for installing and replacing
batteries.
5. Infrared sensing point/IR: used for frequency binding
operation with the receiver.
6. Antenna: RF antenna.
1. Receiving antenna
2. Microphone input jack
3. Power switch / Volume knob
4. Power LED
5. LED display screen
6. Infrared receiving window
7. Battery compartment
8. Battery protection cover
ANT
C+D
ANT
A+B
1. Select the channel to be adjusted: press ➏CH1~4
2. Unlock the channel: press and hold the ➌ VOL-LOCK button for 3 seconds
3. Activate the automatic frequency scanning function of the channel: press and hold the channel button ➏CH1~4 for more than three
seconds, the frequency scanning function is activated (there is a prompt on the host screen), and the system will automatically
search for the best communication frequency of the channel.
4. Synchronize frequency: align the infrared window of the transmitter with the infrared window of the receiver (about 3cm), press the
channel ➏CH1~4 button, when the frequency displayed by the transmitter is consistent with the frequency displayed by the channel,
the frequency will be synchronized success.
1. AUTOMATIC FREQUENCY SELECTION SETTING
2. Manual Frequency Selection Setting
1. Select the channel to be adjusted: press ➏CH1~4.
2. Unlock the channel: long press the ➌ VOL-LOCK button for 3 seconds.
3. Switch to volume interface: Press the ➌ VOL-LOCK button to select volume adjustment interface.
4. Press the ➍➎ Up or Down key to select a suitable volume.
3. Volume Adjustment Settings
CH1
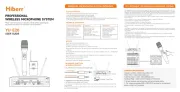
RECEIVER SYSTEM USAGE SETTINGS
RECEIVING HOST SYSTEM FUNCTION INTRODUCTION
TRANSMITTER SYSTEM FUNCTION INTRODUCTION
FRONT PANEL
BACK PANEL
1. Power switch key: After pressing this key, the information display screen will light up,
and then it can be used and operated.
2. TFT display screen: Information display screen, displaying frequency, battery usage
and other information.
3. Function switch key: frequency / volume / lock.
4. Up key: Used to adjust the parameters of specific menu items.
tomatic frequency sweep.
transmitter.
8. Antenna input interface: Insert the two random equipped antennas into this interface
respectively.
1. Select the channel to be adjusted: press ➏CH1~4
2. Unlock the channel: press and hold the ➌ VOL-LOCK button for 3 seconds
3. Select the frequency: Press the ➍➎ up or down key to select the appropriate target communication frequency.
4. Synchronize frequency: align the infrared window of the transmitter with the infrared window of the receiver (about 3cm),
press the channel ➏CH1~4 button, when the frequency displayed by the transmitter is consistent with the frequency
displayed by the channel, the frequency will be synchronized success.
CH1:SCAN
CH1
Product specificaties
| Merk: | Hiberr |
| Categorie: | Microfoon |
| Model: | YU-E40 |
Heb je hulp nodig?
Als je hulp nodig hebt met Hiberr YU-E40 stel dan hieronder een vraag en andere gebruikers zullen je antwoorden
Handleiding Microfoon Hiberr
2 Mei 2025
2 Mei 2025
2 Mei 2025
Handleiding Microfoon
- GoPro
- Cherry
- SPL
- Nady
- Insignia
- Sony
- Radial Engineering
- Artsound
- Srhythm
- TIE Audio
- Apogee
- QTX
- Chandler
- Lenco
- Nowsonic
Nieuwste handleidingen voor Microfoon
17 September 2025
15 September 2025
15 September 2025
15 September 2025
15 September 2025
15 September 2025
15 September 2025

15 September 2025

15 September 2025
15 September 2025