GPX C303B Handleiding
Bekijk gratis de handleiding van GPX C303B (27 pagina’s), behorend tot de categorie Radio. Deze gids werd als nuttig beoordeeld door 63 mensen en kreeg gemiddeld 4.5 sterren uit 5 reviews. Heb je een vraag over GPX C303B of wil je andere gebruikers van dit product iets vragen? Stel een vraag
Pagina 1/27
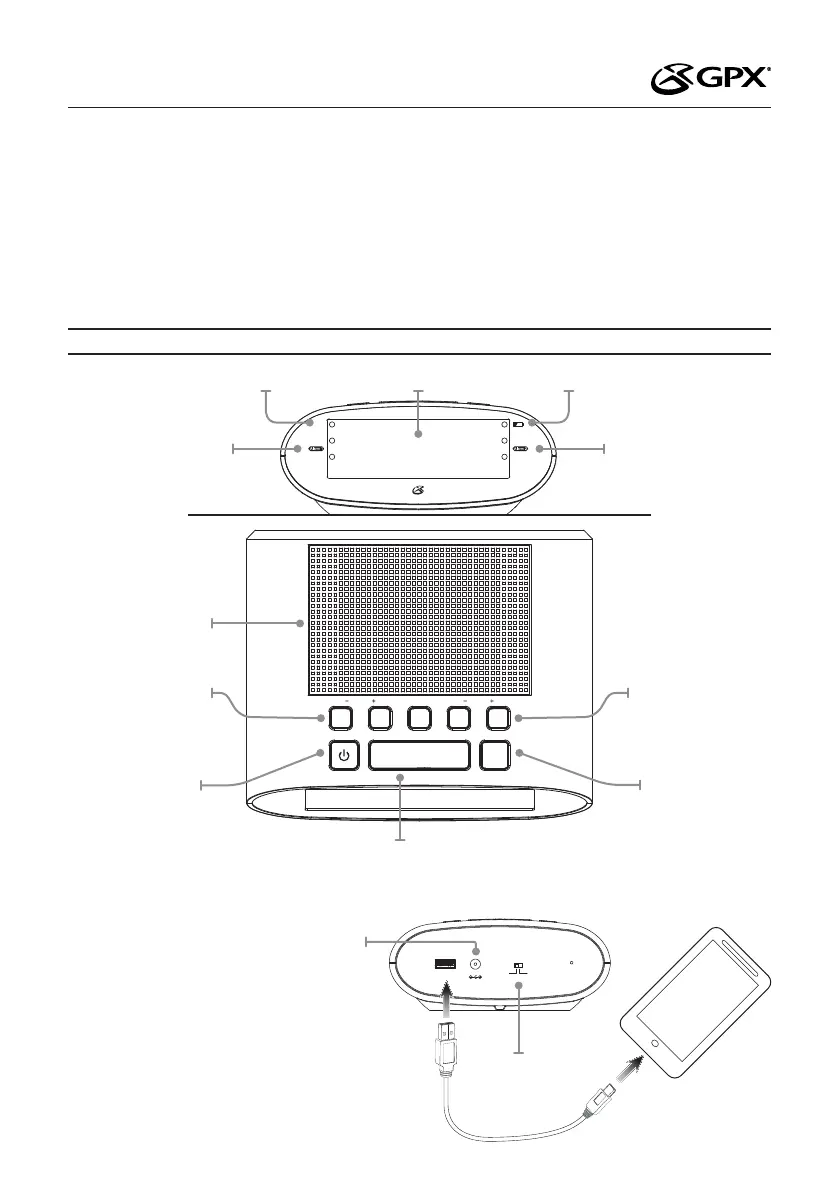
DC IN
USB CHARGER
FM ANT
DST
OFFON
Power
Plug the AC/DC power adapter (included) into the
DC Power Input on the unit, and a standard power outlet.
The unit can be used to charge mobile devices through a USB
charging port in the rear, as seen on the right (USB cable not included).
SNOOZE
AL1AL2HOURMINUTE
CLOCK/ PRESETAM/FMDIMMER
TUNINGVOLUME
TIME ZONE
DC Power Input
Daylight
Savings On/O
Snooze/Dimmer
Press to snooze the alarm after it sounds.
Press and hold to dim the brightness of the LED display.
FCC Warnings
Warning: Changes or modications to this unit not expressly approved by the party
responsible for compliance could void the user’s authority to operate the equipment.
NOTE: This equipment has been tested and found to comply with the limits for a Class B
digital device, pursuant to Part 15 of the FCC Rules. These limits are designed to provide
reasonable protection against harmful interference in a residential installation. This
equipment generates, uses, and can radiate radio frequency energy and, if not installed
and used in accordance with the instructions, may cause harmful interference to radio
communications. However, there is no guarantee that interference will not occur in a
particular installation.
If this equipment does cause harmful interference to radio or television reception, which can
be determined by turning the equipment off and on, the user is encouraged to try to correct
the interference by one or more of the following measures:
• Reorient or relocate the receiving antenna.
• Increase the separation between the equipment and receiver.
• Connect the equipment into an outlet on a circuit different from that to which the
receiver is connected.
• Consult the dealer or an experienced radio/TV technician for help.
Clock Radio with Dual Alarm
User’s Guide for Model C303B v997-01
FUNCTIONS AND CONTROLS
Volume/AL1/AL2
Press to adjust the volume.
Press and hold to begin
setting Alarm 1 or Alarm 2.
Tuning/Hour/Min
Press to tune the radio.
Press to adjust the minute
or hour when setting
the clock or alarm.
Radio/Power
Press to power on the Radio.
Press and hold to power o
the Radio. Press briey
to switch between AM
and FM bands.
Preset/Clock
With the Radio on, press to
cycle through preset radio
stations. In o mode, press
and hold to adjust the clock.
BuzzerBuzzer
RadioRadio
PM
LED DisplayBattery Status
Alarm 1 Buzzer/
Radio Indicator
Speaker
Alarm 2 Buzzer/
Radio Indicator
PM Indicator
Additional Warnings
• The apparatus shall not be exposed to dripping or splashing and that no objects lled
with liquids, such as vases, shall be placed on apparatus.
• Do not place the unit on top of any soft, porous, or sensitive surfaces to avoid
damaging the surface. Use a protective barrier between the unit and surface to
protect the surface.
• This product is supplied with a coin/button cell battery. If the coin/button cell battery
is swallowed, it can cause severe internal burns and can lead to death.
• Keep new and used batteries away from children. If the battery compartment does
not close securely, stop using the product and keep it away from children.
• If you think batteries might have been swallowed or placed inside any part of the
body, seek immediate medical attention.
• Batteries should be recycled or disposed of as per state and local guidelines.
• WARNING: This product may contain chemicals known to the State of California
to cause birth defects, or other reproductive harm (California Prop 65). Wash hands
after handling.
• This product meets and complies with all Federal regulations.
Product specificaties
| Merk: | GPX |
| Categorie: | Radio |
| Model: | C303B |
Heb je hulp nodig?
Als je hulp nodig hebt met GPX C303B stel dan hieronder een vraag en andere gebruikers zullen je antwoorden
Handleiding Radio GPX

18 November 2024
20 Maart 2024
20 Maart 2024
19 Maart 2024
19 Maart 2024
19 Maart 2024
19 Maart 2024
19 Maart 2024
18 Februari 2024
18 Februari 2024
Handleiding Radio
Nieuwste handleidingen voor Radio
1 Juli 2026
30 Juni 2026
30 Juni 2026
30 Juni 2026
29 Juni 2026
29 Juni 2026
29 Juni 2026
26 Mei 2026
22 Mei 2026
22 Mei 2026