Garmin GPSMAP 64 Handleiding
Bekijk gratis de handleiding van Garmin GPSMAP 64 (5 pagina’s), behorend tot de categorie Navigator. Deze gids werd als nuttig beoordeeld door 77 mensen en kreeg gemiddeld 4.3 sterren uit 39 reviews. Heb je een vraag over Garmin GPSMAP 64 of wil je andere gebruikers van dit product iets vragen? Stel een vraag
Pagina 1/5

GPSMAP® 64
Quick Start Manual
February 2014 190-01702-01_0B Printed in Taiwan

Getting Started
WARNING
See the guide in the Important Safety and Product Information
product box for product warnings and other important
information.
Device Overview
ÀInternal GPS/GLONASS antenna
ÁKeys
ÂPower key
ÃMini-USB port (under weather cap)
ÄMCX connector for GPS antenna (under weather cap)
ÅmicroSD™ card slot (under batteries)
ÆBattery compartment
ÇMounting spine
ÈBattery cover D-ring
NOTE: The MCX connector is included on GPSMAP 64s and
GPSMAP 64st models only.
Battery Information
WARNING
The temperature rating for the device may exceed the usable
range of some batteries. Alkaline batteries can rupture at high
temperatures.
Do not use a sharp object to remove batteries.
CAUTION
Contact your local waste disposal department to properly
recycle the batteries.
NOTICE
Alkaline batteries lose a significant amount of their capacity as
the temperature decreases. Use lithium batteries when
operating the device in below freezing conditions.
Installing the NiMH Battery Pack
The device operates using the optional NiMH battery pack
(purchased separately) or two AA batteries ( ).Installing Batteries
1Turn the D-ring counter-clockwise, and pull up to remove the
cover.
2Locate the battery pack À.
3Insert the battery pack, observing polarity.
4Gently press the battery pack into place.
5Replace the battery cover, and turn the D-ring clockwise.
Charging the Battery Pack
NOTICE
To prevent corrosion, thoroughly dry the mini-USB port, the
weather cap, and the surrounding area before charging or
connecting to a computer.
Do not attempt to use the device to charge a battery that was
not provided by Garmin®. Attempting to charge a battery that
was not provided by Garmin can damage the device and void
the warranty.
Before you can connect the straight connector of the USB cable
to your device, you may have to remove optional mount
accessories.
NOTE: The battery will not charge when outside the
temperature range of 32° to 122°F (0° to 50°C).
You can charge the battery using a standard wall outlet or a
USB port on your computer.
1Pull up the weather cap
À from the mini-USB port Á.
2Plug the small end of the USB cable into the mini-USB port.
3Plug the USB end of the cable into the AC adapter or a
computer USB port.
4Plug the AC adapter into a standard wall outlet.
When you connect the device to a power source, the device
turns on.
5Charge the battery completely.
Installing Batteries
The handheld device operates using two AA batteries (not
included). Use NiMH or lithium batteries for best results.
1Turn the D-ring counter-clockwise, and pull up to remove the
cover.
2Insert two AA batteries, observing polarity.
2
3Replace the battery cover, and turn the D-ring clockwise.
4 Hold .
5Select > > .Setup System AA Battery Type
6Select , , , or Alkaline Lithium Traditional NiMH Precharged
NiMH.
Turning On the Device
Hold .
Acquiring Satellite Signals
It may take 30 to 60 seconds to acquire satellite signals.
1Go outdoors to an open area.
2If necessary, turn on the device.
3Wait while the device searches for satellites.
A question mark flashes while the device determines your
location.
4 Select to open the status page.
shows the GPS/GLONASS signal strength.
When the bars are green, the device has acquired satellite
signals.
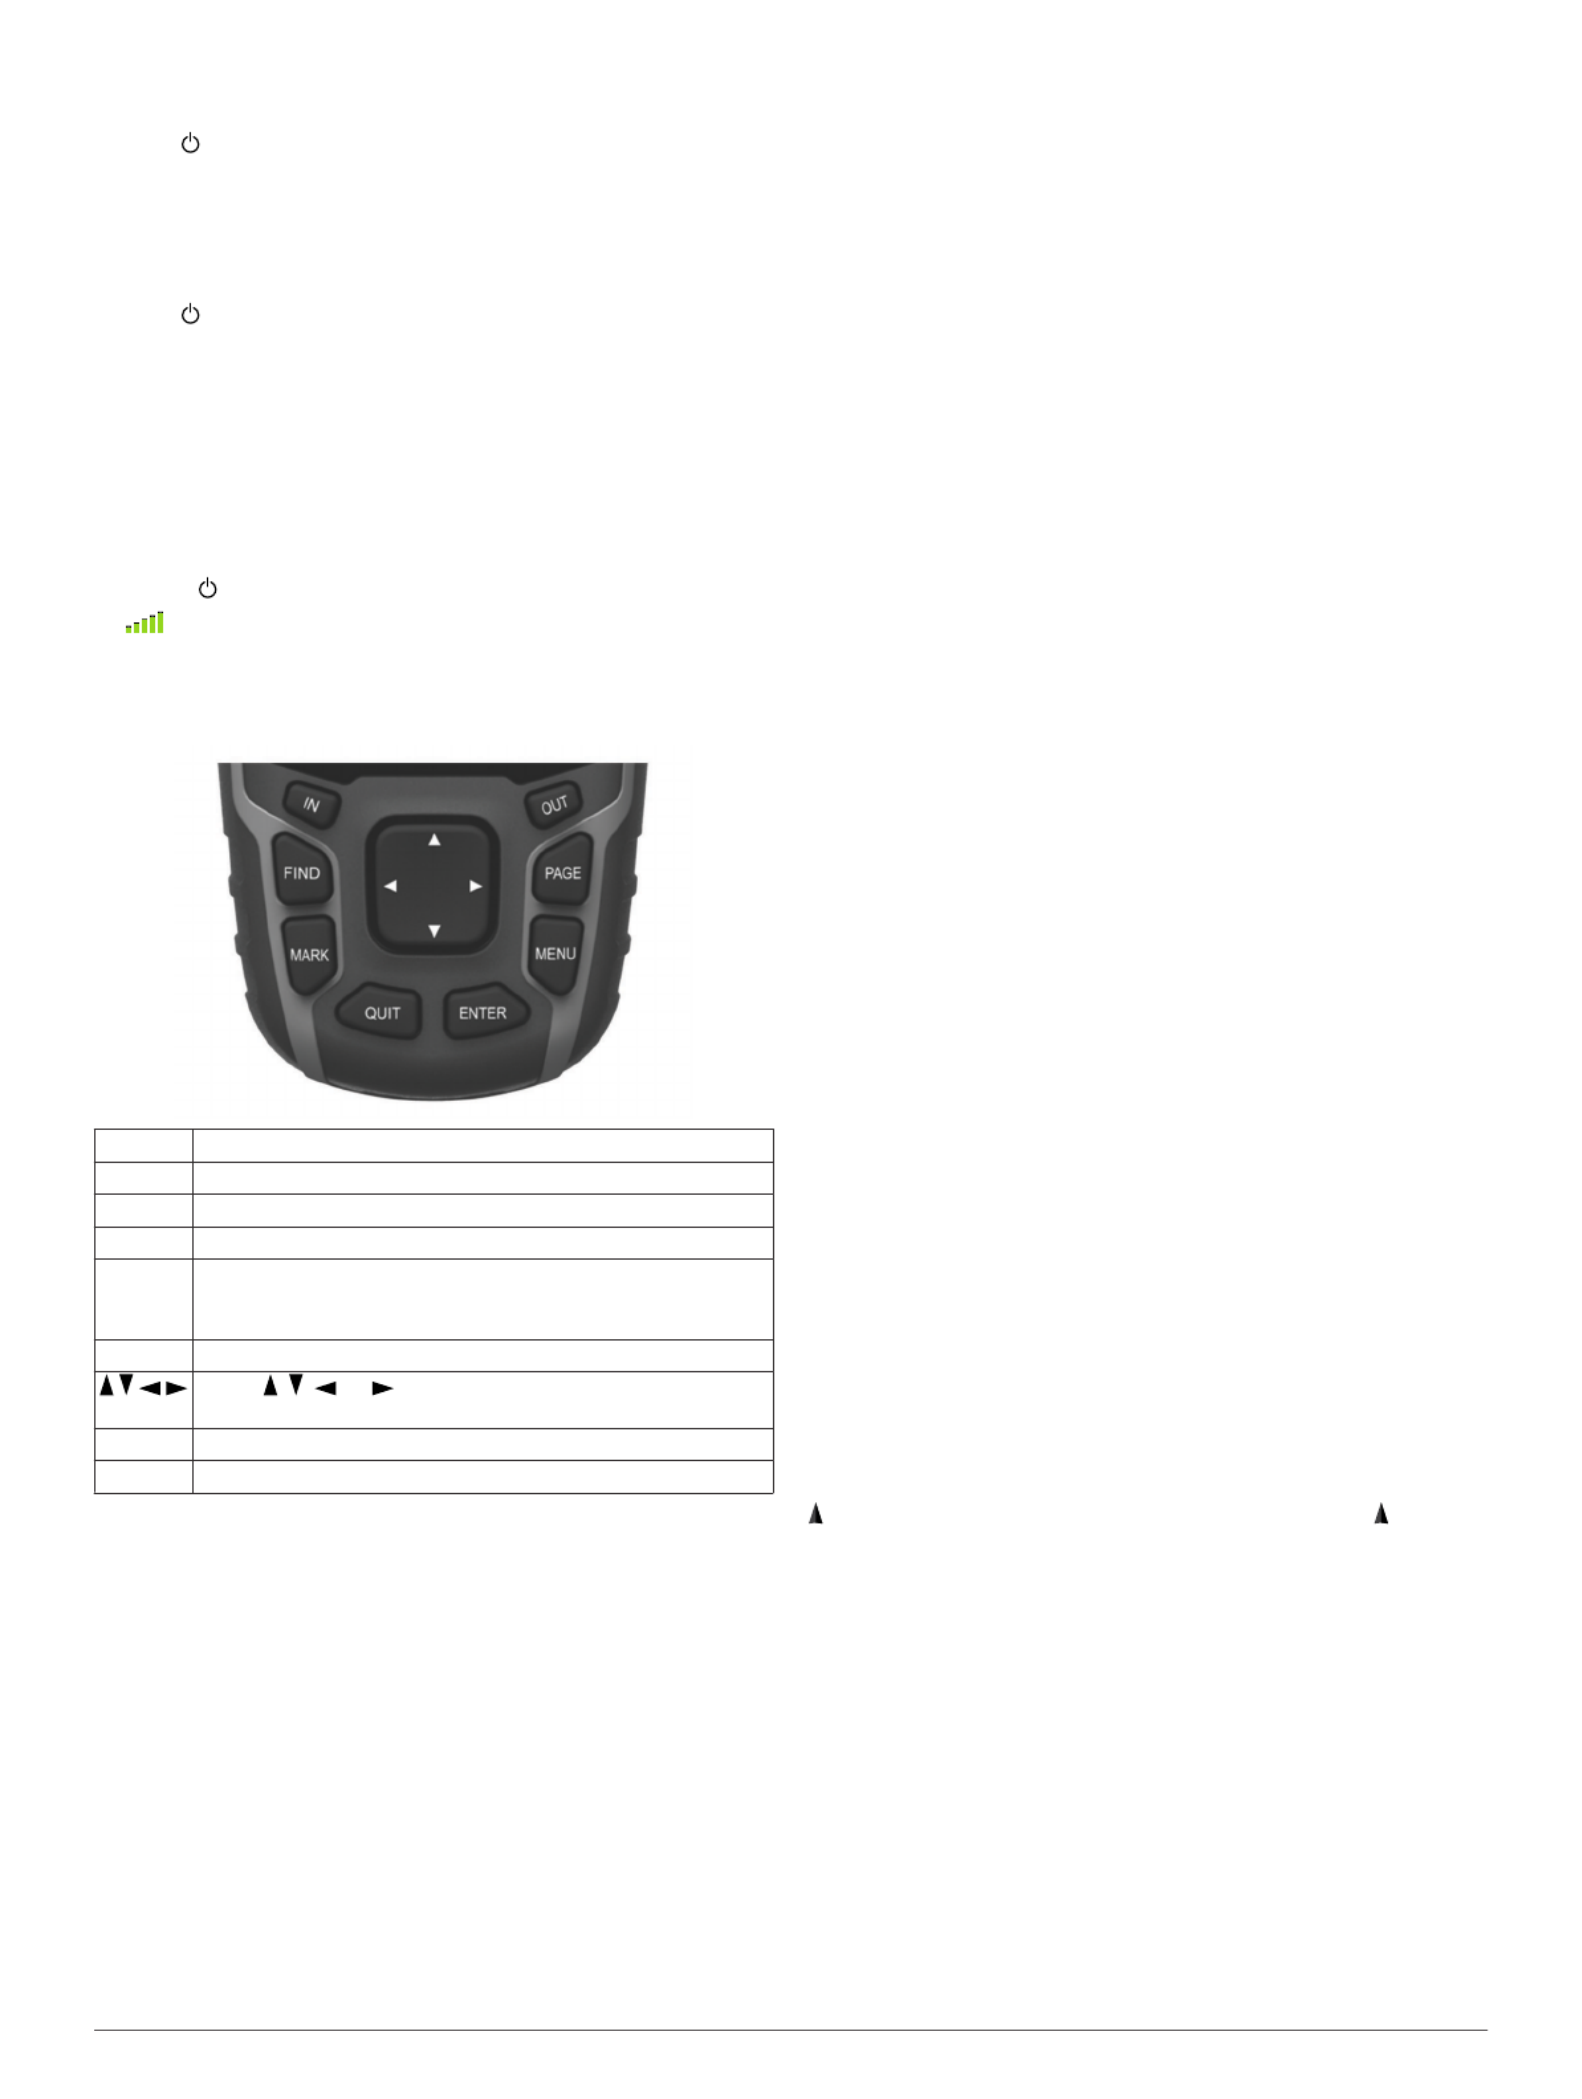
Keys
FIND Select to open the search menu.
MARK Select to save your current location as a waypoint.
QUIT Select to cancel or return to the previous menu or page.
ENTER Select to select options and acknowledge messages.
MENU Select to open the options menu for the page that is
currently open. Select twice to open the main menu (from
any page).
PAGE Select to scroll through the main pages.
Select , , , or to select menu options and move the
map cursor.
IN Select to zoom in on the map.
OUT Select to zoom out on the map.
Navigation
Waypoints
Waypoints are locations you record and store in the device.
Creating a Waypoint
You can save your current location as a waypoint.
1Select .MARK
2If necessary, select a field to make changes to the waypoint.
3Select .Done
Navigating to a Waypoint
1From the main menu, select > .FIND Waypoints
2Select a waypoint.
3Select .Go
Editing a Waypoint
Before you can edit a waypoint, you must create a waypoint.
1Select .Waypoint Manager
2Select a waypoint.
3Select an item to edit, such as the name.
4Enter the new information, and select .Go
Deleting a Waypoint
1Select .Waypoint Manager
2Select a waypoint.
3Select > .MENU Delete
Routes
A route is a sequence of waypoints or locations that leads you
to your final destination.
Creating a Route
1Select > > .Route Planner Create Route Select First Point
2Select a category.
3Select the first point in the route.
4Select .Use
5Select to add additional points to the Select Next Point
route.
6Select to save the route.QUIT
Navigating a Saved Route
Before you can navigate using a saved route, you must create a
route.
1Select > .FIND Routes
2Select a route.
3Select .Go
Tracks
A track is a recording of your path. The track log contains
information about points along the recorded path, including
time, location, and elevation for each point.
Viewing the Current Track
1From the main menu, select > Track Manager Current
Track.
2Select an option:
• To show the current track on the map, select .View Map
• To show the elevation plot for the current track, select
Elevation Plot.
Navigating a Saved Track
Before you can navigate a saved track, you must save a track.
1Select > .FIND Tracks
2Select a saved track.
3Select .Go
Map
represents your location on the map. As you travel, moves
and leaves a track log (trail). Waypoint names and symbols
appear on the map. When you are navigating to a destination,
your route is marked with a colored line on the map.
Changing the Map Orientation
1From the map, select .MENU
2Select > .Setup Map Orientation
3Select an option:
• Select to show north at the top of the page.North Up
• Select to show your current direction of travel at Track Up
the top of the page.
• Select to show an automotive Automotive Mode
perspective with the direction of travel at the top.
Measuring Distance on the Map
You can measure the distance between two locations.
1From the map, select a location.
3
Product specificaties
| Merk: | Garmin |
| Categorie: | Navigator |
| Model: | GPSMAP 64 |
| Kleur van het product: | Black,Orange |
| Gewicht: | 260.1 g |
| Breedte: | 61 mm |
| Diepte: | 36 mm |
| Hoogte: | 160 mm |
| Gebruikershandleiding: | Ja |
| Internationale veiligheidscode (IP): | IPX7 |
| Bluetooth: | Nee |
| Beeldscherm: | TFT |
| Beeldschermdiagonaal: | 2.6 " |
| Resolutie: | 160 x 240 Pixels |
| Touchscreen: | Nee |
| Interne opslagcapaciteit: | 4 GB |
| Electronisch kompas: | Nee |
| Vormfactor: | Handheld |
| Ondersteuning voor plaatsing: | Verticaal |
| Type stroombron: | AC |
| Meegeleverde kabels: | USB |
| Compatibele geheugenkaarten: | MicroSD (TransFlash) |
| Ondersteund aantal accu's/batterijen: | 2 |
| Beeldscherm, aantal kleuren: | 65536 kleuren |
| Levensduur accu/batterij: | 16 uur |
| Opslagmedia-type: | Flash |
| Ingebouwde camera: | Nee |
| Antenne: | Ja |
| Batterijtechnologie: | Lithium-Ion (Li-Ion) |
| Type batterij: | AA |
| Zon & maan informatie: | Ja |
| Jaag/Vis kalender: | Ja |
| Barometrische hoogtemeter: | Nee |
| Outdoor: | Ja |
| Geocaching: | Ja |
| Auto: | Ja |
| Inclusief mappen: | Ja |
| Kaart dekking: | Wereld |
| Foto-navigatie: | Ja |
| Traffic Message Channel (TMC): | Nee |
| Waypoints: | Ja |
| Aantal Waypoints: | 5000 |
| Mogelijkheid om mappen toe te voegen: | Ja |
| Map view opties: | 2D/3D |
| Tracklog: | Ja |
| Area berekening: | Ja |
| Automatische routing: | Ja |
| Aantal tracks: | 200 |
| Getijde tabellen: | Ja |
| Image viewer: | Ja |
| Draadloze gegevensoverdracht naar soortgelijke toestellen: | Ja |
| Aantal nuttige plaatsen: | 10000 |
Heb je hulp nodig?
Als je hulp nodig hebt met Garmin GPSMAP 64 stel dan hieronder een vraag en andere gebruikers zullen je antwoorden
Handleiding Navigator Garmin

10 Maart 2025
10 Maart 2025
10 Maart 2025
9 Januari 2025
7 December 2024

7 December 2024
7 December 2024

15 November 2024

24 September 2024

24 September 2024
Handleiding Navigator
- IZZO Golf
- Eagle
- Cheetah
- Maxcom
- Pyle
- Clarion
- Lowrance
- Motorola
- Insignia
- Chrysler
- TELE System
- Blaupunkt
- Danew
- Lanzar
- Uniden
Nieuwste handleidingen voor Navigator
5 Juli 2025

3 Juli 2025

3 Juli 2025

3 Juli 2025
2 Juli 2025
2 Juli 2025
2 Juli 2025
2 Juli 2025
2 Juli 2025

1 Juli 2025