Elro AS80SR11B Handleiding

Elro Beveiliging AS80SR11B

Lees hieronder de đź“– handleiding in het Nederlandse voor Elro AS80SR11B (5 pagina's) in de categorie Beveiliging. Deze handleiding was nuttig voor 36 personen en werd door 2 gebruikers gemiddeld met 4.5 sterren beoordeeld

Pagina 1/5
1
Strobe
light &
red LED
Control Box –
hidden under
water proof cover
(below)
e
Control
box
cover
r
AS80SR11B
Solar Siren
Installation Instructions
General Introduction
The AS80SR11B is an outdoor siren powered by solar energy and rechargeable
battery. By its visible presence, the external siren indicates that an alarm system is
installed and deters intruders. In case of intrusion, it alerts the neighborhood by its
powerful 110 decibels piercing sound and a flashing red light
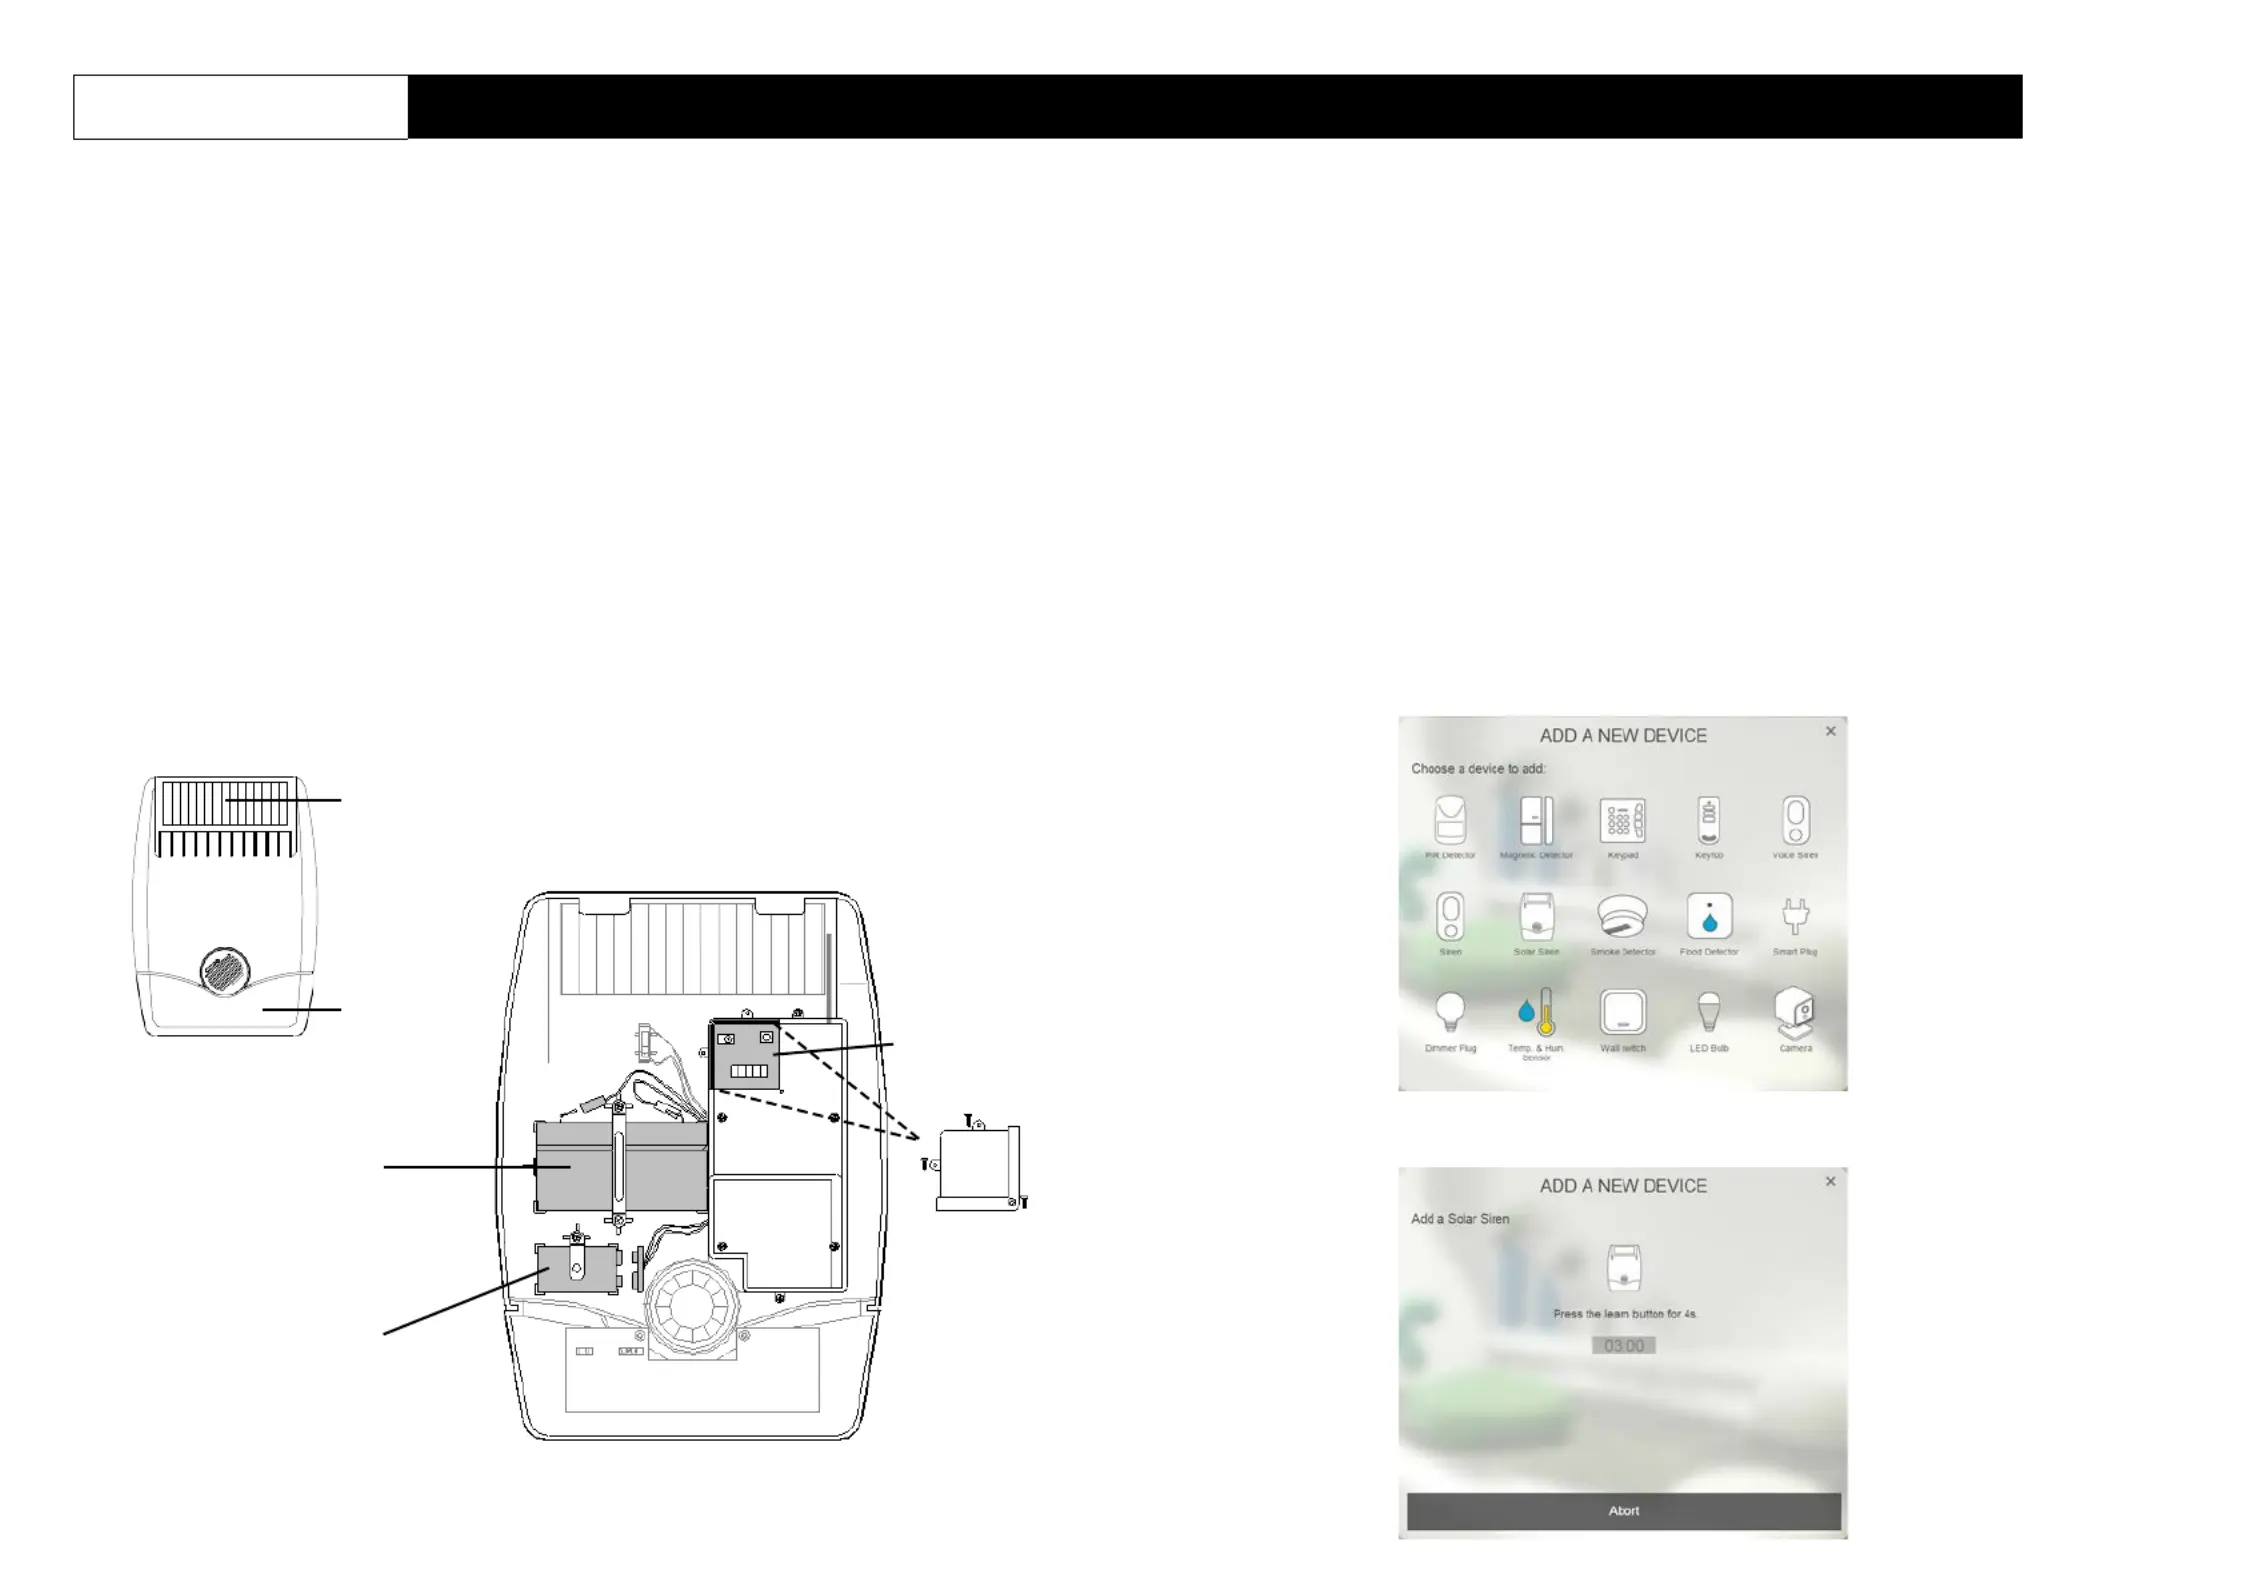
Product Overview
FRONT VIEW
Binding
1.
Open up the siren by removing the fixing screw from the bottom edge and carefully
peeling off the back cover. All electronic components are housed within the front
cover.
2.
A 9V Alkaline battery is supplied to boost the initial power to the unit when it is first
activated until the Solar Panel charges the main battery. Locate the battery clips of
this 9V battery but do not connect it up yet.
3.
Log into the ELRO Smart Home Alarm account from a web browser.
4.
Select “System”.
5.
Select “Add a New Device”, then “Solar Siren”.
Solar Panel
6V 1.2Ahr
rechargeabl
battery
9V initial powe
up battery
INSIDE VIEW OF SIREN MAIN BODY
(BACK COVER REMOVED)
6.
The following screen will appear. This means the gateway is entering binding mode.
2
7.
Connect the 9V battery to its battery clips to power up the siren.
8.
The screen below will appear in 10 seconds if the process is successful.
Note: Time-out will occur if the binding process was unsuccessful. Please refer to
the “Manual Binding” in the Troubleshooting section.
9.
Next connect the main rechargeable battery to the charging leads. Connect the
Red lead to the Red (+ve) terminal and the Black lead to the Black (-ve) terminals.
10.
The siren is now ready however do not refit the back cover just yet.
Operation & Testing
IMPORTANT: The loud sound level produced by this device will be deafening and
cause discomfort to the ear. Place the siren outdoors and do not stand in close
proximity to the siren.
Note: It is strongly advised to have the keyfob or keypad ready to quickly Disarm
the system to turn off the siren.
1.
Assemble the back cover back to the main body without screwing the fixing screw
at the bottom.
2.
Place the siren facing up on a flat surface so that the protruding tamper switch is
pressed.
3.
Set the system to Arm mode and trigger the alarm. The siren will emit a loud
piercing sound and the strobe light will flash brightly.
4.
Quickly disarm the system to stop the siren.
Mounting
The Siren should be mounted:
-
as high as possible in a prominent position so that it can be easily seen and heard.
-
on a flat surface so that the rear tamper switch is not easily activated. Ensure also
that the tamper switch does not fall into the recess between brick courses as this
could prevent the switch from closing and give a permanent tamper signal.
-
ideally on a south facing wall to receive optimum amount of sunlight, but an east or
west facing wall will also suffice. Avoid mounting on a north facing wall, and avoid
shadows cast by neighboring walls, trees, and roof overhangs.
-
at least 1 meter away from any external or internal metalwork which can affect its
radio transmission.
Installation
To install the siren on the wall, first affix its back cover on the wall and then followed by
mounting its main body onto the back cover.
3
1.
Remove the back cover again. Using the back cover itself as a template, position
the back cover on the wall and mark the positions of four mounting holes.
2.
Drill four 6mm holes and insert the wall plugs.
3.
Fit two 30mm fixing screws in the top holes leaving approximately 10mm of the
screw protruding.
4.
Place the top keyhole slots of the back cover over the screw heads. Adjust the
back cover position and adjust the screws until they form a neat fit with minimal
movement.
5.
Secure the back cover in position using the two 25mm fixing screws at the bottom.
Fit two 30mm fixing screws in
the top holes leaving
approximately 10mm of the
screw protruding
Secure back cover using
two 25mm fixing screws at
the bottom
6.
Before mounting the main body, ensure the waterproof cover of the Control box
has been secured back if it was removed earlier.
10.
To mount the main body, hinge the front cover tabs over the top edge of the back
cover and carefully push the base of the siren cover into place. Secure the main
body in place by refitting the fixing screw in the bottom edge of the cover. Do not
over tighten the screw as this could damage the thread.
IMPORTANT: Ensure that the rear tamper switch is closed when the main body is
fitted (i.e. listen for the switch to click). If the switch does not close, this will prevent
the Siren from operating correctly. If necessary, remove the main body again and
adjust the screw on the back cover tamper plunger to ensure the switch closes
when the siren is secured in position.
11.
Upon completion of mounting the main body on the wall, the Strobe LED will flash
about 3 seconds as an indication of normal operation.
Troubleshooting
The troubleshooting table lists some possible causes and solutions. Please contact
your original retailer or nearest service center if the below solutions cannot solve your
problem.
Symptom
Cause of Failure
Recommendation
LED cannot be
displayed
1.
Run out of battery
power.
2.
Check if reverse
battery polarity.
3.
Siren is out of order.
1.
Replace a new battery.
2.
Refit the battery with correct
polarity.
3.
Do not open the device and
send it for repairs.
The LED on the
siren is operating,
but it cannot be
operated
1.
Check if siren has
completed binding
with Homesys
Gateway
2.
The siren cannot
communicate with
the gateway.
Remove both the battery and
follow the steps for binding
with ELRO Smart Home Alarm
1.
Locate the siren closer to the
gateway.
Back
Cover


Product specificaties

Merk: Elro
Categorie: Beveiliging
Model: AS80SR11B

Heb je hulp nodig?

Als je hulp nodig hebt met Elro AS80SR11B stel dan hieronder een vraag en andere gebruikers zullen je antwoorden


Handleiding Beveiliging Elro

Handleiding Beveiliging

Nieuwste handleidingen voor Beveiliging