Edelkrone Action Module Handleiding
Edelkrone
Niet gecategoriseerd
Action Module
Bekijk gratis de handleiding van Edelkrone Action Module (5 pagina’s), behorend tot de categorie Niet gecategoriseerd. Deze gids werd als nuttig beoordeeld door 48 mensen en kreeg gemiddeld 4.6 sterren uit 24.5 reviews. Heb je een vraag over Edelkrone Action Module of wil je andere gebruikers van dit product iets vragen? Stel een vraag
Pagina 1/5

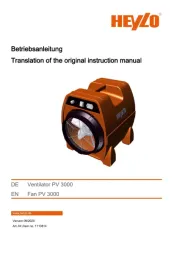
ACTION MODULE
USER’S MANUAL
Before operating your edelkrone,
please watch the users manual video.
TABLE OF CONTENTS
WHAT’S IN THE BOX & THE BASICS.
MOUNTING YOUR ACTION MODULE TO YOUR SLIDERPLUS
CAUTIONS AND TIPS
WIZARD MODE
MACRO MODE
PHOTO TIMELAPSE MODE
VIDEO TIMELAPSE MODE
STOP MOTION MODE
1.
2.
3.
4.
5.
6.
7.
8.
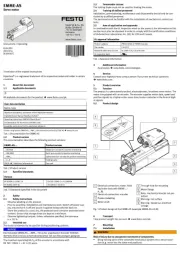
1. WHAT’S IN THE BOX & THE BASICS
1
72
3
4
6
5
8
9
11
10 12
13
Action Module
Control button
Screen
On/O switch
Shutter trigger port
1/
2/
3/
4/
5/
6/
7/
8/
9/
10/
DC socket
AC-DC adaptor*
Motion control belt
Battery bracket
Allen wrench
11/
12/
13/
Shutter trigger cable*
Attachment screws
Battery bracket screws
*Shutter trigger cable sold separately.
*The shape of the plug adapter varies with the country or region

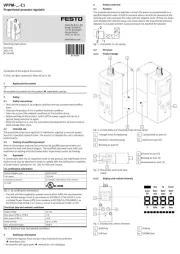
2. MOUNTING YOUR ACTION MODULE TO YOUR SLIDERPLUS
1
1/
2/
3/
2
4
3
Attach the belt
Place the action module to its position
Place the screws to their positions
4/
Detailed video explaining how to attach this belt and mountaing details can be found
from : manuals.edelkrone.com
If the action module is going to be
powered by batteries, place the battery
bracket to its position & attach the
screws
3. CAUTIONS & TIPS
During inclined operations, you may need to
assist the slider movement with your hands
by carrying the weight of your equipment.
Action module only assists the momentum
of the movement to smoothen your shot. Do
not take your
hands o your camera for the safety of your
equipment.
Do not slide too fast in order to prevent
skipping on the belt.
Do not attempt to move the slider by hand
except when using wizard mode.
Do not attempt to operate the slider when
Action is mounted to SliderPLUS even when
the unit is powered o.
When Action is set to recording mode, do
not apply excessive speed to the unit.
Use fully charged batteries or ac-dc adaptor
to get better results.
Do not attempt to disassemble the module.
This will void your warranty.
Before operating your product, please watch the users manual videos from the link:
manuals.edelkrone.com

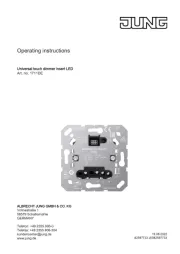
6. ”PHOTO TIME LAPSE MODE”
If you are a DSLR / mirrorless user, you could perform time lapse shots with the help of the Photo Time Lapse Mode. Attach the
trigger cable, select the mode and follow these steps. If Action Module is not on Photo Time Lapse Mode, turn o the device
and turn it on again to be able to choose Photo Time Lapse Mode.
1. Use buttons to move your cameraLEFT/RIGHT
to the end point position. By choosing same end and
start points you could perform Steady Time-Lapse.
Use buttons to move your camera2. LEFT/RIGHT
to the start point position.
GET ME TO MY END POINT!
8. Push buttons to choose UP/DOWN
when to start. Now, or set a countdown.
6. Set up your camera’s shutter speed according to
value on the screen in order to prevent slide overlaps.
9. The system will start begin the countdown to your
time lapse.
10.1. While in operation, pushing buttonsLEFT/RIGHT
shows the information of percentage completed and
continues as.
4. Push buttons to set your frame UP/DOWN
rate.
WHAT SHOULD BE OUR FINAL VIDEO FPS?
EASE IN OUT OPTION
TIMELAPSE STARTS IN
SHOW ME WHERE TO START!
10.2. The duration of the nal video so far.
% COMPLETE
10.3. Elapsed time so far
FINAL VIDEO DURATION SO FAR TIME ELAPSED
3. Push buttons to set duration of timeUP/DOWN
lapse.
HOW LONG ARE WE HERE FOR?
DON’T EXCEED SHUTTER SPEED OF
10.5. Pause the process and it will memorize where
it paused.
10.4. Remaining time to nish.
TIME REMAININGPAUSE?
5. Push buttons to set your UP/DOWN
nal video duration.
WHAT SHUOLD BE OUR FINAL VIDEO DURATION?
7. Push buttons to enable/disable ease LEFT/RIGHT
in/out option.
In this mode use left/right control buttons to move the camera.
To go back to previous question press OK and wait 3 secs.
Action Module can perfom time lapses up to 365 days. Be prepared the unit by either hot
swapping or using an AC-DC adapter.
WHEN SHALL WE GET STARTED?
Before operating your product, please watch the users manual videos from the link:
manuals.edelkrone.com
Product specificaties
| Merk: | Edelkrone |
| Categorie: | Niet gecategoriseerd |
| Model: | Action Module |
Heb je hulp nodig?
Als je hulp nodig hebt met Edelkrone Action Module stel dan hieronder een vraag en andere gebruikers zullen je antwoorden
Handleiding Niet gecategoriseerd Edelkrone

17 November 2024

17 November 2024

29 Mei 2024

29 Mei 2024

5 Juli 2023

4 Juli 2023

4 Juli 2023

4 Juli 2023

3 Juli 2023

2 Juli 2023
Handleiding Niet gecategoriseerd
- Sabco
- DMT
- Marshall
- Omron
- OptiTrack
- Medivon
- Cisco
- Genius
- Seenergy
- Truma
- Tesla
- Televés
- TAURUS Titanium
- Macally
- Make Noise
Nieuwste handleidingen voor Niet gecategoriseerd

2 Augustus 2025

2 Augustus 2025
2 Augustus 2025

2 Augustus 2025

2 Augustus 2025
2 Augustus 2025
2 Augustus 2025
2 Augustus 2025
2 Augustus 2025

1 Augustus 2025