CTA Digital PAD-PARAFDC Handleiding
CTA Digital Niet gecategoriseerd PAD-PARAFDC
Bekijk gratis de handleiding van CTA Digital PAD-PARAFDC (3 pagina’s), behorend tot de categorie Niet gecategoriseerd. Deze gids werd als nuttig beoordeeld door 40 mensen en kreeg gemiddeld 4.2 sterren uit 2 reviews. Heb je een vraag over CTA Digital PAD-PARAFDC of wil je andere gebruikers van dit product iets vragen? Stel een vraag
Pagina 1/3
Premium Locking Floor Stand Kiosk w/
Digital Password Combination Security Enclosure
PAD-PARAFDC
INSTRUCTION - MANUAL
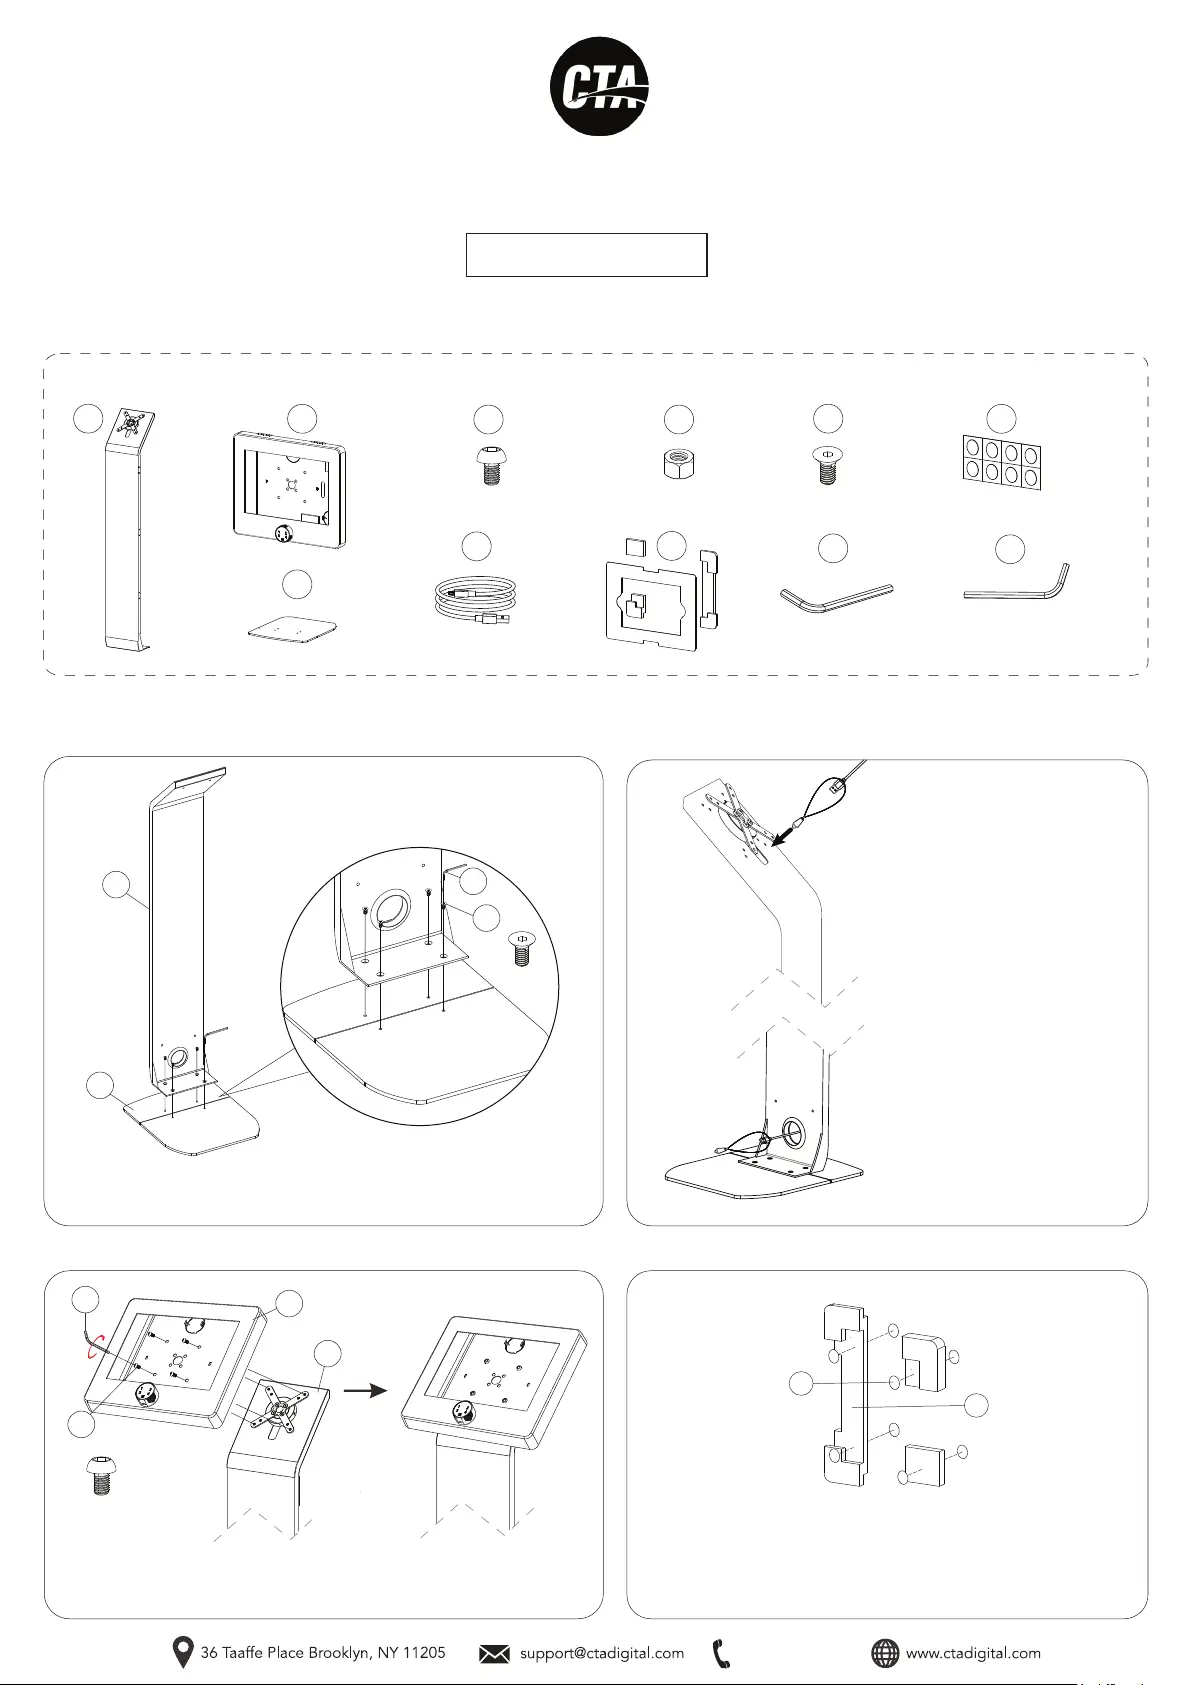
CONTENTS:
INSTALLATION:
1. Assembling floorstand base :
A
J
x1
M5 Allen Key
3. Attaching enclosure to VESA plate :
1A. Allign the holes on the sntad (A) with holes on the base (B) and turn
in screws (F) with provided allen tool (K) until securely tightened. Shown
above.
2B. When the cable reaches the
bottom of the stand, pull through
the hole at the stand back and
remove the weighted pendant
as shown.
2A. To route a charge cable
through the stand, attach the
weighted pendant to your
charge cable, then pass through
the cutout at the top of the
stand.
3A. Align enclosure (C) VESA holes to VESA plate holes in stand (A) and
from the front of enclosure turn in screws (D) into the threaded VESA
holes with provided allen tool (J) until securely thigtened. Shown above.
C
x1
E
x4
M5 NutM5 x 10
D
x4
M5 x 10
x4
B
x1
x1
K
x1
M6 Allen Key
x1
I
M6 p1-x4
F
x4
M6
2. Cable routing :
C
A
J
A
B
F
K
D
G
I
4. Setting up the foam adapters :
4A. Identify the double sided adhesives (G). Peel away the backing on
both sides. Adhesive four of them behind the foam pieces (I) as
illustrated. They are to adhese the foam to the enclosure. Peel away
the back on the next four and place them on top of the foam pieces as
illustrated. These are to attach the foam to the tablets and ensure
security.
x1
H
x1
G
888-733-4448
Product specificaties
| Merk: | CTA Digital |
| Categorie: | Niet gecategoriseerd |
| Model: | PAD-PARAFDC |
| Kleur van het product: | Zwart |
| Gewicht: | 15512 g |
| Breedte: | 307.34 mm |
| Diepte: | 259.08 mm |
| Hoogte: | 50.8 mm |
| Snoerlengte: | 0.45 m |
| Montagewijze: | Vloer |
| Materiaal: | Staal |
| Merkcompatibiliteit: | Apple |
| Breedte van de standaard: | 406.4 mm |
| Diepte van de standaard: | 342.9 mm |
| Hoogte van de standaard: | 1270 mm |
| Verbeterd kabelbeheer: | Ja |
| Maximale schermgrootte: | 11 " |
| Minimale schermgrootte: | 9.7 " |
| Slot type: | Sleutel |
Heb je hulp nodig?
Als je hulp nodig hebt met CTA Digital PAD-PARAFDC stel dan hieronder een vraag en andere gebruikers zullen je antwoorden
Handleiding Niet gecategoriseerd CTA Digital

22 Juni 2026
22 Juni 2026
22 April 2026
22 April 2026
19 April 2026
26 Maart 2026
26 Maart 2026
26 Maart 2026
25 Maart 2026
25 Maart 2026
Handleiding Niet gecategoriseerd
Nieuwste handleidingen voor Niet gecategoriseerd
22 Juni 2026
22 Juni 2026
22 Juni 2026
22 Juni 2026
22 Juni 2026
22 Juni 2026
22 Juni 2026
22 Juni 2026
22 Juni 2026
22 Juni 2026