Conair CLS1X Handleiding
Conair Niet gecategoriseerd CLS1X
Bekijk gratis de handleiding van Conair CLS1X (2 pagina’s), behorend tot de categorie Niet gecategoriseerd. Deze gids werd als nuttig beoordeeld door 246 mensen en kreeg gemiddeld 4.8 sterren uit 8 reviews. Heb je een vraag over Conair CLS1X of wil je andere gebruikers van dit product iets vragen? Stel een vraag
Pagina 1/2
IMPORTANT SAFETY
INSTRUCTIONS
THE APPLIANCE MUST
NOT COME INTO CONTACT
WITH WATER.
DO NOT USE
ON DAMP TEXTILES!
The fabric shaver might damage structured
textiles or very soft materials such as Angora
wool. Always test on an area that is not vis-
ible on the item you want to treat. In testing,
set the distance ring to the highest level.
OPERATING
INSTRUCTIONS
1. Put the item you want to treat on an
even surface.
2. Turn the distance ring to the appropri-
ate position or remove the ring entirely,
depending on the distance required.
3. Switch the unit ON.
4. Without applying pressure, run the shaver
head lightly over the parts you wish to
remove the fuzz from. Fuzz will accumu-
late in the fuzz collector.
5. After use, switch the unit OFF.
IMPORTANT: Empty the fuzz collector regu-
larly and before it becomes overfilled, which
can cause the unit to slow down or stop. If
unit slows or stops, check and empty fuzz
collector prior to replacing the batteries.
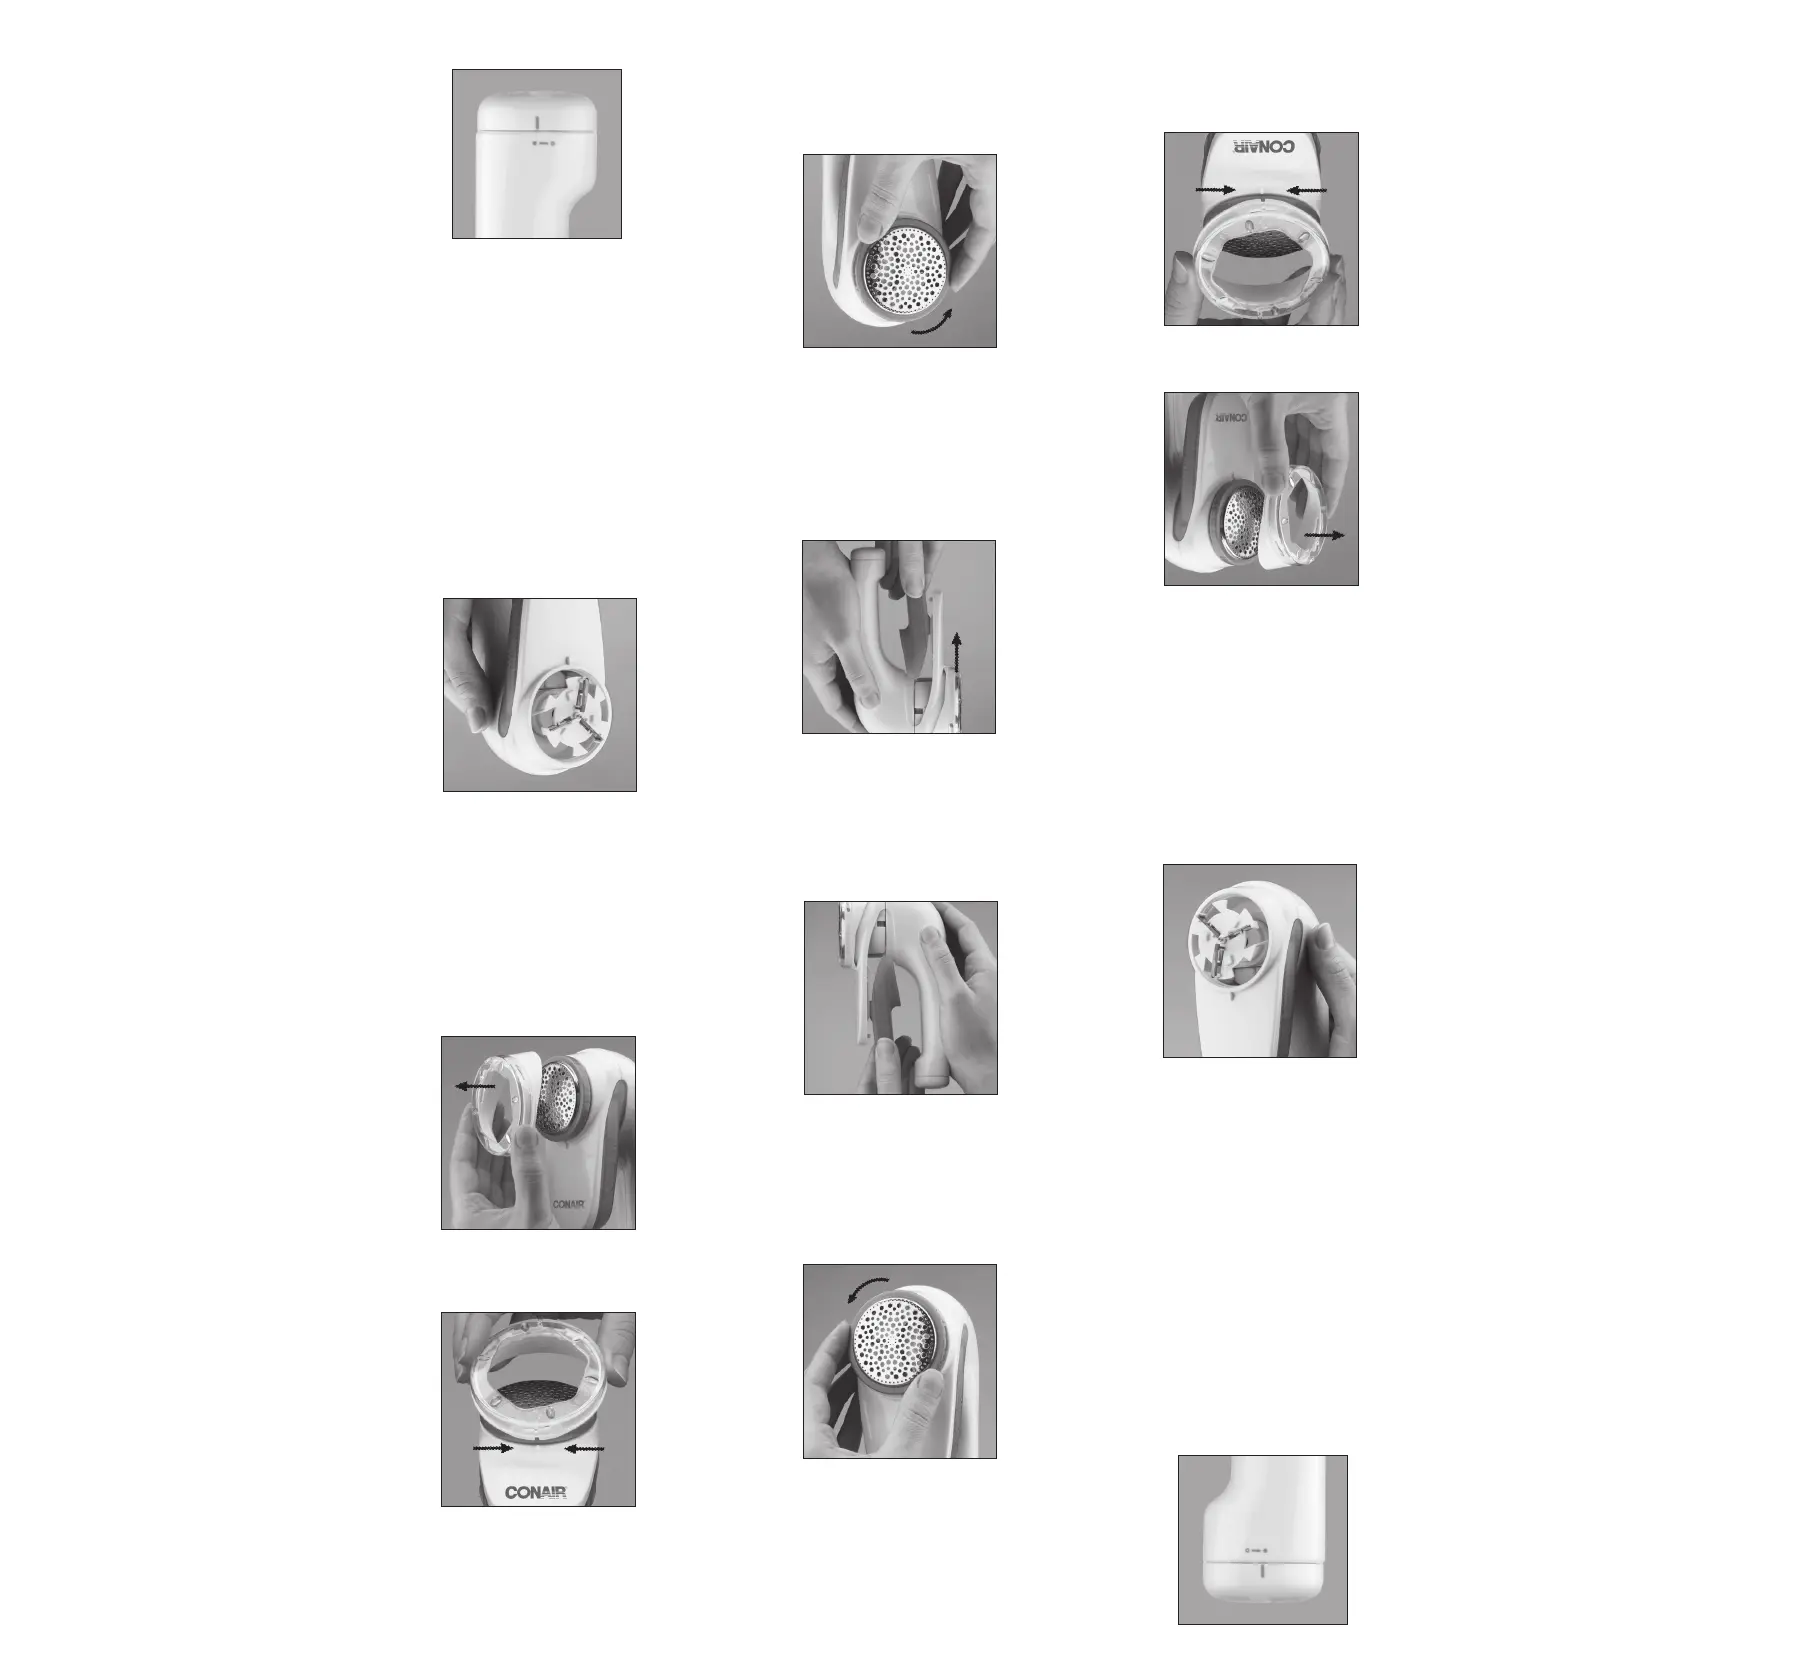
REMOVING AND FITTING
THE DISTANCE RING
TO REMOVE: Grasp both sides of the
ring and pull it off the unit in the direction
of the arrow.
TO FIT: Push the distance ring onto the
unit so that the recess on the distance ring
engages the lug on the body of the shaver.
This ensures that the distance ring does not
twist when you adjust it.
EMPTYING THE FUZZ COLLECTOR
Slide the fuzz collector downward and out of
the unit.
Empty the collector and slide it straight into
the unit until it engages audibly.
CLEANING THE FABRIC SHAVER
AND SHAVER HEAD
1. Remove the batteries from the appliance.
2. Remove the distance ring and turn the
shaver head counterclockwise to remove it.
INSTRUCTIONS FOR
USING BATTERIES
• Always purchase the correct size and grade
of battery most suitable for the intended use.
• Replace all batteries at the same time.
• Do not mix old and new batteries.
• Do not mix alkaline, standard (carbon-zinc)
or rechargeable (nickel-cadmium) batteries.
• Clean the battery contacts as well as those
of the device prior to battery installation.
• Ensure that the batteries are installed
correctly with regard to polarity (+ and -).
• Remove batteries from equipment that is
not to be used for an extended period of time.
• Remove depleted batteries promptly.
DISPOSAL OF BATTERIES
When replacing the batteries, make sure you
dispose of the old batteries in accordance
with applicable regulations. They should
be disposed of in a location specifically
designated for that purpose so they can be
recycled safely without posing any risk to the
environment. Do not burn or bury them.
3. Brush out residual fuzz with any small clean-
ing brush. CAUTION: Blades are extremely
sharp and can be damaged easily.
4. Reattach the shaver head and fit the
distance ring.
If necessary, wipe off the unit casing with a
slightly dampened cloth.
INSERTING BATTERIES
Open the battery compartment by sliding the
mark on the battery compartment lid against
the marking arrow on the handle to
°
and
lift it off. Insert the two (2) AA batteries (not
included) so that the +/- terminals on each
battery match the markings in the battery
compartment. Place the battery cover back
on and then turn it in the direction of
•
until
it engages audibly.
MEDIDAS DE
SEGURIDAD
IMPORTANTES
ESTE APARATO NO
DEBE TENER CONTACTO
CON AGUA.
¡NO LO USE EN
PRENDAS HÚMEDAS!
El quitapelusas puede dañar los tejidos con
textura y los tejidos muy suaves, tales como
la lana angora. Siempre haga una prueba en
un área discreto de la prenda. Ajuste el anillo
regulador de distancia a la posición más
larga antes de hacer la prueba.
INSTRUCCIONES
DE OPERACIÓN
1. Coloque la prenda sobre una
superficie plana.
2. Gire el anillo regulador de distancia hasta
la posición deseada, o retírelo si desea.
3. Encienda (ON) el aparato.
4. Pase el cabezal del quitapelusas
lentamente por encima de la tela, sin
presionar; las pelusas se acumularán en el
depósito de pelusas.
5. Después del uso, apague (OFF) el aparato.
IMPORTANTE: vacíe el depósito de pelusas a
menudo, antes de que esté lleno, porque esto
puede hacer que el aparato pierda velocidad
o se detenga. Si el aparato pierde velocidad
o se detiene, vacíe el depósito de pelusas.
Si esto no soluciona el problema, cambie
las pilas.
CÓMO RETIRAR/AJUSTAR EL
ANILLO REGULADOR DE DISTANCIA
REMOCIÓN: agarre el anillo por los costados
y jale en dirección de la flecha.
AJUSTE: instale el anillo regulador de
distancia sobre el cabezal, haciendo coincidir
la ranura en el anillo con la protuberancia
en la carcasa del aparato. Esto evita que la
distancia cambie durante el uso.
CÓMO LIMPIAR EL
DEPÓSITO DE PELUSAS
Deslice el depósito de pelusas hacia
abajo para retirarlo.
Vacíe las pelusas. Vuelva a instalar el
depósito, deslizándolo hacia arriba hasta
que haga clic y quede firme en su lugar.
LIMPIEZA DEL QUITAPELUSAS
Y DEL CABEZAL
1. Retire las pilas del aparato.
2. Quite el anillo regulador de distancia
y gire el cabezal en sentido antihorario
para retirarlo.
INSTRUCCIONES ESPECIALES
ACERCA DEL USO DE LAS PILAS
• No utilice pilas que no sean del tamaño o
de la potencia indicada para uso con este
aparato.
• Cambie todas las pilas al mismo tiempo.
• No junte pilas nuevas con pilas usadas.
• No junte pilas alcalinas con pilas regulares
(carbón-zinc) o pilas recargables (níquel
cadmio).
• Limpie los contactos del aparato y los de
la(s) pila(s) antes de instalar ésta(s).
• Siempre respete los signos de polaridad
(+/-) al instalar la(s) pila(s).
• Retire las pilas si no va a usar el aparato
durante un largo período de tiempo.
• Retire las pilas usadas sin demora.
RECICLAJE DE LAS PILAS
Deseche las pilas usadas conforme a las
leyes vigentes. Las pilas se deben tirar en
un lugar específicamente designado para tal
efecto, para que sean recicladas de manera
segura y respetando al medio ambiente. No
las queme ni las entierre.
3. Quite las pelusas con un pequeño cepillo
de limpieza. PRECAUCIÓN: las hojas son
muy filosas y pueden dañarse fácilmente.
4. Vuelva a instalar el cabezal y el anillo
regulador de distancia.
Limpie la carcasa del aparato con un paño
ligeramente húmedo si es necesario.
INSTALACIÓN DE LAS PILAS
Gire la tapa del compartimiento de las pilas
hasta que la flecha coincida con la marca
°
.
Retire la tapa para abrir el compartimiento.
Inserte 2 pilas “AA” (no incluidas) en el
compartimiento, respetando los signos de
polaridad +/-. Cierre la tapa, girando hacia la
marca
•
hasta que haga clic.
Product specificaties
| Merk: | Conair |
| Categorie: | Niet gecategoriseerd |
| Model: | CLS1X |
Heb je hulp nodig?
Als je hulp nodig hebt met Conair CLS1X stel dan hieronder een vraag en andere gebruikers zullen je antwoorden
Handleiding Niet gecategoriseerd Conair

5 November 2025
15 Augustus 2025
4 Juli 2025
10 December 2024
10 December 2024
10 December 2024
20 November 2024
20 November 2024
20 November 2024
20 November 2024
Handleiding Niet gecategoriseerd
Nieuwste handleidingen voor Niet gecategoriseerd
8 Juni 2026
8 Juni 2026
8 Juni 2026
7 Juni 2026
7 Juni 2026
7 Juni 2026
7 Juni 2026
7 Juni 2026
6 Juni 2026
6 Juni 2026