Celestron Labs CM1000C Handleiding
Celestron Miscroscoop Labs CM1000C
Bekijk gratis de handleiding van Celestron Labs CM1000C (20 pagina’s), behorend tot de categorie Miscroscoop. Deze gids werd als nuttig beoordeeld door 68 mensen en kreeg gemiddeld 4.2 sterren uit 8 reviews. Heb je een vraag over Celestron Labs CM1000C of wil je andere gebruikers van dit product iets vragen? Stel een vraag
Pagina 1/20
English
Congratulations on your Celestron Labs
microscope purchase. Your new Celestron
Labs microscope is a precision optical
instrument, made of the highest quality
materials to ensure durability and long
life. It is designed to give you a lifetime of
enjoyment with minimal maintenance.
This CL-CM1000C microscope provides
powers from 40x up to 1000x. It is ideal for
examining specimen slides of yeasts and
molds, cultures, plant and animal parts,
fibers, bacteria, etc.
Before attempting to use your Celestron
Labs microscope, please read these
instructions to familiarize yourself with
the parts and functions of the microscope.
Refer to the microscope diagrams to locate
the parts discussed in the manual. The final
section of the manual provides simple care
and maintenance tips.
IN THE BOX
- Microscope CM1000C
- 3 objective lenses: 4x, 10x, 40x
(spring-loaded)
- 2 Eyepieces: 10x, 25x
- AC Adapter
- 10 Prepared Slides
- 3 AA Batteries
- Dust Cover
- Hex Key
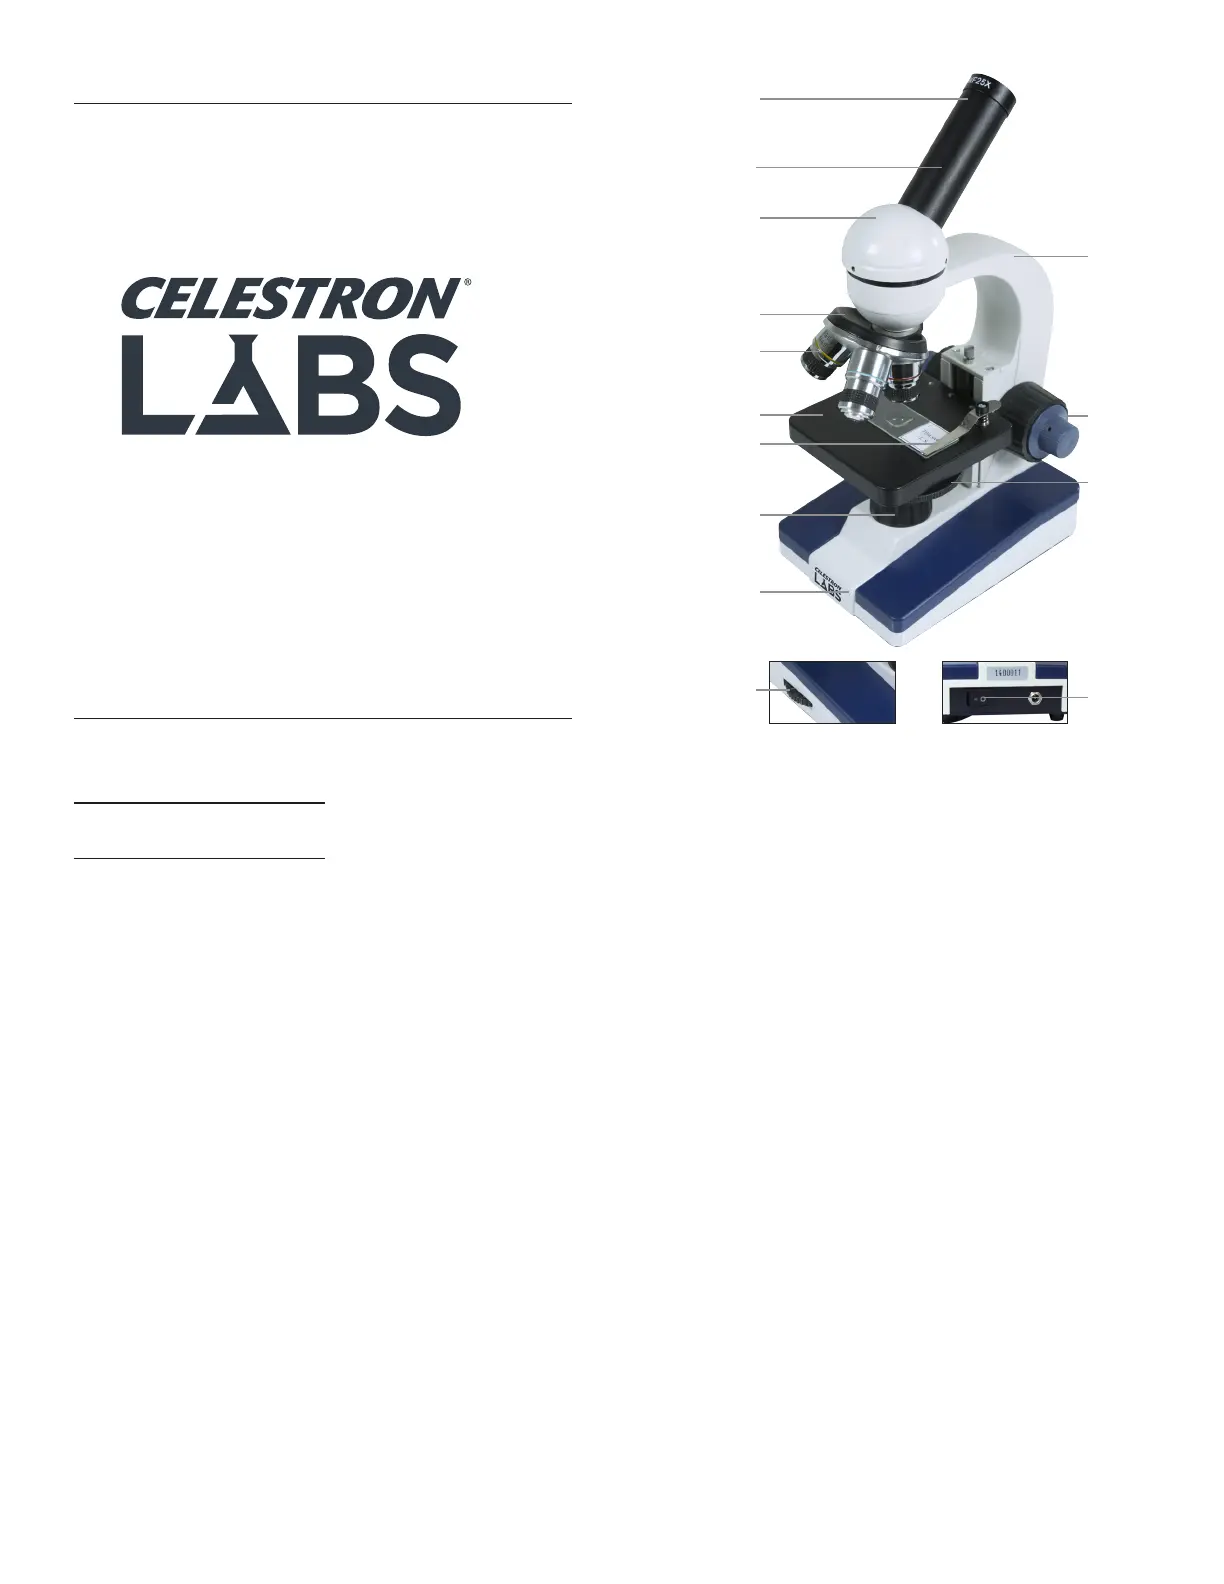
PARTS
1. Eyepiece
2. Eyepiece Tube
3. Head
4. Nosepiece
5. Objective Lens
6. Stage
7. Stage Clips
8. Illuminator
9. Base
10. Illuminator Adjustment
11.Arm
12. Coaxial Focus Knob
13. Disc Diaphragm
14. Power Switch
SPECIFICATIONS
STAGE: Plain Stage with Clips –
3.5 in x 3.5 in (88 mm x 88 mm)
HEAD: 360° rotatable monocular with 45°
incline
MAGNIFICATIONRANGE: 40x to 1000x
FOCUSER: Coaxial, coarse/fine focus knob
OBJECTIVES: 4x, 10x, 40x
EYEPIECES: WF 10x, WF 25x
NOSEPIECE: Triple with click stop
ILLUMINATOR: LED, adjustable
CONDENSER: N.A. 0.65
DIAPHRAGM: Disc diaphragm with 6
aperture sizes
DIMENSIONS: 4.6 in x 6.3 in x 12.0 in
(117 mm x 160 mm x 305 mm)
WEIGHT: 3 lbs.- 14 oz / 1.76 kg
MAGNIFICATION TABLE
Use the following table to determine
magnification using your microscope’s
different eyepiece/objective lens
combinations.
OBJECTIVE LENS:
4x 10x 40x
WF 10X EYEPIECE:
40x 100x 400x
WF 25X EYEPIECE:
100x 250x 1000x
SETTING UP YOUR
MICROSCOPE
1. Remove the Styrofoam container from
the carton.
2. Carefully remove the microscope and
accessories from container and set them
on a table, desk, or other flat surface.
3. Remove bag coverings from microscope.
4. Remove cap from eyepiece tube (2).
5. Remove the eyepieces from plastic bags.
6. Insert the 10x eyepiece into the eyepiece
tube (2).
7. Plug the AC adapter into the socket on
the back of the base (9).
8. Insert the plug end of the AC adapter
into the proper power source.
NOTE :Alternatively, the microscope can run on
three AA batteries. To install the batteries,
open the battery compartment on the base
(9) of the microscope using the Hex key.
Insert the three AA batteries (supplied)
and close the battery compartment.
MICROSCOPE OPERATION
Before viewing specimens, please read
these sections thoroughly regarding
focusing, changing power (magnification),
using the stage and adjusting illumination.
VIEWING A SPECIMEN
Carefully place a specimen slide under the
stage clips (7) and center the specimen.
The images you see in your microscope will
be upside down and reversed right to left.
Your microscope includes prepared slides to
help you get started.
You are now ready to focus and view the
specimen. Use caution to avoid damaging
the slide or object. When using higher
CM1000C
Model # 44129
1
2
11
12
13
14
3
4
5
6
7
8
9
10
Product specificaties
| Merk: | Celestron |
| Categorie: | Miscroscoop |
| Model: | Labs CM1000C |
Heb je hulp nodig?
Als je hulp nodig hebt met Celestron Labs CM1000C stel dan hieronder een vraag en andere gebruikers zullen je antwoorden
Handleiding Miscroscoop Celestron

30 Mei 2024
27 Februari 2024
31 Mei 2023
1 Mei 2023
30 Maart 2023
29 Maart 2023
20 Maart 2023
5 Maart 2023
22 Februari 2023
17 Februari 2023
Handleiding Miscroscoop
Nieuwste handleidingen voor Miscroscoop
7 Mei 2026
6 Mei 2026
6 Mei 2026
5 Mei 2026
5 Mei 2026
2 April 2026
31 Maart 2026
26 Maart 2026
26 Maart 2026
25 Maart 2026