Casio G-Shock GPW-1000 Handleiding
Casio
Smartwatch
G-Shock GPW-1000
Bekijk gratis de handleiding van Casio G-Shock GPW-1000 (11 pagina’s), behorend tot de categorie Smartwatch. Deze gids werd als nuttig beoordeeld door 59 mensen en kreeg gemiddeld 5.0 sterren uit 30 reviews. Heb je een vraag over Casio G-Shock GPW-1000 of wil je andere gebruikers van dit product iets vragen? Stel een vraag
Pagina 1/11

Operation Guide 5410
E-7C
Glossary
The following explains some of the terms used in this manual.
x GPS (Global Positioning System)
A positioning system based on satellites. Signals transmitted by GPS satellites include time information
and orbit information. The distances from multiple GPS satellites are used to acquire watch position
information.
x calibration signal
Long-wave signals emitted by transmitters set up by governments or other organizations that can be used
as timekeeping reference signals. Time calibration signals include time information only.
x time zone
Global zones that are used to defi ne the standard time at a specifi c location.
See “City/Time Zone Indicators and Time Offset Table” (page L-2) for more information.
x summer time
A difference of one hour or 30 minutes applied to standard time during summer. The start and end of the
period during which summer time is applied differs according to country and geographic region. Also,
there are countries and/or regions that do not use the summer time system.
x Home City (Time Zone)
The city and/or time zone whose date and time are normally displayed by a timepiece. When GPS
position information is acquired, the current position’s city and/or time zone is the Home City (Time Zone).
See “Acquiring GPS Position Information” (page E-30) and “Confi guring Home City (Time Zone) Settings”
(page E-59) for more information.
x World Time City (Time Zone)
The city and/or time zone whose date and time are normally displayed for World Time.
See “Checking the Current Time in a Different Time Zone” (page E-48).
E-6
About This Manual
Operations are performed using the watch’s crown, and the three buttons
indicated by the letters , and in this manual.A B C
Hand Functions
1
1
1
1 1
Second Hand
2
2
2
2 2
Minute Hand
3
3
3
3 3
Hour Hand
4
4
4
4 4
Hour Hand (24-hour)
5
5
5
5 5
Small Minute Hand
6
6
6
6 6
Small Hour Hand (24-hour)
7
7
7
7 7
Mode Hand
8
8
8
8 8
Day Indicator
This User’s Guide uses numbers shown above to identify watch hands and
indicators.
Hand and Date Indicator Movement
x The movement of the
2
2
2
22
and Minute Hand
3
3
3
33
of this watch are coordinated. To change the Hour Hand
3
3
3
33
setting, you will need to move the Hour Hand
2
2
2
22
.Minute Hand
E-5
Confi guring Home City (Time Zone) Settings . . . . . . . . . . . . . . . . . . . . . . . . . . . . . . . . . . . . . . . . . . .E-59
To confi gure Home City (time zone) settings . . . . . . . . . . . . . . . . . . . . . . . . . . . . . . . . . . . . . . . . . .E-59
To switch between standard time and summer time manually . . . . . . . . . . . . . . . . . . . . . . . . . . . . E-61
Confi guring Current Time and Date Settings Manually . . . . . . . . . . . . . . . . . . . . . . . . . . . . . . . . . . .E-63
To change the current time and date settings manually . . . . . . . . . . . . . . . . . . . . . . . . . . . . . . . . .E-63
Adjusting the Hand and Day Home Positions . . . . . . . . . . . . . . . . . . . . . . . . . . . . . . . . . . . . . . . . . .E-67
To adjust the hand and day home positions . . . . . . . . . . . . . . . . . . . . . . . . . . . . . . . . . . . . . . . . . .E-68
Troubleshooting . . . . . . . . . . . . . . . . . . . . . . . . . . . . . . . . . . . . . . . . . . . . . . . . . . . . . . . . . . . . . . . . . .E-71
Specifi cations . . . . . . . . . . . . . . . . . . . . . . . . . . . . . . . . . . . . . . . . . . . . . . . . . . . . . . . . . . . . . . . . . . . .E-77
E-4
Checking the Current Time in a Different Time Zone . . . . . . . . . . . . . . . . . . . . . . . . . . . . . . . . . . . . .E-48
To view the time in another time zone . . . . . . . . . . . . . . . . . . . . . . . . . . . . . . . . . . . . . . . . . . . . . . .E-48
Using the Stopwatch . . . . . . . . . . . . . . . . . . . . . . . . . . . . . . . . . . . . . . . . . . . . . . . . . . . . . . . . . . . . . . .E-51
To enter the Stopwatch Mode . . . . . . . . . . . . . . . . . . . . . . . . . . . . . . . . . . . . . . . . . . . . . . . . . . . . .E-51
To measure elapsed time . . . . . . . . . . . . . . . . . . . . . . . . . . . . . . . . . . . . . . . . . . . . . . . . . . . . . . . .E-51
Using the Countdown Timer . . . . . . . . . . . . . . . . . . . . . . . . . . . . . . . . . . . . . . . . . . . . . . . . . . . . . . . . .E-53
To enter the Countdown Timer Mode . . . . . . . . . . . . . . . . . . . . . . . . . . . . . . . . . . . . . . . . . . . . . . .E-53
To specify the countdown start time . . . . . . . . . . . . . . . . . . . . . . . . . . . . . . . . . . . . . . . . . . . . . . . .E-54
To perform a countdown timer operation . . . . . . . . . . . . . . . . . . . . . . . . . . . . . . . . . . . . . . . . . . . . .E-54
To stop the alarm . . . . . . . . . . . . . . . . . . . . . . . . . . . . . . . . . . . . . . . . . . . . . . . . . . . . . . . . . . . . . . .E-55
Using the Alarm . . . . . . . . . . . . . . . . . . . . . . . . . . . . . . . . . . . . . . . . . . . . . . . . . . . . . . . . . . . . . . . . . . .E-56
To enter the Alarm Mode . . . . . . . . . . . . . . . . . . . . . . . . . . . . . . . . . . . . . . . . . . . . . . . . . . . . . . . . .E-56
To change the alarm time setting . . . . . . . . . . . . . . . . . . . . . . . . . . . . . . . . . . . . . . . . . . . . . . . . . .E-56
To turn the alarm on or off . . . . . . . . . . . . . . . . . . . . . . . . . . . . . . . . . . . . . . . . . . . . . . . . . . . . . . . . E-57
To stop the alarm . . . . . . . . . . . . . . . . . . . . . . . . . . . . . . . . . . . . . . . . . . . . . . . . . . . . . . . . . . . . . . .E-57
Illumination . . . . . . . . . . . . . . . . . . . . . . . . . . . . . . . . . . . . . . . . . . . . . . . . . . . . . . . . . . . . . . . . . . . . . .E-58
To turn on illumination manually . . . . . . . . . . . . . . . . . . . . . . . . . . . . . . . . . . . . . . . . . . . . . . . . . . . .E-58
E-3D
Timekeeping (by GPS Signal) . . . . . . . . . . . . . . . . . . . . . . . . . . . . . . . . . . . . . . . . . . . . . . . . . . . . . . . .E-29
Appropriate Signal Reception Location (GPS Signal) . . . . . . . . . . . . . . . . . . . . . . . . . . . . . . . . . . .E-29
Adjusting Time Settings Immediately After Purchasing the Watch or While Traveling . . . . . . . . . .E-30
Normal Daily Time Adjustment (GPS Signal) . . . . . . . . . . . . . . . . . . . . . . . . . . . . . . . . . . . . . . . . . .E-32
Triggering an Immediate Time Adjustment Operation . . . . . . . . . . . . . . . . . . . . . . . . . . . . . . . . . . .E-34
Leap Second Reception . . . . . . . . . . . . . . . . . . . . . . . . . . . . . . . . . . . . . . . . . . . . . . . . . . . . . . . . .E-35
Timekeeping (by Time Calibration Signal) . . . . . . . . . . . . . . . . . . . . . . . . . . . . . . . . . . . . . . . . . . . . .E-36
Appropriate Signal Reception Location (Time Calibration Signal) . . . . . . . . . . . . . . . . . . . . . . . . . E-36
Normal Daily Time Adjustment (Time Calibration Signal) . . . . . . . . . . . . . . . . . . . . . . . . . . . . . . . .E-36
Time Calibration Signal Reception Ranges and Conditions . . . . . . . . . . . . . . . . . . . . . . . . . . . . . .E-37
GPS Signal and Time Calibration Signal Common Information . . . . . . . . . . . . . . . . . . . . . . . . . . . .E-40
To check receive operation results (acquisition results) . . . . . . . . . . . . . . . . . . . . . . . . . . . . . . . . . E-40
Radio-controlled Atomic Timekeeping Precautions . . . . . . . . . . . . . . . . . . . . . . . . . . . . . . . . . . . . .E-41
Mode Reference Guide . . . . . . . . . . . . . . . . . . . . . . . . . . . . . . . . . . . . . . . . . . . . . . . . . . . . . . . . . . . . .E-42
Using the Watch in an Aircraft (Airplane Mode) . . . . . . . . . . . . . . . . . . . . . . . . . . . . . . . . . . . . . . . . .E-45
To enter the Airplane Mode . . . . . . . . . . . . . . . . . . . . . . . . . . . . . . . . . . . . . . . . . . . . . . . . . . . . . . . E-46
To exit the Airplane Mode . . . . . . . . . . . . . . . . . . . . . . . . . . . . . . . . . . . . . . . . . . . . . . . . . . . . . . . .E-46
Timekeeping . . . . . . . . . . . . . . . . . . . . . . . . . . . . . . . . . . . . . . . . . . . . . . . . . . . . . . . . . . . . . . . . . . . . . .E-47
E-2
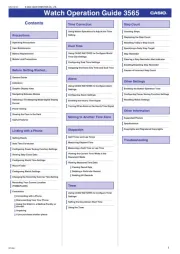
Contents
About This Manual . . . . . . . . . . . . . . . . . . . . . . . . . . . . . . . . . . . . . . . . . . . . . . . . . . . . . . . . . . . . . . . . .E-6
Do this immediately after purchasing your watch!
(Position Information Acquisition Operation) . . . . . . . . . . . . . . . . . . . . . . . . . . . . . . . . . . . . . . . . . . . .E-9
General Daily Operation Flow . . . . . . . . . . . . . . . . . . . . . . . . . . . . . . . . . . . . . . . . . . . . . . . . . . . . . . .E-11
Using the Crown . . . . . . . . . . . . . . . . . . . . . . . . . . . . . . . . . . . . . . . . . . . . . . . . . . . . . . . . . . . . . . . . . .E-14
To lock the crown . . . . . . . . . . . . . . . . . . . . . . . . . . . . . . . . . . . . . . . . . . . . . . . . . . . . . . . . . . . . . . . E-14
To unlock the crown . . . . . . . . . . . . . . . . . . . . . . . . . . . . . . . . . . . . . . . . . . . . . . . . . . . . . . . . . . . . .E-14
To pull out, rotate, or push the crown in . . . . . . . . . . . . . . . . . . . . . . . . . . . . . . . . . . . . . . . . . . . . .E-15
To start HS1 high-speed movement . . . . . . . . . . . . . . . . . . . . . . . . . . . . . . . . . . . . . . . . . . . . . . . .E-15
To start HS2 high-speed movement . . . . . . . . . . . . . . . . . . . . . . . . . . . . . . . . . . . . . . . . . . . . . . . .E-16
To stop high-speed movement . . . . . . . . . . . . . . . . . . . . . . . . . . . . . . . . . . . . . . . . . . . . . . . . . . . .E-16
Checking the Charge Level . . . . . . . . . . . . . . . . . . . . . . . . . . . . . . . . . . . . . . . . . . . . . . . . . . . . . . . . .E-17
Confi guring Time and Date Settings . . . . . . . . . . . . . . . . . . . . . . . . . . . . . . . . . . . . . . . . . . . . . . . . . .E-19
Charging the Watch . . . . . . . . . . . . . . . . . . . . . . . . . . . . . . . . . . . . . . . . . . . . . . . . . . . . . . . . . . . . . . . .E-22
To recover from the sleep state . . . . . . . . . . . . . . . . . . . . . . . . . . . . . . . . . . . . . . . . . . . . . . . . . . . .E-27
Automatic Timekeeping (by GPS Signal and Time Calibration Signal) . . . . . . . . . . . . . . . . . . . . . .E-28
E-1B
ENGLISH
Congratulations upon your selection of this CASIO watch.
x Note that the product illustrations in this manual are intended for reference only, and so the actual
product may appear somewhat different than depicted by an illustration.
x Do not try to remove the rechargeable battery from this watch. Always be sure to request rechargeable
battery replacement from your retailer. Use of a non-specifi ed battery type and/or incorrect
replacement creates the risk of burn injury and fi re due to explosion, overheating, ignition, etc.
Note that CASIO COMPUTER CO., LTD. assumes no responsibility for any damage or loss suffered by
you or any third party arising through the use of your watch or its malfunction.
For information about procedures and precautions, visit the website below.
http://support.casio.com/wat/hybrid/
MA1709-EF © 2014 CASIO COMPUTER CO., LTD.

Operation Guide 5410
E-15
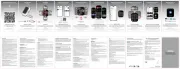
To pull out, rotate, or push the crown in
Important!
x Before performing any of these operations, fi rst unlock the crown.
The illustrations below show the different crown operations.
The crown can be pulled out to one of two (click) positions. Never apply undue force when pulling out the
crown.
First click Second click Rotate Push in
High-speed Movement
When setting a time or when performing home position adjustment (page E-67), you can move the hands
either forward or back at high speed. There are two high-speed levels: HS1 and HS2 (faster than HS1).
To start HS1 high-speed movement
While the crown is pulled out, rotate it rapidly three turns away from you (for
forward movement) or towards you (for reverse movement). High-speed
movement will continue even if you release the crown.
E-14
Using the Crown
This watch has a lock-type crown.
Important!
x You should keep the crown locked during normal daily use. Leaving the crown unlocked creates the
risk of unintended operations or even damage due to impact.
To lock the crown
1. Push the crown back in (page E-15).
x Note that attempting to lock the crown when it is not pushed in can cause
unexpected watch operation.
2. Rotate the crown so Mark 1 is aligned with Mark 2.
3. While pushing in on the crown (a), rotate it to the right (b) until it stops, and align
Mark 1 with Mark 3.
4. Gently pull on the crown to make sure it is securely locked and does not come out.
To unlock the crown
Rotate the crown so Mark 1 aligns with Mark 2.
Mark 2
Mark 1
b
a
Mark 3
Mark 1
E-13
Acquiring GPS Position Information after Changing Time Zones
After arriving at your destination, acquire GPS position information (page E-30).
x Time information is received along with position information.
x After the position information acquisition operation is successful, the watch will refl ect your current
location in its settings, and display the correct time and date for that location.
30
TOKYO
30
NEW YORK
LONDON
x After a position information acquisition operation is successful, you can use the watch as described
under “If you normally plan to use the watch in one time zone”.
Important!
x Put the watch into the Airplane Mode (page E-45) whenever you are inside an aircraft or in any other area
where radio wave reception is prohibited or restricted. After disembarking from an aircraft or leaving
a restricted area, perform a position information acquisition operation to adjust the watch’s time and
date settings.
E-12
Calibration Signal GPS Signal
Evening (between
midnight and 5:00 a.m.)
The receive operation starts
at regular intervals until
receive is successful.
x Locate the watch near a
window.
No auto reception
(Receive using button operation possible.)
Daytime (between 6:00
a.m. and 10:00 p.m.)
No reception The receive operation will start automatically when the
watch is continually expose to light.
(Receive using button operation also supported.)
x Make sure to comply with the conditions below.
− Move the watch outside where there is a clear view
of the sky above, with no obstructing buildings,
trees, or other objects.
− Position the watch with its face pointed straight up.
Important!
x The availability of time calibration signals depends on the country and/or geographic area. See “Time
Calibration Signal Reception Ranges and Conditions” (page E-37).
x You can perform a button operation at any time during the day to perform a GPS time information
acquisition operation and adjust the watch’s time and date settings. See “Receiving GPS Time
Information” (page E-34).
For details, see “Automatic Timekeeping (by GPS Signal and Time Calibration Signal)” (page E-28),
“Timekeeping (by GPS Signal)” (page E-29) and “Timekeeping (by Time Calibration Signal)” (page E-36).
E-11
General Daily Operation Flow
The operations described in this section are applicable following a position acquisition operation
immediately after purchasing the watch.
If you normally plan to use the watch in one time zone
Performing a GPS signal receive or time calibration signal receive operation confi gures time and date
settings.
x If you are in a location where a time calibration signal can be received, it is recommended that you use
the time calibration signal to adjust the time and date.
Important!
x Signal reception requires large amounts of power. Be sure to keep the watch exposed to light so it can
charge its battery and avoid insuffi cient battery power.
x Once a time calibration or GPS signal receive operation is successful, no more Auto Receive
operations are performed that day.
E-10
x After the time and date are adjusted following a successful position information acquisition operation,
you can use the watch as described under “If you normally plan to use the watch in one time zone”
(page E-11).
x Position information acquisition requires large amounts of power. Perform the acquisition operation only
when it is required.
x You can use the procedure under “To check receive operation results (acquisition results)” (page E-40) to
check the latest position information acquisition result.
E-9
Do this immediately after purchasing your watch!
(Position Information Acquisition Operation)
When position information is acquired successfully, the watch is able to determine its current location and
adjust its time and date setting accordingly.
Important!
x Before using the watch, check its current charge level and charge it if necessary. See “Checking the
Charge Level” (page E-17).
x Perform this operation in the Timekeeping Mode (not in the Airplane Mode). See “Mode Reference
Guide” (page E-42).
x It can take as long as 13 minutes for position information to be acquired.
1. Move to a location that is appropriate for GPS signal reception.
x See “Appropriate Signal Reception Location (GPS Signal)” (page E-29).
2. Position the watch with its face pointed straight up and acquire position
information.
x Hold down for at least three seconds until the B
1
1
1
11
moves Second Hand
to . If the T+P
1
1
1
11
moves to any other position besides , Second Hand T+P
keep depressed until it moves to .BT+P
x Successful acquisition of position information will automatically display the
time and date for the resulting location.
x In the normal (not Airplane Mode) Timekeeping Mode, the
7
7
7
77
Mode Hand
indicates the current day of the week.
E-8 C
x UTC (Universal Time Coordinated)
The standard time at any particular location around the world is based on Universal Time Coordinated
(UTC). UTC times are based on high-precision International Atomic Time (TAI).
See “City/Time Zone Indicators and Time Offset Table” (page L-2).
x leap second
There are very slight differences between UTC and TAI due to irregularities in the earth’s rotation. Leap
seconds are added to times to make adjustments for these differences.

Operation Guide 5410
E-23
Warning!
Leaving the watch in bright light for charging can cause it to become quite hot. Take care when
handling the watch to avoid burn injury. The watch can become particularly hot when exposed to
the following conditions for long periods.
x On the dashboard of a car parked in direct sunlight
x Too close to an incandescent lamp
x Under direct sunlight
Important!
x Keep the watch in an area normally exposed to bright light when storing it for long periods. This helps
to ensure that power does not run down.
x Storing the watch for long periods in an area where there is no light or wearing it in such a way that it is
blocked from exposure to light can cause power to run down. Make sure that the watch is exposed to
bright light whenever possible.
E-22
Charging the Watch
The face of the watch is a solar panel that generates power from light. The generated power charges a
built-in rechargeable battery, which powers watch operations. The watch charges whenever it is exposed
to light.
Important!
x This watch uses a special secondary battery.
− Charging will not be possible if the watch’s temperature is outside the approximate range of
approximately –10°C to 60°C (14°F to 140°F).
− Over-discharge will occur if the watch is not charged within approximately three months after it stops
operation due to low battery power. Charging may not be possible after over-discharge occurs. See
“Power Levels” (page E-24).
Charging Guide
Whenever you are not
wearing the watch, be sure
to leave it in a location where
it is exposed to light.
x Best charging
performance is achieved
by exposing the watch to
light that is as strong as
possible.
When wearing the watch, make
sure that its face is not blocked
from light by the sleeve of your
clothing.
x The watch may enter a sleep
state (page E-27) if its face is
blocked by your sleeve even
only partially.
E-21
Note
x If the time and/or date setting is not correct even after you try performing the operations below, use
button and crown operations to confi gure time and date settings manually (page E-63).
− Change to another location and try performing a GPS signal and/or time calibration signal receive
operation again.
− Adjust the hand and day indicator home positions.
x Even in the above case, it is recommended that you move to a location that is appropriate for GPS
signal reception and perform a position information receive operation to confi gure time and date
settings.
x Even if you are unable to perform a GPS signal and/or time calibration signal receive operation for
some reason, the watch will keep time with average monthly accuracy of ±15 seconds.
E-20 C
If the time and date settings are incorrect
If the watch’s time and date settings are not correct after you fi nish performing the procedure above, it
could mean that the watch’s hands and/or date indicator positions are out of alignment. If this happens,
perform the home position adjustment procedure (page E-67).
x Note that an internal decoding process the watch performs after it receives a signal may cause the
time setting to be slightly off (by less than one second). Performing the home position adjustment
procedure does not correct this condition.
If time and date settings still are not correct, try performing the steps below.
Confi gure the Home City (Time Zone) setting (page E-59) and the summer time setting (page E-60).
Use one of the procedures below.
x Perform the GPS signal time information receive operation to confi gure time settings (page E-34).
x Perform the time calibration signal auto receive operation to confi gure time settings (page E-36).
x Perform the GPS signal auto receive operation (page E-32).
Refer to the “City/Time Zone Indicators and Time Offset Table” (page L-2) to select your Home City
(Time Zone).
Important!
x A time calibration signal can be received in specifi c geographic areas only. See “Time Calibration
Signal Reception Ranges and Conditions” (page E-37).
E-19
Confi guring Time and Date Settings
Perform the procedures in this section when the time and date settings of your watch are not correct.
Important!
x Before using the watch, check its current charge level and charge it if necessary. See “Checking the
Charge Level” (page E-17).
Perform this operation in the Timekeeping Mode (not in the Airplane Mode). See “Mode Reference Guide”
(page E-42).
Perform the GPS position information acquisition operation (page E-30).
You can use the watch as described under
“If you normally plan to use the watch in one
time zone” (page E-11).
Move to a location that is appropriate for
signal reception (page E-29).
Information acquisition successful Information acquisition failed
Perform the GPS position information
acquisition operation again.
E-18
Function Limitations Due to Temperature
The functions listed below become disabled whenever the temperature of the watch is outside the
approximate range of –10ºC to 60ºC (14°F to 140°F).
−GPS signal and/or time calibration signal reception
−Operation tones, and count down timer and alarm tones
−Illumination
−Hand and Day home position correction
E-17
Checking the Charge Level
Check the charge level by observing the
1
1
1
11
position immediately after entering the Second Hand
Timekeeping mode.
See “Mode Reference Guide” (page E-42).
12 o’clock 2 o’clock 4 o’clock 6 o’clock
The watch is charged. Power is low. Charge the watch by placing it in a
location where it is exposed to light.
The conditions below indicate low battery power. Expose the watch to light to charge.
− Second hand jumping at two-second or fi ve-second increments
See “Charging the Watch” (page E-22) and “Power Levels” (page E-24).
Important!
x Even if the
1
1
1
11
is in the 12 o’clock (0-second) or 2 o’clock (10-second) position, it is Second Hand
recommended that you normally keep it exposed to light.
E-16
To start HS2 high-speed movement
While HS1 high-speed movement is in progress, rotate the crown rapidly three
turns again in the same direction as the current HS1 movement (away from you
for forward movement).
To stop high-speed movement
Rotate the crown in the direction that is opposite that of the current high-speed
movement or press any button.
Note
x You can use HS1 high-speed movement to perform the operations below.
Timer start time setting, alarm time setting, manual time setting, hand home position adjustment
x You can use HS2 high-speed movement to perform the operations below.
Timer start time setting, alarm time setting, manual time setting
Product specificaties
| Merk: | Casio |
| Categorie: | Smartwatch |
| Model: | G-Shock GPW-1000 |
Heb je hulp nodig?
Als je hulp nodig hebt met Casio G-Shock GPW-1000 stel dan hieronder een vraag en andere gebruikers zullen je antwoorden
Handleiding Smartwatch Casio
27 Maart 2025

23 November 2024

30 Mei 2023

25 Mei 2023

10 Mei 2023

27 April 2023

18 April 2022

9 April 2022

9 April 2022

9 April 2022
Handleiding Smartwatch
- Lookit
- Huawei
- Oregon Scientific
- X-unknown
- Fossil
- Soehnle
- Honor
- Papago
- Blaupunkt
- Yamazen
- Hallofo
- Omron
- Lintelek
- Stenlille
- Belesy
Nieuwste handleidingen voor Smartwatch
22 Juli 2025
21 Juli 2025
15 Juli 2025

15 Juli 2025

15 Juli 2025
15 Juli 2025
14 Juli 2025

5 Juli 2025
5 Juli 2025
4 Juli 2025