Casio G-Shock GMA-S140-1AER Handleiding
Bekijk gratis de handleiding van Casio G-Shock GMA-S140-1AER (8 pagina’s), behorend tot de categorie Horloge. Deze gids werd als nuttig beoordeeld door 9 mensen en kreeg gemiddeld 4.9 sterren uit 5 reviews. Heb je een vraag over Casio G-Shock GMA-S140-1AER of wil je andere gebruikers van dit product iets vragen? Stel een vraag
Pagina 1/8

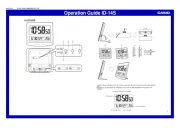
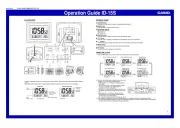
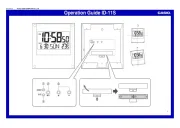
Operation Guide 5612 5613
E-9
To set the digital time and date
1. In the Timekeeping Mode, hold down A for at least
three seconds until the currently selected city code
flashes in the lower digital display. This is the setting
mode.
2. Use D (east) and B (west) to display the city code
you want to select.
• Make sure you select your Home City code before
changing any other setting.
• For full information on city codes, see the “City Code
Table” at the back of this manual.
City code
PM indicator
Hour
Seconds
Minutes
E-8
Timekeeping
You can adjust the Home Time city date and time in the Timekeeping Mode.
• The analog time of this watch is synchronized with the digital time. The analog time
setting is adjusted automatically whenever you change the digital time.
• If the analog time does not match the digital time for any reason, use the procedure
described under “To adjust home positions” (page E-44) to match the analog setting to
the digital setting.
• Pressing D in the Timekeeping Mode toggles digital display between the Home
City Date and Home City Time.
Home City Date Home City Time
Day of week
Month Day PM indicator Hour : Minutes
Day of week SecondsSeconds
D
E-7
Alarm Mode (page E-34)
Countdown Timer Mode (page E-26)
World Time Mode (page E-30)
Stopwatch Mode (page E-14)
C
C
C
E-6
General Guide
• Press C to change from mode to mode.
• In any mode (except a setting mode), press B to illuminate the face.
Timekeeping Mode
C
C
E-5
Illumination ……………………………………………………………………………E-39
To illuminate the face manually ………………………………………………E-39
To specify the illumination duration……………………………………………E-40
To turn the auto light switch on and off ………………………………………E-43
Hand Home Position Correction ……………………………………………………E-44
To adjust home positions ………………………………………………………E-44
Reference ………………………………………………………………………………E-46
Specifications …………………………………………………………………………E-50
Operating Precautions ………………………………………………………………E-52
User Maintenance ……………………………………………………………………E-63
E-4
Countdown Timer………………………………………………………………………E-26
To use the countdown timer ……………………………………………………E-27
To configure countdown start time and auto-repeat settings ………………E-28
World Time ………………………………………………………………………………E-30
To view the current time in another time zone ………………………………E-31
To toggle a city code time between Standard Time and
Daylight Saving Time ………………………………………………………E-32
To swap your Home City and World Time City ………………………………E-33
Alarms ……………………………………………………………………………………E-34
To set an alarm time ……………………………………………………………E-35
To turn an alarm on and off ……………………………………………………E-37
To turn the Hourly Time Signal on and off ……………………………………E-38
E-3
Contents
General Guide ………………………………………………………………………… E-6
Timekeeping …………………………………………………………………………… E-8
To set the digital time and date ……………………………………………… E-9
To change the Daylight Saving Time (summer time) setting ………………E-12
Stopwatch ………………………………………………………………………………E-14
To specify a distance value ……………………………………………………E-16
To specify lap time or split time readings ……………………………………E-19
To perform elapsed time measurement ………………………………………E-20
To set up the stopwatch to take lap time readings …………………………E-21
To perform a lap time measurement …………………………………………E-22
To set up the stopwatch to take split time readings …………………………E-23
To perform a split time measurement …………………………………………E-24
To measure times with the stopwatch ………………………………………E-25
E-2
• Each section of this manual provides you with the information you need to perform
operations in each mode. Further details and technical information can be found in
the “Reference” section.
• To ensure that this watch provides you with the years of service for which it is
designed, carefully read and follow the instructions under “Operating Precautions”
and “User Maintenance.”
E-1
About This Manual
• Depending on the model of your watch, digital display text appears either as dark
figures on a light background or light figures on a dark background. All sample
displays in this manual are shown using dark figures on a light background.
• Button operations are indicated using the letters shown in the illustration.
• Note that the product illustrations in this manual are intended for reference only,
and so the actual product may appear somewhat different than depicted by an
illustration.
MO1906-EA © 2019 CASIO COMPUTER CO., LTD.

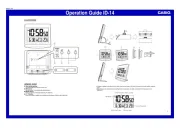
Operation Guide 5612 5613
E-19
To specify lap time or split time readings
1. In the Stopwatch Mode, make sure the stopwatch is stopped and reset to all zeros.
• Make sure that (lap times) or (split times) is shown in the lower digital LAP SPL
display.
• If you need to reset the stopwatch to all zeros, press A.
2. You can toggle between (lap times) and (split times) by pressing LAP SPL A.
A
E-18
Example:
When the speed value is 1,740.
Speed hand: Indicates 40.
Upper digital segments: Indicate 700.
1000 and MACH indicators: Displayed
Time Measurement
You need to specify either lap time (page E-21) or split time (page E-23) measurement before
you start a stopwatch operation.
• If you want to measure total elapsed time, select split time measurement.
E-17
How speed is indicated
• While an elapsed time measurement operation is being
performed in the Stopwatch Mode, the watch will
indicate a speed value, which is calculated based on
the distance you specified and the elapsed time.
The speed value is indicated as described below.
• Upper digital segments: 100 unit
• 1000 appears when the speed exceeds 1,000.
• MACH appears when the speed exceeds 1,226.
• The speed hand indicates speed values less than 100.
Only even-numbered values are indicated.
• Speed can be indicated from 0 to 1998.
OVER is
indicated by the speed hand when the speed exceeds
1998.
Segments
(100 unit)
OVER
Speed hand
(Up to 100)
Mach (MACH)
1000 indicator
E-16
To specify a distance value
1. In the Stopwatch Mode, make sure the stopwatch is
stopped and reset to all zeros.
• If you need to reset the stopwatch to all zeros, press
A.
2. Hold down A for at least three seconds until the current
distance value setting flashes in the upper digital display.
• This is the distance value setting mode.
3. Press C to move the flashing between the values on
the left side and right side of the distance value decimal
point.
4. While a distance value is flashing, use D (+) and B (–)
to change it.
• You can specify a distance value in the range of 0.1
to 99.9.
5. After specifying the distance value you want, press A
to exit the setting mode.
E-15
Important!
• Check to make sure that the speed hand is not moving before you perform any
Stopwatch Mode button operation.
Specifying a Distance Value
You can use the procedure below to specify a distance value, if you want. If you
specify a distance value, the watch will calculate and indicate speed for certain
stopwatch operations.
• The distance value represents kilometers, miles, or any other distance unit you
want. Specifying a distance value of 10.0, for example, can mean 10.0 kilometers or
10.0 miles.
• No speed calculation is performed when 0.0 is specified as the current distance
value.
• For lap time readings, you can specify either the lap distance (when all the laps are
the same distance) or the total race distance.
• For split time readings, you can specify the total race distance only. Though the
watch will indicate a speed each time you take a split reading, they will be based
on the total race distance, and so they will not indicate actual intermediate split
speeds.
E-14
Stopwatch
You can use the stopwatch to measure elapsed time, lap
times and split times. If you specify a distance value, the
stopwatch also will calculate and display speeds.
• The digital display range of the stopwatch is 99 hours,
59 minutes, 59.999 seconds. The stopwatch continues
to run until you stop it. If it reaches the above limit, it will
restart the time measurement from zero.
• The stopwatch operation continues even if you exit the
Stopwatch Mode. If you exit the Stopwatch Mode while
a stopwatch operation is in progress, the upper digital
segments will appear and disappear sequentially in
accordance with the passage of timekeeping seconds.
This is to let you know that a stopwatch operation is in
progress.
• All of the operations in this section are performed in the
Stopwatch Mode, which you enter by pressing
C (page
E-7).
Speed hand
Upper digital
segments
E-13
4. When the setting you want is selected, press A to exit the setting mode.
• The DST indicator appears to indicate that Daylight Saving Time is turned on.
12-hour and 24-hour timekeeping
• With the 12-hour format, the PM indicator appears for times in the range of noon to
11:59 p.m. and no indicator appears for times in the range of midnight to 11:59 a.m.
• With the 24-hour format, times are displayed in the range of 0:00 to 23:59, without
the PM indicator.
• The 12-hour/24-hour timekeeping format you select in the Timekeeping Mode is
applied in all other modes.
E-12
5. Press A to exit the setting mode.
• The day of the week is displayed automatically in accordance with the date
(year, month, and day) settings.
Daylight Saving Time (DST)
Daylight Saving Time (summer time) advances the time setting by one hour from
Standard Time. Remember that not all countries or even local areas use Daylight
Saving Time.
To change the Daylight Saving Time (summer time) setting
1. In the Timekeeping Mode, hold down A for at least
three seconds until the currently selected city code
flashes in the lower digital display. This is the setting
mode.
2. Press C. This will display the DST setting screen.
3. Use D to toggle the DST setting on (on) and off (
OFF).
• The default DST setting is off (OFF).
DST indicator
E-11
Screen: To do this: Do this:
Toggle between 12-hour (
12H) and
24-hour (24H) timekeeping Press D.
Reset the seconds to
00 Press D.
Change the hour and minutes
Use D (+) and B (–).
Change the year, month, or day
Toggle the face illumination duration
between 1.5 seconds (
LT1
) and three
seconds (LT3)
Press D.
E-10
3. Press C to change the flashing screen content in the sequence shown below to
select the other settings.
City Code DST 12/24-Hour
Format
Illumination
Duration
Seconds Hour
YearMonthDay Minutes
4. When the setting you want to change is flashing, use D or B to change it as
described below.
Screen: To do this: Do this:
Change the city code Use D (east) and B
(west).
Toggle the DST setting between Daylight
Saving Time (on) and Standard Time
(OFF).
Press D.

Operation Guide 5612 5613
E-29
• To toggle auto repeat between on and off, press D while the on/off setting is
flashing.
4. Press A to exit the setting mode.
• The auto-repeat on ( ) indicator is displayed on the Countdown Timer Mode
screen while this function is turned on.
E-28
To configure countdown start time and auto-repeat settings
1. While the countdown start time is in the Countdown
Timer Mode, hold down A for at least three seconds
until the hour setting of the countdown start time starts
to flash. This is the setting mode.
• If the countdown start time is not displayed, use the
procedure under “To use the countdown timer” (page
E-27) to display it.
2. Press C to move the flashing in the sequence shown
below, and select the setting you want to change.
Start Time
(Hours)
Start Time
(Minutes)
Auto-Repeat
On/Off
3. Perform the following operations, depending on which setting currently is selected
above.
• While the start time setting is flashing, use D (+) and B (–) to change it.
Start time
(Hours : Minutes)
Auto-repeat on
E-27
To use the countdown timer
Press D while in the Countdown Timer Mode to start the countdown in the upper
digital display.
• When the end of the countdown is reached, the alarm will sound for 10 seconds or
until you stop it by pressing any button.
• If auto-repeat is turned off, the countdown time is reset to its starting value
automatically after the alarm stops.
• If auto-repeat is turned on, the countdown will restart automatically without pausing
when it reaches zero.
• The countdown timer measurement operation continues even if you exit the
Countdown Timer Mode.
• Press D while a countdown operation is in progress to pause it.
Press D again to resume the countdown.
• To stop a countdown timer operation completely, first pause it (by pressing D),
and then press A. This returns the countdown time to its starting value.
E-26
Countdown Timer
You can set the countdown start time within a range of
one minute to 24 hours. An alarm sounds when the
countdown reaches zero.
• You also can select auto-repeat, which automatically
restarts the countdown from the original value you set
whenever zero is reached.
• All of the operations in this section are performed in the
Countdown Timer Mode, which you enter by pressing
C (page E-7).
Seconds
Auto-repeat off
Start time
(Hours : Minutes)
E-25
To measure times with the stopwatch
Elapsed Time
D D A
Start Stop Reset
Lap Time
D A A D A
Start
(LAP displayed)
Lap
(Lap01)
Lap
(Lap02)
Stop Reset
Split Time
D A A D A
Start
(SPL displayed)
Split Split release Stop Reset
E-24
To perform a split time measurement
Select split time (SPL) measurement and then perform the
following button operations.
D Start ➝
A Split ➝ A Split Release* ➝
D Stop ➝
A Reset
* The split time is released automatically if you do not
press A within about 12 seconds.
• You can press A
to take split readings as many times
as you like. The
SPL indicator flashes while a split
reading is displayed.
• The stopwatch continues elapsed time measurement
internally while a split time reading is displayed.
• Pressing
A while a split time is displayed will switch
back to normal elapsed time measurement. The
elapsed time will appear in the upper digital display.
• You also could press D to stop elapsed time
measurement instead.
• Pressing
D to stop elapsed time measurement
displays the time (and speed if a distance is specified)
of the final split (which is the overall elapsed time).
Hours
SPL indicator
Speed hand (calculated)
Minutes
Seconds
1/1000 seconds
E-23
Split Time
Split time readings appear in the upper digital display.
They show the time elapsed since the beginning of the
current time measurement.
• If you want the watch to calculate the speed of the race,
specify the race distance for the distance setting (page
E-15).
• For split time readings, you can specify the total race
distance only. Though the watch will indicate a speed
each time you take a split reading, they will be based
on the total race distance, and so they will not indicate
actual intermediate split speeds.
To set up the stopwatch to take split time readings
1. In the Stopwatch Mode, make sure the stopwatch is stopped and reset to all zeros.
• If you need to reset the stopwatch to all zeros, press A.
2. Make sure that SPL (split times) is shown in the lower digital display.
• If LAP (lap times) is displayed, press A to toggle it to SPL.
Split time
E-22
To perform a lap time measurement
Select lap time (LAP) measurement and then perform the
following button operations.
D Start ➝
A Lap* ➝ A Lap* ➝ D Stop ➝ A Reset
* Lap time remains frozen in the upper digital display for
about 12 seconds. After that, elapsed time
measurement reappears.
• You can press A
to take lap readings as many times
as you like. The
LAP indicator flashes while a lap
reading is displayed.
• While a lap time is displayed, the lower digital display
will alternate between the lap hour value and the lap
number (#01
to # 99
). If you take more than 99 lap
readings, the lap number will restart from #
00 following
lap #99.
• Pressing
D to stop elapsed time measurement
displays the time (and speed if a distance is specified)
of the final lap.
Lap number
LAP indicator
Speed hand (calculated)
Minutes
Seconds
1/1000 seconds
Hours
E-21
Lap Time
Lap time readings appear in the upper digital display.
They show the time elapsed since the last lap time
reading was taken.
• If you want the watch to calculate the speed of each lap
(when all of the laps are the same distance), specify the
lap distance for the distance setting (page E-15).
• If you want the watch to calculate the speed of the
entire race, specify the race distance for the distance
setting (page E-15). A speed will be indicated each time
you take a lap reading, but these lap speeds will not
indicate actual speed of the entire race.
To set up the stopwatch to take lap time readings
1. In the Stopwatch Mode, make sure the stopwatch is stopped and reset to all zeros.
• If you need to reset the stopwatch to all zeros, press A.
2. Make sure that LAP (lap times) is shown in the lower digital display.
• If (split times) is displayed, press SPL A to toggle it to LAP.
Lap time
E-20
Elapsed Time Measurement
Use the following procedure to measure elapsed time, without taking lap time or split
time readings.
To perform elapsed time measurement
Select split time (SPL) measurement and then perform the following button operations.
D Start ➝ D Stop ➝ A Reset
• If you have a distance value (page E-15) specified for the current elapsed time
measurement, the upper digital segments and speed hand will indicate the speed
when you press D to stop the elapsed time operation.
• After pressing
D to stop an elapsed time operation, you could press D again to
restart from the point where you left off.
Product specificaties
| Merk: | Casio |
| Categorie: | Horloge |
| Model: | G-Shock GMA-S140-1AER |
Heb je hulp nodig?
Als je hulp nodig hebt met Casio G-Shock GMA-S140-1AER stel dan hieronder een vraag en andere gebruikers zullen je antwoorden
Handleiding Horloge Casio
18 Juni 2025
17 Juni 2025
17 Juni 2025
16 Juni 2025

16 Juni 2025
16 Juni 2025
16 Juni 2025
16 Juni 2025
16 Juni 2025
16 Juni 2025
Handleiding Horloge
- Executive
- Oregon Scientific
- Invicta
- Inter-Quartz
- Jaguar
- Slazenger
- Armani
- Omega
- Calypso
- Bushnell
- Clas Ohlson
- Breo
- Tauchmeister
- Irox
- Dugena
Nieuwste handleidingen voor Horloge
5 Juli 2025

5 Juli 2025
4 Juli 2025
4 Juli 2025
4 Juli 2025

4 Juli 2025
4 Juli 2025

2 Juli 2025
1 Juli 2025
21 Juni 2025