Casio G-Shock GM110-1A Handleiding
Bekijk gratis de handleiding van Casio G-Shock GM110-1A (5 pagina’s), behorend tot de categorie Horloge. Deze gids werd als nuttig beoordeeld door 60 mensen en kreeg gemiddeld 4.7 sterren uit 30.5 reviews. Heb je een vraag over Casio G-Shock GM110-1A of wil je andere gebruikers van dit product iets vragen? Stel een vraag
Pagina 1/5

Operation Guide 5553
E-9
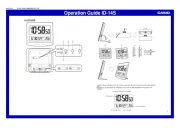
To set the time and date
1. In the Timekeeping Mode, hold down A for about two
seconds until “SET” appears on the lower display. This
is the setting mode.
• Note that keeping A depressed too long (for about
five seconds) will cause a different type of setting
mode to be entered (page E-33).
2. Use D and B to select the city code you want.
• Make sure you select your Home City code before
changing any other setting.
• For full information on city codes, see the “City Code
Table” at the back of this manual.
l
l
l
l
l
l
l
l
l
l
l
l
l
l
l
l
l
l
l
l
l
l
l
l
l
l
l
l
l
l
l
l
l
l
l
l
l
l
l
l
l
l
l
l
l
l
l
l
l
l
l
l
l
l
l
l
l
l
l
l
City code
E-8
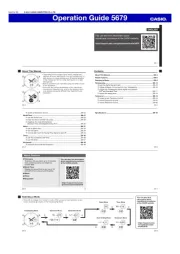
Timekeeping
You can adjust the Home Time city date and time in the Timekeeping Mode.
• Pressing A in the Timekeeping Mode will toggle lower display between the
screens shown below.
A
Home City Date Home City Time
Day of the week Day of the week
Date PM indicator
Hour : Minutes
SecondsSeconds
E-7
Alarm Mode (page E-24)
Countdown Timer Mode (page E-17)
World Time Mode (page E-20)
Stopwatch Mode (page E-14)
C
C
C
E-6
General Guide
• Press C to change from mode to mode.
• To return to the Timekeeping Mode from any other mode, hold down
C for about
three seconds.
• In any mode (except a setting mode), press B to illuminate the display.
Timekeeping Mode
C
C
E-5
Hand Home Position Correction ……………………………………………………E-33
To adjust home positions ………………………………………………………E-33
Reference ………………………………………………………………………………E-35
To turn the button operation tone on and off …………………………………E-36
Specifications …………………………………………………………………………E-40
E-4
World Time ………………………………………………………………………………E-20
To view the current time in another time zone ………………………………E-21
To toggle a city code time between Standard Time and
Daylight Saving Time ………………………………………………………E-22
To swap your Home City and World Time City ………………………………E-23
Alarms ……………………………………………………………………………………E-24
To set an alarm time ……………………………………………………………E-25
To test the alarm ………………………………………………………………E-26
To turn an alarm on and off ……………………………………………………E-27
To turn the Hourly Time Signal on and off ……………………………………E-28
Illumination ……………………………………………………………………………E-29
To illuminate the display manually ……………………………………………E-29
To specify the illumination duration……………………………………………E-30
To turn the auto light switch on and off ………………………………………E-32
E-3
Contents
Getting Acquainted …………………………………………………………………… E-1
General Guide ………………………………………………………………………… E-6
Timekeeping …………………………………………………………………………… E-8
To set the time and date ……………………………………………………… E-9
To change the Daylight Saving Time (summer time) setting ………………E-12
Stopwatch ………………………………………………………………………………E-14
Countdown Timer………………………………………………………………………E-17
To use the countdown timer ……………………………………………………E-18
To configure countdown start time settings …………………………………E-19
E-2
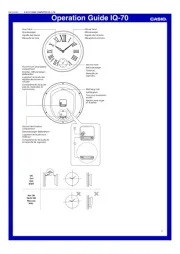
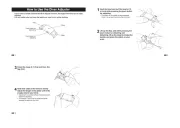
• Button operations are indicated using the letters shown in the illustration.
• Each section of this manual provides you with the information you need to perform
operations in each mode. Further details and technical information can be found in
the “Reference” section.
E-1
Getting Acquainted
Congratulations upon your selection of this CASIO watch. To get the most out of your
purchase, be sure to read this manual carefully.
• Be sure to keep all user documentation handy for future reference.
About This Manual
• Depending on the model of your watch, display text appears either as dark figures
on a light background or light figures on a dark background. All sample displays in
this manual are shown using dark figures on a light background.
MO1710-EA © 2017 CASIO COMPUTER CO., LTD.

Operation Guide 5553
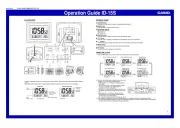
E-19
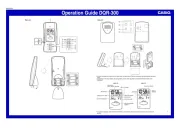
To configure countdown start time settings
1. While the countdown start time is on the display in the
Countdown Timer Mode, hold down A for about two
seconds until the hour setting of the countdown start
time starts to flash. This is the setting mode.
• Holding down A will initially cause “Hold” to appear
on the screen. Keep A depressed until “Hold”
disappears.
• If the countdown start time is not displayed, use the
procedure under “To use the countdown timer” (page
E-18) to display it.
2. Press C to move the flashing in the sequence shown
below, and select the setting you want to change.
Start Time
(Hours)
Start Time
(Minutes)
C
C
3. Press A to exit the setting mode.
l
l
l
l
l
l
l
l
l
l
l
l
l
l
l
l
l
l
l
l
l
l
l
l
l
l
l
l
l
l
l
l
l
l
l
l
l
l
l
l
l
l
l
l
l
l
l
l
l
l
l
l
l
l
l
Start time
(Hours : Minutes)
E-18
To use the countdown timer
Press D while in the Countdown Timer Mode to start the countdown timer.
• When the end of the countdown is reached, the alarm will sound for 10 seconds or
until you stop it by pressing any button.
• The countdown time is reset to its starting value automatically after the alarm stops.
• Press D while a countdown operation is in progress to pause it.
Press D again to resume the countdown.
• To stop a countdown timer operation completely, first pause it (by pressing D),
and then press A. This returns the countdown time to its starting value. Note that
the countdown start time cannot be changed while a countdown timer operation is
ongoing or paused. To change the start time, you first need to stop the countdown
timer operation completely as described above.
E-17
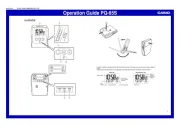
Countdown Timer
You can set the countdown timer start time within a range
of one minute to 24 hours. An alarm sounds when the
countdown reaches zero.
• All of the operations in this section are performed in the
Countdown Timer Mode, which you enter by pressing
C (page E-7).
Start time
(Hours : Minutes)
Seconds
E-16
Stopwatch hand
Elapsed time seconds
Measured time or split time
Hours
• Alternates with “SPL” during
split time display.
Minutes, seconds,
1/100 seconds
• Pressing
D without resetting the displayed time will restart elapsed time
measurement from where it was last stopped (cumulative elapsed time
measurement).
• An ongoing elapsed time measurement operation continues even if you exit the
Stopwatch Mode. In this case, the stopwatch hand indicates the current minutes
count.
E-15
Elapsed Time Measurement
In the Stopwatch Mode, press D to start and stop elapsed time measurement.
• Pressing A while elapsed time measurement is in progress will display the current
split time.
Start Split Stop
Split
cancel
Display
time reset
D A DA A
(Measured time
displayed.)
(Measured time
displayed.)
(Split time
displayed.)
(Stopped) (Stopped)(Measurement)
E-14
Stopwatch
You can use the stopwatch to measure elapsed time and
split times.
• The digital display range of the stopwatch is 999 hours,
59 minutes, 59.99 seconds. The stopwatch continues to
run until you stop it. If it reaches the above limit, it will
restart the time measurement from zero.
• The stopwatch operation continues even if you exit the
Stopwatch Mode.
• All of the operations in this section are performed in the
Stopwatch Mode, which you enter by pressing
C (page
E-7).
E-13
3. Use D to toggle the DST setting on and off.
DST off ( ) DST on ( )
D
• The default DST setting is OFF ( ).
4. When the setting you want is selected, press
A to exit the setting mode.
• The DST indicator appears to indicate that Daylight Saving Time is turned on.
12-hour and 24-hour timekeeping
• With the 12-hour format, the PM indicator (P) appears on the lower display for times
in the range of noon to 11:59 p.m. and no indicator appears for times in the range
of midnight to 11:59 a.m.
• With the 24-hour format, times are displayed in the range of 0:00 to 23:59, without
the PM indicator (P).
• The 12-hour/24-hour timekeeping format you select in the Timekeeping Mode is
applied in all other modes.
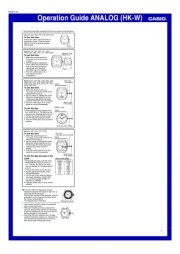
E-12
Daylight Saving Time (DST)
Daylight Saving Time (summer time) advances the time setting by one hour from
Standard Time. Remember that not all countries or even local areas use Daylight
Saving Time.
To change the Daylight Saving Time (summer time) setting
1. In the Timekeeping Mode, hold down A for about two
seconds until “SET” appears on the display.
• Note that keeping A depressed too long (for about
five seconds) will cause a different type of setting
mode to be entered (page E-33).
2. Press C. This will display the DST setting screen.
l
l
l
l
l
l
l
l
l
l
l
l
l
l
l
l
l
l
l
l
l
l
l
l
l
l
l
l
l
l
l
l
l
l
l
l
l
l
l
l
l
l
l
l
l
l
l
l
l
l
l
l
l
l
l
l
l
l
l
l
l
l
l
l
l
l
l
l
l
l
l
l
l
l
l
l
l
l
l
l
l
l
l
l
l
l
l
l
l
l
l
l
l
l
l
l
l
l
l
l
l
l
l
l
l
l
l
l
l
l
l
l
l
l
l
DST indicator
E-11
Screen: To do this: Do this:
Reset the seconds to Press
D.
Change the hour and minutes
Use D (+) and B (–).
Change the year, month, or day
Toggle the button operation tone
between (on) and (off) Press D.
Toggle the display illumination duration
between 1.5 seconds ( ) and three
seconds ( ) Press D.
5. Press
A to exit the setting mode.
• The day of the week is displayed automatically in accordance with the date (year,
month, and day) settings.
E-10
3. Press C to change the flashing screen content in the sequence shown below to
select the other settings.
City
Code DST 12/24-Hour
Format Seconds Hour Minutes
YearMonthDay
Button
Operation Tone
Illumination
Duration
C C C C C
C C
CCCC
4. When the timekeeping setting you want to change is flashing, use
D or B to
change it as described below.
Screen: To do this: Do this:
Change the city code Use
D (east) and B (west).
Toggle the DST setting between
Daylight Saving Time ( ) and
Standard Time ( ).
Press D.
Toggle between 12-hour ( ) and
24-hour ( ) timekeeping Press D.

Operation Guide 5553
E-29
Illumination
An LED (light-emitting diode) illuminates the face of the
watch for easy reading in the dark. The watch’s auto light
switch turns on illumination automatically when you angle
the watch towards your face.
• The auto light switch must be turned on (indicated by
the auto light switch indicator) for it to operate.
• See “Illumination Precautions” (page E-38) for other
important information about using illumination.
To illuminate the display manually
In any mode, press B to turn on illumination.
• The above operation turns on illumination regardless of
the current auto light switch setting.
• You can use the procedure below to select either 1.5
seconds or 3 seconds as the illumination duration.
When you press B, the illumination will remain on for
about 1.5 seconds or 3 seconds, depending on the
current illumination duration setting.
Auto light switch
indicator
E-28
To turn the Hourly Time Signal on and off
1. In the Alarm Mode, use D to select the Hourly Time
Signal ( ) (page E-25).
2. Press A to toggle it on and off.
• The Hourly Time Signal on indicator is shown on the
display in all modes while this function is turned on.
Hourly time signal
on indicator
ON
E-27
To turn an alarm on and off
1. In the Alarm Mode, use D to select an alarm.
2. Press A to toggle it on and off.
• Turning on a alarm ( , , , or )
displays the alarm on indicator on its Alarm Mode
screen.
• In all modes, the alarm on indicator is shown for any
alarm that currently is turned on.
• The alarm on indicator flashes while the alarm is
sounding.
• The snooze alarm indicator flashes while the snooze
alarm is sounding and during the 5-minute intervals
between alarms.
Snooze alarm indicator
Alarm on indicator
ON
E-26
3. Press C to move the flashing between the hour and minute settings.
4. While a setting is flashing, use
D (+) and B (–) to change it.
5. Press A to exit the setting mode.
Alarm Operation
The alarm tone sounds at the preset time for 10 seconds, regardless of the mode the
watch is in. In the case of the snooze alarm, the alarm operation is performed a total
of seven times, every five minutes, or until you turn the alarm off (page E-27).
• Alarm and Hourly Time Signal operations are performed in accordance with the
current time in your Home City, as kept in the Timekeeping Mode.
• To stop the alarm tone after it starts to sound, press any button.
• Performing any one of the following operations during a 5-minute interval between
snooze alarms cancels the current snooze alarm operation.
Displaying the Timekeeping Mode setting screen (page E-9)
Displaying the setting screen (page E-25)
To test the alarm
In the Alarm Mode, hold down D to sound the alarm.
E-25
To set an alarm time
1. In the Alarm Mode, use D to scroll through the alarm
screens until the one whose time you want to set is
displayed.
D D D D
DD
• To set an alarm time, display the applicable alarm
screen ( through , or ).
• is the hourly time signal setting (page E-28).
• The snooze alarm operation repeats every five
minutes.
2. After you select an alarm, hold down A for about two seconds until the hour setting
of the alarm time starts to flash. This is the setting mode.
• Holding down A will initially cause “Hold” to appear on the screen. Keep
A
depressed until “Hold” disappears.
• This operation turns on the alarm automatically.
OFF
E-24
Alarms
When an alarm is turned on, the alarm tone will sound
when its alarm time is reached. One of the alarms is a
snooze alarm, while the other four are daily alarms.
You also can turn on an Hourly Time Signal that causes
the watch to beep twice every hour on the hour.
• The snooze alarm screen is indicated by , while the
other alarm screens are numbered through .
The Hourly Time Signal screen is indicated by .
• All of the operations in this section are performed in the
Alarm Mode, which you enter by pressing C (page E-7).
Alarm time
(Hour : Minutes)
ON
E-23
Swapping your Home City and World Time City
You can use the procedure below to swap your Home City and World Time City. This
changes your Home City to your World Time City, and your World Time City to your
Home City. This capability can come in handy when you frequently travel between two
cities in different time zones.
To swap your Home City and World Time City
1. In the World Time Mode, use D to select the World Time City you want.
2. Press A and B at the same time until the watch beeps.
• This will make the World Time City you selected in step 1 your Home City, and
cause the hour and minute hands to move to the current time in that city. At the
same time, it will change the Home City you had selected prior to step 2 your World
Time City, and cause the content of lower display to change accordingly.
• After swapping the Home City and World Time City, the watch stays in the World
Time Mode with the city that was selected as the Home City prior to step 2 now
displayed as the World Time City.
E-22
To toggle a city code time between Standard Time and Daylight Saving Time
1. In the World Time Mode, press D to display the city
code (time zone) whose Standard Time/Daylight Saving
Time setting you want to change.
2. Hold down A for about two seconds to toggle between
Daylight Saving Time ( indicator displayed) and DST
Standard Time ( indicator not displayed).DST
• Holding down A will initially cause “Hold” to appear on
the screen. Keep
A depressed until “Hold” disappears.
• The DST indicator is shown in the lower display while
Daylight Saving Time is turned on.
• You can turn on DST individually for each city code,
except UTC.
• Turning on DST for the city code that is currently
selected as your Home City will turn on DST for normal
timekeeping.
DST indicator
E-21
To view the current time in another time zone
In the World Time Mode, use D to scroll through available city codes (time zones).
Holding down the button scrolls at high speed.
• The lower display shows the current time in the World Time City.
• To select the UTC time zone (Differential 0), press B and D at the same time.
• When the city code (time zone) you want is selected, you can press A to display
the date. After about one second, the watch will resume regular timekeeping for the
currently selected city.
Hour : Minutes Date
Seconds
A
One second
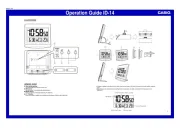
E-20
World Time
World Time digitally displays the current time in one of
48 cities (31 time zones) around the world. A simple
operation swaps your Home City with the currently
selected World Time City.
• The times kept in the World Time Mode are
synchronized with the time being kept in the
Timekeeping Mode. If you feel that there is an error in
any World Time Mode time, check to make sure you
have the correct city selected as your Home City. Also
check to make sure that the current time as shown in
the Timekeeping Mode is correct.
• Times in the World Time Mode are based on UTC
offsets. See the “City Code Table” at the back of this
manual for information about the UTC offsets that are
supported.
• All of the operations in this section are performed in the
World Time Mode, which you enter by pressing
C
(page E-7).
Currently selected
World Time City
World Time
Product specificaties
| Merk: | Casio |
| Categorie: | Horloge |
| Model: | G-Shock GM110-1A |
Heb je hulp nodig?
Als je hulp nodig hebt met Casio G-Shock GM110-1A stel dan hieronder een vraag en andere gebruikers zullen je antwoorden
Handleiding Horloge Casio
18 Juni 2025
17 Juni 2025
17 Juni 2025
16 Juni 2025

16 Juni 2025
16 Juni 2025
16 Juni 2025
16 Juni 2025
16 Juni 2025
16 Juni 2025
Handleiding Horloge
- Olivia Burton
- Festina
- World Timer Chronograph
- Executive
- Rolex
- Fromanteel
- Timex
- Iron Annie
- Audemars Piguet
- Bulova
- Beper
- Philip Watch
- Habitat
- Michael Kors
- Radley London
Nieuwste handleidingen voor Horloge
5 Juli 2025

5 Juli 2025
4 Juli 2025
4 Juli 2025
4 Juli 2025

4 Juli 2025
4 Juli 2025

2 Juli 2025
1 Juli 2025
21 Juni 2025