Casio G-Shock G-2900F-8VER Handleiding
Bekijk gratis de handleiding van Casio G-Shock G-2900F-8VER (4 pagina’s), behorend tot de categorie Horloge. Deze gids werd als nuttig beoordeeld door 36 mensen en kreeg gemiddeld 4.6 sterren uit 18.5 reviews. Heb je een vraag over Casio G-Shock G-2900F-8VER of wil je andere gebruikers van dit product iets vragen? Stel een vraag
Pagina 1/4

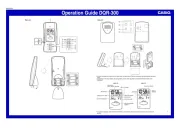
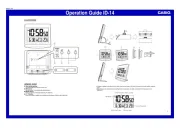
Operation Guide 2548/2821
1
MA0309-EA
About This Manual
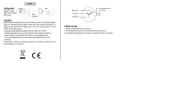
•The operational procedures for Modules 2548 and 2821
are identical. All of the illustrations in this manual show
Module 2548.
•Button operations are indicated using the letters shown
in the illustration.
•Each section of this manual provides you with the
information you need to perform operations in each
mode. Further details and technical information can be
found in the “Reference” section.
Module 2821
(Light)
Module 2548
•Module 2821 does not display an AM indicator (A).
General Guide
•Press C to change from mode to mode.
•In any mode, press L to illuminate the display.
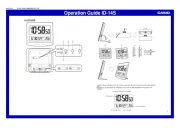
Timekeeping Mode World Time Modee-DATA MEMORY Mode Stopwatch ModeCountdown Timer ModeAlarm Mode
Press .
City code
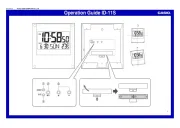
Timekeeping
Use the Timekeeping Mode to set and view the current
time and date.
Read This Before You Set the Time and Date !
The times displayed in the Timekeeping Mode and World
Time Mode are linked. Because of this, make sure you
select a city code for your Home City (the city where you
normally use the watch) before you set the time and date.
Seconds
Hour : Minutes
PM indicator
Day of week
Month – Day
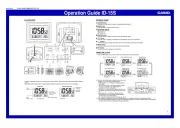
To set the time and date
1. In the Timekeeping Mode, hold down A until the
seconds start to flash, which indicates the setting
screen.
2. Press C to move the flashing in the sequence shown
below to select other settings.
Minutes
12/24-Hour
Format
Seconds City Code Hour
YearDay
DST
Month
3. When the setting you want to change is flashing, use D and B to change it as
described below.
Screen
50
OFF
TYO
P10:58
12H
2003
6-30
To do this:
Reset the seconds to 00
Toggle between Daylight Saving Time (0N)
and Standard Time ( )0FF
Change the city code
Change the hour or minutes
Toggle between 12-hour (12H) and 24-hour
(24H) timekeeping
Change the year
Change the month or day
Do this:
Press .D
Press .D
Use
D B (east) and (west).
Use
D B (+) and (–).
Press .D
Use
D B (+) and (–).
•
For full information on city codes, see the City Code Table“ ”.
•See “Daylight Saving Time (DST)” for details about DST setting.
4. Press A to exit the setting screen.
•With the 12-hour format, the P (PM) indicator appears on the display for times in the
range of noon to 11:59 p.m. and the (AM) indicator appears for times in the rangeA
of midnight to 11:59 a.m. Note that Module 2821 does not display an AM indicator
(A).
•With the 24-hour format, times are displayed in the range of 0:00 to 23:59, without
any indicator.
•The 12-hour/24-hour timekeeping format you select in the Timekeeping Mode is
applied in all modes.
•The day of the week is automatically displayed in accordance with the date (year,
month, and day) settings.
Daylight Saving Time (DST)
Daylight Saving Time (summer time) advances the time setting by one hour from Standard
Time. Remember that not all countries or even local areas use Daylight Saving Time.
To toggle the Timekeeping Mode time between DST and Standard Time
1. In the Timekeeping Mode, hold down A until the
seconds start to flash, which indicates the setting
screen.
2. Press C to display the DST setting screen.
3. Press D to toggle between Daylight Saving Time
(ON displayed) and Standard Time (
OFF displayed).
•Note that you cannot switch between Standard Time
and Daylight Saving Time while GMT is selected as
the Home City code.
4. Press A to exit the setting screen.
•The indicator appears on the display to indicateDST
that Daylight Saving Time is turned on.
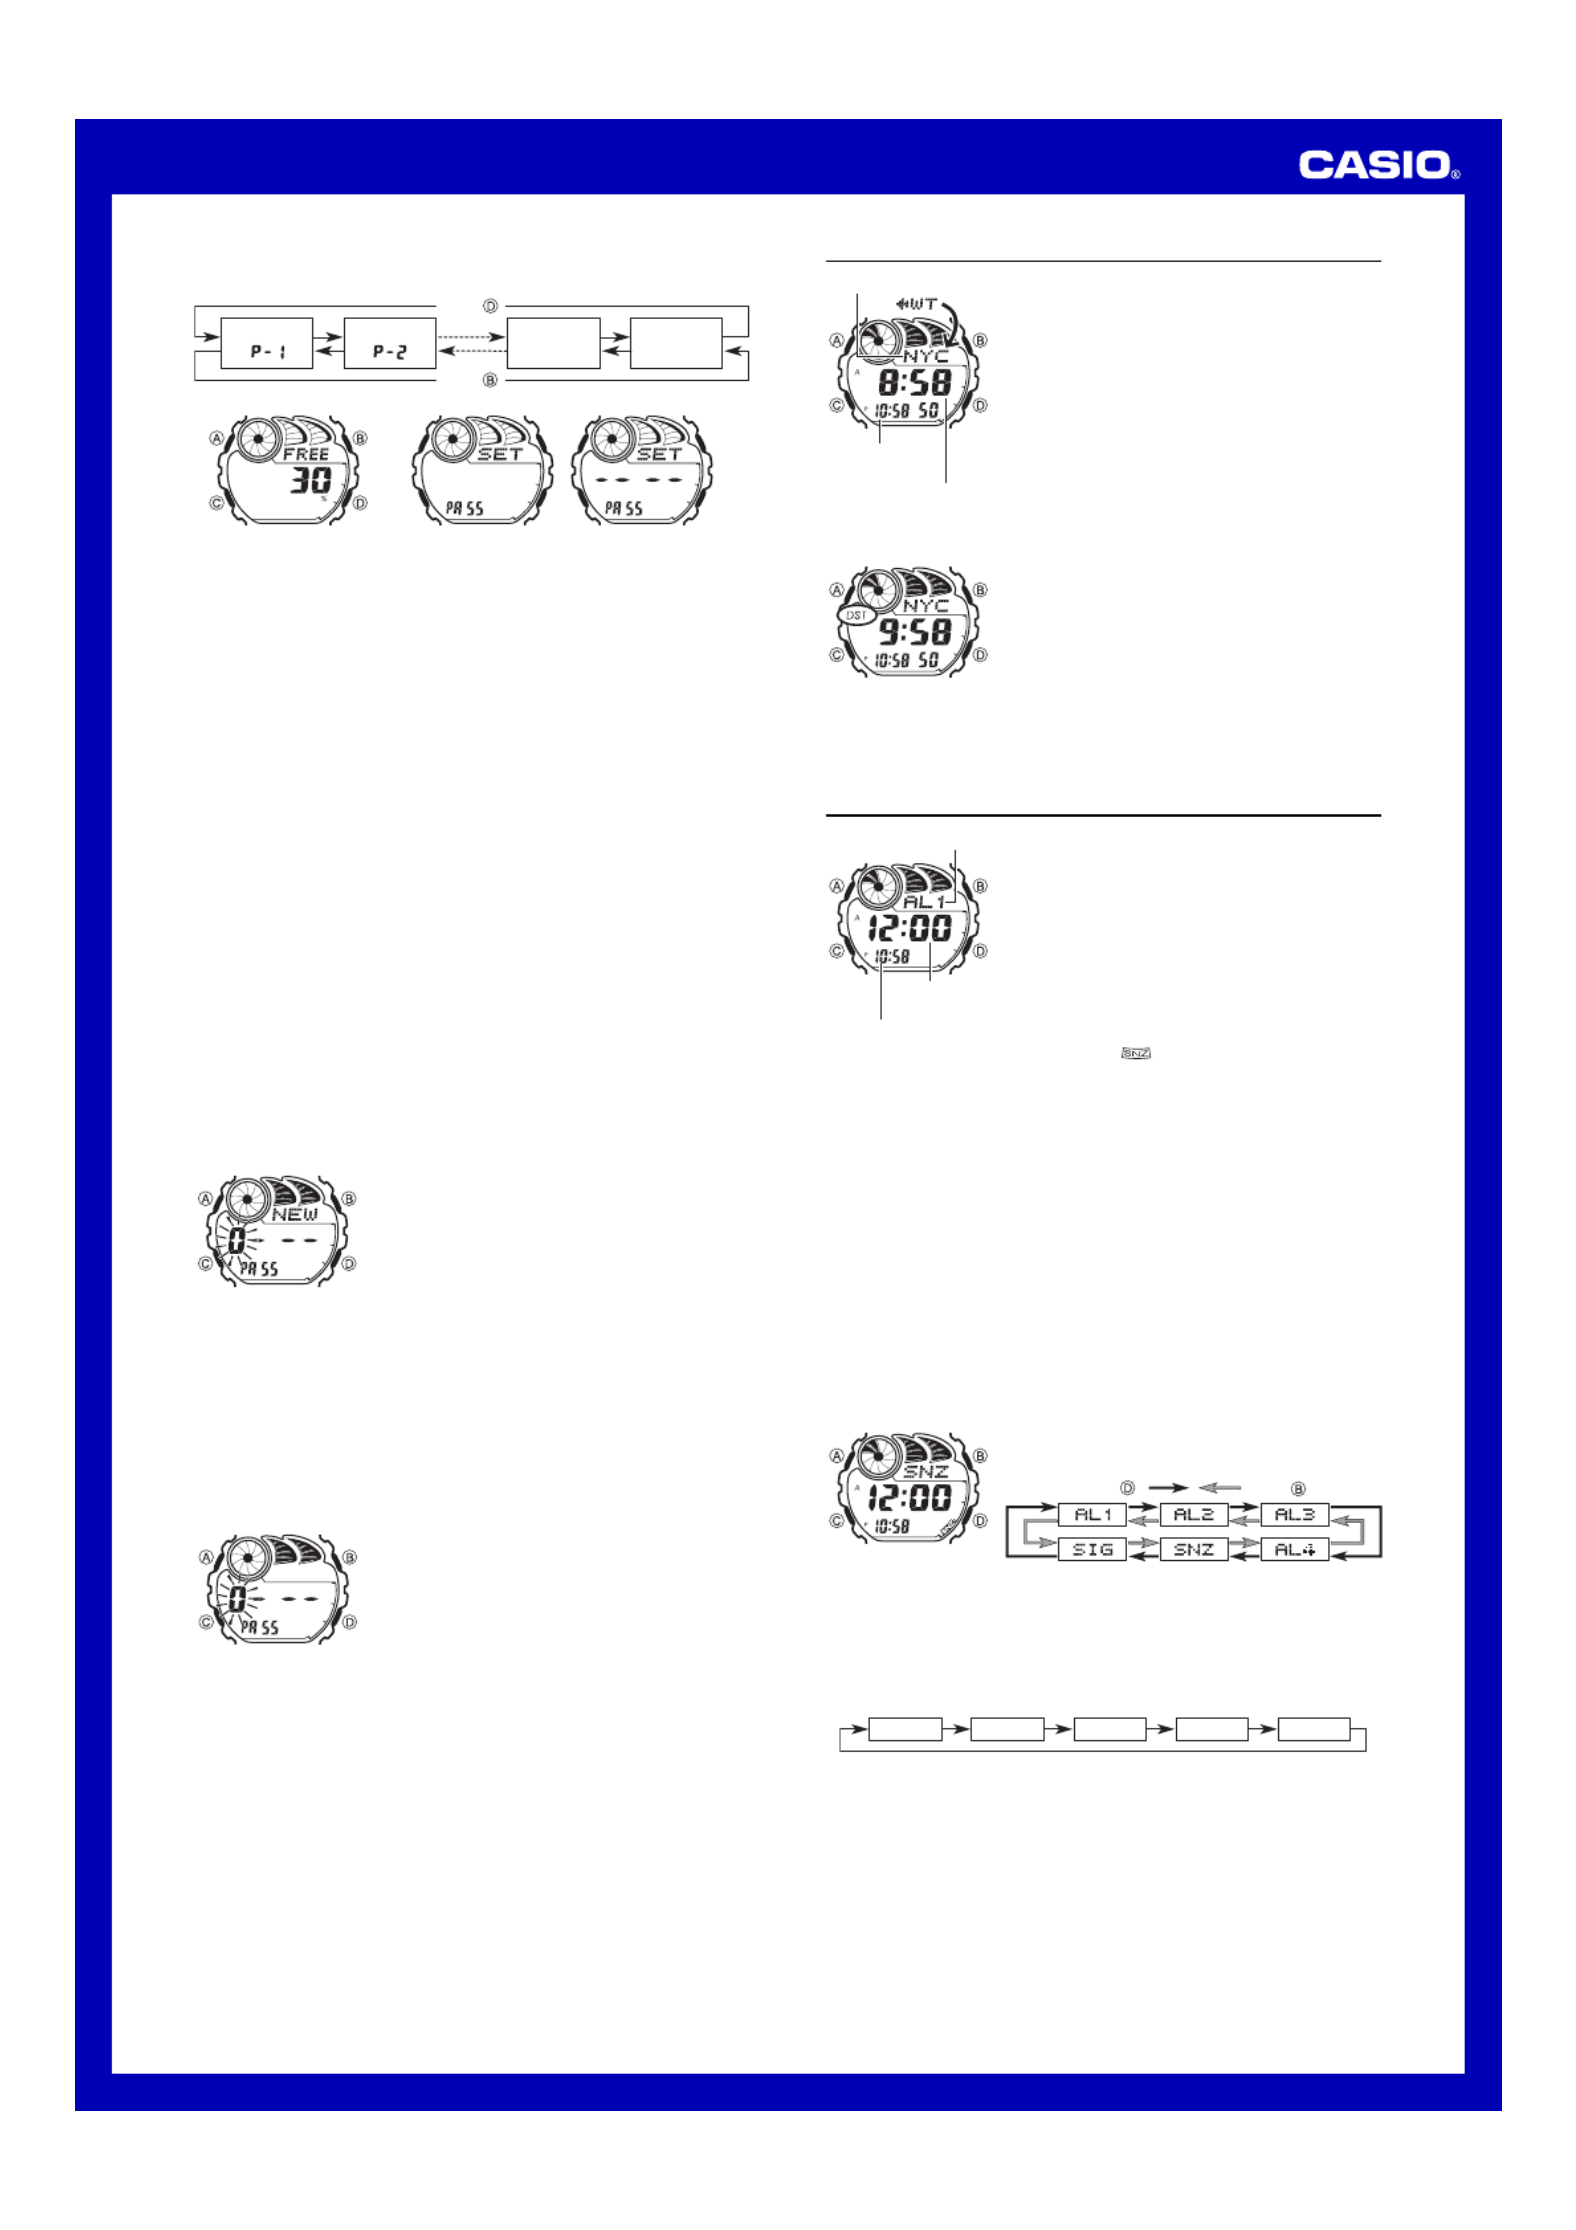
e-DATA MEMORY
You can use the watch s e-DATA MEMORY to store e-mail’
addresses, Web page URLs, and other text data.
You can also use a password to limit access to e-DATA
MEMORY contents.
•All of the operations in this section are performed in the
e-DATA MEMORY Mode, which you enter by pressing
C.
e-DATA MEMORY Management
e-DATA MEMORY can hold up to 315 characters total,
while each record can contain up to 63 characters. The
maximum number of records depends on the number of
characters per record, as shown below.
•63 characters per record: 5 records
•7 or fewer characters per record: 40 records
To create a new e-DATA MEMORY record
1. In the e-DATA MEMORY Mode, press D B and at the
same time to display the remaining memory screen.
•If 0 % is shown for remaining memory, it means that
memory is full. To store another record, you will first
have to delete some of the records stored in memory.
2. Hold down A until the flashing cursor ( #) appears on
the display, which indicates the setting screen.
•The setting screen also shows the record number that
is automatically assigned to the new record.
3. Input the text you want.
•When inputting the text, use D B (+) and (–) to
cycle through characters at the current cursor
location, and to move the cursor to the right. SeeC
“Inputting Text”.
Record number
(Page number)
Text
Remaining memory (%)
4. Press A to store your data and return to the e-DATA MEMORY record screen
(without the cursor).
•Pressing A causes the message SET to appear for about two seconds as the
data is stored. After that, the e-DATA MEMORY record screen appears.
•The text can show only three characters at a time, so longer text scrolls
continuously from right to left. The last character is indicated by the symbol s after
it. Press to stop and restart scrolling.A
•Records are stored in memory in the sequence they are created.
Operation Guide 2548/2821
2
To recall e-DATA MEMORY records
In the e-DATA MEMORY Mode, use ) to cycle through e-DATAD (+) and B (–
MEMORY records as shown below.
Press .
Press .
Remaining
memory
screen
Record 1
( )
Record 2
( )
Password
setting
screen
Remaining Memory Screen Password Setting Screen
•The value on the remaining memory screen is the percentage of memory that
is still available. It does not indicate the number of records that can be stored.
•The Password Setting screen shows xxxx when a password is already
registered.
•You can use the Password Setting screen to register, edit, or delete your
password. See Using a Password to Protect e-DATA MEMORY Data“ ” for
more information.
To edit an e-DATA MEMORY record
1. In the e-DATA MEMORY Mode, use D B (+) and (–) to display the record
you want to edit.
2. Hold down A until the flashing cursor appears on the display.
3. Use C to move the flashing to the character you want to change.
4. Use D B (+) and (–) to change the character.
5. After making the changes you want, press A to store them and return to the
e-DATA MEMORY record screen.
To delete an e-DATA MEMORY record
1. In the e-DATA MEMORY Mode, use D B (+) and (–) to display the record
you want to delete.
2. Hold down A until the flashing cursor appears on the display.
3. Press B and D at the same time to delete the record.
•The message CLR appears to indicate that the record is being deleted.
After the record is deleted, the cursor appears on the display, ready for
input.
4. Input data or press A to return to the remaining memory screen.
Using a Password to Protect e-DATA MEMORY Data
You can register a 4-digit password to keep e-DATA MEMORY data secure.
Important!
Use a 4-digit password that is easy for you to remember, but difficult for others
to decipher. If you forget the password, you will have to have your watch
initialized (which deletes all data in memory) in order to access the e-DATA
MEMORY again. To have the watch initialized, contact the store or dealer where
you purchased it, and ask to have the AC operation performed.
To register a new password
1. In the e-DATA MEMORY Mode, use D (+) and
B (–) to display the Password Setting screen.
•This displays a screen that shows SET PA55.
2. Hold down A for about one second until NEW
appears, with the first 0 flashing.
•This is the New Password Setting screen.
3. Use D B (+) and (–) to scroll through numbers at the first digit.
4. When the first digit is the number you want, press C to advance to the next digit.
5. Repeat steps 3 and 4 to input all four digits of the password you want.
•Pressing A while inputting a new password clears your input and returns to the
Password Setting screen.
6. After all four of the password digits are the way you want, press C to register
them.
•Pressing C causes the message SET to appear for about one second as the
password is stored. After that, the Password Setting screen appears.
•After registering a password, you can input, recall, edit and delete data, if you want.
After you exit the e-DATA MEMORY Mode, you will have to input the password
every time you want to enter it again.
To input the password
1. Enter the e-DATA MEMORY Mode.
2. On the Password Input screen (xxxx PA55 ), press D
or B. This causes the first digit of the password to
flash.
3. Input the password.
•Use D (+) and B (–) to scroll through numbers at
each digit.
•Press C to advance to the next digit.
•Pressing A while inputting the password clears your
input and returns to the Password Input screen.
4. After the password is the way you want, press C.
•If the input password matches the one registered, the message OK!appears,
followed by an e-DATA MEMORY screen.
•If the password does not match, the message ERR appears, followed by the
Password Input screen.
To change the password
1. Enter the e-DATA MEMORY Mode by inputting the current password.
2. Use D B (+) and (–) to display the Password Setting screen.
3. Perform the procedure starting from step 2 under “To register a new password to”
specify the new password.
To delete the password
1. Enter the e-DATA MEMORY Mode by inputting the current password.
2. Use D B (+) and (–) to display the Password Setting screen.
3. Hold down A for about one second until NEW appears, with the first 0 flashing.
4. Press B and D at the same time to delete the password.
•The message CLR appears to indicate that the password is being deleted. After the
password is deleted, the Password Setting screen appears.
World Time
World Time shows the current time in 27 cities (29 time
zones) around the world.
•All of the operations in this section are performed in the
World Time Mode, which you enter by pressing C.
To view the time in another city code
In the World Time Mode, press to scroll through cityD
codes (time zones) to the east or to scroll to the west.B
•For full information about city codes, see the “City Code
Table”.
•If the current time shown for a city is wrong, check your
Timekeeping Mode time and Home City code settings
and make the necessary changes.
•When the currently selected time zone is one that includes
mostly ocean, a value indicating the zone s Greenwich’
Mean Time differential appears in place of a city code.
To toggle a city code time between Standard Time and Daylight Saving Time
1. In the World Time Mode, use B D and to display the
city code (time zone) whose Standard Time/Daylight
Saving Time setting you want to change.
2. Hold down A for about one second to toggle Daylight
Saving Time (DST displayed) and Standard Time (DST
not displayed).
•The DST indicator is on the display whenever you
display a city code for which Daylight Saving Time is
turned on.
•Note that the DST/Standard Time setting affects only the currently displayed city
code. Other city codes are not affected.
•Note that you cannot switch between Standard Time and Daylight Saving Time while
GMT is selected as the city code.
Current time in the zone
of the selected city code
Timekeeping
Mode time
City code
Alarms
You can set up to five independent multi-function alarms
with hour, minutes, month, and day. When an alarm is
turned on, the alarm tone sounds when the alarm time is
reached. One of the alarms is a snooze alarm, while the
other four are one-time alarms. You can also input
reminder text that appears when the alarm time is
reached.
You can also turn on an Hourly Time Signal that causes
the watch to beep twice every hour on the hour.
•There are five alarm screens numbered AL1through
AL4 for the one-time alarm, a snooze alarm screen
indicated by SNZ. The Hourly Time Signal screen is
indicated by SIG.
•In the case of the snooze alarm screen, the snooze
alarm indicator ( ) appears in the lower right corner
of the display.
•Alarm settings (and Hourly Time Signal settings) are available in the Alarm Mode,
which you enter by pressing C.
Alarm Types
The alarm type is determined by the settings you make, as described below.
• Daily alarm
Set the hour and minutes for the alarm time. This type of setting causes the alarm to
sound everyday at the time you set.
• Date alarm
Set the month, day, hour and minutes for the alarm time. This type of setting causes
the alarm to sound at the specific time, on the specific date you set.
• 1-Month alarm
Set the month, hour and minutes for the alarm time. This type of setting causes the
alarm to sound everyday at the time you set, only during the month you set.
• Monthly alarm
Set the day, hour and minutes for the alarm time. This type of setting causes the alarm
to sound every month at the time you set, on the day you set.
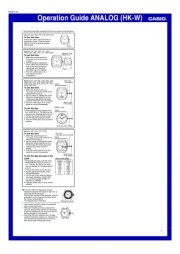
To set an alarm time
1. In the Alarm Mode, use D and B to scroll through the
alarm screens until the one whose time you want to set
is displayed.
Press .Press .
•To set a one-time alarm, display one of the screens indicated by an alarm number
from AL1 AL4through . To set the snooze alarm, display the screen indicated
by SNZ.
•The snooze alarm repeats every five minutes.
2. After you select an alarm, hold down A until the hour setting of the alarm time
starts to flash, which indicates the setting screen.
•This operation automatically turns on the alarm.
3. Press C to move the flashing in the sequence shown below to select other settings.
Hour TextMinutes Month Day
•Selecting the text causes the text input cursor (#) to appear. There are eight
spaces in the text, so you have to press eight times to move to the HourC
setting.
Alarm time
(Hour : Minutes)
Alarm number
Timekeeping Mode time

Operation Guide 2548/2821
3
To use the countdown timer
Press D while in the Countdown Timer Mode to start the countdown timer.
•When the end of the countdown is reached and auto-repeat is turned off, the alarm
sounds for 10 seconds or until you stop it by pressing any button. The countdown
time is automatically reset to its starting value after the alarm stops.
•When the end of the countdown is reached and auto-repeat is turned on, the alarm
sounds, but the countdown starts again automatically whenever the countdown
reaches zero.
•The countdown timer measurement operation continues even if you exit the
Countdown Timer Mode.
•Press D while a countdown operation is in progress to pause it. Press D again to
resume the countdown.
•To completely stop a countdown operation, first pause it (by pressing ), and thenD
press B. This returns the countdown time to its starting value.
To set up the countdown timer
1. While the countdown start time is on the display in the
Countdown Timer Mode, hold down A until the hour
setting of the countdown start time starts to flash, which
indicates the setting screen.
•If the countdown start time is not displayed, use the
procedure “To use the countdown timer to display it.”
2. Press C to move the flashing in the sequence shown
below to select other settings.
Auto-repeatMinutes
Hours
3. While a setting is flashing, use D and B to change it as described below.
•Note that Module 2821 does not display an AM indicator (A).
•Pressing and at the same time while any setting is flashing automaticallyB D
sets the time to AM12:00 and the date to x-xx. It also clears any text that is input
for the alarm.
5. Press A to exit the setting screen.
•If you input reminder text, the text appears in place of
the alarm number.
•If the reminder text is more than three characters, it will
scroll form right to left.
•If the alarm has a month and/or day setting, the month/
day appears at the bottom of the display, in place of the
Timekeeping Mode time.
4. While a setting is flashing, use D B C, , and to change it as described below.
Snooze alarm indicator
Alarm on indicator
Screen
A12:00
x-xx
#
To do this:
Change the hour
and minutes
Change the
month and day
Input reminder
text
Do this:
Use ).D (+) and B (–
•With the 12-hour format, set the time correctly as a.m.
(A indicator) or p.m. (P indicator).
•To set an alarm that does not include a month and/or
day, set for each setting.x
Use D (+) and B (–) to cycle through characters at the
current cursor location, and to move the cursor to theC
right. See “Inputting Text”.
Screen
0:15
OFF
To do this:
Change the hours or minutes
Toggle auto-repeat on (ON) and off (OFF)
Do this:
Use ).D (+) and B (–
Press .D
•To specify a countdown start time of 24 hours, set 0:00.
4. Press A to exit the setting screen.
•
The auto-repeat on indicator ( ) appears on the display while this function is turned on.
•Frequent use of auto-repeat and the alarm can run down battery power.
Stopwatch
The stopwatch lets you measure elapsed time, split times,
and two finishes.
•The display range of the stopwatch is 23 hours,
59 minutes, 59.99 seconds.
•The stopwatch continues to run, restarting from zero
after it reaches its limit, until you stop it.
•The stopwatch measurement operation continues even
if you exit the Stopwatch Mode.
•Exiting the Stopwatch Mode while a split time is frozen
on the display clears the split time and returns to
elapsed time measurement.
•All of the operations in this section are performed in the
Stopwatch Mode, which you enter by pressing .C
To measure times with the stopwatch
Elapsed Time
Start Stop Re-start Stop Clear
Start Split
( displayed)
Split release Stop Clear
Start Split Stop Split release Clear
Split Time
Two Finishes
First runner
finishes.
Display time of
first runner.
Second runner
finishes.
Display time of
second runner.
•The time on the screen may not appear to stop immediately when you press a
button to stop timing or to perform a split operation. Despite this, the time recorded
by your button operation is accurate.
Seconds
1/100 second
Hours
Minutes
Backlight
The backlight uses an EL (electro-luminescent) panel that
causes the entire display to glow for easy reading in the
dark. The watch’s auto light switch automatically turns on
the backlight when you angle the watch towards your
face.
•The auto light switch must be turned on (indicated by
the auto light switch on indicator) for it to operate.
•See “Backlight Precautions” for other important
information about using the backlight.
To turn on the backlight manually
In any mode, press L to illuminate the display for about
one second.
•The above operation turns on the backlight regardless of
the current auto light switch setting.
Auto light switch on
indicator
Module 2821
Alarm Operation
All of the graphic area segments start to flash, starting
from the point the Timekeeping Mode time reaches one
hour before an alarm time. This pre-alarm feature lets you
know that an alarm time is about to be reached.
The alarm tone sounds at the preset time for 10 seconds,
regardless of the mode the watch is in. In the case of the
snooze alarm, the alarm operation is performed a total of
seven times, every five minutes, until you turn the alarm
off.
•To stop the alarm tone after it starts to sound, press any button.
•The pre-alarm feature works in the Timekeeping Mode only. To stop the pre-alarm
after it starts, press any button. Note, however, that pressing also changes to theC
e-DATA MEMORY Mode.
•If you input reminder text for an alarm, the text appears for one minute on the
Timekeeping Mode screen when the alarm time is reached. You can clear the
reminder text display by pressing , or , or by exiting the TimekeepingA B, D
Mode.
•In the case of the snooze alarm, the reminder text appears on the Timekeeping
Mode screen for the initial alarm operation only.
•Performing any one of the following operations during a 5-minute interval between
snooze alarms cancels the current snooze alarm operation.
Displaying the Timekeeping Mode setting screen
Displaying the
SNZ
setting screen
Changing the DST setting of the Home City code in the World Time Mode
To test the alarm
In the Alarm Mode, hold down to sound the alarm.D
To turn an alarm on and off
1. In the Alarm Mode, use D B and to select an alarm.
2. Press A to toggle it on and off.
•Turning on a alarm (AL1 AL4 SNZto , or ) displays
the alarm on indicator ( ) on its Alarm Mode screen.
•In all modes, the alarm on indicator is shown for any
alarm that is currently turned on.
•The alarm on indicator flashes while the alarm is
sounding.
•The snooze alarm indicator ( ) flashes while the
snooze alarm is sounding and during the
5-minute intervals between alarms.
To turn the Hourly Time Signal on and off
1. In the Alarm Mode, use D B and to select the Hourly
Time Signal (SIG).
2. Press A to toggle it on (ON) and off (OFF ).
•The Hourly Time Signal on indicator ( ) is shown on
the display in all modes while this function is turned on.
Graphic areas
Alarm on indicator
Hourly time signal o
n
indicator
Countdown Timer
You can set the countdown timer within a range of
one minute to 24 hours. An alarm sounds when the
countdown reaches zero.
•You can also select auto-repeat, which automatically
restarts the countdown from the original value you set
whenever zero is reached.
•The initial default countdown start time when you
purchase the watch or after you have its battery
replaced is 15 minutes.
•Countdown timer functions are available in the
Countdown Timer Mode, which you can enter using C.
Hours Minutes
Seconds
Timekeeping Mode time
Product specificaties
| Merk: | Casio |
| Categorie: | Horloge |
| Model: | G-Shock G-2900F-8VER |
Heb je hulp nodig?
Als je hulp nodig hebt met Casio G-Shock G-2900F-8VER stel dan hieronder een vraag en andere gebruikers zullen je antwoorden
Handleiding Horloge Casio
18 Juni 2025
17 Juni 2025
17 Juni 2025
16 Juni 2025

16 Juni 2025
16 Juni 2025
16 Juni 2025
16 Juni 2025
16 Juni 2025
16 Juni 2025
Handleiding Horloge
- Movado
- Habitat
- Lotus
- Geemarc
- Gc
- Sekonda
- Irox
- Olivia Burton
- Breo
- Rodania
- TomTom
- Adidas
- Mondaine
- PANERAI
- Girard-Perregaux
Nieuwste handleidingen voor Horloge
5 Juli 2025

5 Juli 2025
4 Juli 2025
4 Juli 2025
4 Juli 2025

4 Juli 2025
4 Juli 2025

2 Juli 2025
1 Juli 2025
21 Juni 2025