Casio G-7710-1ER Handleiding

Casio Horloge G-7710-1ER

Lees hieronder de đź“– handleiding in het Nederlandse voor Casio G-7710-1ER (5 pagina's) in de categorie Horloge. Deze handleiding was nuttig voor 19 personen en werd door 2 gebruikers gemiddeld met 4.5 sterren beoordeeld

Pagina 1/5
1
Operation Guide 3095
MA0707-EA
About This Manual
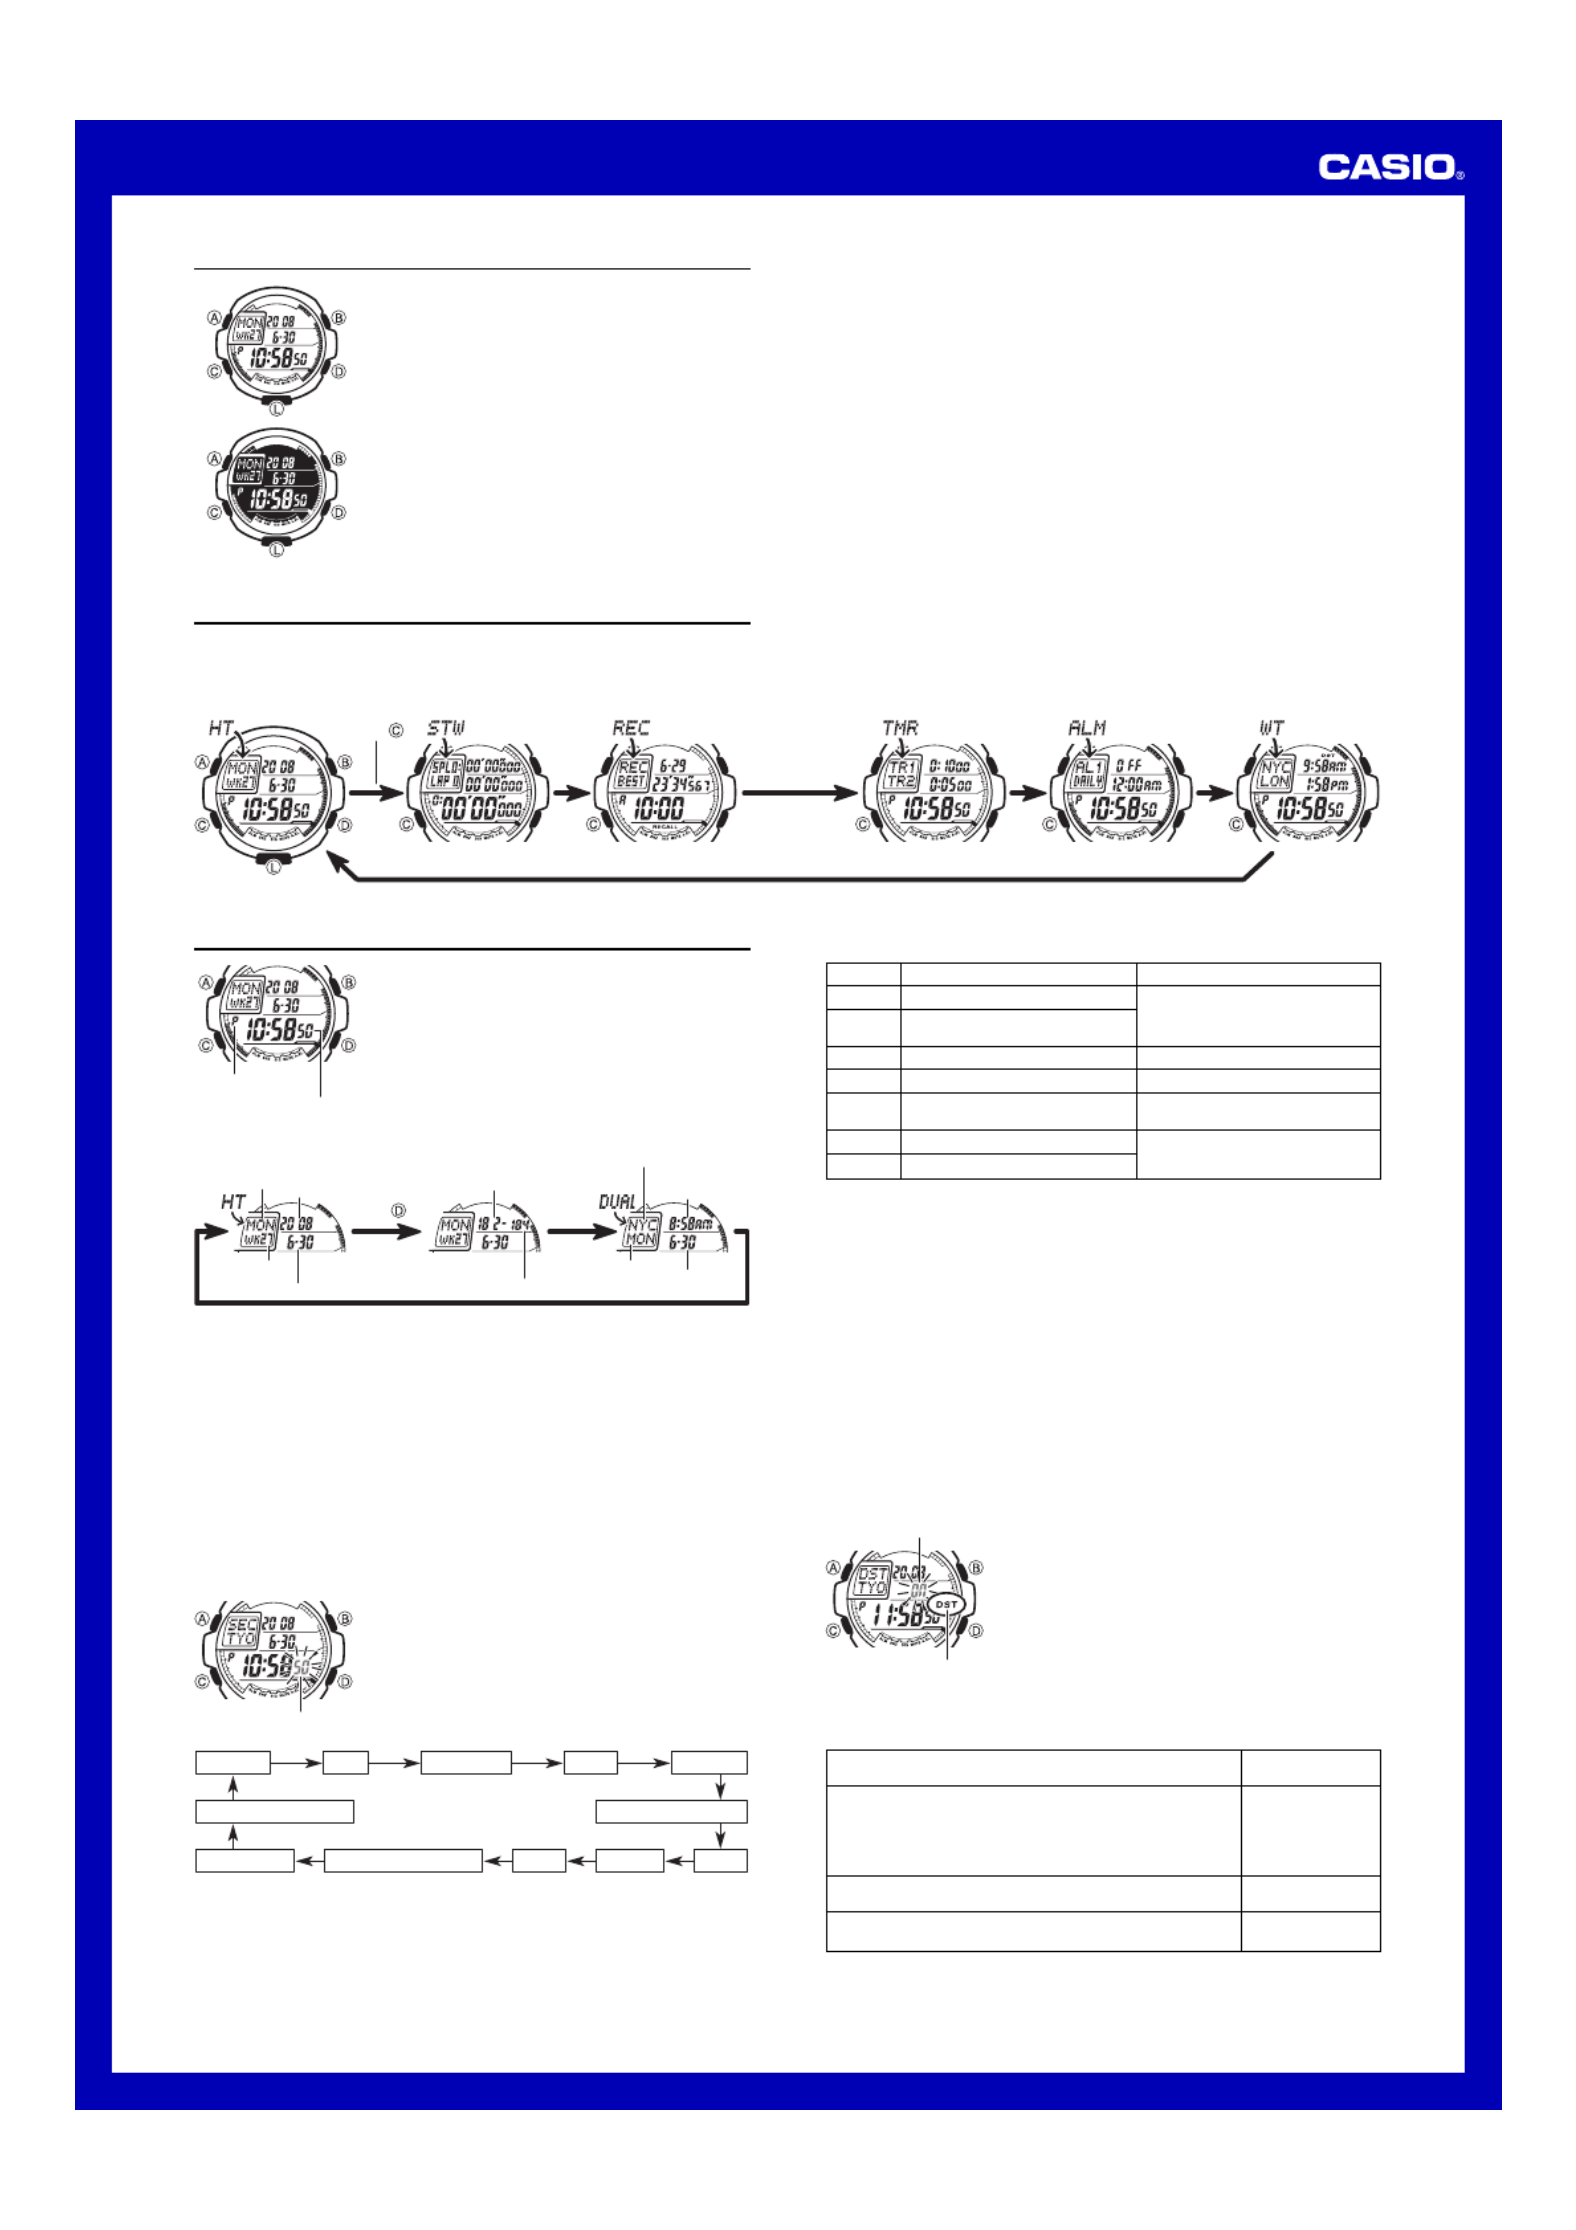
•Depending on the model of your watch, display text
appears either as dark figures on a light background or
light figures on a dark background. All sample displays
in this manual are shown using dark figures on a light
background.
•Button operations are indicated using the letters shown
in the illustration.
•Each section of this manual provides you with the
information you need to perform operations in each
mode. Further details and technical information can be
found in the “Reference” section.
Press .
Timekeeping Mode Stopwatch Mode Recall Mode Countdown Timer Mode Alarm Mode World Time Mode
General Guide
•Press C to change from mode to mode.
•In any mode, press L to illuminate the display for about one second.
Hour : Minutes Seconds
PM indicator
Timekeeping
Use the Timekeeping Mode to set and view the current
time and date. You can select from among the three
different Timekeeping Mode screens shown below.
•Whenever you enter the Timekeeping Mode from
another mode, the indicator in the upper left corner of
the screen will show if the Dual Time screen isDUAL
selected. If the Home City Time screen or Elapsed/
Remaining Day screen is selected, the indicator will
show HT.
Week number
Day of week Elapsed
number of days
Dual Time City code
Current time in
Dual Time City
Current day of
the week in
Dual Time City
Current date in
Dual Time City
Remaining
number of days
Month – Day
Year
Home City Time Elapsed/Remaining Days Dual Time
Press .
•You can use in the Timekeeping Mode to cycle through the different screensD
shown above, which changes the information in the top of the screen.
•The Elapsed/Remaining Days screen shows the number of days that have elapsed
from January 1 of the current year (Elapsed Days), and the number of days
remaining until December 31 of the current year (Remaining Days).
•The Dual Time screen shows the current time in your Home City and another city
(Dual Time City).
Read This Before You Set the Time and Date!
The time setting of the Dual Time City as well as all of the times in the World Time
Mode are based on the current time you set for your Home City in the Timekeeping
Mode. Because of this, make sure you select a city code for your Home City (the city
where you normally use the watch) before you set the time and date.
•For full information on city codes, see the “City Code Table”.
•For more information about Dual Time, see Using Dual Time“ ”.
To set the time and date
1. In the Timekeeping Mode, hold down A until the
seconds start to flash, which indicates the setting
screen.
2. Press C to move the flashing in the sequence shown
below to select other settings.
Seconds
Seconds DST City Code Hour Minutes
Day Month Year
12/24-Hour FormatContrast Adjustment
Week Count MethodFlash Alert
Screen
50
OFF
TYO
P
10:58
12H
2008
6-30
To do this:
Reset the seconds to 00
Toggle between Daylight Saving
Time (ON) and Standard Time (OFF)
Change the city code
Change the hour or minutes
Toggle between 12-hour ( )12H
and 24-hour ( ) timekeeping24H
Change the year
Change the month or day
Do this:
Press .D
Use D (east) and B (west).
Use ).D (+) and B (–
Press .D
Use ).D (+) and B (–
3. When the setting you want to change is flashing, use and to change it asD B
described below.
•See “Daylight Saving Time (DST) for details about the DST setting.”
•The following shows where you should go in order to find more information about
the above settings.
Week count method: “Week Number”
Flash alert: “Flash Alert”
Contrast adjustment: “Contrast Adjustment”
4. Press A twice to exit the setting screen.
•The first press of A will display the Dual Time setting screen.
•Resetting the seconds to 00 while the current count is in the range of 30 to 59
causes the minutes to be increased by 1. In the range of 00 to 29, the seconds are
reset to 00 without changing the minutes.
•The day of the week is displayed automatically in accordance with the date (year,
month, and day) settings.
Daylight Saving Time (DST)
Daylight Saving Time (summer time) advances the time setting by one hour from
Standard Time. Remember that not all countries or even local areas use Daylight
Saving Time.
To toggle the Timekeeping Mode time between DST and Standard Time
1. In the Timekeeping Mode, hold down A until the
seconds start to flash, which indicates the setting
screen.
2. Press C to display the DST setting screen.
3. Press D to toggle between Daylight Saving Time (ON
displayed) and Standard Time (OFF displayed).
4. Press A twice to exit the setting screen.
•The DST indicator appears on the display to indicate
that Daylight Saving Time is turned on.
To count like this:
Start each week from Monday, and count the week that contains
the first Thursday as the first week of the year.
• This counting method is specified by ISO8601.
• Due to the ways that weeks are counted, the year of a particular
week may be different from a date that occurs during that week.
Example: January 1, 2005 is Week 53 of 2004
.
Start each week from Monday, and count the week that contains
January 1 as the first week of the year.
Start each week from Sunday, and count the week that contains
January 1 as the first week of the year.
Select this
counting method:
ISO
MON
SUN
DST indicator
On/Off status
Week Number
The week number shows the number of the current date in the current year. You can
select from among the following three types of week counting methods.
2
Operation Guide 3095
Current date in
Dual Time City
Dual Time City code
Current time in
Dual Time City
Current day of
the week in Dual Time City
Week countin
g
method
Week number
To specify the week counting method
1. In the Timekeeping Mode, hold down A until the
seconds start to flash, which indicates the setting
screen.
2. Press C nine times to display the week count method
screen.
3. Use D B and to cycle through the week counting
methods in the sequence shown below.
Press .
Press .
4. Press A twice to exit the setting screen.
Using Dual Time
In the Timekeeping Mode, you can display a Dual Time
screen that shows the current time and date in your Home
City and in one other city (Dual Time City). You can select
the city you want to use as your Dual Time City. You also
can specify Standard Time or Daylight Saving Time for the
Dual Time City.
•The initial factory default Dual Time City setting is NYC
(New York City).
•For information about display the Dual Time screen.
•Whenever you enter the Timekeeping Mode from
another mode, the indicator in the upper left corner of
the screen will show DUAL if the Dual Time screen is
selected. If the Home City Time screen or Elapsed/
Remaining Day screen is selected, the indicator will
show HT.
Dual Time City code
On/Off status
DST indicator
To switch the Dual Time City between Daylight Saving Time and Standard Time
1. In the Timekeeping Mode, hold down A until the
seconds start to flash, which indicates the setting
screen.
2. Press A again.
•This will display the Dual Time City DST setting
screen.
3. Press D to toggle the Dual Time between Daylight
Saving Time (ON displayed) and Standard Time (OFF
displayed).
4. Press A to exit the setting screen.
•The DST indicator appears on the display to indicate
that Daylight Saving Time is turned on.
To change the Dual Time City code
1. In the Timekeeping Mode, hold down A until the
seconds start to flash, which indicates the setting
screen.
2. Press A again.
3. Press C once to display the Dual Time City selection
screen.
4. Use D B (east) and (west) to scroll through the
available city codes.
•For full information on city codes, see the “City Code
Table”.
5. Press A to exit the setting screen.
Stopwatch
The 1/1000-second stopwatch measures elapsed time, as well as lap/split times, and
has an Auto-Start feature. Measurements taken using the stopwatch can
be stored in memory for later recall with the Recall Mode.
•“ ”Lap time is the time spent to cover a specific segment of a race, such as one lap
around a track. Split time is the time spent from the beginning of a race up to a“ ”
certain point.
•For information about how data recorded with the stopwatch is stored in memory,
see .“Memory Management”
•The stopwatch measurement operation continues even if you exit the Stopwatch
Mode.
•The stopwatch continues to run, restarting from zero after it reaches its limit, until
you stop it.
•All of the operations in this section are performed in the Stopwatch Mode, which you
enter by pressing C.
•While the stopwatch is stopped and reset to all zeros, you can press B to switch
between the elapsed time and lap time screens.
Elapsed Time Screen Lap Time Screen
Press .
Elapsed time
Lap time Lap number
Split time
Current lap time
Lap time Lap number
Split time
•The Elapsed Time screen is recommended when you want to view the elapsed time
during split/lap time readings.
•The Lap Time screen is recommended when you want to view the current lap time
during split/lap time readings.
•The measurement range of the Elapsed Time Screen elapsed time (bottom of the
screen) and split time (top of the screen) is 9 hours, 59 minutes, 59.999 seconds.
The measurement range of the lap time (center of the screen) is 59 minutes, 59.999
seconds.
•The measurement range of the Lap Time Screen lap time (bottom of the screen) and
split time (top of the screen) is 9 hours, 59 minutes, 59.999 seconds. The display
range of the previous lap time (center of the screen) is 59 minutes, 59.999 seconds.
Elapsed time
Lap time
Lap number
Split time
Elapsed Time Screen
Measuring Elapsed Time
Use the following procedure to perform a basic elapsed time operation with the
stopwatch.
To measure elapsed time
1. While the stopwatch is stopped and reset to all zeros,
press B to display the Elapsed Time screen.
•If the stopwatch is not reset to all zeros, stop the
stopwatch and then press to reset to all zeros.B
2. Press D to start the stopwatch elapsed time operation.
3. Press D to stop the elapsed time operation.
•You can restart the elapsed time operation by pressing
D again.
•After stopping the elapsed time operation, press B to
reset to all zeros.
Current lap time
Lap time
Lap number
Split time
Lap Time Screen
Measuring Split Times and Lap Times
You can use the stopwatch Elapsed Time screen or the Lap Time screen to measure
split times and lap times.
•The Elapsed Time screen is recommended when you want to view the elapsed time
during split/lap time readings.
•The Lap Time screen is recommended when you want to view the current lap time
during split/lap time readings.
To take split time and lap time readings
1. While the stopwatch is stopped and reset to all zeros,
press B to toggle between the Elapsed Time screen
and Lap Time screen.
•If the stopwatch is not reset to all zeros, stop the
stopwatch and then press to reset to all zeros.B
2. Press D to start the stopwatch elapsed time operation.
3. Press B when you want to take a lap and split time
reading.
•Each press of B will display the lap/split time at that
point. You can take up to 999 lap/split readings during
a single elapsed time operation.
4. Press D when you want to stop the elapsed time
operation.
•You can press to re-start the stopwatch elapsed timeD
operation, if you want.
•The watch’s memory can store up to 99 lap times. If you stop an elapsed time
operation during which you recorded more than 99 lap times, any lap times past Lap
99 will not be stored in watch memory. If you restart the elapsed time operation in
this case, the display will show for the last lap time until you record then-- -- ---' ''
next lap time.
•After stopping the elapsed time operation, press B to reset to all zeros.
•One-digit lap numbers (1 to 9) are displayed using the format “ ”LAP 1 .
Example: Lap time number 8: LAP 8
Two- and three-digit lap numbers (10 to 999) are displayed using the format “ ”L.100
or .“ ”L.50
Example: Lap time number 150: L.150
About Auto-Start
With Auto-Start, the watch performs a 5-second countdown, and the elapsed time
operation starts automatically when the countdown reaches zero. Beeper and flash
alert operations are performed for each of the final four seconds of the countdown.
•When the end of the countdown is reached, a beeper operation is performed
followed by a flash alert operation. The alerts are performed separately to avoid
putting too much load on the battery at the same time.
•When Flash Alert is turned on, the red and green LEDs at the bottom of the display
will flash in time with the Auto-Start countdown beeper.
To use Auto-Start
1. While the stopwatch screen is showing all zeros in the
Stopwatch Mode, press A.
•This displays a 5-second countdown screen.
•To return to the all zeros screen, press again.A
2. Press D to start the countdown.
•A stopwatch elapsed time operation will start
automatically when the end of the countdown is
reached.
•To terminate an ongoing countdown and start the elapsed time operation, press D.
•To cancel an ongoing countdown and return to the 5-second countdown screen,
press .B
Memory Management
Your watch has memory for two elapsed time records . Each elapsed time record“ ”
contains the data (elapsed time, lap times, split times, etc.) recorded from the
beginning to the end of an elapsed time measurement.
While an elapsed time operation is in progress in the Stopwatch Mode, the two
elapsed time records in memory are one for the data being produced by the elapsed
time operation you are performing and one for the data produced by the last elapsed
time operation you completed.
When there is no elapsed time operation in progress in the Stopwatch Mode (when
the stopwatch is reset to all zeros), the two elapsed time records in memory consist of
one for the data produced by the last elapsed time operation you completed and one
more record for the elapsed time operation before the last one.
•Whenever you start a new elapsed time operation, the older record currently in
memory is deleted automatically to make room for the new elapsed time data.
•You can use the Recall Mode to view the elapsed time records that currently are in
the watch s memory.’
Elapsed Time Record Data
Each elapsed time record contains the following data.
Total elapsed time
Up to 99 lap/split time records
Start date (month, day) and time of elapsed time measurement
Best lap time and number record
•Each elapsed time record can contain up to 99 lap/split times. The watch will not
store any more lap/split times after the 99th, but the best lap record will continue to
be updated whenever a new lap time betters the time of the current best lap record.
•If there are multiple lap times in an elapsed time record that are the same as the
time of the best lap, the earliest time is used as the best lap time.
•-- is shown for the best lap time if no lap/split time operation was performed during
the elapsed time operation.
3
Operation Guide 3095
Using Auto-start
•If you use Auto-start to start a stopwatch operation, the watch will interpret the
beginning of the Auto-start countdown as the starting point of the elapsed time
operation and will start recording elapsed time record data from there.
•If you press B to stop the Auto-start countdown, all of the data in the elapsed time
record will show to indicate that no data was stored.--
Recall Mode
You can use the Recall Mode to view the elapsed time record data (elapsed time, lap
times, split times, etc.) that you measure with the Stopwatch Mode.
•When you enter the Recall Mode, the newest elapsed time record appears first.
•All of the operations in this section are performed in the Recall Mode, which you
enter by pressing C.
To view elapsed time record data
1. Press C to enter the Recall Mode.
•The Best Lap screen of the newer record that currently is in memory will appear
first.
•Press A when you want to switch to the other (older) record. Each press of A
toggles between the two records.
•The data that appears on the Best Lap screen depends on whether you are
viewing the data of a completed elapsed time operation or an ongoing elapsed
time operation.
•In the case of a completed elapsed time operation, the Best Lap screen will
display information like that shown.
•If an elapsed time operation is in progress in the Stopwatch Mode, what is shown
for the time on the Best Lap screen will depend on whether you have the elapsed
time screen or lap time screen selected in the Stopwatch Mode. If you have the
Elapsed Time screen selected in the Stopwatch Mode, the elapsed time will
appear on the Best Lap screen. If you have the Lap Time screen selected, the
lap/split time will appear on the Best Lap screen.
2. When the Best Lap screen of the elapsed time record you want to view is
displayed, use D and B to scroll through the lap/split times in the record.
Press .
Press .
Final lap/split timeFirst lap/split timeBest Lap Screen
Elapsed time
Hours : Minutes
Best Lap
indicator
Lap time
Split time
Month/Day
Lap time Lap number
Timekeeping
Mode time
TR2 countdown time
(hours, minutes, seconds)
TR1 countdown time
(hours, minutes, seconds)
Countdown Timer
Your watch comes with two countdown timers named TR1
(Timer 1) and TR2 (Timer 2). The setting range for the
countdown timers is from one second to 99 hours, 59
minutes, 59 seconds. The countdown startsTR2
automatically when the countdown reaches zero.TR1
The countdown timers can be used for interval training
(for example, three minutes running with , 1 minuteTR1
rest with ) or for timing an multi-period event (forTR2
example, 45 minutes of play with , 15 minutes restTR1
with ).TR2
•The initial factory default settings are 10 minutes for
TR1 TR2 and 5 minutes for .
•All of the operations in this section are performed in the
Countdown Timer Mode, which you enter by pressing
C.
To configure countdown timer settings
1. In the Countdown Timer Mode, hold down A until the
hour setting of the countdown time starts to flash.TR1
This is the setting screen.
2. Press C to move the flashing in the sequence shown
below to select other settings.
TR1
Hours TR1
Minutes TR1
Seconds
TR2
Seconds TR2
Minutes TR2
Hours
3. While a setting is flashing, use D B (+) and (–) to change it.
•Any timer whose start time is will not be used during the countdown timer0:00 00
operation.
4. Set the times of all of the timers that you want.
5. Press A to exit the setting screen.
To perform a countdown timer operation
In the Countdown Timer Mode, press D to start the countdown.TR1
•When the TR1 countdown reaches zero, the TR2 countdown will start automatically.
•To pause the countdown timer that currently is counting down, press . Press D D
again to restart.
•If start time of a countdown timer is zero ( ), that timer will be skipped.0:00 00
•The watch will continue cycling the countdown automatically between TR1 TR2 and
for five countdowns or until you stop the countdown by pressing D.
•When the countdown of either TR1 TR2 or reaches zero, a beeper sounds for about
10 seconds. If a countdown start time is 10 seconds or less, the beeper will sound
for only about one second when the end of the countdown is reached.
•Regardless of the start time for timer TR2, the beeper will sound for about 10
seconds when reaches the end of its fifth countdown.TR2
•When Flash Alert is turned on, the red and green LEDs at the bottom of the display
will flash in time with the beeper that sounds when the TR1 or TR2 countdown
reaches zero.
•An ongoing countdown timer operation continues to be performed even if you exit
the Countdown Timer Mode.
•To stop a countdown timer operation, first press to pause the countdown of theD
current timer, and then press . This will reset the countdown timers to theirB
starting times.
Timekeeping
Mode time
AM indicator
On/Off status
Alarm time
(Hour : Minutes)
Alarms
Your watch has five independent multi-function alarms.
You can set the hour and minute for the alarm time, and
you can select one of four repeat patterns (week day,
weekend, Daily, One-time). One of the alarms is a snooze
alarm.
You also can turn on an Hourly Time Signal that causes
the watch to beep twice every hour on the hour. You can
specify the Hourly Time Signal repeat pattern, and a start
time and end time.
•There are five alarm screens, each of which shows an
alarm name: to , and AL1 AL4 SNZ. The Hourly Time
Signal is indicated by SIG.
•When you enter the Alarm Mode, the data you were
viewing when you last exited the mode appears first.
•All of the operations in this section are performed in the
Alarm Mode, which you enter by pressing C.
Repeat Patterns
You can select from among four repeat patterns for the multi-function alarms, and
three repeat patterns for the Hourly Time Signal.
To set an alarm time
1. In the Alarm Mode, use D to scroll through the alarm
screens until the one whose settings you want to
configure is displayed.
•Select alarm screen AL1 through AL4 to configure a
normal alarm. Select the SNZ alarm screen to
configure the snooze alarm.
•The snooze alarm repeats every five minutes.
2. After you select an alarm, hold down A until the hour
setting of the alarm time starts to flash, which indicates
the setting screen.
•This operation turns on the alarm automatically.
3. Press C to move the flashing in the sequence shown
below to select other settings.
Hour
( )HR Minutes
( )MIN Repeat Pattern
( )REP
4. While a setting is flashing, use D B (+) and (–) to change it.
•You can select any one of the four alarm repeat patterns described below.
To configure the alarm to sound:
Daily
Once on the specified date only
Daily on Saturday and Sunday
Daily from Monday through Friday
Select this setting:
DAILY
ONCE
wEND
wDAY
5. Press A to exit the setting screen.
•With the 12-hour format, set the time correctly as a.m. or p.m.
Alarm Operation
The alarm tone sounds at the preset time for 10 seconds, regardless of the mode the
watch is in. In the case of the snooze alarm, the alarm operation is performed a total
of seven times, every five minutes, until you turn the alarm off.
•Alarm and Hourly Time Signal operations are performed in accordance with the
Timekeeping Mode time.
•To stop the alarm tone after it starts to sound, press any button.
•When Flash Alert is turned on, the red and green LEDs at the bottom of the display
will flash in time with the alarm beeper.
•Performing any one of the following operations during a 5-minute interval between
snooze alarms cancels the current snooze alarm operation.
Displaying the Timekeeping Mode setting screen
Displaying the SNZ setting screen
To test the alarm
In the Alarm Mode, hold down to sound the alarm.D
To turn an alarm on and off
1. In the Alarm Mode, use D to select an alarm.
2. Press B to toggle it on (on) and off (OFF).
•Turning on an alarm (AL1 AL4 to , or SNZ) displays the
alarm on indicator on its Alarm Mode screen.
•In all modes, the alarm on indicator is shown for any
alarm that currently is turned on.
•The alarm on indicator flashes while the alarm is
sounding.
•The snooze alarm indicator flashes while the snooze
alarm is sounding and during the 5-minute intervals
between alarms.
Snooze alarm
indicator
Alarm on indicator
On/Off status


Product specificaties

Merk: Casio
Categorie: Horloge
Model: G-7710-1ER
Timer: 1/1s - 100h
Gewicht: 56 g
Stopwatch: Ja
Waterbestendig diepte: 200 m
Schokbestendig: Ja
Wereldklok functie: Ja
Alarm functie: Ja
Agenda: Ja
Snooze functie: Ja
Klokmodus: 12/24 uur
Nauwkeurigheid: ±15 sec/maand
Horlogekast materiaal: Kunststof
Band materiaal: Kunststof
Glas type van horloge: Mineraalglas
Levensduur batterij/accu: 5 jaar
Ondersteund aantal accu's/batterijen: 1
Afmetingen (B x D x H): 45.9 x 14.6 x 52.3 mm
Type batterij: CR2025

Heb je hulp nodig?

Als je hulp nodig hebt met Casio G-7710-1ER stel dan hieronder een vraag en andere gebruikers zullen je antwoorden


Handleiding Horloge Casio

Handleiding Horloge

Nieuwste handleidingen voor Horloge