Casio EQW-500DBE-1AVER Handleiding
Bekijk gratis de handleiding van Casio EQW-500DBE-1AVER (4 pagina’s), behorend tot de categorie Horloge. Deze gids werd als nuttig beoordeeld door 39 mensen en kreeg gemiddeld 3.8 sterren uit 20 reviews. Heb je een vraag over Casio EQW-500DBE-1AVER of wil je andere gebruikers van dit product iets vragen? Stel een vraag
Pagina 1/4

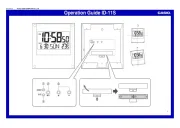
Operation Guide 5041
1
MO0806-EA
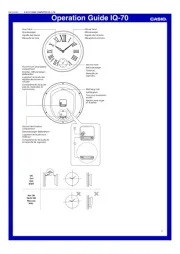
Getting Acquainted
Congratulations upon your selection of this CASIO watch. To get the most out of your
purchase, be sure to read this manual carefully.
Starting second hand movement and digital display
To conserve battery power, the watch is shipped from the
factory with its functions disabled. Pressing any one of the
watch’s three buttons will activate its functions, which will
cause the second hand to start moving and the digital
display to activate.
Note that CASIO COMPUTER CO., LTD. assumes no responsibility for any damage
or loss suffered by you or any third party arising through the use of this product or
its malfunction.
About This Manual
•Button operations are indicated using the letters shown
in the illustration.
•Each section of this manual provides you with the
information you need to perform operations in each
mode. Fur ther details and technical information can be
found in the “Reference” section.
Hour hand
Minute hand
Date
Second hand
(Timekeeping/
Stopwatch)
24-hour hand
Stopwatch
minute hand
Stopwatch second hand
▲
▲
Hand Setting Mode Alarm Mode
World Time Mode
General Guide
•Press C to change from mode to mode.
•About one or two seconds after you enter the World Time Mode, Alarm Mode, or
Hand Setting Mode, the hands will move to the position that indicates the current
setting of the mode.
•In the Timekeeping Mode (except when a setting screen is on the display), press B
to illuminate the face of the watch for about one second.
Timekeeping Mode
Press C.
Stopwatch Mode
▲
▲
▲
Radio-controlled Atomic Timekeeping
This watch receives a time calibration signal and updates its time setting accordingly.
•Supported time calibration signals: Germany (Mainflingen), England (Anthorn).
•See the information under “Signal Reception Troubleshooting” if you experience
problems with time calibration signal reception.
Current Time Setting
This watch adjusts its time setting automatically in accordance with a time calibration
signal. You also can perform a manual procedure to set the time and date, when
necessary.
•The first thing you should do after purchasing this watch is to specify your
Home City, which is the city where you normally will use the watch. For more
information, see “To specify your Home City”.
•When using the watch outside the areas covered by the time signal transmitters, you
will have to adjust the current time setting manually as required. See
“Timekeeping”
for more information about manual time settings.
To specify your Home City
1. In the Timekeeping Mode, hold down A for about five
seconds until the watch beeps twice.
•The second hand will move to the city code of the
currently selected Home City. This is the city code
setting mode.
2. Use B to move the second hand to the city code you
want to use as your Home City.
•Each press of B causes the second hand to advance
clockwise to the next city code.
•Time calibration signal reception is supported when
any one of the city codes shown in the table below is
selected as your Home City.
Second hand
City code
•For full information on city codes, see the “City Code Table”.
• In addition to the above, you also can select city codes that are outside the ranges
of the time calibration signal transmitters supported by this watch.
3. After the Home City setting is the way you want, press to return to theA
Timekeeping Mode.
•Normally, your watch should show the correct time as soon as you specify your
Home City code. If it does not, it should adjust automatically after the next auto
receive operation. You also can perform manual receive or you can set the time
manually.
German/U.K. Signal
City Code
LON
PA R
ATH
City Name
London
Paris
Athens
•Even if the time calibration signal is received correctly, there are some times when
the analog hands may not indicate the correct time. If this happens, use the
procedures under “Adjusting the Home Positions” to check the home positions of the
hands, and make adjustments as required.
Time Calibration Signal Reception
There are two different methods you can use to receive the time calibration signal:
auto receive and manual receive.
•Auto Receive
With auto receive, the watch receives the time calibration signal automatically up to six
times a day. When any auto receive is successful, the remaining auto receive
operations are not performed. For more information, see “About Auto Receive”.
•Manual Receive
Manual receive lets you start a time calibration receive operation with the press of a
button. For more information, see “To perform manual receive”.
12 o’clock
or
Important!
•When getting ready to receive the time calibration signal, position the watch as
shown in the nearby illustration, with its 12 o’clock side facing towards a window.
This watch is designed to receive a time calibration signal late at night. Because of
this, you should place the watch near a window as shown in the illustration when you
take it off at night. Make sure there are no metal objects nearby.
•Make sure the watch is facing the right way.
•Proper signal reception can be difficult or even impossible under the conditions listed
below.
•Signal reception normally is better at night than during the day.
•Time calibration signal reception takes from two to seven minutes, but in some
cases it can take as long as 14 minutes. Take care that you do not perform any
button operations or move the watch during this time.
Inside or
among
buildings
Inside a
vehicle
Near a
construction
site, airport,
or other
sources of
electrical
noise
Near high-
tension power
lines
Among or
behind
mountains
Near
household
appliances,
office
equipment,
or a mobile
phone
Approximate Reception Ranges
Anthorn
Mainflingen
500 kilometers
1,500 kilometers
U.K. signal transmitter
approximate reception
range as of April 2007
•In April 2007, the U.K. signal transmitter was moved from Rugby to Anthorn, which
resulted in a slight shift in the approximate reception range of the signal. The shift is
so slight that there is virtually no change in the ability to receive the signal.
•Even when the watch is within the reception range of a transmitter, signal reception
may be impossible at times due to the effects of geographic contours, structures,
weather, the season of the year, the time of day, radio interference, etc. Note that the
signal becomes weaker at distances of approximately 500 kilometers from the
transmitter, which means that the influence of the conditions listed above becomes
even greater.

Operation Guide 5041
2
About Auto Receive
The watch receives the time calibration signal automatically up to six times a day.
When any auto receive is successful, the remaining auto receive operations are not
performed. The reception schedule (calibration times) depends on your currently
selected Home City, and whether standard time or Daylight Saving Time is selected
for your Home City.
Your Home City Auto Receive Start Times
LON
PAR
ATH
Standard Time
Daylight
Saving Time
Standard Time
Daylight
Saving Time
Standard Time
Daylight
Saving Time
1
1:00 am
2:00 am
2:00 am
3:00 am
3:00 am
4:00 am
2
2:00 am
3:00 am
3:00 am
4:00 am
4:00 am
5:00 am
3
3:00 am
4:00 am
4:00 am
5:00 am
5:00 am
Midnight*
4
4:00 am
5:00 am
5:00 am
Midnight*
Midnight*
1:00 am*
5
5:00 am
Midnight*
Midnight*
1:00 am*
1:00 am*
2:00 am*
6
Midnight*
1:00 am*
1:00 am*
2:00 am*
2:00 am*
3:00 am*
* Next day
Note
•When a calibration time is reached, the watch will receive the calibration signal only
if it is in either the Timekeeping Mode or World Time Mode. Reception is not
performed if a calibration time is reached while you are configuring settings.
•Auto receipt of the calibration signal is designed to be performed early in the
morning, while you sleep (provided that the Timekeeping Mode time is set correctly).
Before going to bed for the night, remove the watch from your wrist, and put it in a
location where it can receive the signal easily.
•The watch receives the calibration signal for two to 14 minutes ever y day when the
time in the Timekeeping Mode reaches each of the calibration times. Do not perform
any button operation within 14 minutes before or after the calibration times. Doing so
can interfere with correct calibration.
•Remember that reception of the calibration signal depends on the current time in the
Timekeeping Mode.
To perform manual receive
1. Place the watch on a stable surface so its 12 o’clock
side is facing towards a window.
2. In the Timekeeping Mode, hold down A for about two
seconds until the watch beeps.
3. The second hand will move to R (READY) to indicate
that the watch is setting up for time calibration
reception.
•The second hand will move to ) and stay thereW (WORK
while actual reception is in progress.
•If signal reception is unstable during reception, the
second hand may move between ) andW (WORK
R (READY).
•The hour and minute hands continue to keep time
normally.
R (READY)
W (WORK)
•Time calibration signal reception takes from two to
seven minutes, but in some cases it can take as long as
14 minutes. Take care that you do not perform any
button operations or move the watch during this time.
•If reception is successful, the second hand will move to
Y YES( ). Five seconds later, the hands will move to the
correct time.
Note
•To interrupt a receive operation and return to the Timekeeping Mode, press any
button.
•If reception is not successful, the second hand will move to ). Five secondsN (NO
later, the second hand will resume normal operation, without any adjustment of the
hand setting.
•If the second hand is pointing to Y ( (YES) or N NO), you can return to the
Timekeeping Mode by pressing A.
Y (YES)
N (NO)
Viewing the Latest Signal Reception Results
You can use the procedure below to check whether or not the last signal receive
operation was successful.
To check the latest signal reception results
In the Timekeeping Mode, press A.
•If the watch was able to perform a successful signal
receive operation since midnight, the second hand will
move to Y (YES). If the watch has been unable t o
receive any signal successfully, the second hand will
move to N ( ).NO
•The watch will return to the Timekeeping Mode after five
seconds or when you press A.
•The current receive result is cleared when the first auto
receive operation is performed on the following day. This
means (Y YES) indicates successful signal reception
since the start of the current day.
Y (YES)
N (NO)
•If you adjust the time or date setting manually, the second hand will move to N ( ).NO
Signal Reception Troubleshooting
Check the following points whenever you experience problems with signal reception.
Probable Cause
•
You changed the time setting manually.
•
You performed some button operation
during the auto receive operation.
•The watch is not in the Timekeeping
Mode.
•Signal reception results are reset at
midnight each day.
•
Radio interference is often present
during the day time, which can interfere
with calibration signal reception.
•The Home City setting is not correct
for the area where you are using the
watch.
•The home position of the hands is
off.
Problem
The second
hand is pointing
at ( ).N NO
The time setting
is incorrect
following signal
reception.
What you should do
•
Perform manual signal
receive at night or wait until
the next auto signal receive
operation is performed.
•
Enter the Timekeeping
Mode and try again.
•Check to make sure the
watch is in a location
where it can receive the
signal.
•Select the correct Home
City.
•Enter the home position
adjustment mode and
adjust the home position.
•For further information, see “Important!” under “Time Calibration Signal Reception”
and “Radio-controlled Atomic Timekeeping Precautions”.
Twin Stopwatch
Your watch has two stopwatches built in, each of which can measure elapsed time and
cumulative elapsed time in 1/100-second units up to 29 minutes, 59.99 seconds (30
minutes total).
•When the maximum limit is reached by either stopwatch, it returns to zero
automatically and timing continues from there.
•
A stopwatch elapsed time measurement operation continues even if you exit the
Stopwatch Mode.
•All of the operations in this section are performed in the Stopwatch Mode, which you
enter by pressing C.
Stopwatch B second hand
Stopwatch minute hand
(Used for both A and B.)
Stopwatch 1/100 second
indicator
(Used for both A and B.)
Stopwatch A second hand
Stopwatch B
Stopwatch A
Entering the Stopwatch Mode
Use the button to enter the Stopwatch Mode.C
•The second hand of Stopwatch A or Stopwatch B will move to 12 o’clock. “ST” will
appear on the digital display.
Elapsed Time Measurement in Progress
If you enter the Stopwatch Mode while elapsed time measurement is being performed,
the second hands of Stopwatch A and Stopwatch B will quickly move to the current
elapsed second. The stopwatch minute hand and the digital display will indicate the
minutes of the last stopwatch (A or B) you were viewing the last time you exited the
Stopwatch Mode.
Elapsed Time Measurement Not in Progress
Both stopwatches will be reset to their starting positions, with the stopwatch minute
hand stopped at 0 and the digital display showing 00. Stopwatch A will be standing by
to start timing. The hour and minute hands of the watch indicate the current
Timekeeping Mode time.
Elapsed Time Measurements
Perform the same steps for either of the stopwatches. Each stopwatch can be used to
perform a separate timing operation.
1. Press the A button to toggle between Stopwatch A and Stopwatch B.
•The stopwatch minute hand and the digital display indicate the minutes and
1/100 seconds for the currently selected stopwatch.
2. Press the B button to start and stop the currently selected stopwatch.
•Pressing the B button to restart the stopwatch without resetting it to all zeros
resumes elapsed time measurement from where it was last stopped.
•Switching from one stopwatch to another does not stop any ongoing timing
operation. The timing operations continue internally, even though they are not
indicated on the display.
Resetting a Stopwatch
•To reset the currently selected stopwatch to its starting position, make sure it is
stopped and then hold down the B button for about three seconds.
•To reset both of the stopwatches to their starting positions, make sure they are both
stopped and then hold down the A button for about three seconds.
World Time
The World Time Mode shows you the current time in 29
cities (29 time zones) around the world.
•When you enter the World Time Mode, the second hand
will move to the city code that is currently selected as
the World Time city. At the same time, the hour and
minute hands will move to the current time in that city.
•If the current time shown for a city is wrong, check your
Home City settings and make the necessary changes.
•All of the operations in this section are performed in the
World Time Mode.
Current time (hour) in
the currently selected
World Time city
Minutes
City code
Seconds
Second
hand
To view the time in another city
In the World Time Mode, use B to move the second hand to the city code you want to
select as the World Time city.
• The hour hand, minute hand, and second display will change automatically to the
applicable settings for the currently selected city code.
• All buttons (except for for changing modes) are disabled while the hands andC
second display are changing.
• For full information on city codes, see the “City Code Table”.
To toggle a city code time between Standard Time and Daylight Saving Time
1. In the World Time Mode, use B to move the second
hand to the city code whose Standard Time/Daylight
Saving Time setting you want to change.
2. Hold down A for about three seconds until the watch
beeps to toggle Daylight Saving Time (DST indicator
displayed) and Standard Time (DST indicator not
displayed).
• Note that you cannot switch between Standard Time and
Daylight Saving Time while UTC is selected as the city
code.
• Note that the Standard Time/Daylight Saving Time
setting affects only the currently displayed city code.
Other city codes are not affected.
l
l
l
l
l
l
l
l
l
l
l
l
l
l
l
l
l
l
l
l
l
l
l
l
l
l
l
l
l
l
l
l
l
l
l
l
l
l
l
l
l
l
l
l
l
l
l
l
l
l
l
l
l
l
l
Hold down
A for three
seconds.
▲
▲
DST indicator

Operation Guide 5041
3
Alarm
When the alarm is turned on, the alarm sounds when the
alarm time is reached.
• All of the operations in this section are performed in the
Alarm Mode, which you enter by pressing C.
To set an alarm time
1. In the Alarm Mode, hold down A for two seconds to
enter the setting mode.
2. Use B to change the alarm time.
•Press B to move the hands clockwise in one-minute
steps.
3. After setting the alarm time, press A to exit the setting
mode.
•Setting the alarm time causes the alarm to turn on
automatically.
Alarm time minute hand
On/Off status
Alarm time
hour hand
Alarm Operation
The alarm tone sounds at the preset time for 10 seconds, regardless of the mode the
watch is in.
•Alarm operations are performed in accordance with the Timekeeping Mode time.
•Pressing any button stops the alarm tone operation.
To toggle an alarm on and off
In the Alarm Mode, press to toggle the alarm and BON OF ( ).OFF
•The watch will beep when you turn on the alarm.
Adjusting the Home Positions
If the time and date settings are wrong even after the time calibration signal is
received normally, use the following procedure to adjust their home positions.
To adjust the home positions
1. In the Timekeeping Mode, press C four times to enter
the Hand Setting Mode.
2. Hold down A for about three seconds until the watch
beeps and starts to flash, which indicates the 0 0
analog setting screen.
• The second hand is at the proper home position if it
moves to 12 o’clock. If it doesn’t, press B to move it
to 12 o’clock.
l
l
l
l
l
l
l
l
l
l
l
l
l
l
l
l
l
l
l
l
l
l
l
l
l
l
l
l
l
l
l
l
l
ll
l
l
l
l
l
l
l
l
l
l
l
l
l
l
l
l
l
l
l
l
l
l
l
l
l
3. After confirming that the second hand is at the proper
home position, press C. This will switch to hour hand
and minute hand home position adjustment (Hm
flashes).
• The hour hand and minute hand are at their proper
home positions if they both move to 12 o’clock, and if
the 24-hour hand is pointing at hour 24. If the hands
are not positioned correctly, use B to move them to
their proper home positions.
4. After confirming that the hour hand and minute hand
are both at their proper home positions, press C.
This will switch to stopwatch B second hand home
position adjustment ( flashes).60
• The stopwatch B second hand is at the proper home
position if it moves to 60. If it doesn’t, use to moveB
it to 60.
l
l
l
l
l
l
l
l
l
l
l
l
l
l
l
l
l
l
l
l
l
l
l
l
l
l
l
l
l
l
l
l
l
l
l
l
l
l
l
l
l
l
l
l
l
l
l
l
l
l
l
l
l
l
l
l
l
l
l
l
l
l
l
l
l
l
l
l
l
l
l
l
l
l
l
l
l
l
l
l
l
l
l
l
l
l
l
l
l
l
l
l
l
l
l
l
l
l
l
l
l
l
l
l
l
l
l
l
l
l
l
l
l
l
l
l
l
l
l
l
Minute hand
Stopwatch B second hand
24-hour hand
Hour hand
5. After confirming that the stopwatch B second hand is at
the proper home positions, press . This will switch toC
stopwatch minute hand home position adjustment
(30 flashes).
• The stopwatch minute hand is at the proper home
position if it moves to 0. If it doesn’t, use B to move it
to 0.
6. Press A to exit the setting screen.
•After you complete the home position adjustment
procedure, place the watch in a location that allows
good time calibration signal reception, and then perform
a manual receive operation. See “To perform manual
receive” for more information.
l
l
l
l
l
l
l
l
l
l
l
l
l
l
l
l
l
l
l
l
l
l
l
l
l
l
l
l
l
l
l
l
l
l
l
l
l
l
l
l
l
l
l
l
l
l
l
l
l
l
l
l
l
l
l
l
l
l
l
l
Stopwatch minute hand
Timekeeping
Use the Timekeeping Mode to set and view the current
time and date. This section also explains how to set the
current date and time manually.
•All of the operations in this section are performed in the
Timekeeping Mode, which you enter by pressing C.
Hour hand
Date
Minute hand
Second hand
24-hour hand
To set the time and date manually
1. In the Timekeeping Mode, hold down A for about five
seconds until the watch beeps twice.
•The second hand will move to the city code of the
currently selected Home City. This is the city code
setting mode.
•The DST indicator indicates that Daylight Saving Time
(summer time) is turned on for the currently selected
Home City.
2. Use B to change the Home City setting.
•For full information on city codes, see the “City Code
Table”.
l
l
l
l
l
l
l
l
l
l
l
l
l
l
l
l
l
l
l
l
l
l
l
l
l
l
l
l
l
l
l
l
l
l
l
l
l
l
l
l
l
l
l
l
l
l
l
l
l
l
l
l
l
l
l
l
l
l
l
l
l
l
l
l
l
DST indicator
3. Press C to move the flashing in the sequence shown below to select other
settings.
Home
City DST
Day
Minutes
(time)
YearMonth
4. When the setting you want to change is flashing, use to change it asB
described below.
To do this:
Change the Home City
Toggle between Daylight Saving Time ( ),
Standard Time ( ), or Auto DST ( )
Change the minutes (time)
Do this:
Use B (+).
Press .B
Use B (+).
Screen
Change the year
Change the month
Change the day
Use B (+).
5. Press A to exit the setting screen.
•Pressing any time during the above procedure will return to the TimekeepingA
Mode, where the timekeeping second hand will resume timekeeping from second 0.
•When you exit the setting screen, the analog hands are adjusted automatically to
match the digital time.
Daylight Saving Time (DST)
Daylight Saving Time (summer time) advances the time setting by one hour from
Standard Time. Remember that not all countries or even local areas use Daylight
Saving Time.
The time calibration signals include both Standard Time and DST data. When the auto
DST setting is turned on, the watch switches between Standard Time and DST
(summer time) automatically in accordance with the signal it receives.
•If you experience problems receiving the time calibration signal in your area, it is
probably best to switch between Standard Time and Daylight Saving Time (summer
time) manually.
Illumination
An LED (light-emitting diode) illuminates the face of the
watch for easy reading in the dark. The watch’s auto light
switch illuminates the face automatically when you angle
the watch towards your face.
•The auto light switch must be turned on for it to operate.
•See “Illumination Precautions” for other important
information.
To illuminate the face of the watch
In the Timekeeping Mode (except when a setting screen is
on the display), press to illuminate the face of theB
watch for about one second.
•The above operation turns on illumination regardless of
the current auto light switch setting.
About the Auto Light Switch
Turning on the auto light switch causes the face to illuminate, whenever you position
your wrist as described below in any mode.
Moving the watch to a position that is parallel to the ground and then tilting it
towards you at more than 40 degrees causes illumination to turn on.
• Wear the watch on the outside of your wrist.
Parallel to
ground
More than
40°
Warning!
•Always make sure you are in a safe place whenever you are reading the face
of watch using the auto light switch. Be especially careful when running or
engaged in any other activity that can result in accident or injury. Also take
care that sudden illumination by the auto light switch does not startle or
distract others around you.
•When you are wearing the watch, make sure that its auto light switch is turned
off before riding a bicycle, or operating a motorcycle or any other motor
vehicle. Sudden and unintended operation of the auto light switch can create a
distraction, which can result in a traffic accident and serious personal injury.
To turn the auto light switch on and off
In the Timekeeping Mode (except when a setting screen is on the display), hold down
B for about three seconds to toggle the auto light switch on and off.
•Turning on the auto light switch will cause the watch to beep. The ON indicator will
appear and the light will turn on for about one second.
•Turning off the auto light switch will cause the watch to beep. The ) indicatorOF (OFF
will appear for about one second. The light will not turn on.
•In order to protect against running down the battery, the auto light switch turns off
automatically approximately six hours after you turn it on.
Reference
This section contains more detailed and technical information about watch operation.
It also contains important precautions and notes about the various features and
functions of this watch.
Auto Return Features
•If you leave the watch in the Alarm or Hand Setting Mode for two or three minutes
without performing any operation, it returns to the Timekeeping Mode automatically.
•If you do not perform any operation for about two or three minutes while a setting
mode is selected, the watch will exit the setting mode automatically.
Scrolling
•The B button is used to change the hand setting in various setting modes. In most
cases, holding down this button will start high-speed movement of the applicable
hand(s).
•High-speed movement of hands will continue until you press any button, or until the
moving hand(s) finishes one complete cycle.
- One complete cycle for the hands is one revolution (360 degrees) or 24 hours.
Product specificaties
| Merk: | Casio |
| Categorie: | Horloge |
| Model: | EQW-500DBE-1AVER |
| Gewicht: | 91.8 g |
| LED backlight: | Ja |
| Stopwatch: | Ja |
| Waterbestendig diepte: | 100 m |
| Wereldklok functie: | Ja |
| Alarm functie: | Ja |
| Agenda: | Ja |
| Horlogekast materiaal: | Roestvrijstaal |
| Band materiaal: | Kunststof |
| Glas type van horloge: | Mineraalglas |
| Levensduur batterij/accu: | 2 jaar |
| Ondersteund aantal accu's/batterijen: | 1 |
| Radio signaal ontvanger: | DCF/MSF |
| Afmetingen (B x D x H): | 46 x 13.7 x 49 mm |
| Type batterij: | CR1616 |
Heb je hulp nodig?
Als je hulp nodig hebt met Casio EQW-500DBE-1AVER stel dan hieronder een vraag en andere gebruikers zullen je antwoorden
Handleiding Horloge Casio
18 Juni 2025
17 Juni 2025
17 Juni 2025
16 Juni 2025

16 Juni 2025
16 Juni 2025
16 Juni 2025
16 Juni 2025
16 Juni 2025
16 Juni 2025
Handleiding Horloge
- La Crosse
- Epson
- Haffstreuner
- Radley London
- Gc
- Citizen
- Tikkers
- Girard-Perregaux
- IKEA
- Crane
- Medion
- HYT
- PANERAI
- Sempre
- Victorinox
Nieuwste handleidingen voor Horloge

5 Juli 2025

5 Juli 2025
4 Juli 2025
4 Juli 2025

4 Juli 2025

4 Juli 2025
4 Juli 2025

2 Juli 2025
1 Juli 2025
21 Juni 2025