Casio 5470 Handleiding
Bekijk gratis de handleiding van Casio 5470 (26 pagina’s), behorend tot de categorie Horloge. Deze gids werd als nuttig beoordeeld door 13 mensen en kreeg gemiddeld 4.9 sterren uit 7 reviews. Heb je een vraag over Casio 5470 of wil je andere gebruikers van dit product iets vragen? Stel een vraag
Pagina 1/26

Basic Operations
This section provides an overview of the watch
and explains operations that are common to
all modes.
Important!
●This watch is not a special-purpose
measuring instrument.
Measurement function readings are
intended for general reference only.
●Whenever using the Digital
Compass of this watch for serious
trekking, mountain climbing, or other
activities, be sure to always take
along another compass to confirm
readings. If the readings produced
by the Digital Compass of this watch
are different from those of the other
compass, perform bidirectional
calibration of the Digital Compass to
ensure better accuracy.
ーCompass readings and
calibration will not be possible if
the watch is in the vicinity of a
permanent magnet (magnetic
accessory, etc.), metal objects,
high-voltage wires, aerial wires, or
electrical household appliances
(TV, computer, cellphone, etc.)
lDigital Compass
●The watch’s Altimeter Mode
calculates and displays relative
altitude based on barometric
pressure readings produced by its
pressure sensor. Because of this,
altitude values displayed by the
watch may be different from your
actual elevation and/or sea level
elevation indicated for the area
where you are located. Regular
calibration in accordance with the
local altitude (elevation) indications
is recommended.
lAltitude Measurement
Note
●In this manual, the expression “time
signal” refers to a time calibration
signal. Time signals include time
information.
●Note that the watch illustrations in
this manual are intended for
reference only. The actual watch
may appear somewhat different
than depicted in the illustrations.
MA1509-EA © 2015 CASIO COMPUTER CO., LTD.
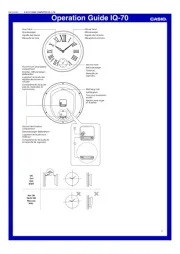
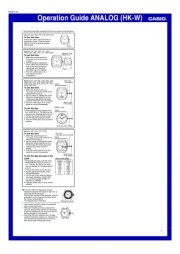
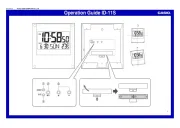
General Guide
③① ②
⑥
⑤
④
AHour hand
BSecond hand
CMinute hand
DMode hand
ELCD
FCrown
Indicators
① ② ③ ④ ⑤
AAppears when an alarm is turned on.
BAppears when the hourly time signal is on.
CAppears when the indicated time is
summer time.
DAppears when Barometric Pressure
Change Indications are on.
EShows the barometric pressure
measurement unit.
Navigating Between Modes
Your watch has the modes shown below.
B
B
B
B
B
B
A
BA BC
C
B
B
B
Receive Mode
World Time Mode
Alarm Mode
Timer ModeStopwatch Mode
Data Recall Mode
Thermometer Mode
Barometer Mode
Digital Compass ModeAltimeter Mode
Timekeeping Mode
Use the buttons in the illustration above to
navigate between modes.
Important!
●To return to the Timekeeping Mode
from any other mode, hold down the
(B) button for about two seconds.
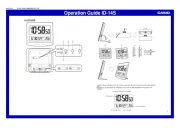
Operation Guide 5470
1

Selecting a Timekeeping
Mode Digital Display Format
In the Timekeeping Mode, you can use the
operation below to change the contents of the
digital displays.
pD
pD
D
Day of the week,
month, day
Hour, minute, second
Barometric pressure
graph
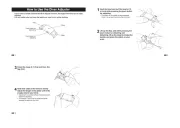
Using the Crown
The watch’s crown is a screw-in (screw lock)
type. To use the crown, you first need to rotate
it towards you (leftwards) to loosen it.
Loosen
Crown
●Pulling Out and Pushing In the Crown
Pull out the crown before performing crown
operations. Do not pull the crown with too
much force.
Normal timekeeping
Pull out
Important!
●To prevent loss of water resistance
and/or damage due to impact, be
sure to screw the crown in by rotating
it away from you as you push it in.
Screw in
●When pushing the crown back in,
take care not to apply too much
force.
●Fast Forward/Fast Reverse
After pulling out the crown, rotating it quickly
in succession in either direction will start a fast
forward or fast reverse operation. While a fast
forward operation is in progress, quickly
rotating the crown in succession again will
increase the speed even further.
●The fast reverse operation speed is fixed
and cannot be changed.
●Stopping Fast Forward/Fast Reverse
Rotate the crown in the direction opposite that
of the ongoing operation or press any button.
Note
●If you do not perform any operation
for about two minutes after pulling
out the crown, crown operations will
automatically become disabled. If
that happens, push the crown back
in and then pull it out again.
●The message [PUSH] will appear on
the display in the cases below. If that
happens, push the crown back in
and then pull it out again.
ーWhen the crown is pulled out while
in a mode that does not support
crown operation
ーWhen you do not perform any
operation for about two minutes
after pulling out the crown
Shifting the Hands
Hand shift moves the hands out of the way for
easy viewing of display info.
1. While holding down (L), press (B).
●All hands will move to 2 o’clock.
2. To return the hands to their normal
timekeeping positions, press (A), (B), (C),
or (D).
Note
●This function can be used in any
mode.
ーHand shift cannot be used while
configuring the city code or the
summer time setting, or when
manually configuring time and
date settings.
●Shifted hands will return to their
normal positions if no button
operation is performed within about
ten seconds after hands are shifted.
●In the modes below, hands that are
blocking a digital display will
automatically move to 4 o’clock or 8
o’clock. The hands will return to their
normal positions after about three
seconds.
ーAltimeter Mode
ーBarometer Mode
ーThermometer Mode
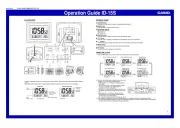
Operation Guide 5470
2

Switching between 12-hour
and 24-hour Timekeeping
1. Pull out the crown.
The second hand will move to the
currently set city.
Crown
2. Press (B) five times so the current setting
([12H] or [24H]) is flashing on the display.
3. Rotate the crown to select [12H] (12-hour
timekeeping) or [24H] (24-hour
timekeeping).
4. Push the crown back in to complete the
setting operation.
Note
●While 12-hour timekeeping is
selected, the [A] indicator will be
displayed for a.m. times, and [P] will
be displayed for p.m. times.
Solar Charging
What is solar charging?
This watch runs on power supplied from a
rechargeable (secondary) battery that is
charged by a solar panel. The solar panel is
integrated into the face of the watch, and
power is generated whenever the face is
exposed to light.
Charging the Watch
When you are not wearing the watch, put it in
a location where it is exposed to bright light.
While you are wearing the watch, make sure
that its face (solar panel) is not blocked from
the light by the sleeve of your clothing. Power
generation efficiency is reduced even when
the face of the watch is blocked only partially.
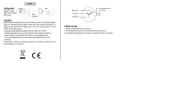
NOYES
Important!
●Depending on light intensity and
local conditions, the watch may
become hot to the touch when
exposed to light for charging. Take
care to avoid burn injury after
charging. Also, avoid charging the
watch under high-temperature
conditions like the ones described
below.
ーOn the dashboard of a vehicle
parked in the sun
ーNear an incandescent light bulb or
other source of heat
ーUnder direct sunlight or in other
hot areas for long periods
●The display panel may become
black (or white, depending on the
LCD type) under very high
temperatures. This is temporary,
and the display will return to normal
at lower temperatures.
Checking the Charge Level
A display indicator shows the watch’s charge
level when you enter the Timekeeping Mode.
lNavigating Between Modes
●The display will show charge levels 4 and 5,
even if the watch is not in the Timekeeping
Mode.
●Charge Level 1: Good
All functions enabled.
●Charge Level 2: Good
All functions enabled.
●Charge Level 3: Low
The functions below are disabled. Also, the
second hand jumps at two-second intervals.
●Time signal reception
●Compass, altitude, barometric pressure,
temperature measurements
●Face illumination
●Sounds (alarms, etc.)
One second later
●Charge Level 4: Low
Battery charge is lower than Level 3, and all
functions are disabled. Also, all hands are
stopped.
●Charge Level 5: Dead
All hands are stopped and digital displays are
blank. Memory data is lost, and watch settings
are returned to their initial factory defaults.
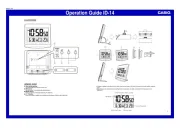
Operation Guide 5470
3
Product specificaties
| Merk: | Casio |
| Categorie: | Horloge |
| Model: | 5470 |
Heb je hulp nodig?
Als je hulp nodig hebt met Casio 5470 stel dan hieronder een vraag en andere gebruikers zullen je antwoorden
Handleiding Horloge Casio
18 Juni 2025
17 Juni 2025
17 Juni 2025
16 Juni 2025

16 Juni 2025
16 Juni 2025
16 Juni 2025
16 Juni 2025
16 Juni 2025
16 Juni 2025
Handleiding Horloge
- Inter-Quartz
- Calypso
- Breo
- IWC
- Fossil
- Daniel Steiger
- Irox
- La Crosse Technology
- Naitica
- Karlsson
- Davis
- Omega
- Pilgrim
- Ebel
- Mondaine
Nieuwste handleidingen voor Horloge
5 Juli 2025

5 Juli 2025
4 Juli 2025
4 Juli 2025
4 Juli 2025

4 Juli 2025
4 Juli 2025

2 Juli 2025
1 Juli 2025
21 Juni 2025