Casio 4732 Handleiding
Bekijk gratis de handleiding van Casio 4732 (5 pagina’s), behorend tot de categorie Horloge. Deze gids werd als nuttig beoordeeld door 33 mensen en kreeg gemiddeld 3.9 sterren uit 17 reviews. Heb je een vraag over Casio 4732 of wil je andere gebruikers van dit product iets vragen? Stel een vraag
Pagina 1/5

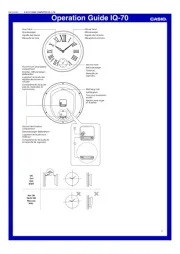
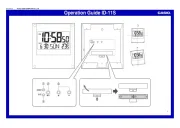
Operation Guide 4732 4733
1
MO0605-EA
Warning!
•The measurement functions built into this watch are not intended for use in taking
measurements that require professional or industrial precision. Values produced
by this watch should be considered as reasonably accurate representations only.
•When fishing, always take proper precautions to ensure your own personal safety
and the personal safety of others around you.
•The fishing level indicator and moon phase indicator produced by this watch are
all based on calculations that use the watch’s current time, date, and Home Site
settings. Because of this, you should make sure that the current date and time,
and your Home Site data are all correct before using the indicators.
• See the “Timekeeping” section of this manual for information about setting the
current time and date, and about specifying your Home Site.
•Note that the fishing level indicator and moon phase indicator are all based on
calculated values. They are provided only for reference purposes.
•CASIO COMPUTER CO., LTD. assumes no responsibility for any loss, or any
claims by third parties that may arise through the use of this watch.
Getting Acquainted
Congratulations upon your selection of this CASIO watch. To get the most out of your
purchase, be sure to read this manual carefully. About This Manual
•Depending on the model of your watch, display text
appears either as dark figures on a light background
(Module 4732), or light figures on a dark background
(Module 4733). All sample displays in this manual are
shown using dark figures on a light background.
•Button operations are indicated using the letters shown
in the illustration.
•For the sake of simplicity, the sample displays in this
manual do not show the analog hands of the watch.
•Each section of this manual provides you with the
information you need to perform operations in each
mode. Further details and technical information can be
found in the “Reference” section.
Module 4732
Module 4733
(Light)
General Guide
•Press C to change from mode to mode.
•In any mode (except when a setting screen is on the display), press to illuminateB
the display.
Temperature Data
Recall Mode
Stopwatch Mode
World Time Mode
Fishing Mode
▲
▲
▲
Countdown Timer
Mode
▲
▲
Alarm Mode
Press .C
▲
Hand Setting Mode
Timekeeping Mode
▲
▲
Timekeeping
Use the Timekeeping Mode to set and view the current time and date.
This watch features separate digital and analog timekeeping. The procedures for
setting the digital time and analog time are different.
•In the Timekeeping Mode, press A to toggle between the thermometer screen and
the temperature tendency screen.
•
The fishing level indicator indicates the times when fish can be expected to be feeding.
For more information, see
“
Fishing Mode
”.
Temperature Tendency
Screen
Temperature
tendency
graph
Day of
week –
Day
PM
indicator
Hour : Minutes
Moon phase
indicator
Fishing level
indicator
Press .A
▲
▲
Thermometer Screen
Temperature
Seconds
•The Moon phase indicator shows the current Moon phase in accordance with the
current date as kept in the Timekeeping Mode.
•See Thermometer“ ” for details about the thermometer screen and temperature
tendency graph.
Important!
•Be sure to configure the current time and date, and your Home Site data (data for
the site where you use the watch) correctly before using the functions of this watch.
See “Home Site Data” for more information.
Setting the Digital Time and Date
This watch is preset with UTC differential values that represent each time zone around
the globe. Before setting the digital time, be sure to first set the UTC differential for
your Home Site, which is the location where you normally will be using the watch.
•Note that World Time Mode times are all displayed based on the time and date
settings you configure in the Timekeeping Mode.
To set the digital time and date
1. In the Timekeeping Mode, hold down A until the
seconds start to flash, which indicates the setting
screen.
•Be sure to configure the correct UTC differential for
your Home Site before configuring any other
Timekeeping Mode settings.
•See the “ ”UTC Differential/City Code List for
information about the UTC differential settings that are
supported.
2. Press C to move the flashing in the sequence shown
below to select the setting you want.
l
l
l
l
l
l
l
l
l
l
l
l
l
l
l
l
l
Seconds
Hour
UTC
Differential Minutes
Year
DST
Day Month
Seconds
Temperature
Unit
12/24-Hour
Format
Temperature Sensor
Calibration
3. When the setting you want to change is flashing, use and D B to change it as
described below.
Screen: To do this:
Reset the seconds to 00
Toggle between Daylight Saving
Time (ON) and Standard Time (OF)
Specify the UTC differential
Change the hour or minutes
Toggle between 12-hour (12H) and
24-hour ( ) timekeeping2 H4
Do this:
Press D.
Press D.
Use ).D (+) and B (–
Use ).D (+) and B (–
Press D.
Use ).D (+) and B (–
Change the year, month, or day
• The UTC differential setting range is 12.0 to +14.0 in 0.5-hour units for Standard–
Time (DST turned off), and 11.0 to +15.0 in 0.5-hour units for summer time (DST–
turned on).
• For information about settings other than the time and date, see the following.
Temperature Sensor Calibration: “Thermometer”
Temperature Unit: “To specify the temperature display unit”
4. Press A twice to exit the setting screen.
•The 12-hour/24-hour timekeeping format you select in the Timekeeping Mode is
applied in all modes.
•The day of the week is displayed automatically in accordance with the date (year,
month, and day) settings.
•See “Daylight Saving Time (DST) Setting” below for details about the DST setting.
•Any time the seconds setting is changed, the analog hands are adjusted accordingly.
Daylight Saving Time (DST) Setting
Daylight Saving Time (summer time) advances the time setting by one hour from
Standard Time. Remember that not all countries or even local areas use Daylight
Saving Time.
To toggle the Timekeeping Mode digital time between DST and Standard Time
1.In the Timekeeping Mode, hold down until theA
seconds start to flash, which indicates the setting
screen.
2. Press C once and the DST setting screen appears.
3. Press to toggle between Daylight Saving Time (DON
displayed) and Standard Time ( displayed).OF
4. Press twice to exit the setting screen.A
•
The DST indicator appears on the Timekeeping, Fishing,
Alarm, and Hand Setting Mode screens to indicate that
Daylight Saving Time is turned on. In the case of the
Fishing Mode, the indicator appears on the fishingDST
level screen only.
l
l
l
l
l
l
l
l
l
l
l
l
l
l
l
l
DST indicator
On/Off status

Operation Guide 4732 4733
2
Home Site Data
Moon phase, the fishing level indicator, and Fishing Mode data will not be
displayed properly unless Home Site data (UTC differential and longitude) is
configured correctly.
•The UTC differential is a value that indicates the time difference between a
reference point in Greenwich, England and the time zone where a city is located.
•The letters UTC is the abbreviation for Coordinated Universal Time, which is the
world-wide scientific standard of timekeeping. It is based upon carefully maintained
atomic (cesium) clocks that keep time accurately to within microseconds. Leap
seconds are added or subtracted as necessary to keep UTC in sync with the Earth s’
rotation.
•The “ ”Site Data List provides UTC differential and longitude information around the
world.
•The following is the initial factory default Home Site data (Tokyo, Japan) when you
first purchase the watch and whenever you have the batteries replaced. Change
these settings to match the area where you normally use the watch.
UTC differential (+9.0); Longitude (East 140 degrees)
To configure Home Site data
1. In the Timekeeping Mode, hold down A until the
seconds start to flash, which indicates the setting
screen.
2. Press twice to display the UTC differential settingC
screen, and confirm that the setting is correct.
•If the UTC differential setting is not correct, use D (+)
and B (–) to change it.
3. Press to display the longitude value setting screen.A
4. Press to toggle the flashing between the longitudeC
value and the longitude unit (east/west).
5. While the setting you want to change is flashing, use
D B and to change it as described below.
l
l
l
l
l
l
l
l
l
l
l
l
l
l
l
l
l
l
l
l
Longitude
value
Longitude
(east/west)
Setting
Longitude Value
Longitude Unit
(East/West)
Button Operations
Use D (+) and B (–) to change the setting.
•You can specify a value from 0 , in 1-° to 180°
degree units.
Use D to switch between east longitude ( )
and west longitude ( ).
Screen
6. Press A to exit the setting screen.
Setting the Analog Time
Perform the procedure below when the time indicated by the analog hands does not
match the time of the digital display.
To adjust the analog time
1. In the Timekeeping Mode, press C seven times to
enter the Hand Setting Mode.
2. Hold down A until the current digital time starts to
flash, which indicates the setting screen.
3. Use to adjust the analog setting.D
•Press D once to advance the hands 20 seconds.
•Hold down D to advance the hands at high speed.
•To lock high speed hands movement, hold down D to start it and then press B
to lock. The hands will continue to advance for one 12-hour cycle or until you
press any button to stop it.
It will also stop automatically after the time advances 12 hours or if an alarm (daily
alarm, Hourly Time Signal, or countdown beeper) starts to sound.
4. Press A to exit the setting screen.
•The minute hand will be adjusted slightly to match the seconds when you exit the
setting screen.
•To return to the Timekeeping Mode, press C.
l
l
l
l
l
l
l
l
l
l
l
l
l
l
l
l
l
l
l
l
Fishing Mode
The Fishing Mode displays an indicator that shows, as
one of five levels, the suitability of a specific date and time
(minute 00 to minute 59 of a particular hour) for fishing.
This mode also can be used to display Moon Data (Moon
age and Moon phase) for a specific date.
• If you suspect that the fishing level indicator or current
Moon data is wrong for some reason, check the current
Timekeeping Mode settings (time, date, and Home Site),
and correct them if required.
• See “ ”Moon Phase Indicator for information about the
Moon phase indicator.
• All of the operations in this section are performed in the
Fishing Mode, which you enter by pressing C.
Month – Day
Time
FISH
indicator
Moon phase
indicator
Fishing Level Screen
Fishing level
indicator
Fishing Level Indicator
The fishing level indicator shows the relative favorability of a fishing time (calculated in
accordance with Moon transit and phase) as shown in the table below.
Level 5 Level 4 Level 3 Level 2 Level 1Module
4732
4733
Upper
Lower
West
East Other
Moon Transit
Moon Phase
New moon*
Full moon
First quarter
Last quarter
Other
Level 5
Level 4
Level 3
Level 4
Level 3
Level 2
Level 3
Level 2
Level 1
* These indicators actually appear during Moon ages 13.0 to 16.6 (Full Moon and
phase immediately preceding it) and 27.7 to 1.8 (New Moon and phase immediately
preceding it).
•The fishing level indicator changes in accordance with the Moon data.
•In the Timekeeping Mode, the indicator flashes whenever the fishing level ofFISH
the current time is 4 or 5.
To view the current fishing level and Moon data
In the Fishing Mode, press to toggle between the fishing level screen and theA
Moon Data screen.
•The fishing level indicator shows the level for the displayed time. The initial fishing
level screen shows the level for 6:00 a.m. The Moon data screen shows the Moon
age and Moon phase for the current date.
•While the fishing level screen is displayed, press to advance to the next hour.D
Month – Day
Time
Fishing Level Screen
Fishing level
indicator
Month – Day
Moon phase
indicator
Moon age
Press .A
▲
▲
Moon Data Screen
•While the Moon Data screen is displayed, press to advance to the next day.D
•You can also specify a particular date (year, month, day) to view its fishing level and
Moon data. See To specify a date for more information.“ ”
•When you enter the Fishing Mode, the screen (fishing level or Moon data) that was
displayed the last time you exited the mode appears first.
Month DayYe a r
Month – Day
l
l
l
l
l
l
l
l
l
l
l
l
l
l
l
l
l
l
l
l
l
l
l
Year
To specify a date
1. In the Fishing Mode, hold down until the year settingA
starts to flash, which indicates the setting screen.
2. Press C to move the flashing in the sequence shown
below to select the other settings.
3. While a setting is flashing, use D (+) or ) to change it.B (–
• You can specify a date in the range of January 1, 2000 to December 31, 2099.
4. Press A to exit the setting screen.
5. Use A to display either the fishing level screen or the Moon Data screen.
Thermometer
This watch uses a temperature sensor to measure temperature. A reading is taken
during each even-numbered minute, and the result of the last reading is displayed on
the thermometer screen.
The watch also takes separate readings and stores them in memory for display in the
temperature tendency graph, which can be viewed in the Timekeeping Mode.
Measured temperature values are stored in memory for later recall when you need
them.
Press .A
▲
▲
Thermometer Screen
Temperature
Temperature
Tendency Screen
Temperature
tendency
graph
•You can select either Celsius ( C) or Fahrenheit ( F) units for the thermometer° °
screen. See To specify the temperature display unit“ ” for more information.
•The thermometer screen displays temperature values in 0.1° °C units (or 0.2 F units).
•The display range of the thermometer screen is –10.0°C to 60.0 C (or 14.0° °F to
140.0°F).
•You can calibrate the temperature sensor if you feel that the displayed temperature
values are not correct. See “Temperature Sensor Calibration” for more information.
Important!
•Temperature measurements are affected by your body temperature (while you are
wearing the watch), direct sunlight, and moisture. To achieve a more accurate
temperature measurement, remove the watch from your wrist, place it in a well
ventilated location out of direct sunlight, and wipe all moisture from the case. It takes
approximately 20 to 30 minutes for the case of the watch to reach the actual
surrounding temperature.
Temperature Tendency Graph
The watch also takes temperature readings at the top and the bottom of each hour
and stores the results in memory for display on the temperature tendency graph.
Depending on the current Timekeeping Mode time, the temperature tendency graph
shows either the top of the hour measurements or the bottom of the hour
measurements for the past 17 hours.
From the top of each hour to the 29th minute, past top of the hour readings are shown
in the graph. From the bottom of each hour to the 59th minute, past bottom of the hour
readings are shown in the graph.
Temperature tendency graph contents are updated every 30 minutes.
Past 17 hours of
measurement values Latest measurement
value
+6.0 to +9.9 C (+10.8 to +17.8° °F)
+2.0 to +5.9 C (+3.6 to +10.6° °F)
– –1.9 to +1.9°C ( 3.4 to +3.4°F)
– – – –5.9 to 2.0°C ( 10.6 to 3.6°F)
– – – –9.9 to 6.0°C ( 17.8 to 10.8°F)
▲

Operation Guide 4732 4733
3
Temperature change greater
than +10.0
°
C (+18.0
°
F)
Temperature change greater
than –10.0
°
C (–18.0
°
F)
Error
The horizontal axis of the graph represents time. The rightmost column is the newest
temperature value in memory, while the leftmost column is the temperature value
stored approximately 17 hours ago (1 dot = 1 hour). The vertical axis of the graph
represents the relative change from one hour to the next.
•When the relative change from one hour to the next exceeds +10.0 C (+18.0 F), the° °
dot at the highest point for the applicable hour flashes.
•When the relative change from one hour to the next exceeds –10.0° °C (–18.0 F),
there is no dot in the applicable hour’s column.
•If a measurement error occurs for some reason, only a single the dot in the center
column will be displayed.
Recalling Temperature Data
The measurements the watch takes at the top and the bottom of each hour are stored
in memory automatically. Memory can hold up to 50 measurement records. You can
use the Temperature Data Recall Mode to recall memory data when you need it.
•Each temperature data record has a number. The newest data record is number 01,
while the oldest data record is the one with the highest number.
•When there are already 50 records in memory, storage of a new temperature
reading causes the oldest record (record number 50) to be deleted automatically to
make room for the new data. The new data is assigned record number 1, and all of
the numbers of all the other records (01 to 49) are incremented by 1 (becoming 02
through 50).
To recall temperature recor ds
1. In the Timekeeping Mode, press twice to enter theC
Temperature Data Recall Mode.
•This displays the newest record currently in memory.
2. Use D (+) to scroll through the records.
•Pressing D while the oldest record is displayed will
scroll to the newest record.
•If a temperature measurement operation is performed
while a record is displayed, the displayed record’s
number will be incremented by 1.
•If an error occurs during temperature measurement,
‘‘-- -. ’’ will be shown for the temperature value in the
corresponding record.
Temperature
Record number
Data storage time
Stopwatch
The stopwatch lets you measure elapsed time, split times,
and two finishes.
•The display range of the stopwatch is 99 hours, 59
minutes, 59.99 seconds.
•The stopwatch continues to run, restarting from zero
after it reaches its limit, until you stop it.
•The stopwatch measurement operation continues even
if you exit the Stopwatch Mode.
•Exiting the Stopwatch Mode while a split time is frozen
on the display clears the split time and returns to
elapsed time measurement.
•All of the operations in this section are performed in the
Stopwatch Mode, which you enter by pressing C.
1/100 second
Minutes
Seconds
Hours
To measure times with the stopwatch
D
Start Stop
Elapsed Time
➤
Re-start Clear
D➤
Stop
D➤D➤A
Split Time
D
Start Split
➤
Split release Clear
A➤
Stop
A➤D➤A
Two Finishes
D
Start Split
➤
Stop Clear
A➤
Split release
D➤A➤A
First runner
finishes.
Display time of
first runner.
Second runner
finishes.
Display time of
second runner.
(SPL displayed)
Countdown Timer
You can set the countdown timer within a range of one
minute to 100 hours. An alarm sounds when the
countdown reaches zero.
•You can also select auto-repeat, which automatically
restarts the countdown from the original value you set
whenever zero is reached.
•All of the operations in this section are performed in the
Countdown Timer Mode, which you enter by pressing
C.
Seconds
Hours Minutes
To use the countdown timer
Press while in the Countdown Timer Mode to start the countdown timer.D
•When the end of the countdown is reached and auto-repeat is turned off, the alarm
sounds for 10 seconds or until you stop it by pressing any button. The countdown
time is automatically reset to its starting value after the alarm stops.
•When auto-repeat is turned on, the countdown will restart automatically without
pausing when it reaches zero. The alarm sounds to signal when the countdown
reaches zero.
•The countdown timer measurement operation continues even if you exit the
Countdown Timer Mode.
•To stop a countdown operation completely, first pause it (by pressing ), and thenD
press A. This returns the countdown time to its starting value.
To configure countdown start time and auto-repeat settings
1. While the countdown star t time is on the display in the
Countdown Timer Mode, hold down A until the hour
setting of the countdown start time starts to flash, which
indicates the setting screen.
•If the countdown start time is not displayed, use the
procedure under “To use the countdown timer” to
display it.
2. Press C to move the flashing in the sequence shown
below, and select the setting you want to change.
Start Time
(Minutes)
Auto-Repeat
On/Off
Start Time
(Hours)
3. Perform the following operations, depending on which setting is currently selected
on the display.
•While the start time setting is flashing, use D B (+) and (–) to change it.
l
l
l
l
l
l
l
l
l
l
l
l
l
l
Auto-repeat on indicator
On/Off status
•Set 0:00 to specify 100 hours.
•While the auto-repeat on/off setting ( ) is flashing on the display, press0N or 0F
D to toggle auto-repeat on (0N) and off (0F).
4. Press A to exit the setting screen.
•The auto-repeat on indicator ( ) is displayed on the Countdown Timer Mode
screen while this function is turned on.
•Frequent use of auto-repeat and the alarm can run down battery power.
Alarm
While the alarm is turned on, the watch beeps when the
alarm time is reached. You can also turn on an Hourly
Time Signal, which will cause the watch to beep twice
ever y hour on the hour.
•All of the operations in this section are performed in the
Alarm Mode, which you enter by pressing C.
Hourly time signal
on indicator
Alarm on
indicator
Alarm time
(Hour : Minutes)
AM indicator
To set the alarm time
1. In the Alarm Mode, hold down A until the hour setting
of the alarm time starts to flash, which indicates the
setting screen.
•This operation turns on the alarm automatically.
2. Press C to move the flashing between the hour and
minute settings.
3. While a setting is flashing, use D B (+) and (–) to
change it.
•When setting the alarm time using the 12-hour format, take care to set the time
correctly as a.m. (A indicator) or p.m. (P indicator).
4. Press A to exit the setting screen.
Alarm Operation
The alarm sounds at the preset time for 10 seconds, regardless of the mode the watch is in.
•To stop the alarm tone after it starts to sound, press any button.
To test the alarm
In the Alarm Mode, hold down to sound the alarm.D
l
l
l
l
l
l
l
l
l
l
l
l
l
l
To turn the Daily alarm and the Hourly Time Signal on and off
In the Alarm Mode, press to cycle through the settings shown below.D
•The alarm on indicator and the Hourly Time Signal on indicator are shown on the
display in all modes while these functions are turned on.
Alarm Off
Signal Off
Alarm On
Signal Off
Alarm Off
Signal On
Alarm On
Signal On
Module 4732
Alarm Off
Signal Off
Alarm On
Signal Off
Alarm Off
Signal On
Alarm On
Signal On
Module 4733
World Time
The World Time Mode digitally displays the current time in
50 cities (30 time zones) around the world.
•The times kept in the World Time Mode are
synchronized with the time being kept in the
Timekeeping Mode. If you feel that there is an error in
any World Time Mode time, check the UTC differential of
your Home Site Data (Home City) and the current
setting of the Timekeeping Mode time.
•Select a city code in the World Time Mode to display the
current time in any particular time zone around the
globe. See the “UTC Differential/City Code List” for
information about the UTC differential settings that are
supported.
•All of the operations in this section are performed in the
World Time Mode, which you enter by pressing C.
City code
Current time in
selected city
Day of week and day in
selected city
To view the time in another city
While in the World Time Mode, press to scroll eastward through the city codesD
(time zones).
Product specificaties
| Merk: | Casio |
| Categorie: | Horloge |
| Model: | 4732 |
Heb je hulp nodig?
Als je hulp nodig hebt met Casio 4732 stel dan hieronder een vraag en andere gebruikers zullen je antwoorden
Handleiding Horloge Casio
18 Juni 2025
17 Juni 2025
17 Juni 2025
16 Juni 2025

16 Juni 2025
16 Juni 2025
16 Juni 2025
16 Juni 2025
16 Juni 2025
16 Juni 2025
Handleiding Horloge
- Naviforce
- Tauchmeister
- Xonix
- Haffstreuner
- ETA
- Raketa
- HYT
- TFA
- Danish Design
- Kogan
- Executive
- DMC
- TCM
- Karlsson
Nieuwste handleidingen voor Horloge
5 Juli 2025

5 Juli 2025
4 Juli 2025
4 Juli 2025
4 Juli 2025

4 Juli 2025
4 Juli 2025

2 Juli 2025
1 Juli 2025
21 Juni 2025