Casio 3227 Handleiding
Bekijk gratis de handleiding van Casio 3227 (5 pagina’s), behorend tot de categorie Horloge. Deze gids werd als nuttig beoordeeld door 38 mensen en kreeg gemiddeld 4.7 sterren uit 19.5 reviews. Heb je een vraag over Casio 3227 of wil je andere gebruikers van dit product iets vragen? Stel een vraag
Pagina 1/5

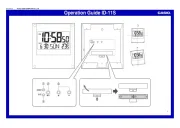
Operation Guide 3227
MO1110-EA
E
About This Manual
•Depending on the model of your watch, display text
appears either as dark figures on a light background or
light figures on a dark background. All sample displays
in this manual are shown using dark figures on a light
background.
•Button operations are indicated using the letters shown
in the illustration.
•Each section of this manual provides you with the
information you need to perform operations in each
mode. Further details and technical information can be
found in the “Reference” section.
(Light)
E-1
Contents
General Guide ......................................................................................................... E-4
Timekeeping ............................................................................................................ E-6
Data Bank .............................................................................................................. E-12
Alarms .................................................................................................................... E-18
Stopwatch .............................................................................................................. E-25
Countdown Timer .................................................................................................. E-27
Dual Time ............................................................................................................... E-29
Reference .............................................................................................................. E-31
Specifications ....................................................................................................... E-34
E-2
Procedure Lookup
The following is a handy reference list of all the operational procedures contained in
this manual.
To set the time, date and language ....................................................................... E-6
To toggle between 12-hour and 24-hour timekeeping ......................................... E-9
To toggle the Timekeeping Mode time between DST and Standard Time ........E-10
T
o display the Dual Time screen and Data Bank screen in the Timekeeping Mode ...
E-11
To create a new Data Bank record ...................................................................... E-13
To recall Data Bank records ................................................................................. E-16
To edit a Data Bank record ................................................................................... E-16
To delete a Data Bank record............................................................................... E-17
To set an alarm time ............................................................................................. E-20
E-3
To test the alarm ................................................................................................... E-22
To turn Alarms
2
through
5
and the Hourly Time Signal on and off ............... E-23
To select the operation of Alarm
11
111
...................................................................... E-24
To measure times with the stopwatch ................................................................ E-26
To set the countdown start time ..........................................................................E-27
To use the countdown timer ................................................................................E-28
To set the Dual Time ............................................................................................. E-29
To toggle Dual Time Mode time between DST and Standard Time ................... E-30
To display the Timekeeping screen and Data Bank screen in the Dual Time Mode ...
E-30
E-4
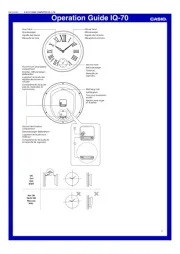
General Guide
•Press B to change from mode to mode.
•In any mode, press L to illuminate the display.
Timekeeping Mode
▲
B
▲
Data Bank Mode
B
E-5
Stopwatch ModeAlarm Mode
▲
▲
▲
▲
Countdown Timer ModeDual Time Mode
B
B
B B
E-6
Timekeeping
Use the Timekeeping Mode to set the time, date and
language. You can also view the Dual Time Mode screen
or Data Bank Mode screen from the Timekeeping Mode.
Note
This watch is capable of displaying text for the day of the
week in any one of 13 different languages (English,
Portuguese, Spanish, French, Dutch, Danish, German,
Italian, Swedish, Polish, Romanian, Turkish, and
Russian).
To set the time, date and language
1. In the Timekeeping Mode, hold down A until the
seconds start to flash, which indicates the setting
screen.
2. Use C and B to move the flashing in the sequence
shown below to select other settings.
Day of week
Year Month–Day
PM indicator
Hour : Minutes Seconds
l
l
l
l
l
l
l
l
l
l
l
l
l
l
l
l
l
l
l
l
l
l
l
l
l
l
l
l
l
l
l
l
l
l
l
l
l
l
l
l
l
l
l
l
l
l
l
l
l
l
l
l
l
l
l
l
l
l
l
l
l
l
l
l
l
l
l
l
l
l
l
l
l
l
l
l
l
l
l
l
l
l
l
l
l
Language indicator
E-7
•The currently selected language indicator flashes on the display while the
Language (setting) is selected in the above sequence.
3. When the setting you want to change is flashing, use E and D to change it as
described below.
To Do This:
Reset the seconds to 00
Change the year, month, day,
hour or minutes
Change the language
Do This:
Press .E
Use E (+) and D (–).
Use E D and .
Month DayYearSeconds
Minutes Hour Language
B
C
B
C
B
C
C
BC
C
BBBC
E-8
•While the language indicator is flashing on the display, use E and D to cycle
through the language indicators as shown below, until the one for the language
you want to select is displayed.
4. Press A to exit the setting screen.
•The day of the week is automatically displayed in accordance with the date (year,
month, and day) settings.
•See the “Day of the Week List” at the back of this manual for information on
abbreviations used.
Indicator Language
ENxEnglish
POR Portuguese
ESP Spanish
FRA French
NED Dutch
Press .E
Press .D
Indicator Language
DAN Danish
DEU German
ITA Italian
SVE Swedish
POL Polish
Indicator Language
RO Romanian
T)R Tur k is h
P CURussian
E-9
•In addition to the day of the week display, the language setting also affects the type
of characters you can input for the name in the Data Bank Mode.
•Pressing A in the Timekeeping Mode displays the indicator for the currently
selected language. Keeping A depressed for one or two seconds changes to the
Timekeeping Mode setting screen (indicated by the flashing seconds digits). If you
accidentally display the setting screen, press A again to exit.
To toggle between 12-hour and 24-hour timekeeping
In the Timekeeping Mode, press C to toggle between 12-hour timekeeping (indicated
by A or P on the display), or 24-hour timekeeping.
•With the 12-hour format, the P (PM) indicator appears on the display for times in the
range of noon to 11:59 p.m. and the (AM) indicator appears for times in the rangeA
of midnight to 11:59 a.m.
•With the 24-hour format, times are displayed in the range of 0:00 to 23:59, without
any indicator.
•The 12-hour/24-hour timekeeping format you select in the Timekeeping Mode is
applied in all modes.

Operation Guide 3227
E-10
Daylight Saving Time (DST)
Daylight Saving Time (summer time) advances the time setting by one hour from
Standard Time. Remember that not all countries or even local areas use Daylight
Saving Time.
To toggle the Timekeeping Mode time between DST and Standard Time
Holding down C for about two seconds in the
Timekeeping Mode toggles between Daylight Saving Time
(DST displayed) and Standard Time (DST not displayed).
•Note that pressing C in the Timekeeping Mode also
toggles between 12-hour timekeeping and 24-hour
timekeeping.
•The DST indicator appears on the display to indicate
that Daylight Saving Time is turned on.
DST indicator
E-11
To display the Dual Time screen and Data Bank screen in the Timekeeping Mode
Holding down D in the Timekeeping Mode displays the Dual Time screen. Holding
down displays the record you were viewing when you last used the Data BankE
Mode.
Dual Time Screen Data Bank Screen
Hold down . Hold down D E.
E-12
Data Bank
The Data Bank Mode lets you store up to 30 records,
each containing name and telephone number data.
Records are automatically sorted based on the characters
of the name. You can recall records by scrolling through
them on the display.
•The characters you can input for the name depend on
the language you select in the Timekeeping Mode. See
“To set the time, date and language” (page E-6) for more
information. Changing the language setting does not
affect names that are already stored.
•All of the operations in this section are performed in the
Data Bank Mode, which you enter by pressing B (page
E-4).
Name
Telephone number
Remaining number of records
E-13
To create a new Data Bank record
1. In the Data Bank Mode, press C to display the new
record screen.
•The new record screen is the one that is blank
(contains no name and telephone number).
•If the new record screen does not appear when you
press C, it means that memory is full. To store
another record, you will first have to delete some of
the records stored in memory.
2. Hold down A until the flashing cursor (_) appears in
the name area of the display. This is the record input
screen.
3. In the name area, use E D and to cycle through
characters at the cursor position. The characters cycle
in the sequence shown below.
Number area
New Record Screen
Name area
l
l
l
l
l
l
l
l
l
l
l
l
l
l
l
l
l
l
l
l
l
l
l
l
l
l
l
l
l
l
l
l
l
l
l
l
l
l
l
l
l
l
l
l
l
l
l
l
l
l
l
l
l
l
l
l
l
l
l
l
l
l
l
l
l
l
l
l
ll
E-14
•The above character sequence is for English input. See “Character List” at the
back of this manual for the character sequences of other languages.
4. When the character you want is at the cursor position, press C to move the cursor
to the right.
5. Repeat steps 3 and 4 until the name is complete.
•You can input up to eight characters for the name.
6. After you input the name, press C as many times as necessary to move the cursor
to the number area.
•When the cursor is located at the eighth space of the name area, moving the
cursor to the right causes it to jump to the first digit of the number. When the
cursor is at the 15th digit of the number, moving it to the right (by pressing C)
causes it to jump to the first character in the name.
•Pressing moves the cursor the right, while moves it to the left.C B
(space)
A
to
Z
(alphabet)
@
to
-
(symbol)
0
to
9
(number)
Press .E
Press .D
E-15
7. In the number area, use E and D to cycle through numbers and symbols
(hyphen, brackets, space) at the cursor position. The characters cycle in the
sequence shown below.
8. When the character you want is at the cursor position, press C to move the cursor
to the right.
9. Repeat steps 7 and 8 until you complete number input.
•The number area initially contains all hyphens. You can leave the hyphens or
replace them with numbers or other symbols (brackets, space).
•You can input up to 15 digits for the number.
10. Press A to store your data and exit the Data Bank record input screen.
•When you press A to store data, the name and number you input flash for about
one second as Data Bank records are sorted. After the sort operation is complete,
the Data Bank record screen appears.
x0 9 [ ] to (space)
Press .E
Press .D
E-16
•The name can show only three characters at a time, so longer text scrolls
continuously from right to left. The last character is indicated by the symbol after it.
To recall Data Bank records
In the Data Bank Mode, use E (+) and (–) to scroll through Data Bank records onD
the display.
•See “Sort Table” at the back of this manual for details on how the watch sorts
records.
•Pressing while the last Data Bank record is on the display or while the firstE D
record is on the display displays the new data screen.
To edit a Data Bank record
1. In the Data Bank Mode, use E (+) and D (–) to scroll through the records and
display the one you want to edit.
2. Hold down A until the flashing cursor appears on the display. This is the record
input screen.
3. Use C B (right) and (left) to move the flashing to the character you want to
change.
4. Use E D (forward) and (back) to change the character.
E-17
5. After making the changes that you want, press A to store them and exit the Data
Bank record input screen.
To delete a Data Bank record
1. In the Data Bank Mode, use E D (+) and (–) to scroll through the records and
display the one you want to delete.
2. Hold down A until the flashing cursor appears on the display. This is the record
input screen.
3. Press B and C at the same time to delete the record.
•CLR appears to indicate that the record is being deleted. After the record is
deleted, the cursor appears on the display, ready for input.
4. Input data or press A to return to the Data Bank record screen.
E-18
Alarms
You can set up to five independent multi-function alarms
with hour, minutes, month, and day. When an alarm is
turned on, the alarm tone sounds when the alarm time is
reached. One of the alarms can be configured as a
snooze alarm or a one-time alarm, while the other four are
one-time alarms.
You can also turn on an Hourly Time Signal, which will
causes the watch to beep twice every hour on the hour.
•There are five alarm screens numbered1 5 through .
The Hourly Time Signal screen is indicated by :00.
•All of the operations in this section are performed in the
Alarm Mode, which you enter by pressing B (page
E-5).
Alarm time
(Hour : Minutes)
Alarm number
Alarm date
(Month Day)–
Timekeeping
Mode time
Alarm Screen
Hourly Time Signal Screen
E-19
Alarm Types
The alarm type is determined by the settings you make, as described below.
•Daily alarm
Set the hour and minutes for the alarm time. This type of setting causes the alarm to
sound everyday at the time you set.
•Date alarm
Set the month, day, hour and minutes for the alarm time. This type of setting causes
the alarm to sound at the specific time, on the specific date you set.
•1-Month alarm
Set the month, hour and minutes for the alarm time. This type of setting causes the
alarm to sound everyday at the time you set, only during the month you set.
•Monthly alarm
Set the day, hour and minutes for the alarm time. This type of setting causes the alarm
to sound every month at the time you set, on the day you set.
Note
The 12-hour/24-hour format of the alarm time matches the format you select in the
Timekeeping Mode.

Operation Guide 3227
E-20
To set an alarm time
1. In the Alarm Mode, use E and D to scroll through the
alarm screens until the one whose time you want to set
is displayed.
•You can configure Alarm1 as a snooze alarm or a
one-time-alarm. Alarms through can be used as2 5
one-time alarms only.
•The snooze alarm repeats every five minutes.
2. After you select an alarm, hold down A until the hour
setting of the alarm time starts to flash, which indicates
the setting screen.
•This operation automatically turns on the alarm.
Alarm Alarm Alarm 123
Hourly Time
Signal
Alarm Alarm 5 4
Press . Press .E D
Alarm 2 on indicator
Hour : Minutes
Alarm number
AM Indicator
Month Day–
E-21
3. Use C and B to move the flashing in the sequence shown below to select other
settings.
4. While a setting is flashing, use E (+) and (–) to change it.D
•To set an alarm that does not include a month (Daily alarm, Monthly alarm), set x
for the month. Use E and D until the x mark appears (between and ) while
month setting is flashing.
•To set an alarm that does not include a day (Daily alarm, 1-Month alarm), set xx
for the day. Use and E D until the mark appears (between the end of thexx
month and ) while the day setting is flashing.
•When setting the alarm time using the 12-hour format, take care to set the time
correctly as a.m. ( indicator) or p.m. (A P indicator).
5. Press A to exit the setting screen.
MinutesHour Month Day
Press .C
Press .B
E-22
Alarm Operation
The alarm tone sounds at the preset time for 10 seconds, regardless of the mode the
watch is in. In the case of the snooze alarm, the alarm tone operation is performed a
total of seven times, every five minutes, until you turn the alarm off or change it to a
one-time alarm (page E-24).
•Pressing any button stops the alarm tone operation.
•Performing any one of the following operations during a 5-minute interval between
snooze alarms cancels the current snooze alarm operation.
Displaying the Timekeeping Mode setting screen (page E-6)
Displaying the alarm
1
setting screen (page E-20)
To test the alarm
In the Alarm Mode, hold down to sound the alarm.C
•Pressing also toggles the currently display alarm or the Hourly Time Signal onC
and off.
E-23
To turn Alarms
2
through
5
and the Hourly Time Signal on and off
1. In the Alarm Mode, use E and D to select a one-time
alarm (alarm 2 through 5) or the Hourly Time Signal.
2. Press C to toggle it on and off.
•The current on/off status of Alarms 2 5 through is
shown by indicators (AL-2 through AL-5). The SIG
indicator shows the on (SIG displayed)/off (SIG not
displayed) status of the Hourly Time Signal.
•The alarm on indicators and Hourly Time Signal on
indicator are displayed in all modes.
•While an alarm is sounding, the applicable alarm on
indicator flashes on the display.
Alarm on indicators
Hourly Time Signal
on indicator
E-24
To select the operation of Alarm
1
1. In the Alarm Mode, use E and D to select Alarm1.
2. Press C to cycle through the available settings in the sequence shown below.
•The SNZ indicator and Alarm1 on indicator (AL-1) are displayed in all modes.
•The SNZ indicator flashes during the 5-minute intervals between alarms.
•The alarm indicator ( and/or ) flashes while the alarm is sounding.AL-1 SNZ
SNZ indicator and Alarm1 on indicator
Snooze alarm onOne-time alarm on Alarm off
C C
C
E-25
Stopwatch
The stopwatch lets you measure elapsed time, split times,
and two finishes.
•The display range of the stopwatch is 23 hours, 59
minutes, 59.99 seconds.
•The stopwatch continues to run, restarting from zero
after it reaches its limit, until you stop it.
•The elapsed time measurement operation continues
even if you exit the Stopwatch Mode.
•Exiting the Stopwatch Mode while a split time is frozen
on the display clears the split time and returns to
elapsed time measurement.
•All of the operations in this section are performed in the
Stopwatch Mode, which you enter by pressing B (page
E-5).
1/100 second
Hours
Minutes
Seconds
Timekeeping
Mode time
E-26
To measure times with the stopwatch
C
Start Stop
Elapsed Time
➤
Re-start Clear
C➤
Stop
C➤C➤A
Split Time
C
Start Split
➤
Split release Clear
A➤
Stop
A➤C➤A
Two Finishes
C
Start Split
➤
Stop Clear
A➤
Split release
C➤A➤A
First runner
finishes.
Display time of
first runner.
Second runner
finishes.
Display time of
second runner.
(SPL displayed)
E-27
Countdown Timer
The countdown timer can be set within a range of 1
minute to 24 hours. An alarm sounds when the countdown
reaches zero.
•All of the operations in this section are performed in the
Countdown Timer Mode, which you enter by pressing
B (page E-5).
To set the countdown start time
1. In the Countdown Timer Mode, hold down A until the
hour setting of the countdown start time starts to flash,
which indicates the setting screen.
2. Press B or C to move the flashing between the hour
and minute settings.
3. While a setting is flashing, use E D (+) and (–) to change it.
•To set the starting value of the countdown time to 24 hours, set 0:00.
4. Press A to exit the setting screen.
Hours
Minutes
Seconds
Timekeeping Mode time
E-28
To use the countdown timer
Press while in the Countdown Timer Mode to start the countdown timer.C
•When the end of the countdown is reached, the alarm sounds for 10 seconds or until
you press any button to stop it. The countdown time is automatically reset to its
starting value after the alarm stops.
•The countdown timer operation continues even if you exit the Countdown Timer
Mode.
•Press C while a countdown operation is in progress to pause it. Press C again to
resume the countdown.
•To stop a countdown operation completely, first pause it (by pressing C), and then
press A. This returns the countdown time to its starting value.
E-29
Dual Time
The Dual Time Mode lets you keep track of time in a
different time zone. You can select Standard Time or
Daylight Saving Time for the Dual Time Mode time, and a
simple operation lets you view the Timekeeping Mode
screen or Data Bank Mode screen.
•The seconds count of the Dual Time is synchronized
with the seconds count of the Timekeeping Mode.
•All of the operations in this section are performed in the
Dual Time Mode, which you enter by pressing (pageB
E-5).
To set the Dual Time
1. In the Dual Time Mode, hold down A until the hour setting start to flash, which
indicates the setting screen.
2. Press B or C to move the flashing between the hour and minute settings.
3. While a setting is flashing, use E D (+) and (–) to change it.
4. Press A to exit the setting screen.
Dual time
(Hour : Minutes Seconds)
Timekeeping Mode time
Product specificaties
| Merk: | Casio |
| Categorie: | Horloge |
| Model: | 3227 |
Heb je hulp nodig?
Als je hulp nodig hebt met Casio 3227 stel dan hieronder een vraag en andere gebruikers zullen je antwoorden
Handleiding Horloge Casio
18 Juni 2025
17 Juni 2025
17 Juni 2025
16 Juni 2025

16 Juni 2025
16 Juni 2025
16 Juni 2025
16 Juni 2025
16 Juni 2025
16 Juni 2025
Handleiding Horloge
- Tissot
- Swatch
- DMC
- Hublot
- Fila
- Ronda
- Olivia Burton
- Westfalia
- Certina
- ELYSEE
- Tikkers
- Tauchmeister
- Tudor
- Julie Julsen
- Timberland
Nieuwste handleidingen voor Horloge
5 Juli 2025

5 Juli 2025
4 Juli 2025

4 Juli 2025

4 Juli 2025

4 Juli 2025
4 Juli 2025

2 Juli 2025
1 Juli 2025
21 Juni 2025