Canon Pixma Pro 100 Handleiding
Bekijk gratis de handleiding van Canon Pixma Pro 100 (4 pagina’s), behorend tot de categorie Printer. Deze gids werd als nuttig beoordeeld door 44 mensen en kreeg gemiddeld 4.9 sterren uit 22.5 reviews. Heb je een vraag over Canon Pixma Pro 100 of wil je andere gebruikers van dit product iets vragen? Stel een vraag
Pagina 1/4
1
XXXXXXXX © CANON INC. 2012
4
2
3
1
2
1
3
series Retire la cinta y los materiales de protección.
Conexión de red:
Prepare el cable Ethernet
o los dispositivos de red,
como el router o el punto de
acceso, según convenga.
Evite que caigan objetos dentro de la impresora. Podrían provocar fallos en el
funcionamiento.
No conecte aún el cable USB o
Ethernet.
Conecte el cable de alimentación.
33
Pulse el botón ACTIVADO (ON) y,
a continuación, compruebe que la
luz de se ENCENDIDO (POWER)
ilumina en blanco.
44
Si la luz de parpadea Alarma (Alarm)
en naranja, pulse el botón ACTIVADO
(ON) para apagar la impresora y repita
desde .
Cierre la tapa superior.
22
Preparativos
Elementos
suministrados
Abra la tapa superior, retire la cinta naranja y el material de protección.
11
¡Léame en primer lugar!
Consérvelo a mano para utilizarlo
como referencia en el futuro.
Guía de inicio
ESPAÑOL
Canon Inkjet Impresora
Ayuda de Canon
Asistencia técnica por correo electrónico:
www.usa.canon.com/support
Asistencia técnica gratuita: 1-800-OK-CANON
Esta opción proporciona asistencia telefónica técnica personal, sin
cargo por servicio, de lunes a viernes (excepto festivos), durante
el periodo de garantía.
Se dispone de un dispositivo telefónico auxiliar para sordos (TDD)
en 1-866-251-3752.
Número de modelo: K10377
Para llevar a cabo la instalación, coloque la impresora cerca del punto de acceso* y
del ordenador.
(* necesario para LAN inalámbrica)
Elección de una ubicación
Coloque la impresora sobre una superficie plana.
No coloque ningún objeto delante de la impresora.
Para abrir el soporte del papel y la bandeja de salida del papel, deje un espacio libre como se muestra en la figura.
•
•
•
Para mover la impresora son necesarias al menos dos personas.
10 pulgadas (25 cm)
17 pulgadas (43 cm)
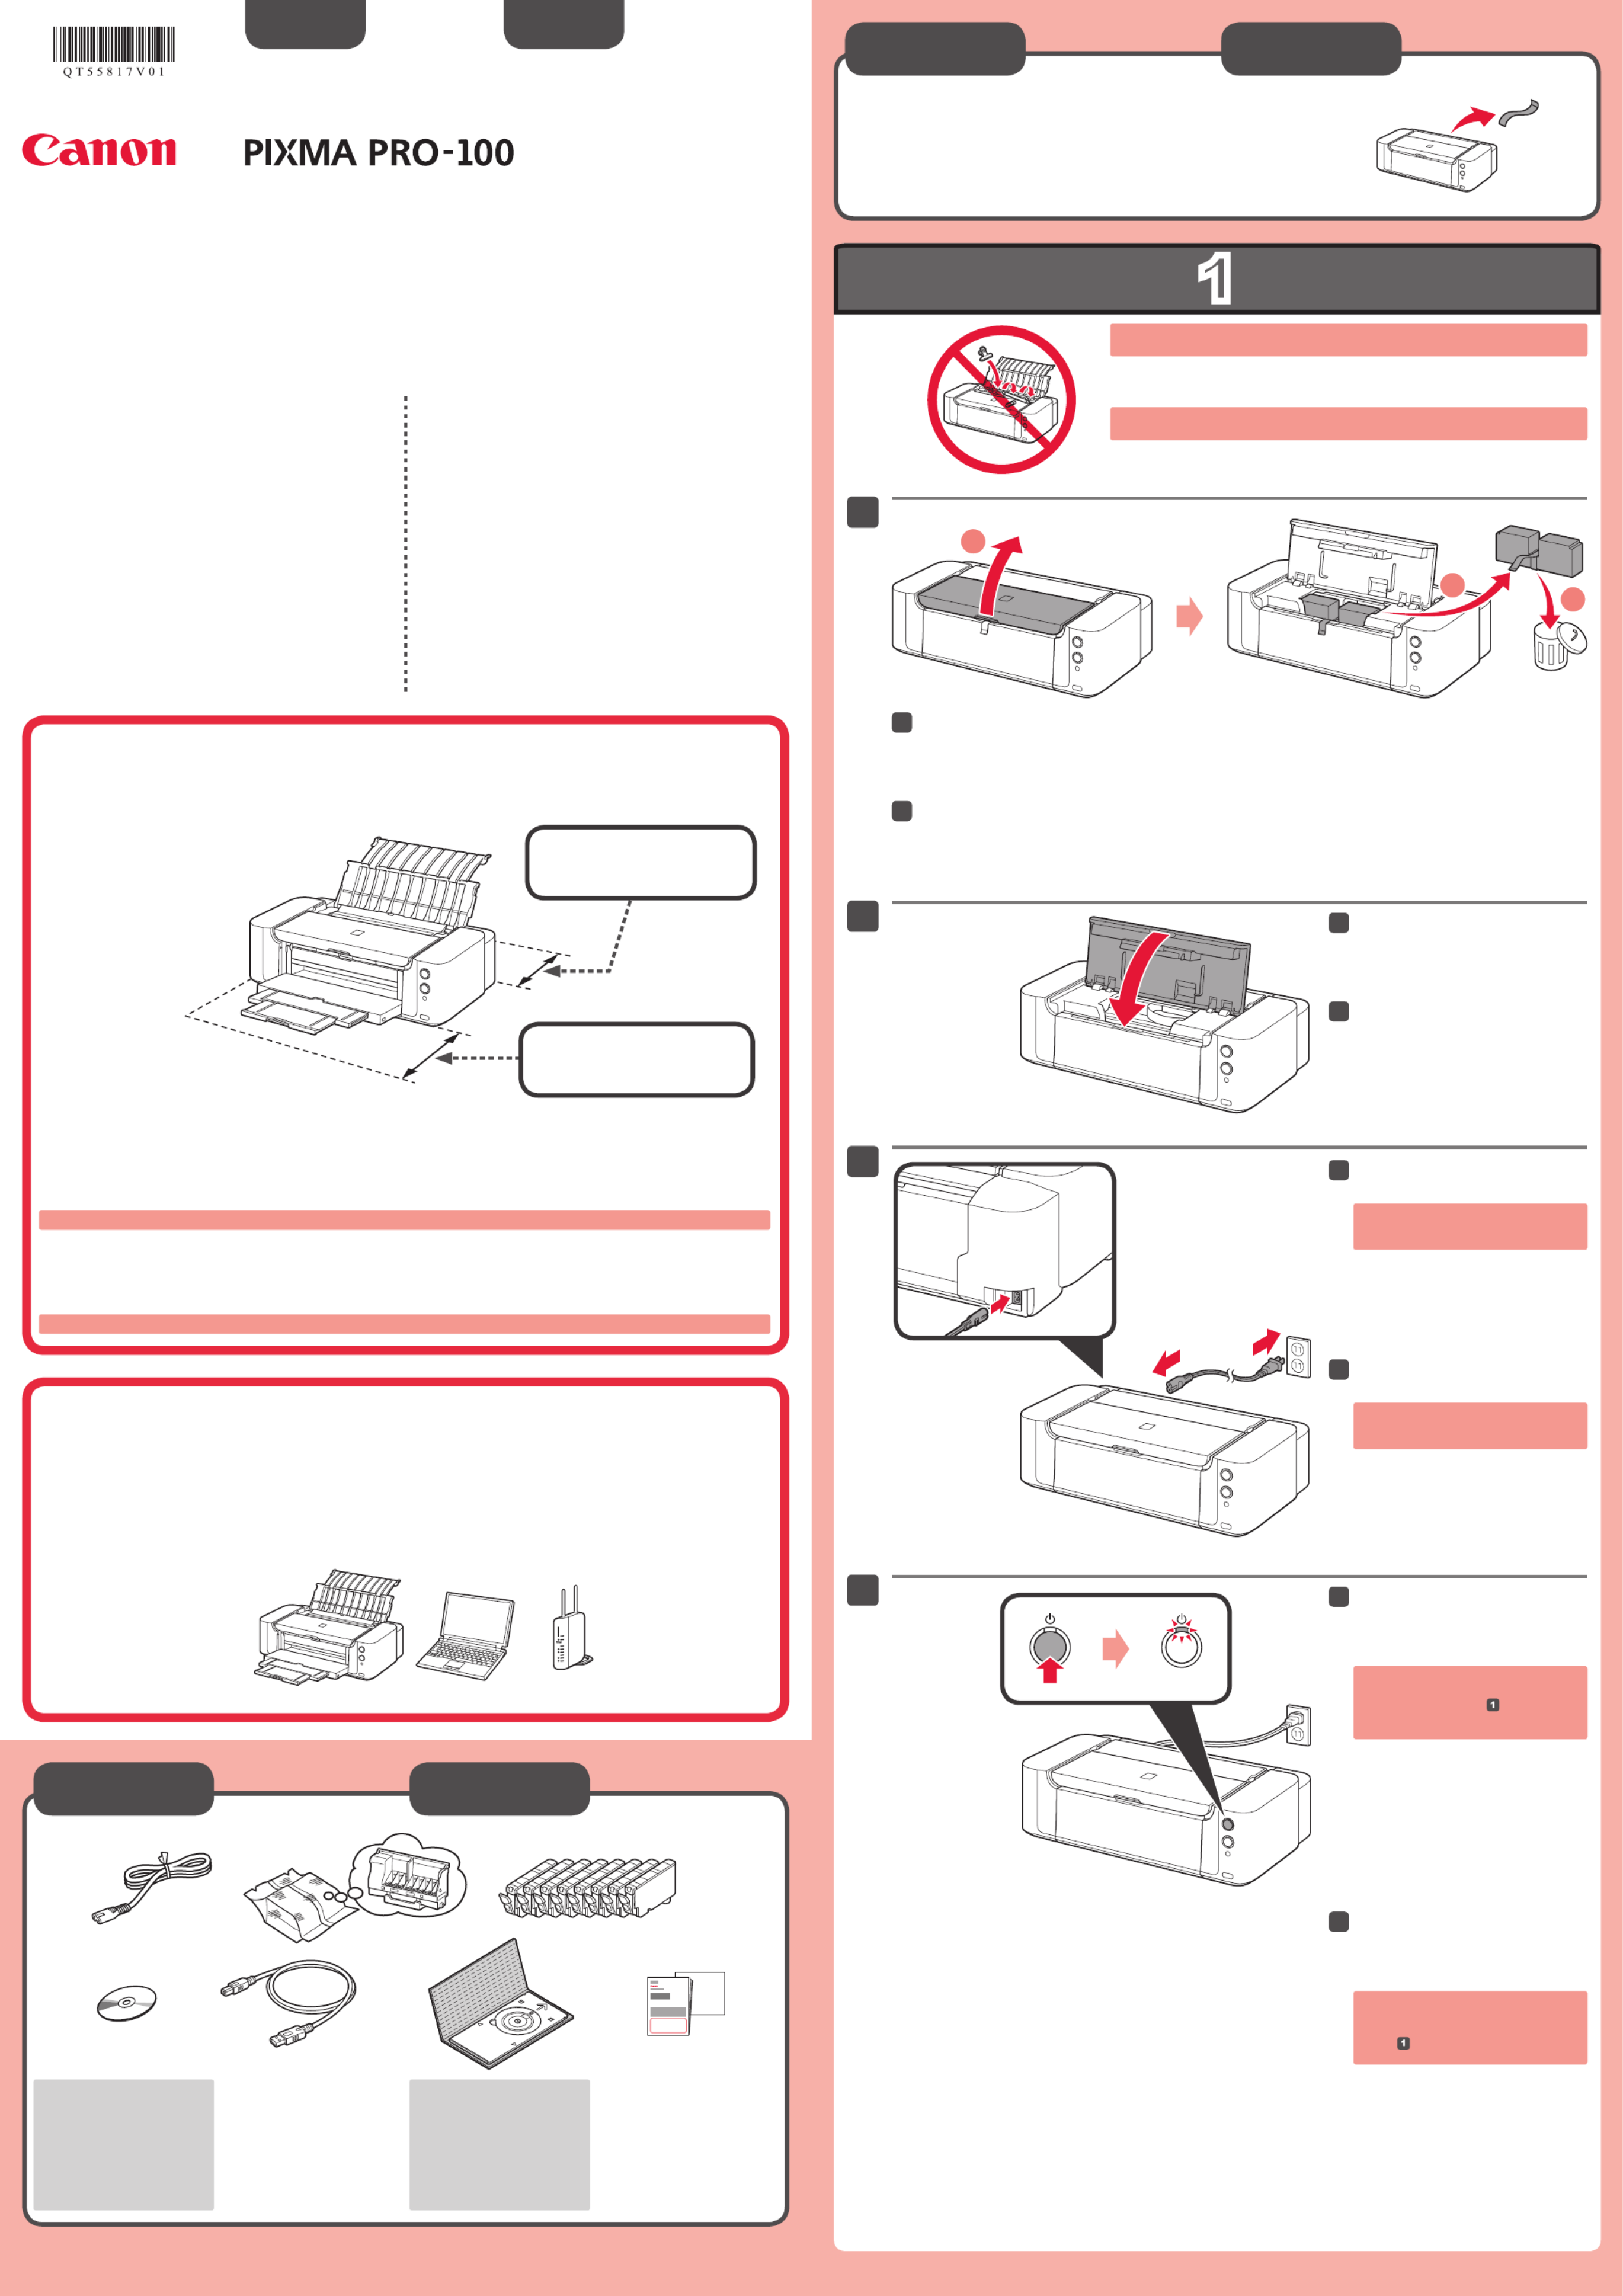
Remove the tape and protective materials.
Network connection:
Prepare the Ethernet cable
or network devices such as a
router or an access point as
necessary.
Do not allow objects to fall inside the printer. These could cause malfunction.
Do not connect the USB or Ethernet
cable yet.
Connect the power cord.
33
Press the button, then check ON
that the lamp lights white.POWER
44
If the Alarm lamp ashes orange,
press the button to turn OFF the ON
printer, then redo from .
Close the Top Cover.
22
Preparation
Included Items
Open the Top Cover, then remove the orange tape and protective material.
11
Getting Started Read me rst!
Keep me handy for future reference.
ENGLISH
Canon Inkjet Printer
Getting Help from Canon
Email Tech Support — www.usa.canon.com/support
Toll-Free Tech Support— 1-800-OK-CANON
This option provides live telephone technical support, free of
service charges, Monday-Friday (excluding holidays), during the
warranty period.
Telephone Device for the Deaf (TDD) support is available at
1-866-251-3752.
Model Number: K10377
To perform setup, place the printer near the access point* and computer.
(* Required for wireless LAN)
Choosing a Location
Place the printer on a flat surface.
Do not place objects in front of the printer.
To open the Paper Support and Paper Output Tray, keep a space as shown in the figure.
•
•
•
It needs two persons to carry the printer.
10 inches (25 cm)
17 inches (43 cm)
QT5-5817-V01 PRINTED IN XXXXXXXX

2
3
1
1
1
2
2
(B)(A)
1
2
2
4
5
6
3
2
Abra la tapa superior.
22
Gire y retire la tapa naranja.
(A) No presione los laterales si la ranura en forma de L está bloqueada.
(B) ¡No tocar!
22
Soporte del cabezal de impresión
No toque el interior hasta que cese el movimiento.
Retire totalmente la cinta naranja.
Retire el envoltorio protector.
11
Levante rmemente la palanca de bloqueo del cabezal de impresión hasta que se detenga.
¡No tocar!
33
Saque el cabezal de impresión del embalaje plateado y, a continuación, la tapa protectora naranja.
¡No tocar!
44
Puede haber un poco de tinta de color claro o transparente dentro del embalaje plateado y de la tapa protectora. No
afecta a la calidad de impresión. Tenga cuidado para no mancharse de tinta.
Coloque el cabezal de impresión en su sitio.
¡No golpee el cabezal de impresión contra los laterales del soporte!
55
Baje por completo la palanca de bloqueo del cabezal de impresión.
66
Una vez instalado el cabezal de impresión, no lo retire si no es necesario.
Abra la bandeja de salida del
papel.
11
Open the Top Cover.
22
Twist and remove the orange cap.
(A) Do not press the sides when the L-shaped groove is blocked.
(B) Do not touch!
22
Remove the orange tape completely.
Remove the protective wrap.
11
Print Head Holder
Do not touch inside until the movement stops.
Firmly raise the Print Head Lock Lever until it stops.
Do not touch!
33
Take out the Print Head from the silver package, then remove the orange protective cap.
Do not touch!
44
There may be some transparent or light color ink on the inside of the silver package and protective cap. It does not
affect the print quality. Be careful not to get ink on yourself.
Set the Print Head in place.
Do not knock the Print Head against the sides of the holder!
55
Lower the Print Head Lock Lever completely.
66
Once you have installed the Print Head, do not remove it unnecessarily.
Open the Paper Output Tray.
11

4
1
2
1
4
1
2
3
5
2
Introduzca el CD-ROM en el
ordenador.
11
Si el cable USB p3-ya está
conectado, desconéctelo.
Si aparece un mensaje en
el ordenador, haga clic en
Cancelar (Cancel).
Siga las instrucciones que aparezcan en pantalla para continuar.
Para seleccionar un idioma, haga clic en .Idioma (Language)
22
Si el CD-ROM no se ejecuta automáticamente:
Haga doble clic en > icono de CD-ROM > .(Mi) PC ((My) Computer) MSETUP4.EXE
Haga doble clic en el icono de CD-ROM del escritorio.
Importante:
Alineación de
los cabezales de
impresión (Print
Head Alignment)
Cubierta interior
Cuando aparezca esta pantalla, cargue 2 hojas de papel normal de tamaño A4 o Carta en la bandeja
posterior y haga clic en .Ejecutar (Execute)
Continúe siguiendo las instrucciones que aparecen en la
pantalla del equipo.
Para obtener más información sobre cómo cargar papel, consulte el
.
Si desea imprimir desde un dispositivo distinto de un PC, continúe con el
proceso de conguración consultando otra hoja: Conguración para impresión con
dispositivos distintos de un PC.
Si desea imprimir desde un ordenador, continúe con .
Compruebe que todas las
lámparas están encendidas.
44
Compruebe que la cubierta interior
está cerrada y cierre la tapa
superior.
Espere aproximadamente 2 minutos,
hasta que la luz de ENCENDIDO
(POWER) parpadee y se quede
encendida en blanco, continúe con el
paso siguiente.
55
Si la luz de Alarma
(Alarm) parpadea en
naranja, compruebe
que los depósitos de
tinta estén instalados
correctamente.
Introduzca y empuje hacia abajo el depósito de tinta en la ranura del color correspondiente.
Compruebe que la lámpara de tinta está encendida y coloque el siguiente depósito de tinta.
33
Insert the CD-ROM into the
computer.
11
If the USB cable is already
connected, unplug it. If a
message appears on the
computer, click .Cancel
Follow the on-screen instructions to proceed.
To select a language, click .Language
22
If the CD-ROM does not autorun:
Double-click > CD-ROM icon > .(My) Computer MSETUP4.EXE
Double-click the CD-ROM icon on the desktop.
Important:
Pri nt Head
Alignment
Inner Cover
When this screen appears, load 2 sheets of A4 or Letter-sized plain paper in the Rear Tray and click
Execute.
Proceed by following the on-screen instructions on the
computer screen.
For details on how to load paper, refer to
.
If you want to print from a non-PC device, continue the setup process by referring to
another sheet: .Setup for Non-PC Device Printing
If you want to print from a computer, proceed to .
Check that all lamps are lit.
44
Check that the Inner Cover is
closed, then close the Top Cover.
Wait for about 2 minutes until the
POWER lamp ashes and stays lit white,
then proceed.
55
If the Alarm lamp ashes
orange, check that the
ink tanks are installed
correctly.
Insert and push down the ink tank into the matching color slot.
Check that the ink lamp is lit, then install the next ink tank.
33
Product specificaties
| Merk: | Canon |
| Categorie: | Printer |
| Model: | Pixma Pro 100 |
Heb je hulp nodig?
Als je hulp nodig hebt met Canon Pixma Pro 100 stel dan hieronder een vraag en andere gebruikers zullen je antwoorden
Handleiding Printer Canon
7 September 2025

6 September 2025
5 September 2025

1 September 2025

1 September 2025

1 September 2025
1 September 2025
15 Augustus 2025
14 Augustus 2025
29 Juli 2025
Handleiding Printer
- Dell
- Epson 7620
- Colop
- Metapace
- Roland
- Unitech
- Nilox
- Lenovo
- Fichero
- Dymo
- Renkforce
- Argox
- Toshiba TEC
- Mutoh
- DTRONIC
Nieuwste handleidingen voor Printer
9 September 2025
9 September 2025

9 September 2025
8 September 2025
8 September 2025

8 September 2025

7 September 2025
7 September 2025
7 September 2025

7 September 2025